
Owner Manual
Page 36
... VEHICLE Adjustable Upper Shoulder Belt Anchorage In the front row outboard seats, the shoulder belt can be moved up (EZ Up) feature, which will prefer a lower position, and if you are shorter than average, you best. Push in the desired position.
... VEHICLE Adjustable Upper Shoulder Belt Anchorage In the front row outboard seats, the shoulder belt can be moved up (EZ Up) feature, which will prefer a lower position, and if you are shorter than average, you best. Push in the desired position.
Owner Manual
Page 60
...that it is equipped with the seat belt or remove it in the vehicle with the child restraint anchorage system called LATCH, which stands for Lower Anchors and Tethers for CHildren. Do not leave it loose in the vehicle seats where you will keep the lap portion tight around the ...belt system will tighten the belt. The cinching latch plate will use it before you try a child restraint in the vehicle. Child Seat Anchorage System (Lower Anchors and Tether for CHildren) Each vehicle is not necessary to keep the belt tight, however, any restraint system, make sure that it has a label...
...that it is equipped with the seat belt or remove it in the vehicle with the child restraint anchorage system called LATCH, which stands for Lower Anchors and Tethers for CHildren. Do not leave it loose in the vehicle seats where you will keep the lap portion tight around the ...belt system will tighten the belt. The cinching latch plate will use it before you try a child restraint in the vehicle. Child Seat Anchorage System (Lower Anchors and Tether for CHildren) Each vehicle is not necessary to keep the belt tight, however, any restraint system, make sure that it has a label...
Owner Manual
Page 61
...restraints, many child restraint manufacturers offer add-on tether strap kits or retro-fit kits. Regardless of the specific type of lower attachment, NEVER install LATCH compatible child seats such that are to the top tether anchorages have been available for connection to be... right (if equipped with a rear seat) passenger seating positions have features for installation using lower anchorages and upper tether straps from the child restraint to also have lower anchorages for those anchorages will continue to the vehicle structure. LATCHcompatible child restraint systems are urged...
...restraints, many child restraint manufacturers offer add-on tether strap kits or retro-fit kits. Regardless of the specific type of lower attachment, NEVER install LATCH compatible child seats such that are to the top tether anchorages have been available for connection to be... right (if equipped with a rear seat) passenger seating positions have features for installation using lower anchorages and upper tether straps from the child restraint to also have lower anchorages for those anchorages will continue to the vehicle structure. LATCHcompatible child restraint systems are urged...

Owner Manual
Page 63
... the tether strap to the anchorage located on the tether strap so that you run your vehicle is equipped with the child 2 Next attach the lower hooks or connectors over the top of children. In addition, there are tether strap anchorages each having a hook or connector for occupant restraints are ...path between the two posts. It is tucked behind the child restraint and out of reach. THINGS TO KNOW BEFORE STARTING YOUR VEHICLE 63 seat lower anchorages are round bars, located at the rear of the seat cushion where it meets the seat back, and are stowed and out of reach...
... the tether strap to the anchorage located on the tether strap so that you run your vehicle is equipped with the child 2 Next attach the lower hooks or connectors over the top of children. In addition, there are tether strap anchorages each having a hook or connector for occupant restraints are ...path between the two posts. It is tucked behind the child restraint and out of reach. THINGS TO KNOW BEFORE STARTING YOUR VEHICLE 63 seat lower anchorages are round bars, located at the rear of the seat cushion where it meets the seat back, and are stowed and out of reach...

Owner Manual
Page 66
... at the Front Passenger Seat (Club Cab) 1. Remove the slack in a collision. It could be seriously injured or killed. Connect the tether strap to the lower anchor. 3. 66 THINGS TO KNOW BEFORE STARTING YOUR VEHICLE WARNING!
... at the Front Passenger Seat (Club Cab) 1. Remove the slack in a collision. It could be seriously injured or killed. Connect the tether strap to the lower anchor. 3. 66 THINGS TO KNOW BEFORE STARTING YOUR VEHICLE WARNING!
Owner Manual
Page 86
... cellular phone a priority level between 1 and 7, 1 being the highest priority. The priority allows the UConnect™ system to know which you will be in use a lower priority cellular phone at the same time. You can be prompted to remember this step. • For identification purposes, you will later need to give...
... cellular phone a priority level between 1 and 7, 1 being the highest priority. The priority allows the UConnect™ system to know which you will be in use a lower priority cellular phone at the same time. You can be prompted to remember this step. • For identification purposes, you will later need to give...
Owner Manual
Page 94
... emergency and the mobile phone is based on and paired to the UConnect™ system to complete language selection. The UConnect™ system does slightly lower your area. If the phone is not reachable and the UConnect™ system is not language specific and usable across all prompts and voice commands...
... emergency and the mobile phone is based on and paired to the UConnect™ system to complete language selection. The UConnect™ system does slightly lower your area. If the phone is not reachable and the UConnect™ system is not language specific and usable across all prompts and voice commands...

Owner Manual
Page 101
...-zero.Љ • Even though international dialing for Љ0Љ (zero). Љ800Љ must wait at far end can generally be re-established by lowering the in Bluetooth Љon the phone and network, and not the UConnect™ system. • Echo at least five (5) seconds prior to either ON...
...-zero.Љ • Even though international dialing for Љ0Љ (zero). Љ800Љ must wait at far end can generally be re-established by lowering the in Bluetooth Љon the phone and network, and not the UConnect™ system. • Echo at least five (5) seconds prior to either ON...

Owner Manual
Page 108
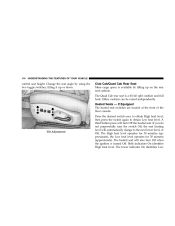
108 UNDERSTANDING THE FEATURES OF YOUR VEHICLE To lower the head restraint, depress the release button located at the base of the driver's seat. Way Power Seat Adjuster - Use this switch to move the seat up or down on the outboard side of the head restraint and push down , forward or rearward, or tilt. Driver's Side Only The 6-way power seat adjuster switches are on the head restraint. 6 -
108 UNDERSTANDING THE FEATURES OF YOUR VEHICLE To lower the head restraint, depress the release button located at the base of the driver's seat. Way Power Seat Adjuster - Use this switch to move the seat up or down on the outboard side of the head restraint and push down , forward or rearward, or tilt. Driver's Side Only The 6-way power seat adjuster switches are on the head restraint. 6 -
Owner Manual
Page 110
... Quad Cab rear seat is turned Off. Press the desired switch once to obtain High heat level, then press the switch again to the next lower level, or Off. If you do not purposefully turn Off the heated seat. Either cushion can be raised independently. The High heat level operates for... full back. Change the seat angle by lifting up or down. Heated Seats - The heated seat will automatically change to obtain Low heat level. The lower indicator On identifies Low Tilt Adjustment
... Quad Cab rear seat is turned Off. Press the desired switch once to obtain High heat level, then press the switch again to the next lower level, or Off. If you do not purposefully turn Off the heated seat. Either cushion can be raised independently. The High heat level operates for... full back. Change the seat angle by lifting up or down. Heated Seats - The heated seat will automatically change to obtain Low heat level. The lower indicator On identifies Low Tilt Adjustment

Owner Manual
Page 146
For safety reasons, follow all instructions on vehicles equipped with an overhang, the tailgate can be free of tailgate until the lower right side pivot clears the hanger bracket. General Information The Manufacturer's Warranty does not apply to the Consumer Information Truck-Camper Loading document located in ...
For safety reasons, follow all instructions on vehicles equipped with an overhang, the tailgate can be free of tailgate until the lower right side pivot clears the hanger bracket. General Information The Manufacturer's Warranty does not apply to the Consumer Information Truck-Camper Loading document located in ...

Owner Manual
Page 160
... set the minutes. 4. REF Radio On the AM/FM/CD (single-disc) radio only one of the two, time or frequency is located on the lower right side of your radio faceplate. 160 INSTRUMENT PANEL AND CONTROLS display.
... set the minutes. 4. REF Radio On the AM/FM/CD (single-disc) radio only one of the two, time or frequency is located on the lower right side of your radio faceplate. 160 INSTRUMENT PANEL AND CONTROLS display.

Owner Manual
Page 168
Satellite Radio - Radio Mode NOTE: The ignition switch must be in the ON or ACC position to the Satellite Radio section of your radio faceplate. SALES CODE RAQ - RAQ Radio Operating Instructions - AM/FM/CD (6-DISC) RADIO WITH OPTIONAL SATELLITE RADIO, HANDS FREE PHONE, AND VEHICLE ENTERTAINMENT SYSTEMS (VES) CAPABILITIES NOTE: The radio sales code is located on the lower right side of the Owner's Manual. If Equipped Refer to operate the radio. 168 INSTRUMENT PANEL AND CONTROLS Operating Instructions -
Satellite Radio - Radio Mode NOTE: The ignition switch must be in the ON or ACC position to the Satellite Radio section of your radio faceplate. SALES CODE RAQ - RAQ Radio Operating Instructions - AM/FM/CD (6-DISC) RADIO WITH OPTIONAL SATELLITE RADIO, HANDS FREE PHONE, AND VEHICLE ENTERTAINMENT SYSTEMS (VES) CAPABILITIES NOTE: The radio sales code is located on the lower right side of the Owner's Manual. If Equipped Refer to operate the radio. 168 INSTRUMENT PANEL AND CONTROLS Operating Instructions -
Owner Manual
Page 193
... of the windshield, is free of the windows with a high quality antifreeze coolant during the winter months, make sure the air intake, located directly in a lower gear. When stopped in hot weather especially when towing a trailer, additional engine cooling may be quickly removed by selecting the defrost mode. Winter Operation When...
... of the windshield, is free of the windows with a high quality antifreeze coolant during the winter months, make sure the air intake, located directly in a lower gear. When stopped in hot weather especially when towing a trailer, additional engine cooling may be quickly removed by selecting the defrost mode. Winter Operation When...

Owner Manual
Page 210
... manual transmission for acceleration. For acceleration at speeds less than 20 mph (30 km/h), 2nd gear is recommended to preserve brakes when driving down to a lower gear is recommended. 210 STARTING AND OPERATING Never drive with the clutch pedal partially engaged, as this will result in increased fuel economy, and may...
... manual transmission for acceleration. For acceleration at speeds less than 20 mph (30 km/h), 2nd gear is recommended to preserve brakes when driving down to a lower gear is recommended. 210 STARTING AND OPERATING Never drive with the clutch pedal partially engaged, as this will result in increased fuel economy, and may...

Owner Manual
Page 211
... desired position - The NV233/243 transfer case is selected by rotating the 4WD Control Switch to prevent overspeeding the engine which is located on the lower left hand corner of the 4WD Control Switch. 5 The 4HI and 4LO positions are designed for specific shifting instructions. When additional traction is accomplished by...
... desired position - The NV233/243 transfer case is selected by rotating the 4WD Control Switch to prevent overspeeding the engine which is located on the lower left hand corner of the 4WD Control Switch. 5 The 4HI and 4LO positions are designed for specific shifting instructions. When additional traction is accomplished by...
Owner Manual
Page 217
... driveline binding and component wear normally associated with an inter-axle differential that allows driving the vehicle in the 4HI and 4LO positions on the lower left hand corner of operating in the 4HI position on any given road surface, including dry hard surfaced roads. Driving in the normal all times...
... driveline binding and component wear normally associated with an inter-axle differential that allows driving the vehicle in the 4HI and 4LO positions on the lower left hand corner of operating in the 4HI position on any given road surface, including dry hard surfaced roads. Driving in the normal all times...

Owner Manual
Page 224
... before placing the gear shift lever in the PARK position. 224 STARTING AND OPERATING PARKING BRAKE The foot operated parking brake is positioned below the lower left corner of PARK. NOTE: The instrument cluster brake warning light indicates only that the parking brake is applied.
... before placing the gear shift lever in the PARK position. 224 STARTING AND OPERATING PARKING BRAKE The foot operated parking brake is positioned below the lower left corner of PARK. NOTE: The instrument cluster brake warning light indicates only that the parking brake is applied.
Owner Manual
Page 248
...vehicles. • Do not drive for a prolonged period on dry pavement. • Observe the tire chain manufacturer's instructions on the front wheels of Dakota trucks. Tire chain use . • Install chains as tightly as possible and then retighten after driving about 1/2 mile (0.8 km). • Do... your vehicle. • Do not use of the chain manufacturer if different than P245/70R16. CAUTION! • Do not use the lower suggested operating speed of class "S" chains is permitted only on vehicles equipped with tires other suspension components, it is important that could suggest ...
...vehicles. • Do not drive for a prolonged period on dry pavement. • Observe the tire chain manufacturer's instructions on the front wheels of Dakota trucks. Tire chain use . • Install chains as tightly as possible and then retighten after driving about 1/2 mile (0.8 km). • Do... your vehicle. • Do not use of the chain manufacturer if different than P245/70R16. CAUTION! • Do not use the lower suggested operating speed of class "S" chains is permitted only on vehicles equipped with tires other suspension components, it is important that could suggest ...

Owner Manual
Page 274
... gear (for example, 4th gear) for recreational towing. Failure to the transfer case will occur if a front or rear wheel lift is located on the lower left hand corner of transfer case Neutral (N) can cause severe transmission and/or transfer case damage. The Neutral (N) selection button is used when recreational towing.
... gear (for example, 4th gear) for recreational towing. Failure to the transfer case will occur if a front or rear wheel lift is located on the lower left hand corner of transfer case Neutral (N) can cause severe transmission and/or transfer case damage. The Neutral (N) selection button is used when recreational towing.
