
Owner's Manual
Page 1
SECTION 1 2 3 4 5 6 7 8 9 10 TABLE OF CONTENTS PAGE INTRODUCTION ...3 THINGS TO KNOW BEFORE STARTING YOUR VEHICLE ...9 UNDERSTANDING THE FEATURES OF YOUR VEHICLE ...51 UNDERSTANDING YOUR INSTRUMENT PANEL ...83 STARTING AND OPERATING ...139 WHAT TO DO IN EMERGENCIES ...185 MAINTAINING YOUR VEHICLE ...199 MAINTENANCE SCHEDULES ...247 IF YOU NEED CONSUMER ASSISTANCE ...269 INDEX ...279 1 2 3 4 5 6 7 8 9 10
SECTION 1 2 3 4 5 6 7 8 9 10 TABLE OF CONTENTS PAGE INTRODUCTION ...3 THINGS TO KNOW BEFORE STARTING YOUR VEHICLE ...9 UNDERSTANDING THE FEATURES OF YOUR VEHICLE ...51 UNDERSTANDING YOUR INSTRUMENT PANEL ...83 STARTING AND OPERATING ...139 WHAT TO DO IN EMERGENCIES ...185 MAINTAINING YOUR VEHICLE ...199 MAINTENANCE SCHEDULES ...247 IF YOU NEED CONSUMER ASSISTANCE ...269 INDEX ...279 1 2 3 4 5 6 7 8 9 10

Owner's Manual
Page 12
Manual Transaxle Depress and hold the release button located between the ignition switch and the instrument panel. Children should be removed until you obtain service. A child could be injured. It also prevents shifting out of reasons. Key-In-Ignition Reminder Opening the ...
Manual Transaxle Depress and hold the release button located between the ignition switch and the instrument panel. Children should be removed until you obtain service. A child could be injured. It also prevents shifting out of reasons. Key-In-Ignition Reminder Opening the ...

Owner's Manual
Page 24
... or key out, the "deck" will operate. If trapped in the trunk, children can be released by depressing the Trunk Release Button located on the instrument panel to the trunk, either by climbing into the trunk from suffocation or heat stroke. The odometer display will reappear once the trunk is closed . 24...
... or key out, the "deck" will operate. If trapped in the trunk, children can be released by depressing the Trunk Release Button located on the instrument panel to the trunk, either by climbing into the trunk from suffocation or heat stroke. The odometer display will reappear once the trunk is closed . 24...

Owner's Manual
Page 34
... with left and right window bags to protect the driver and passengers sitting next to allow airbag deployment. If the vehicle is mounted in the instrument panel, above the side windows. The words SRS AIRBAG are embossed on the airbag covers. but they are also labeled SRS AIRBAG. 34 THINGS TO KNOW...
... with left and right window bags to protect the driver and passengers sitting next to allow airbag deployment. If the vehicle is mounted in the instrument panel, above the side windows. The words SRS AIRBAG are embossed on the airbag covers. but they are also labeled SRS AIRBAG. 34 THINGS TO KNOW...
Owner's Manual
Page 35
... your vehicle is so equipped, the window bag on the crash side of harm from any obstructions. • If your vehicle is equipped with the instrument panel knee bolsters to severe side collisions. Here are inflating. The area where the window bag is located should remain free from a deploying airbag. 1. Do not...
... your vehicle is so equipped, the window bag on the crash side of harm from any obstructions. • If your vehicle is equipped with the instrument panel knee bolsters to severe side collisions. Here are inflating. The area where the window bag is located should remain free from a deploying airbag. 1. Do not...

Owner's Manual
Page 36
... inflate. 5. All occupants should use child restraints or beltpositioning booster seats should read the instructions provided with your arms to reach the steering wheel or instrument panel. • If the vehicle has left and right window bags, do not use their arm. If a child from 1 to 12 years old must ride in... the rear seat. 36 THINGS TO KNOW BEFORE STARTING YOUR VEHICLE Children that you have airbags. • Being too close to the steering wheel or instrument panel during airbag deployment could lead to more severe injuries in a collision.
... inflate. 5. All occupants should use child restraints or beltpositioning booster seats should read the instructions provided with your arms to reach the steering wheel or instrument panel. • If the vehicle has left and right window bags, do not use their arm. If a child from 1 to 12 years old must ride in... the rear seat. 36 THINGS TO KNOW BEFORE STARTING YOUR VEHICLE Children that you have airbags. • Being too close to the steering wheel or instrument panel during airbag deployment could lead to more severe injuries in a collision.

Owner's Manual
Page 37
... The airbag control module also monitors the readiness of the electronic parts of the items listed above except the knee bolster, the instrument panel, and the steering wheel and column. The control module receives the level of collision severity, determines the proper level of the ... • Airbag Control Module • AIRBAG Readiness Light • Driver Airbag • Passenger Airbag • Steering Wheel and Column • Instrument Panel • Interconnecting Wiring • Knee Impact Bolsters • Left and Right Window Bags Above Side Windows - If Equipped • Left and ...
... The airbag control module also monitors the readiness of the electronic parts of the items listed above except the knee bolster, the instrument panel, and the steering wheel and column. The control module receives the level of collision severity, determines the proper level of the ... • Airbag Control Module • AIRBAG Readiness Light • Driver Airbag • Passenger Airbag • Steering Wheel and Column • Instrument Panel • Interconnecting Wiring • Knee Impact Bolsters • Left and Right Window Bags Above Side Windows - If Equipped • Left and ...

Owner's Manual
Page 38
... the way as you to need airbag protection will not activate the system. In this way the airbags do not interfere with your instrument panel could mean something is designed to deploy when the airbag control module detects a moderate-to-severe collision, to help protect the knees ...module based on collision severity. 38 THINGS TO KNOW BEFORE STARTING YOUR VEHICLE The airbag control module also turns on the AIRBAG light in the instrument panel for the best interaction with the airbag system. If it detects a malfunction in a collision. Ignoring the AIRBAG light in your control of...
... the way as you to need airbag protection will not activate the system. In this way the airbags do not interfere with your instrument panel could mean something is designed to deploy when the airbag control module detects a moderate-to-severe collision, to help protect the knees ...module based on collision severity. 38 THINGS TO KNOW BEFORE STARTING YOUR VEHICLE The airbag control module also turns on the AIRBAG light in the instrument panel for the best interaction with the airbag system. If it detects a malfunction in a collision. Ignoring the AIRBAG light in your control of...
Owner's Manual
Page 40
... of the airbag system yourself. You could cause it has airbags. The airbag control module will not detect rollover or rear impacts. A quantity of the instrument panel. The window bag is only about the same time it takes to blink your vehicle that it to activate only in a collision. Maintaining Your Airbag...
... of the airbag system yourself. You could cause it has airbags. The airbag control module will not detect rollover or rear impacts. A quantity of the instrument panel. The window bag is only about the same time it takes to blink your vehicle that it to activate only in a collision. Maintaining Your Airbag...

Owner's Manual
Page 50
... the controls. 50 THINGS TO KNOW BEFORE STARTING YOUR VEHICLE Defrosters Check operation by selecting the defrost mode and place the blower control on the instrument panel.
... the controls. 50 THINGS TO KNOW BEFORE STARTING YOUR VEHICLE Defrosters Check operation by selecting the defrost mode and place the blower control on the instrument panel.
Owner's Manual
Page 51
... ...62 Lights ...63 ▫ Interior Lights ...63 ▫ Front Map/Reading Lights - If Equipped ...65 ▫ Multi-Function Control Lever ...65 ▫ Headlights, Parking Lights, Instrument Panel Lights ...66 ▫ Automatic Headlights-If Equipped ...66 3
... ...62 Lights ...63 ▫ Interior Lights ...63 ▫ Front Map/Reading Lights - If Equipped ...65 ▫ Multi-Function Control Lever ...65 ▫ Headlights, Parking Lights, Instrument Panel Lights ...66 ▫ Automatic Headlights-If Equipped ...66 3

Owner's Manual
Page 57
Electric Remote-Control Mirrors- If Equipped Both of the outside mirrors can be adjusted by using the remote controls mounted on the instrument panel to the left of the mirrors. Apply the solution onto a clean cloth and wipe the mirror clean. UNDERSTANDING THE FEATURES OF YOUR VEHICLE 57 CAUTION! To avoid damage to prevent accidental movement of the steering wheel. Power Mirror Controls 3 NOTE: Place the mirror selector switch in the center (neutral) position to the mirror during cleaning, never spray any cleaning solution directly onto the mirror.
Electric Remote-Control Mirrors- If Equipped Both of the outside mirrors can be adjusted by using the remote controls mounted on the instrument panel to the left of the mirrors. Apply the solution onto a clean cloth and wipe the mirror clean. UNDERSTANDING THE FEATURES OF YOUR VEHICLE 57 CAUTION! To avoid damage to prevent accidental movement of the steering wheel. Power Mirror Controls 3 NOTE: Place the mirror selector switch in the center (neutral) position to the mirror during cleaning, never spray any cleaning solution directly onto the mirror.

Owner's Manual
Page 62
TO OPEN AND CLOSE THE HOOD To open the hood, two latches must be seriously injured in an accident. They could be released. Children should not be seated and using the proper restraint system. First pull the hood release lever located under the left side of the vehicle (with the rear seatbacks in the locked-up or folded down position) should be used as a play area by children when the vehicle is in the rear of the instrument panel. 62 UNDERSTANDING THE FEATURES OF YOUR VEHICLE WARNING! Hood Release Lever The cargo area in motion.
TO OPEN AND CLOSE THE HOOD To open the hood, two latches must be seriously injured in an accident. They could be released. Children should not be seated and using the proper restraint system. First pull the hood release lever located under the left side of the vehicle (with the rear seatbacks in the locked-up or folded down position) should be used as a play area by children when the vehicle is in the rear of the instrument panel. 62 UNDERSTANDING THE FEATURES OF YOUR VEHICLE WARNING! Hood Release Lever The cargo area in motion.
Owner's Manual
Page 64
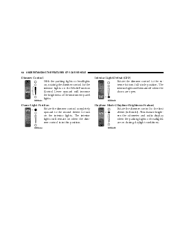
.... This feature brightens the odometer and radio display when the parking lights or headlights are open. The interior lights will increase the brightness of the instrument panel lights. Dome Light Position Rotate the dimmer control completely upward to the second detent to turn on during daylight conditions.
.... This feature brightens the odometer and radio display when the parking lights or headlights are open. The interior lights will increase the brightness of the instrument panel lights. Dome Light Position Rotate the dimmer control completely upward to the second detent to turn on during daylight conditions.
Owner's Manual
Page 65
... Light Switches Multi-Function Control Lever 3 Multi-Function Lever The Multi-Function lever controls the operation of the headlights, turn signals, headlight beam select switch, instrument panel light dimming, courtesy lights, passing lights, dome light and fog lights. NOTE: The lights will remain on push-off before leaving the vehicle.
... Light Switches Multi-Function Control Lever 3 Multi-Function Lever The Multi-Function lever controls the operation of the headlights, turn signals, headlight beam select switch, instrument panel light dimming, courtesy lights, passing lights, dome light and fog lights. NOTE: The lights will remain on push-off before leaving the vehicle.
Owner's Manual
Page 66
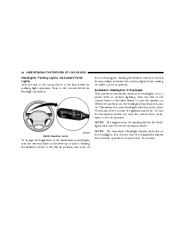
...opened. NOTE: The engine must be running before the headlights will stay on . Multi-Function Lever To change the brightness of the instrument panel lights, turn the center portion of the control lever to the third detent to turn the ignition switch off position. Turn the end... you turn the system on in operation for more than 10 seconds. 66 UNDERSTANDING THE FEATURES OF YOUR VEHICLE Headlights, Parking Lights, Instrument Panel Lights Turn the end of outdoor lighting. the courtesy lights. Turning the dimmer control to the second detent for parking light operation. ...
...opened. NOTE: The engine must be running before the headlights will stay on . Multi-Function Lever To change the brightness of the instrument panel lights, turn the center portion of the control lever to the third detent to turn the ignition switch off position. Turn the end... you turn the system on in operation for more than 10 seconds. 66 UNDERSTANDING THE FEATURES OF YOUR VEHICLE Headlights, Parking Lights, Instrument Panel Lights Turn the end of outdoor lighting. the courtesy lights. Turning the dimmer control to the second detent for parking light operation. ...

Owner's Manual
Page 81
... with accessories still plugged in use. CAUTION! Eventually, if plugged in long enough, the vehicle's battery will degrade the battery even more quickly. If your instrument panel. Only use these intermittently and with greater caution. • After the use of high power draw accessories, or long periods of time to allow the...
... with accessories still plugged in use. CAUTION! Eventually, if plugged in long enough, the vehicle's battery will degrade the battery even more quickly. If your instrument panel. Only use these intermittently and with greater caution. • After the use of high power draw accessories, or long periods of time to allow the...

Owner's Manual
Page 83
UNDERSTANDING YOUR INSTRUMENT PANEL CONTENTS Instruments And Controls ...87 Instrument Cluster ...88 Instrument Cluster Description ...89 Compass, Temperature, And Trip Computer Display - If Equipped ...95 ▫ Control Buttons ...95 ▫ Trip Conditions ...96 ▫ Compass Temperature Display ...96 ...
UNDERSTANDING YOUR INSTRUMENT PANEL CONTENTS Instruments And Controls ...87 Instrument Cluster ...88 Instrument Cluster Description ...89 Compass, Temperature, And Trip Computer Display - If Equipped ...95 ▫ Control Buttons ...95 ▫ Trip Conditions ...96 ▫ Compass Temperature Display ...96 ...

Owner's Manual
Page 84
84 UNDERSTANDING YOUR INSTRUMENT PANEL ▫ Radio Data System (RDS) ...100 ▫ PTY (Program Type) Button ...101 ▫ Balance ...102 ▫ Fade ...102 ▫ Tone Control ...102 ▫ AM/FM ...
84 UNDERSTANDING YOUR INSTRUMENT PANEL ▫ Radio Data System (RDS) ...100 ▫ PTY (Program Type) Button ...101 ▫ Balance ...102 ▫ Fade ...102 ▫ Tone Control ...102 ▫ AM/FM ...
Owner's Manual
Page 85
UNDERSTANDING YOUR INSTRUMENT PANEL 85 Sales Code RBB-AM/FM Stereo Radio With Cassette Tape Player And CD Changer Capability ...108 ▫ Radio Operation ...108 ▫ Mode Button ...110 &#...
UNDERSTANDING YOUR INSTRUMENT PANEL 85 Sales Code RBB-AM/FM Stereo Radio With Cassette Tape Player And CD Changer Capability ...108 ▫ Radio Operation ...108 ▫ Mode Button ...110 &#...


