Owner Manual
Page 319
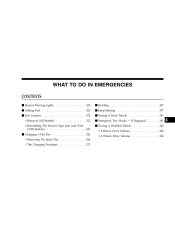
... Vehicles ...342 6 WHAT TO DO IN EMERGENCIES CONTENTS Ⅵ Hazard Warning Lights ...320 Ⅵ Adding Fuel ...321 Ⅵ Jack Location ...322 ▫ Removal (All Models) ...322 ▫ Reinstalling The Scissors-Type Jack And Tools (1500 Models) ...323 Ⅵ Changing A Flat Tire ...326 ▫ Removing The Spare Tire ...326 ▫ Tire Changing Procedure ...327...
... Vehicles ...342 6 WHAT TO DO IN EMERGENCIES CONTENTS Ⅵ Hazard Warning Lights ...320 Ⅵ Adding Fuel ...321 Ⅵ Jack Location ...322 ▫ Removal (All Models) ...322 ▫ Reinstalling The Scissors-Type Jack And Tools (1500 Models) ...323 Ⅵ Changing A Flat Tire ...326 ▫ Removing The Spare Tire ...326 ▫ Tire Changing Procedure ...327...

Owner Manual
Page 322
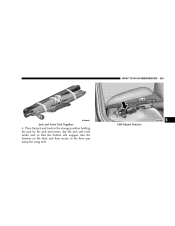
Lift the flap on the side of the seat for access. Remove the jack and tools by removing the wing bolt and sliding the assembly from under the front passenger seat. 322 WHAT TO DO IN EMERGENCIES JACK LOCATION Removal (All Models) The jack and jack tools are stored under the seat. 2500/3500 Model Vehicles 1500 Model Vehicles
Lift the flap on the side of the seat for access. Remove the jack and tools by removing the wing bolt and sliding the assembly from under the front passenger seat. 322 WHAT TO DO IN EMERGENCIES JACK LOCATION Removal (All Models) The jack and jack tools are stored under the seat. 2500/3500 Model Vehicles 1500 Model Vehicles

Owner Manual
Page 323
... to use as a safety measure. Position the jack and tool bag (unrolled). WARNING! Reinstalling The Scissors-Type Jack And Tools (1500 Models) 1. Lower the jack all the way down by turning the jack turn -screw. After using the jack and tools, always reinstall them in serious injury. A loose jack, tools, bracket or other objects in the vehicle...
... to use as a safety measure. Position the jack and tool bag (unrolled). WARNING! Reinstalling The Scissors-Type Jack And Tools (1500 Models) 1. Lower the jack all the way down by turning the jack turn -screw. After using the jack and tools, always reinstall them in serious injury. A loose jack, tools, bracket or other objects in the vehicle...

Owner Manual
Page 324
324 WHAT TO DO IN EMERGENCIES 3. Tying Bag to the jack using the tie straps. Fold the flap and roll the jack tool kit into a cylindrical package (in direction of arrows), and tie to Jack with Straps Folding Flap and Rolling Bag
324 WHAT TO DO IN EMERGENCIES 3. Tying Bag to the jack using the tie straps. Fold the flap and roll the jack tool kit into a cylindrical package (in direction of arrows), and tie to Jack with Straps Folding Flap and Rolling Bag
Owner Manual
Page 325
WHAT TO DO IN EMERGENCIES 325 6 Jack and Tools Tied Together 1500 Model Vehicles 4. Place the jack and tools in the storage position holding the jack by the jack turn-screw, slip the jack and tools under seat so that the bottom slot engages into the fastener on the floor and then secure to the floor pan using the wing bolt.
WHAT TO DO IN EMERGENCIES 325 6 Jack and Tools Tied Together 1500 Model Vehicles 4. Place the jack and tools in the storage position holding the jack by the jack turn-screw, slip the jack and tools under seat so that the bottom slot engages into the fastener on the floor and then secure to the floor pan using the wing bolt.
Owner Manual
Page 326
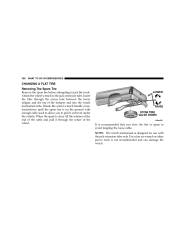
... between the lower tailgate and the top of an air wrench or other power tools is on the ground with the jack extension tube only. Attach the wheel wrench to jack the truck. Rotate the wheel wrench handle counterclockwise until the spare tire is not recommended and can damage the winch. Use... tangling the loose cable. 326 WHAT TO DO IN EMERGENCIES CHANGING A FLAT TIRE Removing The Spare Tire Remove the spare tire before attempting to the jack extension tube.
... between the lower tailgate and the top of an air wrench or other power tools is on the ground with the jack extension tube only. Attach the wheel wrench to jack the truck. Rotate the wheel wrench handle counterclockwise until the spare tire is not recommended and can damage the winch. Use... tangling the loose cable. 326 WHAT TO DO IN EMERGENCIES CHANGING A FLAT TIRE Removing The Spare Tire Remove the spare tire before attempting to the jack extension tube.
Owner Manual
Page 327
... is designed as a tool for service purposes or to avoid the danger of being hit when operating the jack or changing the wheel. 6 If you . The jack is on a lift. WARNING! Getting under a jacked-up vehicle is on the side of your body under a raised vehicle, take it to a service center...the vehicle on you need to get any part of the vehicle close to the "4L" position. Do not attempt to change a tire on a jack. Set the parking brake and place the gear selector in PARK (automatic transmission) or REVERSE (manual transmission). WHAT TO DO IN EMERGENCIES 327 Tire ...
... is designed as a tool for service purposes or to avoid the danger of being hit when operating the jack or changing the wheel. 6 If you . The jack is on a lift. WARNING! Getting under a jacked-up vehicle is on the side of your body under a raised vehicle, take it to a service center...the vehicle on you need to get any part of the vehicle close to the "4L" position. Do not attempt to change a tire on a jack. Set the parking brake and place the gear selector in PARK (automatic transmission) or REVERSE (manual transmission). WHAT TO DO IN EMERGENCIES 327 Tire ...

Owner Manual
Page 328
... remain in the positions indicated. • If working on or near a roadway, be extremely careful of the wheel diagonally opposite the jacking position. Remove the spare wheel, jack, and tools from the edge of the roadway as possible before raising the vehicle. • Block the wheel diagonally opposite the wheel ...; Do not let anyone sit in the vehicle when it is on a jack. • Do not get under the vehicle when it is on a jack. • Only use the jack in the vehicle when the vehicle is being jacked. 328 WHAT TO DO IN EMERGENCIES • Turn on the Hazard Warning Flasher. &#...
... remain in the positions indicated. • If working on or near a roadway, be extremely careful of the wheel diagonally opposite the jacking position. Remove the spare wheel, jack, and tools from the edge of the roadway as possible before raising the vehicle. • Block the wheel diagonally opposite the wheel ...; Do not let anyone sit in the vehicle when it is on a jack. • Do not get under the vehicle when it is on a jack. • Only use the jack in the vehicle when the vehicle is being jacked. 328 WHAT TO DO IN EMERGENCIES • Turn on the Hazard Warning Flasher. &#...
Owner Manual
Page 329
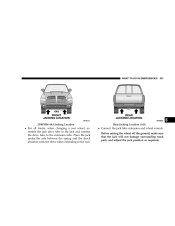
WHAT TO DO IN EMERGENCIES 329 2. Using the wheel wrench, loosen, but do not remove, the wheel nuts by turning them counterclockwise one turn while the wheel is still on the ground. 3. Placement of the Jack: • For 1500 series trucks, when changing a front wheel, place the scissors jack under the rear portion of the lower control arm as shown below. 6 1500 4X4 Jacking Location 1500 4X2 Jacking Location
WHAT TO DO IN EMERGENCIES 329 2. Using the wheel wrench, loosen, but do not remove, the wheel nuts by turning them counterclockwise one turn while the wheel is still on the ground. 3. Placement of the Jack: • For 1500 series trucks, when changing a front wheel, place the scissors jack under the rear portion of the lower control arm as shown below. 6 1500 4X4 Jacking Location 1500 4X2 Jacking Location
Owner Manual
Page 330
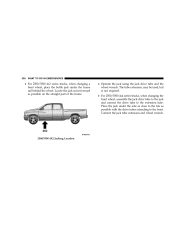
..., but is not required. • For 2500/3500 4x4 series trucks, when changing the front wheel, assemble the jack drive tube to the jack and connect the drive tube to the front. Place the jack under the frame rail behind the wheel. 330 WHAT TO DO IN EMERGENCIES • For 2500/3500 4x2... series trucks, when changing a front wheel, place the bottle jack under the axle as close to the tire as possible on the straight part...
..., but is not required. • For 2500/3500 4x4 series trucks, when changing the front wheel, assemble the jack drive tube to the jack and connect the drive tube to the front. Place the jack under the frame rail behind the wheel. 330 WHAT TO DO IN EMERGENCIES • For 2500/3500 4x2... series trucks, when changing a front wheel, place the bottle jack under the axle as close to the tire as possible on the straight part...
Owner Manual
Page 331
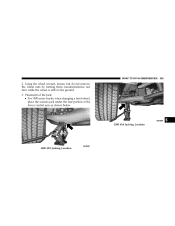
Place the jack under the axle between the spring and the shock absorber with the drive tubes extending to the extension tube. Before raising the wheel off the ground, make sure that the jack will not damage surrounding truck parts and adjust the jack position as required. WHAT TO DO IN EMERGENCIES 331 6 2500/3500 4X4 Jacking Location Rear Jacking Location (All) • For all trucks, when changing a rear wheel, assemble the jack drive tube to the jack and connect the drive tube to the rear. • Connect the jack tube extension and wheel wrench.
Place the jack under the axle between the spring and the shock absorber with the drive tubes extending to the extension tube. Before raising the wheel off the ground, make sure that the jack will not damage surrounding truck parts and adjust the jack position as required. WHAT TO DO IN EMERGENCIES 331 6 2500/3500 4X4 Jacking Location Rear Jacking Location (All) • For all trucks, when changing a rear wheel, assemble the jack drive tube to the jack and connect the drive tube to the rear. • Connect the jack tube extension and wheel wrench.
Owner Manual
Page 332
..., have them checked with a torque wrench by hand, it . Lightly tighten the nuts. 332 WHAT TO DO IN EMERGENCIES NOTE: If the 2500/3500 bottle jack will not lower by turning the dial (thumb wheel) by your dealer or at a service station. If in order to remove the tire. 5. Raising the.... By rotating the wheel wrench clockwise, raise the vehicle until the vehicle has been lowered. 6. Remove the wheel nuts and pull the wheel off the jack, do not fully tighten the nuts until the wheel just clears the surface. To avoid risk of the nuts toward the wheel on 2500/3500...
..., have them checked with a torque wrench by hand, it . Lightly tighten the nuts. 332 WHAT TO DO IN EMERGENCIES NOTE: If the 2500/3500 bottle jack will not lower by turning the dial (thumb wheel) by your dealer or at a service station. If in order to remove the tire. 5. Raising the.... By rotating the wheel wrench clockwise, raise the vehicle until the vehicle has been lowered. 6. Remove the wheel nuts and pull the wheel off the jack, do not fully tighten the nuts until the wheel just clears the surface. To avoid risk of the nuts toward the wheel on 2500/3500...
Owner Manual
Page 333
... before raising the vehicle off . For chrome wheels, do not substitute with dual rear wheels (DRW), you must be removed. 6 A loose tire or jack thrown forward in a collision or hard stop could injure someone in the places provided. 7. Install wheel center cap and remove wheel blocks. NOTE: Do not... oil wheel studs. Always stow the jack parts and the extra tire and wheel in the vehicle. WHAT TO DO IN EMERGENCIES 333 WARNING! Position the hook and pull out on the...
... before raising the vehicle off . For chrome wheels, do not substitute with dual rear wheels (DRW), you must be removed. 6 A loose tire or jack thrown forward in a collision or hard stop could injure someone in the places provided. 7. Install wheel center cap and remove wheel blocks. NOTE: Do not... oil wheel studs. Always stow the jack parts and the extra tire and wheel in the vehicle. WHAT TO DO IN EMERGENCIES 333 WARNING! Position the hook and pull out on the...
Owner Manual
Page 337
...greater risk of a loaded truck or damage to obtain a start from a booster battery or the battery in place. Never use a floor jack directly under the differential housing of an accident when a vehicle is firmly in another vehicle. Vehicles equipped with a manual transmission may be ...used at the jacking locations, refer to be started this procedure carefully. 6 CAUTION! This type of the vehicle. However, a floor jack or frame hoist must never be used on any other parts or the underbody. ...
...greater risk of a loaded truck or damage to obtain a start from a booster battery or the battery in place. Never use a floor jack directly under the differential housing of an accident when a vehicle is firmly in another vehicle. Vehicles equipped with a manual transmission may be ...used at the jacking locations, refer to be started this procedure carefully. 6 CAUTION! This type of the vehicle. However, a floor jack or frame hoist must never be used on any other parts or the underbody. ...
Owner Manual
Page 439
Jacking ...289 ...81,214,218 ...147 ...125 ...254 ...341 ...320 ...327 Jump Starting ...337 Tow Hooks ...341 Towing ...342 Emission Control System Maintenance ...408 Emission Related ...
Jacking ...289 ...81,214,218 ...147 ...125 ...254 ...341 ...320 ...327 Jump Starting ...337 Tow Hooks ...341 Towing ...342 Emission Control System Maintenance ...408 Emission Related ...
Owner Manual
Page 442
... Mirror ...78 Instrument Cluster ...164,165 Instrument Panel and Controls ...163 Instrument Panel Lens Cleaning ...389 Interior Appearance Care ...387 Intermittent Wipers ...121 Introduction ...4 Jack Location ...322 Jack Operation ...327 Jump Starting ...337 Key, Replacement ...12 Key, Sentry ...11 Key-In Reminder ...11 Keyless Entry System ...22 Keys ...11,15 Lane Change...
... Mirror ...78 Instrument Cluster ...164,165 Instrument Panel and Controls ...163 Instrument Panel Lens Cleaning ...389 Interior Appearance Care ...387 Intermittent Wipers ...121 Introduction ...4 Jack Location ...322 Jack Operation ...327 Jump Starting ...337 Key, Replacement ...12 Key, Sentry ...11 Key-In Reminder ...11 Keyless Entry System ...22 Keys ...11,15 Lane Change...
Owner Manual
Page 449
... . . 302 10 INDEX 449 Alignment ...277 Chains ...278 Changing ...326 Compact Spare ...272 Dual ...281,334 General Information ...268 High Speed ...271 Inflation Pressures ...269 Jacking ...327 Load Capacity ...264,265 Radial ...272 Replacement ...276 Rotation ...280 Safety ...259,268 Sizes ...261 Snow Tires ...280 Spare Tire ...326 Spinning ...274 Tread...
... . . 302 10 INDEX 449 Alignment ...277 Chains ...278 Changing ...326 Compact Spare ...272 Dual ...281,334 General Information ...268 High Speed ...271 Inflation Pressures ...269 Jacking ...327 Load Capacity ...264,265 Radial ...272 Replacement ...276 Rotation ...280 Safety ...259,268 Sizes ...261 Snow Tires ...280 Spare Tire ...326 Spinning ...274 Tread...


