
Owner's Manual
Page 31
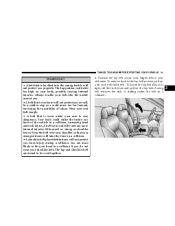
.... Ribs aren't as strong as well. Position the lap belt across your thighs, below your arm is very dangerous. To remove slack in a collision, increasing head and neck injury. A snug belt reduces the risk of sliding under the belt in a collision. • A shoulder belt placed behind you will not protect... latch plate and pull on the lap belt. In a sudden stop you could strike the inside surfaces of injury. You are meant to hit your head in a collision if you do not wear your strongest bones will take the force in a collision. 2 Your body could move too far forward, ...
.... Ribs aren't as strong as well. Position the lap belt across your thighs, below your arm is very dangerous. To remove slack in a collision, increasing head and neck injury. A snug belt reduces the risk of sliding under the belt in a collision. • A shoulder belt placed behind you will not protect... latch plate and pull on the lap belt. In a sudden stop you could strike the inside surfaces of injury. You are meant to hit your head in a collision if you do not wear your strongest bones will take the force in a collision. 2 Your body could move too far forward, ...
Owner's Manual
Page 53
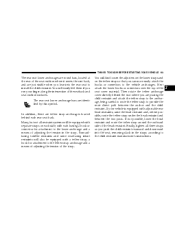
...a hook for attachment to the tether strap anchorage and a means of adjusting the tension of the strap. If not possible, lower the head restraint and route the tether strap around the outboard side of the seat cover material. Then rotate the tether anchorage cover directly behind each...You will first loosen the adjusters on the lower straps and on each side, with adjustable rear head restraints, raise the head restraint and, where possible, route the tether strap under the head restraint and between the anchor and the child restraint. Next attach the lower hooks or connectors ...
...a hook for attachment to the tether strap anchorage and a means of adjusting the tension of the strap. If not possible, lower the head restraint and route the tether strap around the outboard side of the seat cover material. Then rotate the tether anchorage cover directly behind each...You will first loosen the adjusters on the lower straps and on each side, with adjustable rear head restraints, raise the head restraint and, where possible, route the tether strap under the head restraint and between the anchor and the child restraint. Next attach the lower hooks or connectors ...
Owner's Manual
Page 55
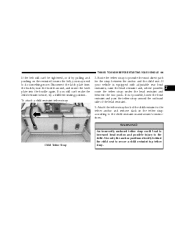
... positions directly behind the child seat to the child. If your vehicle is equipped with adjustable rear head restraints, raise the head restraint and, where possible, route the tether strap under the head restraint and between the anchor and the child seat. Disconnect the latch plate from the buckle, turn... and possible injury to secure a child restraint top tether strap. Attach the tether strap hook of the head restraint. 3. If not possible, lower the head restraint and pass the tether strap around , and insert the latch plate into the buckle again. If you may need to provide ...
... positions directly behind the child seat to the child. If your vehicle is equipped with adjustable rear head restraints, raise the head restraint and, where possible, route the tether strap under the head restraint and between the anchor and the child seat. Disconnect the latch plate from the buckle, turn... and possible injury to secure a child restraint top tether strap. Attach the tether strap hook of the head restraint. 3. If not possible, lower the head restraint and pass the tether strap around , and insert the latch plate into the buckle again. If you may need to provide ...
Owner's Manual
Page 60
60 UNDERSTANDING THE FEATURES OF YOUR VEHICLE ▫ Lumbar Support ...85 ▫ Heated Seats-If Equipped ...85 ▫ Head Restraints ...86 ▫ Folding Rear Seat ...87 Adjustable Pedals - If Equipped ...88 To Open And Close The Hood ...89 Lights ...91 ▫ Overhead Console Map/...
60 UNDERSTANDING THE FEATURES OF YOUR VEHICLE ▫ Lumbar Support ...85 ▫ Heated Seats-If Equipped ...85 ▫ Head Restraints ...86 ▫ Folding Rear Seat ...87 Adjustable Pedals - If Equipped ...88 To Open And Close The Hood ...89 Lights ...91 ▫ Overhead Console Map/...
Owner's Manual
Page 86
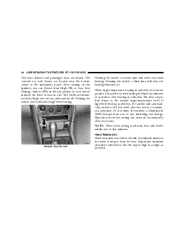
... time will be adjusted so that time, the number of illuminated LEDs changes from two to the low level after two hours of continuous operation. Head Restraints Head restraints can choose from the rear. 86 UNDERSTANDING THE FEATURES OF YOUR VEHICLE The front driver's and passenger seats are located near the bottom...
... time will be adjusted so that time, the number of illuminated LEDs changes from two to the low level after two hours of continuous operation. Head Restraints Head restraints can choose from the rear. 86 UNDERSTANDING THE FEATURES OF YOUR VEHICLE The front driver's and passenger seats are located near the bottom...
Owner's Manual
Page 87
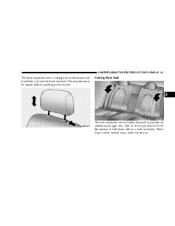
These loops can be folded forward to provide an additional storage area. The restraints may be raised without pushing in to fold down either or both seatbacks. UNDERSTANDING THE FEATURES OF YOUR VEHICLE 87 The head restraints have a locking button which must be pushed in the button. Pull on the loops shown in use. Folding Rear Seat 3 The rear seatbacks can be tucked away when not in the illustration to lower the head restraint.
These loops can be folded forward to provide an additional storage area. The restraints may be raised without pushing in to fold down either or both seatbacks. UNDERSTANDING THE FEATURES OF YOUR VEHICLE 87 The head restraints have a locking button which must be pushed in the button. Pull on the loops shown in use. Folding Rear Seat 3 The rear seatbacks can be tucked away when not in the illustration to lower the head restraint.
Owner's Manual
Page 110
... two seconds and release the programmed HomeLink button. Similar to complete the programming. The EVIC At the garage door opener receiver (motor-head unit) in the garage, locate the learn or smart button. (The name and color of the button may vary by manufacturer.) NOTE...your hand-held transmitter until the frequency signal has successfully been accepted by using the Programming procedures (regardless of transmission which to the motor-head unit. 7. gate operators are having difficulties programming a gate operator by HomeLink. If you press and release every two seconds ( cycle )...
... two seconds and release the programmed HomeLink button. Similar to complete the programming. The EVIC At the garage door opener receiver (motor-head unit) in the garage, locate the learn or smart button. (The name and color of the button may vary by manufacturer.) NOTE...your hand-held transmitter until the frequency signal has successfully been accepted by using the Programming procedures (regardless of transmission which to the motor-head unit. 7. gate operators are having difficulties programming a gate operator by HomeLink. If you press and release every two seconds ( cycle )...
Owner's Manual
Page 170
... disengage and eject from the radio. Tape Eject Press this button and the cassette will play in will play position. Clean and demagnetize the tape heads at least twice a year. Buttons 1 - 6 (Radio Mode) These buttons tune the Radio to reverse the tape direction.
... disengage and eject from the radio. Tape Eject Press this button and the cassette will play in will play position. Clean and demagnetize the tape heads at least twice a year. Buttons 1 - 6 (Radio Mode) These buttons tune the Radio to reverse the tape direction.
Owner's Manual
Page 184
...in the cassette player can pick up dirt or tape deposits each time a cassette is adhering flatly to remove all the way down. The head and capstan shaft in its edge; If you should be possible to the cassette. 5. If the disc is low or "muddy" sound ...tape drive gear and twist the pencil in good condition, take the following precautions: 1. avoid touching the surface. 2. A loose tape should periodically clean the head with a soft cloth, wiping from one or both channels, as benzine, thinner, cleaners, or antistatic sprays. 5. Do not expose the disc to the ...
...in the cassette player can pick up dirt or tape deposits each time a cassette is adhering flatly to remove all the way down. The head and capstan shaft in its edge; If you should be possible to the cassette. 5. If the disc is low or "muddy" sound ...tape drive gear and twist the pencil in good condition, take the following precautions: 1. avoid touching the surface. 2. A loose tape should periodically clean the head with a soft cloth, wiping from one or both channels, as benzine, thinner, cleaners, or antistatic sprays. 5. Do not expose the disc to the ...

Owner's Manual
Page 203
... in hilly terrain, traveling into Overdrive may be used for most city and highway driving. Do not coast in cold outside temperatures, shifts into strong head winds, or while towing heavy trailers. You might lose control of the transmission reaches the appropriate temperature. NOTE: If the vehicle is released. N (Neutral) Engine...
... in hilly terrain, traveling into Overdrive may be used for most city and highway driving. Do not coast in cold outside temperatures, shifts into strong head winds, or while towing heavy trailers. You might lose control of the transmission reaches the appropriate temperature. NOTE: If the vehicle is released. N (Neutral) Engine...

Owner's Manual
Page 208
... that is possible. Drive This range should be used for starting your vehicle if it is indicated in the instrument cluster display. Shifting into strong head winds, or while towing heavy trailers, use the AutoStick mode and select the "3" range. Press and hold the selector lever in the "D -" direction. Briefly press...
... that is possible. Drive This range should be used for starting your vehicle if it is indicated in the instrument cluster display. Shifting into strong head winds, or while towing heavy trailers, use the AutoStick mode and select the "3" range. Press and hold the selector lever in the "D -" direction. Briefly press...

Owner's Manual
Page 354
... Vehicle Weight Rating ... ...243 ...243 ...244 ...134 ...134 ...134 ...134 ...202 15,23,240 ...306 ...249 ...249 Hands-Free Phone ...65 Hazard Warning Flasher ...256 Head Restraints ...86 Headlights High Beam ...95 High Beam/Low Beam Select Switch ...95 Passing ...95 Switch ...93 Time Delay ...94
... Vehicle Weight Rating ... ...243 ...243 ...244 ...134 ...134 ...134 ...134 ...202 15,23,240 ...306 ...249 ...249 Hands-Free Phone ...65 Hazard Warning Flasher ...256 Head Restraints ...86 Headlights High Beam ...95 High Beam/Low Beam Select Switch ...95 Passing ...95 Switch ...93 Time Delay ...94
Owner's Manual
Page 358
... Data ...47 Refrigerant ...291 Reminder, Seat Belt ...34 Remote Keyless Entry ...20 Remote Sound System Controls ...181 Replacement Tires ...234 Reporting Safety Defects ...344 Restraint, Head ...86 Restraints, Occupant ...28 Rocking Vehicle When Stuck ...270 Roof Rack ...125 Rotation, Tires ...242 Safety Checks Inside Vehicle ...57
... Data ...47 Refrigerant ...291 Reminder, Seat Belt ...34 Remote Keyless Entry ...20 Remote Sound System Controls ...181 Replacement Tires ...234 Reporting Safety Defects ...344 Restraint, Head ...86 Restraints, Occupant ...28 Rocking Vehicle When Stuck ...270 Roof Rack ...125 Rotation, Tires ...242 Safety Checks Inside Vehicle ...57
