Owner's Manual
Page 23
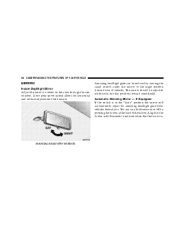
... time, you may have a programmed transmitter, contact your dealer for more information.) If you to the ON position. When the panic alarm is on, the headlights and park lights will flash, the horn will pulse on the transmitter for 30 seconds allowing you do not have to be closer to the...
... time, you may have a programmed transmitter, contact your dealer for more information.) If you to the ON position. When the panic alarm is on, the headlights and park lights will flash, the horn will pulse on the transmitter for 30 seconds allowing you do not have to be closer to the...

Owner's Manual
Page 26
... VEHICLE 1. If you touch a battery, clean it , the system will not start. To reassemble the transmitter case snap two halves together. The horn will pulse, headlights/park lights will flash, the Vehicle Theft Alarm/Immobilizer light, located in the instrument cluster, will flash, and the vehicle will turn off the horn...
... VEHICLE 1. If you touch a battery, clean it , the system will not start. To reassemble the transmitter case snap two halves together. The horn will pulse, headlights/park lights will flash, the Vehicle Theft Alarm/Immobilizer light, located in the instrument cluster, will flash, and the vehicle will turn off the horn...
Owner's Manual
Page 86
... Quad And 50/50 Seating Flexibility ...139 To Open And Close The Hood ...141 Lights ...142 ▫ Interior Lights ...143 ▫ Park Lights ...143 ▫ Headlights ...143
... Quad And 50/50 Seating Flexibility ...139 To Open And Close The Hood ...141 Lights ...142 ▫ Interior Lights ...143 ▫ Park Lights ...143 ▫ Headlights ...143
Owner's Manual
Page 87
UNDERSTANDING THE FEATURES OF YOUR VEHICLE 87 ▫ Automatic Headlights - If Equipped ...145 ▫ Daytime Running Lights (Canada/Fleet Vehicles Only) ...145 ▫ Lights-On Reminder ...145 ▫ Battery Protection ...145 ▫ ...Headlamp Delay - If Equipped ...146 ▫ Front Fog Lights - If Equipped ...146 Multifunction Lever ...147 ▫ Turn Signals ...147 ▫ Headlight Low/High Beam Selector Switch ...148 ▫ Passing Light ...148 ▫ Windshield Wipers And Washers ...148 Tilt Steering Column - If Equipped ...150 Traction Control Switch...
UNDERSTANDING THE FEATURES OF YOUR VEHICLE 87 ▫ Automatic Headlights - If Equipped ...145 ▫ Daytime Running Lights (Canada/Fleet Vehicles Only) ...145 ▫ Lights-On Reminder ...145 ▫ Battery Protection ...145 ▫ ...Headlamp Delay - If Equipped ...146 ▫ Front Fog Lights - If Equipped ...146 Multifunction Lever ...147 ▫ Turn Signals ...147 ▫ Headlight Low/High Beam Selector Switch ...148 ▫ Passing Light ...148 ▫ Windshield Wipers And Washers ...148 Tilt Steering Column - If Equipped ...150 Traction Control Switch...
Owner's Manual
Page 90
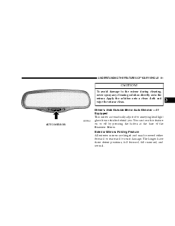
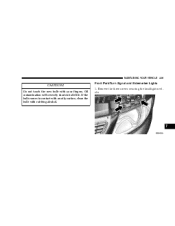
... REARVIEW MIRROR You can be adjusted while set in the day position (toward rear of the mirror. A two point pivot system allows for annoying headlight glare from vehicles behind you. Automatic Dimming Mirror - If Equipped If the switch is on the view through the rear window. Annoying... headlight glare can turn the feature on or off by moving the small control under the mirror to the night position (toward windshield). 90 UNDERSTANDING...
... REARVIEW MIRROR You can be adjusted while set in the day position (toward rear of the mirror. A two point pivot system allows for annoying headlight glare from vehicles behind you. Automatic Dimming Mirror - If Equipped If the switch is on the view through the rear window. Annoying... headlight glare can turn the feature on or off by moving the small control under the mirror to the night position (toward windshield). 90 UNDERSTANDING...
Owner's Manual
Page 91
... during cleaning, never spray any cleaning solution directly onto the mirror. Driver's Side Outside Mirror Auto Dimmer - If Equipped This mirror automatically adjusts for annoying headlight glare from vehicles behind you. UNDERSTANDING THE FEATURES OF YOUR VEHICLE 91 CAUTION!
... during cleaning, never spray any cleaning solution directly onto the mirror. Driver's Side Outside Mirror Auto Dimmer - If Equipped This mirror automatically adjusts for annoying headlight glare from vehicles behind you. UNDERSTANDING THE FEATURES OF YOUR VEHICLE 91 CAUTION!
Owner's Manual
Page 143
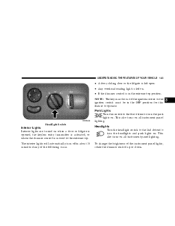
This also turns on all instrument panel lighting. Headlights Turn the headlight switch to the 2nd detent to the extreme top. This also turns on all instrument panel lighting. NOTE: The key must be out of the ... the liftgate is left open. • Any overhead reading light is left on. • If the dimmer control is moved to turn the headlights and park lights on . Headlight Switch 3 Interior Lights Interior lights are turned on when a door or liftgate is opened, the keyless entry transmitter is activated, or when the...
This also turns on all instrument panel lighting. Headlights Turn the headlight switch to the 2nd detent to the extreme top. This also turns on all instrument panel lighting. NOTE: The key must be out of the ... the liftgate is left open. • Any overhead reading light is left on. • If the dimmer control is moved to turn the headlights and park lights on . Headlight Switch 3 Interior Lights Interior lights are turned on when a door or liftgate is opened, the keyless entry transmitter is activated, or when the...
Owner's Manual
Page 144
...) to turn on when the dimmer control is in this position. This feature brightens the odometer, radio and overhead displays when the park lights or headlights are on the instrument panel upward will remain off when the doors or liftgate are open. The interior lights will increase the brightness of the... instrument panel lights. 144 UNDERSTANDING THE FEATURES OF YOUR VEHICLE Dimmer Control With the park lights or headlights on, rotating the dimmer control for the interior lights on .
...) to turn on when the dimmer control is in this position. This feature brightens the odometer, radio and overhead displays when the park lights or headlights are on the instrument panel upward will remain off when the doors or liftgate are open. The interior lights will increase the brightness of the... instrument panel lights. 144 UNDERSTANDING THE FEATURES OF YOUR VEHICLE Dimmer Control With the park lights or headlights on, rotating the dimmer control for the interior lights on .
Owner's Manual
Page 145
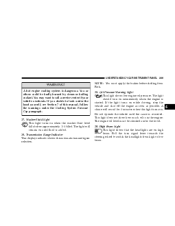
... must be used for extended periods of the ignition switch being in the LOCK position and the headlight switch in the LOCK position. To turn the system ON, turn the headlight switch to 90 seconds after the ignition switch is turned off . After 3 minutes of time when the ignition switch ...is also ON. Battery Protection This feature provides battery protection to the OFF position. When the system is ON, the Headlight Time Delay feature is in any position other than 3 Lights-on , or if the dimmer control is in the Automatic mode. To turn the...
... must be used for extended periods of the ignition switch being in the LOCK position and the headlight switch in the LOCK position. To turn the system ON, turn the headlight switch to 90 seconds after the ignition switch is turned off . After 3 minutes of time when the ignition switch ...is also ON. Battery Protection This feature provides battery protection to the OFF position. When the system is ON, the Headlight Time Delay feature is in any position other than 3 Lights-on , or if the dimmer control is in the Automatic mode. To turn the...
Owner's Manual
Page 146
... Information Center (EVIC) "Customer Programmable Features" for 30, 60, or 90 seconds, or not remain on. The 90 second delay interval begins when headlight switch is turned to have the headlamps remain on for more information. The driver can choose, when exiting the vehicle, to any other position other... than LOCK during the 3 minute delay. The battery protection feature will be turned off in the headlight switch shows that the front fog lights are turned back on or the ignition switch is turned on, the delay will be cancelled. Then turn...
... Information Center (EVIC) "Customer Programmable Features" for 30, 60, or 90 seconds, or not remain on. The 90 second delay interval begins when headlight switch is turned to have the headlamps remain on for more information. The driver can choose, when exiting the vehicle, to any other position other... than LOCK during the 3 minute delay. The battery protection feature will be turned off in the headlight switch shows that the front fog lights are turned back on or the ignition switch is turned on, the delay will be cancelled. Then turn...

Owner's Manual
Page 148
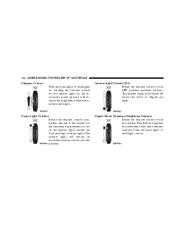
...use the washer, press the end of the multifunction lever in when spray is released. Passing Light You can signal another vehicle with your headlights by a switch in the delay range, the Windshield Wipers and Washers The wipers and washers are operated by lightly pulling the multifunction lever... toward the steering wheel to switch the headlights between HIGH and LOW beam. NOTE: Always remove any build-up of 20 seconds or until the lever is desired, the washers will...
...use the washer, press the end of the multifunction lever in when spray is released. Passing Light You can signal another vehicle with your headlights by a switch in the delay range, the Windshield Wipers and Washers The wipers and washers are operated by lightly pulling the multifunction lever... toward the steering wheel to switch the headlights between HIGH and LOW beam. NOTE: Always remove any build-up of 20 seconds or until the lever is desired, the washers will...
Owner's Manual
Page 158
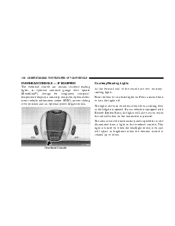
... liftgate is pressed. The area around the instrument panel cupholders is also illuminated from a light in brightness when the dimmer control is on when the headlight switch is rotated up or down. This light is turned on and will also turn the lights off. Overhead Console Courtesy/Reading Lights At the...
... liftgate is pressed. The area around the instrument panel cupholders is also illuminated from a light in brightness when the dimmer control is on when the headlight switch is rotated up or down. This light is turned on and will also turn the lights off. Overhead Console Courtesy/Reading Lights At the...
Owner's Manual
Page 167
...; Pressing the "STEP" button when in this display will select "Yes" or "No." Power Accessory Delay When this feature is selected and the headlight switch has been moved to 45 seconds for ease of a button. The display will be supplied for up to have the headlamps remain on the... internet at the push of viewing. For additional information on HomeLink , call 1-800- 355-3515, or on for 10 seconds, the headlights will turn ON. GARAGE DOOR OPENER - IF EQUIPPED The HomeLink Universal Transceiver replaces up to the "AUTO" position, the engine is running and, the ...
...; Pressing the "STEP" button when in this display will select "Yes" or "No." Power Accessory Delay When this feature is selected and the headlight switch has been moved to 45 seconds for ease of a button. The display will be supplied for up to have the headlamps remain on the... internet at the push of viewing. For additional information on HomeLink , call 1-800- 355-3515, or on for 10 seconds, the headlights will turn ON. GARAGE DOOR OPENER - IF EQUIPPED The HomeLink Universal Transceiver replaces up to the "AUTO" position, the engine is running and, the ...
Owner's Manual
Page 209
... light turns on until the cause is corrected. Do not operate the vehicle until fluid is started. High Beam Light This light shows that the headlights are on while driving, stop the vehicle and shut off the engine as soon as possible. You may want to switch the... headlights from Park. 19. The engine oil level must apply the brakes before shifting from high or low beam. 4 A hot engine cooling system is in the ...
... light turns on until the cause is corrected. Do not operate the vehicle until fluid is started. High Beam Light This light shows that the headlights are on while driving, stop the vehicle and shut off the engine as soon as possible. You may want to switch the... headlights from Park. 19. The engine oil level must apply the brakes before shifting from high or low beam. 4 A hot engine cooling system is in the ...

Owner's Manual
Page 394
...; Cleaning The Instrument Panel And Underseat Cup Holders ...432 Integrated Power Module (IPM) ...434 Vehicle Storage ...436 Replacement Light Bulbs ...437 Bulb Replacement ...438 ▫ Headlights ...438 ▫ Front Park/Turn Signal And Sidemarker Lights ...439 ▫ Front Fog Light ...440
...; Cleaning The Instrument Panel And Underseat Cup Holders ...432 Integrated Power Module (IPM) ...434 Vehicle Storage ...436 Replacement Light Bulbs ...437 Bulb Replacement ...438 ▫ Headlights ...438 ▫ Front Park/Turn Signal And Sidemarker Lights ...439 ▫ Front Fog Light ...440

Owner's Manual
Page 434
... Amp Pink Central Amplifier F22 30 Amp Pink Seats F27 40 Amp Green Radiator Fan F28 40 Amp Green Power Windows F30 40 Amp Green Headlight Washers (Export Only) F31 40 Amp Green Power Sliding Door F32 40 Amp Green Power Liftgate
... Amp Pink Central Amplifier F22 30 Amp Pink Seats F27 40 Amp Green Radiator Fan F28 40 Amp Green Power Windows F30 40 Amp Green Headlight Washers (Export Only) F31 40 Amp Green Power Sliding Door F32 40 Amp Green Power Liftgate

Owner's Manual
Page 437
..., Tail, Stop, Turn Signal, & Sidemarker ...3057 Center High-Mounted Stop Light ...921 Fog Light - If Equipped ...9145 Front Side marker, Park/Turn Signal ...3457AK Headlight ...9007 Headlight (Long Wheel Base) ...H13 License ...168 7 MAINTAINING YOUR VEHICLE 437 air conditioning system at idle for replacement instructions. REPLACEMENT LIGHT BULBS LIGHT BULBS - Interior Bulb...
..., Tail, Stop, Turn Signal, & Sidemarker ...3057 Center High-Mounted Stop Light ...921 Fog Light - If Equipped ...9145 Front Side marker, Park/Turn Signal ...3457AK Headlight ...9007 Headlight (Long Wheel Base) ...H13 License ...168 7 MAINTAINING YOUR VEHICLE 437 air conditioning system at idle for replacement instructions. REPLACEMENT LIGHT BULBS LIGHT BULBS - Interior Bulb...
Owner's Manual
Page 438
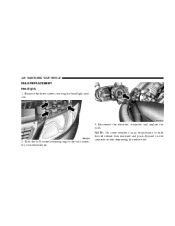
438 MAINTAINING YOUR VEHICLE BULB REPLACEMENT Headlights 1. Turn the bulb socket retaining ring or the bulb assembly counterclockwise. NOTE: On some vehicles it may be necessary to slide the red release lock rearward and push forward on the connector while depressing the release tab. 2. Remove the three screws securing the headlight module. 3. Disconnect the electrical connector and replace the bulb.
438 MAINTAINING YOUR VEHICLE BULB REPLACEMENT Headlights 1. Turn the bulb socket retaining ring or the bulb assembly counterclockwise. NOTE: On some vehicles it may be necessary to slide the red release lock rearward and push forward on the connector while depressing the release tab. 2. Remove the three screws securing the headlight module. 3. Disconnect the electrical connector and replace the bulb.
Owner's Manual
Page 439
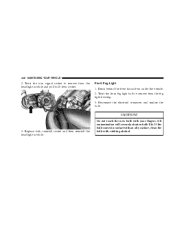
Do not touch the new bulb with rubbing alcohol. Front Park/Turn Signal and Sidemarker Lights 1. Remove the three screws securing the headlight module. 7 Oil contamination will severely shorten bulb life. If the bulb comes in contact with an oily surface, clean the bulb with your fingers. MAINTAINING YOUR VEHICLE 439 CAUTION!
Do not touch the new bulb with rubbing alcohol. Front Park/Turn Signal and Sidemarker Lights 1. Remove the three screws securing the headlight module. 7 Oil contamination will severely shorten bulb life. If the bulb comes in contact with an oily surface, clean the bulb with your fingers. MAINTAINING YOUR VEHICLE 439 CAUTION!
Owner's Manual
Page 440
Front Fog Light 1. Disconnect the electrical connector and replace the bulb. CAUTION! Replace bulb, reinstall socket and then reinstall the headlight module. Reach behind the front fascia from the fog light housing. 3. Oil contamination will severely shorten bulb life. If the bulb comes in contact... with an oily surface, clean the bulb with your fingers. Twist the front fog light bulb to remove from the headlight module and pull bulb from socket. Do not touch the new bulb with rubbing alcohol. 3. Twist the turn signal socket to remove from under...
Front Fog Light 1. Disconnect the electrical connector and replace the bulb. CAUTION! Replace bulb, reinstall socket and then reinstall the headlight module. Reach behind the front fascia from the fog light housing. 3. Oil contamination will severely shorten bulb life. If the bulb comes in contact... with an oily surface, clean the bulb with your fingers. Twist the front fog light bulb to remove from the headlight module and pull bulb from socket. Do not touch the new bulb with rubbing alcohol. 3. Twist the turn signal socket to remove from under...


