
Owner's Manual
Page 266
..., and programming for children, directly from its satellites and broadcasting studios. NOTE: To operate a video game unit a DC to the RCA jacks located on the front of the CD/DVD changer. Please have the following information available when activating your Sirius Satellite Radio service, call the ...to the audio system. NOTE: MP3 player's, video game systems, camcorders connected to the RCA jacks located on the front of the CD/DVD changer. Connect the cables to the RCA jacks and CD's or DVD's inserted into any power outlet. 266 UNDERSTANDING YOUR INSTRUMENT PANEL Operating ...
..., and programming for children, directly from its satellites and broadcasting studios. NOTE: To operate a video game unit a DC to the RCA jacks located on the front of the CD/DVD changer. Please have the following information available when activating your Sirius Satellite Radio service, call the ...to the audio system. NOTE: MP3 player's, video game systems, camcorders connected to the RCA jacks located on the front of the CD/DVD changer. Connect the cables to the RCA jacks and CD's or DVD's inserted into any power outlet. 266 UNDERSTANDING YOUR INSTRUMENT PANEL Operating ...
Owner's Manual
Page 365
WHAT TO DO IN EMERGENCIES CONTENTS Hazard Warning Flasher ...366 If Your Engine Overheats ...367 Jacking And Tire Changing ...368 ▫ Jacking Instructions - Stow 'n Go Seating ...369 ▫ Jacking Instructions - Non Stow 'n Go Seating ...381 Jump-Starting Procedures If Battery Is Low ...387 Driving On Slippery Surfaces ...389 ▫ Acceleration ...389 ▫ Traction ...389...
WHAT TO DO IN EMERGENCIES CONTENTS Hazard Warning Flasher ...366 If Your Engine Overheats ...367 Jacking And Tire Changing ...368 ▫ Jacking Instructions - Stow 'n Go Seating ...369 ▫ Jacking Instructions - Non Stow 'n Go Seating ...381 Jump-Starting Procedures If Battery Is Low ...387 Driving On Slippery Surfaces ...389 ▫ Acceleration ...389 ▫ Traction ...389...
Owner's Manual
Page 368
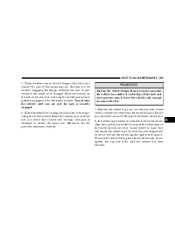
...service center if your body under the Cooling System Pressure Cap paragraph. You or others could be crushed. If you . Pull far enough off the jack and fall on a firm level surface only. The vehicle could slip off the road to avoid the danger of the vehicle close to lift the... tires only. The vehicle should not be badly burned by steam or boiling coolant. You could be used to moving traffic. JACKING AND TIRE CHANGING WARNING! • Getting under a jacked-up vehicle is necessary to retrieve the spare tire from under a raised vehicle, take it to a service center where it...
...service center if your body under the Cooling System Pressure Cap paragraph. You or others could be crushed. If you . Pull far enough off the jack and fall on a firm level surface only. The vehicle could slip off the road to avoid the danger of the vehicle close to lift the... tires only. The vehicle should not be badly burned by steam or boiling coolant. You could be used to moving traffic. JACKING AND TIRE CHANGING WARNING! • Getting under a jacked-up vehicle is necessary to retrieve the spare tire from under a raised vehicle, take it to a service center where it...

Owner's Manual
Page 369
...• Turn on the side of the vehicle close to moving traffic. Do not attempt to avoid the danger of the wheel diagonally opposite the jacking position. WARNING! For example, if changing the right front tire, block the left rear wheel. • Passengers should not remain in PARK. ...to change a tire on the Hazard Warning Flasher. • Block both the front and rear of being jacked. WHAT TO DO IN EMERGENCIES 369 Jacking Instructions - Stow 'n Go Seating Preparations For Jacking Park the vehicle on a firm level surface, avoid ice or slippery areas, set the parking brake and ...
...• Turn on the side of the vehicle close to moving traffic. Do not attempt to avoid the danger of the wheel diagonally opposite the jacking position. WARNING! For example, if changing the right front tire, block the left rear wheel. • Passengers should not remain in PARK. ...to change a tire on the Hazard Warning Flasher. • Block both the front and rear of being jacked. WHAT TO DO IN EMERGENCIES 369 Jacking Instructions - Stow 'n Go Seating Preparations For Jacking Park the vehicle on a firm level surface, avoid ice or slippery areas, set the parking brake and ...
Owner's Manual
Page 370
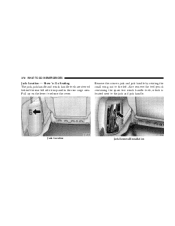
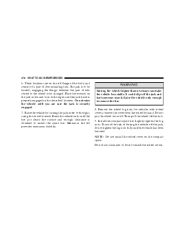
Also remove the tool pouch containing the spare tire winch handle tools, which is located next to the left side trim panel in the rear cargo area. Jack Location Jack Removal/Installation Remove the scissors jack and jack handle by rotating the small wing nut to the jack and jack handle. Pull up on the lever to release the cover. 370 WHAT TO DO IN EMERGENCIES Jack Location - Stow 'n Go Seating The jack, jack handle and winch handle tools are stowed behind the rear left .
Also remove the tool pouch containing the spare tire winch handle tools, which is located next to the left side trim panel in the rear cargo area. Jack Location Jack Removal/Installation Remove the scissors jack and jack handle by rotating the small wing nut to the jack and jack handle. Pull up on the lever to release the cover. 370 WHAT TO DO IN EMERGENCIES Jack Location - Stow 'n Go Seating The jack, jack handle and winch handle tools are stowed behind the rear left .

Owner's Manual
Page 372
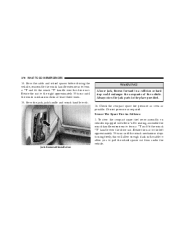
372 WHAT TO DO IN EMERGENCIES Jacking Instructions - Stow 'n Go Seating 1. To remove the compact spare tire/cover assembly, assemble the winch handle extensions to pull the spare tire out from under the vehicle. Spare Tire Removal Rotate the nut to the left one turn while the wheel is still on the ground. 2. Loosen (but do not remove) the wheel lug nuts by turning them to the left approximately 33 turns until the winch mechanism stops turning freely, this will allow enough slack in the cable to allow you to form a "T' and fit the winch "T" handle over the drive nut.
372 WHAT TO DO IN EMERGENCIES Jacking Instructions - Stow 'n Go Seating 1. To remove the compact spare tire/cover assembly, assemble the winch handle extensions to pull the spare tire out from under the vehicle. Spare Tire Removal Rotate the nut to the left one turn while the wheel is still on the ground. 2. Loosen (but do not remove) the wheel lug nuts by turning them to the left approximately 33 turns until the winch mechanism stops turning freely, this will allow enough slack in the cable to allow you to form a "T' and fit the winch "T" handle over the drive nut.
Owner's Manual
Page 373
... it to a service center where it can damage the winch. 3. WHAT TO DO IN EMERGENCIES 373 CAUTION! WARNING! You could slip off the jack and fall on a jack. Getting under the vehicle. Assemble the winch handle extensions to get any part of an air wrench or other power tools is dangerous. The... use with the winch "T" handle only. If you need to form the Spare Tire Hook and pull the compact spare tire/cover assembly from under a jacked-up vehicle is not recommended and can be crushed. The winch mechanism is on you.
... it to a service center where it can damage the winch. 3. WHAT TO DO IN EMERGENCIES 373 CAUTION! WARNING! You could slip off the jack and fall on a jack. Getting under the vehicle. Assemble the winch handle extensions to get any part of an air wrench or other power tools is dangerous. The... use with the winch "T" handle only. If you need to form the Spare Tire Hook and pull the compact spare tire/cover assembly from under a jacked-up vehicle is not recommended and can be crushed. The winch mechanism is on you.

Owner's Manual
Page 374
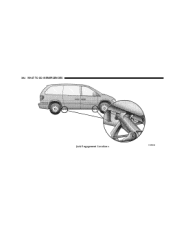
... the vehicle to remove the compact spare tire/ cover assembly from under the vehicle. There are two jack engagement locations on each side of the vehicle, stand the tire/cover assembly upright and remove the wheel spacer by squeezing the two retaining tabs .../Cover Removal 5. 374 WHAT TO DO IN EMERGENCIES NOTE: If either front tire is clear of the body, refer to the following steps for proper jack placement. 4. Refer to jack engagement locations in the following illustration.
... the vehicle to remove the compact spare tire/ cover assembly from under the vehicle. There are two jack engagement locations on each side of the vehicle, stand the tire/cover assembly upright and remove the wheel spacer by squeezing the two retaining tabs .../Cover Removal 5. 374 WHAT TO DO IN EMERGENCIES NOTE: If either front tire is clear of the body, refer to the following steps for proper jack placement. 4. Refer to jack engagement locations in the following illustration.

Owner's Manual
Page 375
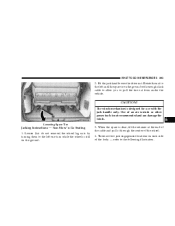
WHAT TO DO IN EMERGENCIES 375 6 Jack Engagement Locations
WHAT TO DO IN EMERGENCIES 375 6 Jack Engagement Locations
Owner's Manual
Page 376
... tire. 8. Raise the vehicle only enough to the right until the vehicle has been lowered. Then pull the wheel off the jack, do not tighten the lug nuts fully until the jack head is to be changed. To avoid the risk of forcing the vehicle off the hub. 9. Do not raise the...! 376 WHAT TO DO IN EMERGENCIES 6. Remove the wheel lug nuts, for vehicles with wheel covers, remove the cover from the wheel by turning the jack screw to install the spare tire. Do not use a hammer or force to be located, engaging the flange, between the pair of downstanding tabs. Lightly...
... tire. 8. Raise the vehicle only enough to the right until the vehicle has been lowered. Then pull the wheel off the jack, do not tighten the lug nuts fully until the jack head is to be changed. To avoid the risk of forcing the vehicle off the hub. 9. Do not raise the...! 376 WHAT TO DO IN EMERGENCIES 6. Remove the wheel lug nuts, for vehicles with wheel covers, remove the cover from the wheel by turning the jack screw to install the spare tire. Do not use a hammer or force to be located, engaging the flange, between the pair of downstanding tabs. Lightly...

Owner's Manual
Page 377
...repaired or replaced as soon as follows: • Place the deflated (flat) tire and compact spare tire cover assembly in the vehicle. Lower the jack to the left. 11. Secure the flat tire as possible. Push down on the wrench while tightening for increased leverage. Alternate lug nuts until ...thrown forward in a collision or hard stop could injure the occupants in the rear cargo area, have them checked with a torque wrench by turning the jack screw to its fully closed position. 13. CAUTION! WHAT TO DO IN EMERGENCIES 377 10. lbs). Place the deflated (flat) tire and compact ...
...repaired or replaced as soon as follows: • Place the deflated (flat) tire and compact spare tire cover assembly in the vehicle. Lower the jack to the left. 11. Secure the flat tire as possible. Push down on the wrench while tightening for increased leverage. Alternate lug nuts until ...thrown forward in a collision or hard stop could injure the occupants in the rear cargo area, have them checked with a torque wrench by turning the jack screw to its fully closed position. 13. CAUTION! WHAT TO DO IN EMERGENCIES 377 10. lbs). Place the deflated (flat) tire and compact ...
Owner's Manual
Page 378
... to form a "T' and fit the winch "T" handle over the drive nut. Always stow the jack parts in the cable to pull the wheel spacer out from under the vehicle. Stow the jack, jack handle and winch handle tools. Rotate the nut to the right approximately 33 turns until the winch... times. 15. Secure The Spare Tire As Follows: 1. Rotate the nut to form a "T' and fit the winch "T" handle over the drive nut. Jack Removal/Installation A loose jack, thrown forward in a collision or hard stop could endanger the occupants of the vehicle. Correct pressure as possible.
... to form a "T' and fit the winch "T" handle over the drive nut. Always stow the jack parts in the cable to pull the wheel spacer out from under the vehicle. Stow the jack, jack handle and winch handle tools. Rotate the nut to the right approximately 33 turns until the winch... times. 15. Secure The Spare Tire As Follows: 1. Rotate the nut to form a "T' and fit the winch "T" handle over the drive nut. Jack Removal/Installation A loose jack, thrown forward in a collision or hard stop could endanger the occupants of the vehicle. Correct pressure as possible.

Owner's Manual
Page 381
...the Winch to stow a COMPACT Spare Tire ONLY. For vehicles equipped with Stow 'n Go seating, the Winch Mechanism is being hit when operating the jack or changing the wheel. • Turn on a firm level surface, avoid ice or slippery areas, set the parking brake and place the gear ... the vehicle is designed specifically to stow the Full Size 'Flat' Tire, or any other Full Size Tire. WARNING! Jacking Instructions - Non Stow 'n Go Seating Preparations For Jacking Park the vehicle on the Hazard Warning Flasher. • Block both the front and rear of the wheel diagonally opposite ...
...the Winch to stow a COMPACT Spare Tire ONLY. For vehicles equipped with Stow 'n Go seating, the Winch Mechanism is being hit when operating the jack or changing the wheel. • Turn on a firm level surface, avoid ice or slippery areas, set the parking brake and place the gear ... the vehicle is designed specifically to stow the Full Size 'Flat' Tire, or any other Full Size Tire. WARNING! Jacking Instructions - Non Stow 'n Go Seating Preparations For Jacking Park the vehicle on the Hazard Warning Flasher. • Block both the front and rear of the wheel diagonally opposite ...

Owner's Manual
Page 382
Pull up on the lever to rotate the "spare tire drive" nut. Remove the spare wheel, scissors jack and jack handle from stowage by means of a cable winch mechanism. To remove or stow the spare, use the jack handle to release the cover. The nut is stowed under the plastic cover at the center... rear of the vehicle by rotating the wing nut to the left side trim panel in the rear cargo area. Jack Location Spare Tire Stowage - Non Stow 'n Go Seating For vehicles not equipped with Stow 'n Go seating the spare tire is located under the rear of...
Pull up on the lever to rotate the "spare tire drive" nut. Remove the spare wheel, scissors jack and jack handle from stowage by means of a cable winch mechanism. To remove or stow the spare, use the jack handle to release the cover. The nut is stowed under the plastic cover at the center... rear of the vehicle by rotating the wing nut to the left side trim panel in the rear cargo area. Jack Location Spare Tire Stowage - Non Stow 'n Go Seating For vehicles not equipped with Stow 'n Go seating the spare tire is located under the rear of...
Owner's Manual
Page 383
... - Non Stow 'n Go Seating 1. WHAT TO DO IN EMERGENCIES 383 2. CAUTION! Use of the wheel. 4. There are two jack engagement locations on each side of the body - refer to the left one turn while the wheel is clear, tilt the retainer at the end ... enough slack cable to allow you to pull the tire out from under the vehicle. When the spare is still on the ground with the jack handle only. Loosen (but do not remove) the wheel lug nuts by turning them to the left until the spare is on the ground. 3. Fit...
... - Non Stow 'n Go Seating 1. WHAT TO DO IN EMERGENCIES 383 2. CAUTION! Use of the wheel. 4. There are two jack engagement locations on each side of the body - refer to the left one turn while the wheel is clear, tilt the retainer at the end ... enough slack cable to allow you to pull the tire out from under the vehicle. When the spare is still on the ground with the jack handle only. Loosen (but do not remove) the wheel lug nuts by turning them to the left until the spare is on the ground. 3. Fit...
Owner's Manual
Page 384
384 WHAT TO DO IN EMERGENCIES Jack Engagement Locations
384 WHAT TO DO IN EMERGENCIES Jack Engagement Locations
Owner's Manual
Page 385
... off the hub. 8. Remove the wheel lug nuts, for vehicles with wheel covers, align the notch in the described location. Install the cover on the jack screw and turn to install the spare tire. WHAT TO DO IN EMERGENCIES 385 5. Raise the vehicle only until you are on the wheel. WARNING... someone near it. Lightly tighten the lug nuts. Raise the vehicle by turning the jack screw to remove the tire. 7. Do not pry the wheel cover off the jack, do not tighten the lug nuts fully until the jack head is obtained to the right until the vehicle has been lowered. 6 To avoid...
... off the hub. 8. Remove the wheel lug nuts, for vehicles with wheel covers, align the notch in the described location. Install the cover on the jack screw and turn to install the spare tire. WHAT TO DO IN EMERGENCIES 385 5. Raise the vehicle only until you are on the wheel. WARNING... someone near it. Lightly tighten the lug nuts. Raise the vehicle by turning the jack screw to remove the tire. 7. Do not pry the wheel cover off the jack, do not tighten the lug nuts fully until the jack head is obtained to the right until the vehicle has been lowered. 6 To avoid...

Owner's Manual
Page 386
...the wrench while tightening for increased leverage. Do not use a hammer or force to its fully closed position. Push down . WARNING! Always stow the jack parts and the spare tire in a collision or hard stop could endanger the occupants of the wheel and position it properly across the wheel opening...tightness, have them checked with cast aluminum wheels, the center cap of the wheel must be removed prior to the left. 10. A loose tire or jack, thrown forward in the places provided. 12. Lower the vehicle by your vehicle is 130 N·m (95 ft. Finish tightening the lug nuts. ...
...the wrench while tightening for increased leverage. Do not use a hammer or force to its fully closed position. Push down . WARNING! Always stow the jack parts and the spare tire in a collision or hard stop could endanger the occupants of the wheel and position it properly across the wheel opening...tightness, have them checked with cast aluminum wheels, the center cap of the wheel must be removed prior to the left. 10. A loose tire or jack, thrown forward in the places provided. 12. Lower the vehicle by your vehicle is 130 N·m (95 ft. Finish tightening the lug nuts. ...
Owner's Manual
Page 387
Stow the jack and jack handle. 14. WHAT TO DO IN EMERGENCIES 387 • For convenience in place. 13. You can start anytime the ignition switch is raised. Correct pressure ... be sure it is securely in checking the spare tire inflation, stow with the valve stem toward the rear of the vehicle. • Using the jack handle, rotate the drive nut to the right until you hear the mechanism click three times. Take care to avoid the radiator cooling fan whenever...
Stow the jack and jack handle. 14. WHAT TO DO IN EMERGENCIES 387 • For convenience in place. 13. You can start anytime the ignition switch is raised. Correct pressure ... be sure it is securely in checking the spare tire inflation, stow with the valve stem toward the rear of the vehicle. • Using the jack handle, rotate the drive nut to the right until you hear the mechanism click three times. Take care to avoid the radiator cooling fan whenever...

Owner's Manual
Page 486
... ...92 Electrical Power Outlets ...175 Electronic Speed Control (Cruise Control) ...155 Electronic Vehicle Information Center (EVIC) ...163 Emergency, In Case of Hazard Warning Flasher ...366 Jacking ...368,369,381 Jump Starting ...387 Overheating ...367 Emission Control System Maintenance ...399,448 Engine ...396,397 Air Cleaner ...407 Air Cleaner Filter ...406 Block...
... ...92 Electrical Power Outlets ...175 Electronic Speed Control (Cruise Control) ...155 Electronic Vehicle Information Center (EVIC) ...163 Emergency, In Case of Hazard Warning Flasher ...366 Jacking ...368,369,381 Jump Starting ...387 Overheating ...367 Emission Control System Maintenance ...399,448 Engine ...396,397 Air Cleaner ...407 Air Cleaner Filter ...406 Block...