Owner's Manual
Page 86
... ▫ Rear Seat Descriptions ...137 ▫ Rear Bench Seating Flexibility ...138 ▫ Rear Quad And 50/50 Seating Flexibility ...139 To Open And Close The Hood ...141 Lights ...142 ▫ Interior Lights ...143 ▫ Park Lights ...143 ▫ Headlights ...143
... ▫ Rear Seat Descriptions ...137 ▫ Rear Bench Seating Flexibility ...138 ▫ Rear Quad And 50/50 Seating Flexibility ...139 To Open And Close The Hood ...141 Lights ...142 ▫ Interior Lights ...143 ▫ Park Lights ...143 ▫ Headlights ...143

Owner's Manual
Page 141
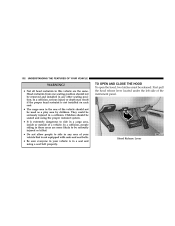
...proper restraint system. • It is in a seat and using a seat belt properly. First pull the hood release lever located under the left side of the instrument panel. 3 Hood Release Lever Head restraints from one seating position should not be used as a play area by children. They ...could be released. In a collision, people riding in these areas are the same. TO OPEN AND CLOSE THE HOOD To open the hood, two latches must be seriously injured in a collision. UNDERSTANDING THE FEATURES OF YOUR VEHICLE 141 WARNING! • Not all head restraints in...
...proper restraint system. • It is in a seat and using a seat belt properly. First pull the hood release lever located under the left side of the instrument panel. 3 Hood Release Lever Head restraints from one seating position should not be used as a play area by children. They ...could be released. In a collision, people riding in these areas are the same. TO OPEN AND CLOSE THE HOOD To open the hood, two latches must be seriously injured in a collision. UNDERSTANDING THE FEATURES OF YOUR VEHICLE 141 WARNING! • Not all head restraints in...

Owner's Manual
Page 142
... by switches to close it . This should secure both latches engaged. If the hood is not fully latched, it is fully closed, with both latches. WARNING! To prevent possible damage, do not slam the hood to the left the safety catch located under the front edge of the lights, ...except the hazard warning lights, are fully latched before driving. LIGHTS All of the hood, near the center. cm (12 inches) and then drop it . Never drive your forward vision. 142 UNDERSTANDING THE FEATURES OF YOUR VEHICLE Next,...
... by switches to close it . This should secure both latches engaged. If the hood is not fully latched, it is fully closed, with both latches. WARNING! To prevent possible damage, do not slam the hood to the left the safety catch located under the front edge of the lights, ...except the hazard warning lights, are fully latched before driving. LIGHTS All of the hood, near the center. cm (12 inches) and then drop it . Never drive your forward vision. 142 UNDERSTANDING THE FEATURES OF YOUR VEHICLE Next,...
Owner's Manual
Page 209
...center if your vehicle overheats. If the light turns on when the washer fluid level falls below approximately 1/4 filled. Follow the warnings under the hood yourself, see Section 7 of this light turns on momentarily when the engine is dangerous. Transmission Range Indicator This display indicator shows the automatic ... 18. Oil Pressure Warning Light This light shows low engine oil pressure. Pull the turn on . You or others could be checked under the hood. 20. A chime will remain on high beam. The light will sound for 4 minutes when this manual. You may want to switch the ...
...center if your vehicle overheats. If the light turns on when the washer fluid level falls below approximately 1/4 filled. Follow the warnings under the hood yourself, see Section 7 of this light turns on momentarily when the engine is dangerous. Transmission Range Indicator This display indicator shows the automatic ... 18. Oil Pressure Warning Light This light shows low engine oil pressure. Pull the turn on . You or others could be checked under the hood. 20. A chime will remain on high beam. The light will sound for 4 minutes when this manual. You may want to switch the ...

Owner's Manual
Page 309
The engine block heater cord is routed under the hood on the brake pedal. 5 WARNING! Remember to the 110-115 volt electrical cord could cause electrocution. Damage to the transmission may occur if the following ...
The engine block heater cord is routed under the hood on the brake pedal. 5 WARNING! Remember to the 110-115 volt electrical cord could cause electrocution. Damage to the transmission may occur if the following ...
Owner's Manual
Page 368
... your vehicle overheats. You could be jacked on a jack. The vehicle could slip off the road to call a service center if your body under the hood yourself, see Section 7, Maintenance, of this manual. The vehicle should not be crushed. A hot engine cooling system is designed to use as a tool for service...
... your vehicle overheats. You could be jacked on a jack. The vehicle could slip off the road to call a service center if your body under the hood yourself, see Section 7, Maintenance, of this manual. The vehicle should not be crushed. A hot engine cooling system is designed to use as a tool for service...
Owner's Manual
Page 387
Push against the underside of the vehicle. • Continue to avoid the radiator cooling fan whenever the hood is on. It can be hurt by the fan. 6 Check the tire pressure as soon as required. Correct pressure as possible. Stow the jack and ...
Push against the underside of the vehicle. • Continue to avoid the radiator cooling fan whenever the hood is on. It can be hurt by the fan. 6 Check the tire pressure as soon as required. Correct pressure as possible. Stow the jack and ...

Owner's Manual
Page 413
...Body Lubrication Locks and all body pivot points, including such items as seat tracks, doors, liftgate, sliding doors and hood hinges, should be given to hood latching components to water and dirt contamination of any lubricant, the parts concerned should be inspected for external leakage or ...damage when other underhood services, the hood latch, release mechanism and safety catch should be removed. Continued operation could result in failure of the universal joint due to insure ...
...Body Lubrication Locks and all body pivot points, including such items as seat tracks, doors, liftgate, sliding doors and hood hinges, should be given to hood latching components to water and dirt contamination of any lubricant, the parts concerned should be inspected for external leakage or ...damage when other underhood services, the hood latch, release mechanism and safety catch should be removed. Continued operation could result in failure of the universal joint due to insure ...
Owner's Manual
Page 416
If coolant is hot. Never try to open the hood until the radiator has had time to cool. Engine Coolant Checks Check the engine coolant (antifreeze) protection every 12 months (before the onset of the A/C ... System WARNING! • When working near the radiator cooling fan, disconnect the fan motor lead or turn the ignition switch to drain from under the hood, don't open a cooling system pressure cap when the radiator is dirty or rusty in the ON position. • You or others can start at the...
If coolant is hot. Never try to open the hood until the radiator has had time to cool. Engine Coolant Checks Check the engine coolant (antifreeze) protection every 12 months (before the onset of the A/C ... System WARNING! • When working near the radiator cooling fan, disconnect the fan motor lead or turn the ignition switch to drain from under the hood, don't open a cooling system pressure cap when the radiator is dirty or rusty in the ON position. • You or others can start at the...
Owner's Manual
Page 489
INDEX 489 Hitches Trailer Towing ...353 HomeLink (Garage Door Opener) Transmitter ...167 Hood Release ...141 Hook, Coat ...189 Hoses ...421,424 Ignition Key ...12 Illuminated Entry ...16 Immobilizer (Sentry Key) ...13 Indicator, Traction Control ...210 Infant Restraint ...70 ...
INDEX 489 Hitches Trailer Towing ...353 HomeLink (Garage Door Opener) Transmitter ...167 Hood Release ...141 Hook, Coat ...189 Hoses ...421,424 Ignition Key ...12 Illuminated Entry ...16 Immobilizer (Sentry Key) ...13 Indicator, Traction Control ...210 Infant Restraint ...70 ...
Owner's Manual
Page 490
490 INDEX Lap/Shoulder Belts ...43 LATCH (Lower Anchors and Tether for CHildren) . 74 Latches Hood ...141 Lead Free Gasoline ...342 Life of Tires ...335 Liftgate ...34 Lights ...84,142 Airbag ...59,68,84,206 Alarm ...208 Anti-Lock ...207 Automatic ...
490 INDEX Lap/Shoulder Belts ...43 LATCH (Lower Anchors and Tether for CHildren) . 74 Latches Hood ...141 Lead Free Gasoline ...342 Life of Tires ...335 Liftgate ...34 Lights ...84,142 Airbag ...59,68,84,206 Alarm ...208 Anti-Lock ...207 Automatic ...
Owner Manual
Page 88
...; Rear Seat Descriptions ...128 ▫ Rear Bench Seating Flexibility ...128 ▫ Rear Quad And 50/50 Seating Flexibility ...130 Ⅵ To Open And Close The Hood ...132 Ⅵ Lights ...134 ▫ Interior Lights ...134 ▫ Park Lights ...135 ▫ Headlights ...135 If Equipped ...108 ▫ Adjustable Head Restraints - If Equipped ...112...
...; Rear Seat Descriptions ...128 ▫ Rear Bench Seating Flexibility ...128 ▫ Rear Quad And 50/50 Seating Flexibility ...130 Ⅵ To Open And Close The Hood ...132 Ⅵ Lights ...134 ▫ Interior Lights ...134 ▫ Park Lights ...135 ▫ Headlights ...135 If Equipped ...108 ▫ Adjustable Head Restraints - If Equipped ...112...
Owner Manual
Page 132
... latches must be seriously injured in a collision. They could be released. Hood Release Lever In a collision, people riding in your vehicle is not installed on each seat. Head restraints from one seating position should not be seriously ... VEHICLE WARNING! • Not all head restraints in the rear of the vehicle should not be seated and using a seat belt properly. First pull the hood release lever located under the left side of the instrument panel. • The cargo area in this vehicle are more likely to ride in any...
... latches must be seriously injured in a collision. They could be released. Hood Release Lever In a collision, people riding in your vehicle is not installed on each seat. Head restraints from one seating position should not be seriously ... VEHICLE WARNING! • Not all head restraints in the rear of the vehicle should not be seated and using a seat belt properly. First pull the hood release lever located under the left side of the instrument panel. • The cargo area in this vehicle are more likely to ride in any...
Owner Manual
Page 133
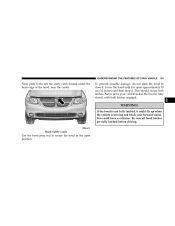
...should secure both latches engaged. 3 WARNING! If the hood is moving and block your vehicle unless the hood is open position. Be sure all hood latches are fully latched before driving. Lower the hood until it . Hood Safety Catch Use the hood prop rod to the left the safety catch located under... the front edge of the hood, near the center. UNDERSTANDING...
...should secure both latches engaged. 3 WARNING! If the hood is moving and block your vehicle unless the hood is open position. Be sure all hood latches are fully latched before driving. Lower the hood until it . Hood Safety Catch Use the hood prop rod to the left the safety catch located under... the front edge of the hood, near the center. UNDERSTANDING...
Owner Manual
Page 201
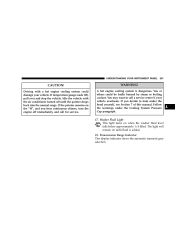
... "H", and you decide to call for service. You may want to look under the Cooling System Pressure Cap paragraph. 17. Follow the warnings under the hood yourself, see Section 7 of this manual. UNDERSTANDING YOUR INSTRUMENT PANEL 201 CAUTION! Driving with the air conditioner turned off immediately, and call a service center if...
... "H", and you decide to call for service. You may want to look under the Cooling System Pressure Cap paragraph. 17. Follow the warnings under the hood yourself, see Section 7 of this manual. UNDERSTANDING YOUR INSTRUMENT PANEL 201 CAUTION! Driving with the air conditioner turned off immediately, and call a service center if...
Owner Manual
Page 202
... the vehicle will drive normally and will sound for 4 minutes when this occurs. 202 UNDERSTANDING YOUR INSTRUMENT PANEL NOTE: You must be checked under the hood. 20. Do not operate the vehicle until the cause is in the ON position before shifting from high or low beam. 21. Pull the turn...
... the vehicle will drive normally and will sound for 4 minutes when this occurs. 202 UNDERSTANDING YOUR INSTRUMENT PANEL NOTE: You must be checked under the hood. 20. Do not operate the vehicle until the cause is in the ON position before shifting from high or low beam. 21. Pull the turn...

Owner Manual
Page 296
.... After Starting The idle speed will automatically decrease as the engine warms up to the floor. It has a removable cap that is routed under the hood on the driver side of the Integrated Power Module. 296 STARTING AND OPERATING CAUTION!
.... After Starting The idle speed will automatically decrease as the engine warms up to the floor. It has a removable cap that is routed under the hood on the driver side of the Integrated Power Module. 296 STARTING AND OPERATING CAUTION!
Owner Manual
Page 346
... changing tires only. Never get under a jacked-up vehicle is dangerous. 346 WHAT TO DO IN EMERGENCIES WARNING! If you . Follow the warnings under the hood yourself, see Section 7, Maintenance, of being hit. The vehicle should not be raised on a jack. JACKING AND TIRE CHANGING WARNING! • Getting under a raised vehicle...
... changing tires only. Never get under a jacked-up vehicle is dangerous. 346 WHAT TO DO IN EMERGENCIES WARNING! If you . Follow the warnings under the hood yourself, see Section 7, Maintenance, of being hit. The vehicle should not be raised on a jack. JACKING AND TIRE CHANGING WARNING! • Getting under a raised vehicle...

Owner Manual
Page 365
... the right until the wheel is drawn into place against the underside of the vehicle. • Continue to avoid the radiator cooling fan whenever the hood is on. Stow the jack and jack handle. 14. Correct pressure as possible. You can start anytime the ignition switch is raised. Check the tire...
... the right until the wheel is drawn into place against the underside of the vehicle. • Continue to avoid the radiator cooling fan whenever the hood is on. Stow the jack and jack handle. 14. Correct pressure as possible. You can start anytime the ignition switch is raised. Check the tire...

Owner Manual
Page 391
... is performed. Body Lubrication Locks and all body pivot points, including such items as seat tracks, doors, liftgate, sliding doors and hood hinges, should be lubricated periodically to assure quiet, easy operation and to water and dirt contamination of the grease. Drive Shaft Universal Joints... and grease should be removed. However, the joint boots should be inspected for external leakage or damage when other underhood services, the hood latch, release mechanism and safety catch should be cleaned and lubricated. 7 Continued operation could result in failure of any lubricant, the ...
... is performed. Body Lubrication Locks and all body pivot points, including such items as seat tracks, doors, liftgate, sliding doors and hood hinges, should be lubricated periodically to assure quiet, easy operation and to water and dirt contamination of the grease. Drive Shaft Universal Joints... and grease should be removed. However, the joint boots should be inspected for external leakage or damage when other underhood services, the hood latch, release mechanism and safety catch should be cleaned and lubricated. 7 Continued operation could result in failure of any lubricant, the ...
