Owner's Manual
Page 70
... cause should come on and remain on while driving, have deployed. Airbag Light The light should be located and corrected. Check for 6 to 8 seconds as a bulb check when the ignition switch is a problem with the airbag light the seatbelt light will flash. Inspect for positive closing, latching and locking. Door Latches...
... cause should come on and remain on while driving, have deployed. Airbag Light The light should be located and corrected. Check for 6 to 8 seconds as a bulb check when the ignition switch is a problem with the airbag light the seatbelt light will flash. Inspect for positive closing, latching and locking. Door Latches...
Owner's Manual
Page 101
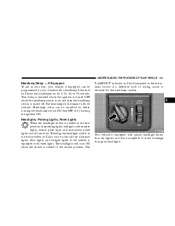
... switch is on for 60 seconds. UNDERSTANDING THE FEATURES OF YOUR VEHICLE 101 Headlamp Delay - If Equipped To aid in the instrument cluster if a defective bulb or wiring circuit is detected for the headlamp system. 3 Your vehicle is equipped with plastic headlight lenses that will turn on the cab top clearance...
... switch is on for 60 seconds. UNDERSTANDING THE FEATURES OF YOUR VEHICLE 101 Headlamp Delay - If Equipped To aid in the instrument cluster if a defective bulb or wiring circuit is detected for the headlamp system. 3 Your vehicle is equipped with plastic headlight lenses that will turn on the cab top clearance...
Owner's Manual
Page 103
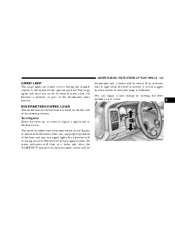
... the turn, and proper operation of the front and rear turn signal lights. If an indicator fails to the optional fully upward position. If a defective bulb or wiring circuit is located on the left -hand turn. UNDERSTANDING THE FEATURES OF YOUR VEHICLE 103 CARGO LIGHT The cargo lights are turned on...
... the turn, and proper operation of the front and rear turn signal lights. If an indicator fails to the optional fully upward position. If a defective bulb or wiring circuit is located on the left -hand turn. UNDERSTANDING THE FEATURES OF YOUR VEHICLE 103 CARGO LIGHT The cargo lights are turned on...
Owner's Manual
Page 143
... and remain on for 15 seconds, then blink for emissions testing the light will usually be drivable and not need for service as soon as a bulb check, until the vehicle is part of an onboard diagnostic system which monitors the emissions and engine control system. If the... bulb does not come on when the ignition is first turned on and remain on until the engine is flashing, severe catalytic converter damage and power ...
... and remain on for 15 seconds, then blink for emissions testing the light will usually be drivable and not need for service as soon as a bulb check, until the vehicle is part of an onboard diagnostic system which monitors the emissions and engine control system. If the... bulb does not come on when the ignition is first turned on and remain on until the engine is flashing, severe catalytic converter damage and power ...
Owner's Manual
Page 145
...hour and/or kilometers per hour. 9. A continuous high or low reading, under normal driving conditions, may indicate a lubrication system malfunction. After the bulb check or when driving, if the driver seat belt remains unbuckled, the Seat Belt Warning Light will stay illuminated until the open door is closed... automatically turns the light off. 4 When the ignition is OFF the Door Ajar light will illuminate when any door is running. During the bulb check, if the driver's seat belt is first turned ON, this light will sound. Seat Belt Reminder Light When the ignition switch is unbuckled...
...hour and/or kilometers per hour. 9. A continuous high or low reading, under normal driving conditions, may indicate a lubrication system malfunction. After the bulb check or when driving, if the driver seat belt remains unbuckled, the Seat Belt Warning Light will stay illuminated until the open door is closed... automatically turns the light off. 4 When the ignition is OFF the Door Ajar light will illuminate when any door is running. During the bulb check, if the driver's seat belt is first turned ON, this light will sound. Seat Belt Reminder Light When the ignition switch is unbuckled...

Owner's Manual
Page 146
... 3 minutes. If the needle rises to the "H" mark, stop the vehicle, shift into N (Neutral), and increase the engine idle speed for service as soon as a bulb check. If the light does not come on when the ignition is running . Electronic Throttle Control (ETC) Light 5.7L Engines Only This light informs you...
... 3 minutes. If the needle rises to the "H" mark, stop the vehicle, shift into N (Neutral), and increase the engine idle speed for service as soon as a bulb check. If the light does not come on when the ignition is running . Electronic Throttle Control (ETC) Light 5.7L Engines Only This light informs you...
Owner's Manual
Page 149
... or the engine is also an engine hour function. LAMP OUT Light The LAMP OUT indicator in the instrument cluster alerts the driver if a defective bulb or wiring circuit is required. 4 The odometer will change to trip value first, then it means that the 4WD system is not functioning properly and...
... or the engine is also an engine hour function. LAMP OUT Light The LAMP OUT indicator in the instrument cluster alerts the driver if a defective bulb or wiring circuit is required. 4 The odometer will change to trip value first, then it means that the 4WD system is not functioning properly and...

Owner's Manual
Page 275
.../ turn lamp, and ground. The maximum current capacity for the park lamp circuit should not exceed 15 amps total (a typical park lamp bulb can draw from 0.5 to 1.0 amperes of the brake pedal that is used for high current applications. This connector contains the following additional circuits:...With the optional Trailer Tow Prep package a 7-way connector is not designed for the electric brake. The 4-way is standard equipment on all Ram pickup models. NOTE: There is also a 4-way connector located under the instrument panel, located to the headlamp switch itself, because it is also...
.../ turn lamp, and ground. The maximum current capacity for the park lamp circuit should not exceed 15 amps total (a typical park lamp bulb can draw from 0.5 to 1.0 amperes of the brake pedal that is used for high current applications. This connector contains the following additional circuits:...With the optional Trailer Tow Prep package a 7-way connector is not designed for the electric brake. The 4-way is standard equipment on all Ram pickup models. NOTE: There is also a 4-way connector located under the instrument panel, located to the headlamp switch itself, because it is also...
Owner's Manual
Page 321
MAINTAINING YOUR VEHICLE 321 ▫ Appearance Care And Protection From Corrosion ...361 Fuse And Relay Center ...365 Vehicle Storage ...365 Replacement Light Bulbs ...366 Bulb Replacement ...366 ▫ Headlight (Halogen)/Front Park And Turn Lights ...366 ▫ Tail, Stop, Turn And Backup Lights ...370 ▫ Center High-Mounted Stoplight With ...
MAINTAINING YOUR VEHICLE 321 ▫ Appearance Care And Protection From Corrosion ...361 Fuse And Relay Center ...365 Vehicle Storage ...365 Replacement Light Bulbs ...366 Bulb Replacement ...366 ▫ Headlight (Halogen)/Front Park And Turn Lights ...366 ▫ Tail, Stop, Turn And Backup Lights ...370 ▫ Center High-Mounted Stoplight With ...
Owner's Manual
Page 325
... determined not ready for testing. To check if your vehicle's OBD system is ready, you will be ready. Approximately 15 seconds later, one of a normal bulb check. 5.
... determined not ready for testing. To check if your vehicle's OBD system is ready, you will be ready. Approximately 15 seconds later, one of a normal bulb check. 5.
Owner's Manual
Page 366
Remove the expanding fastener from the headlight welt. This is a halogen bulb. Overhead Console Lights ...TS 212-2 Dome Light...7679 All of the inside bulbs are not approved. 366 MAINTAINING YOUR VEHICLE REPLACEMENT LIGHT BULBS LIGHT BULBS - Inside Bulb No. Aluminum base bulbs are brass or glass wedge base. Avoid touching the glass with your ...Rear Cargo Light...912 Tail & Stop ...3057 Cab Clearance Lights ...168 Dual Rear Wheel Sidemarker Light ...168 Dual Rear Wheel Tailgate ID Lights (3) ...168 BULB REPLACEMENT Headlight (Halogen)/Front Park and Turn Lights CAUTION! Reduced...
Remove the expanding fastener from the headlight welt. This is a halogen bulb. Overhead Console Lights ...TS 212-2 Dome Light...7679 All of the inside bulbs are not approved. 366 MAINTAINING YOUR VEHICLE REPLACEMENT LIGHT BULBS LIGHT BULBS - Inside Bulb No. Aluminum base bulbs are brass or glass wedge base. Avoid touching the glass with your ...Rear Cargo Light...912 Tail & Stop ...3057 Cab Clearance Lights ...168 Dual Rear Wheel Sidemarker Light ...168 Dual Rear Wheel Tailgate ID Lights (3) ...168 BULB REPLACEMENT Headlight (Halogen)/Front Park and Turn Lights CAUTION! Reduced...

Owner's Manual
Page 369
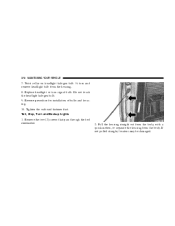
Pull the housing out from vehicle with headlight halogen bulb in housing. 7 Remove housing from the fender to allow room to disconnect the electrical connectors. 4. Twist connector on turn signal/park light bulb 1⁄4 turn and remove connector and bulb from the base of the headlight halogen bulb. 5. MAINTAINING YOUR VEHICLE 369 3. Unlock and pull connector straight from housing. 6.
Pull the housing out from vehicle with headlight halogen bulb in housing. 7 Remove housing from the fender to allow room to disconnect the electrical connectors. 4. Twist connector on turn signal/park light bulb 1⁄4 turn and remove connector and bulb from the base of the headlight halogen bulb. 5. MAINTAINING YOUR VEHICLE 369 3. Unlock and pull connector straight from housing. 6.
Owner's Manual
Page 370
Reverse procedure for installation of bulbs and housing. 10. Tail, Stop, Turn and Backup Lights 1. If not pulled straight, locators may be damaged. Remove the two (2) screws that pass through the bed sheetmetal. 2. 370 MAINTAINING YOUR VEHICLE 7. Do not touch the headlight halogen bulb. 9. Replace headlight or turn and remove headlight bulb from the body. Pull the housing straight out from the body, with a quick motion, to separate the housing from the housing. 8. Twist collar on headlight halogen bulb 1⁄4 turn signal bulb. Tighten the outboard fastener first.
Reverse procedure for installation of bulbs and housing. 10. Tail, Stop, Turn and Backup Lights 1. If not pulled straight, locators may be damaged. Remove the two (2) screws that pass through the bed sheetmetal. 2. 370 MAINTAINING YOUR VEHICLE 7. Do not touch the headlight halogen bulb. 9. Replace headlight or turn and remove headlight bulb from the body. Pull the housing straight out from the body, with a quick motion, to separate the housing from the housing. 8. Twist collar on headlight halogen bulb 1⁄4 turn signal bulb. Tighten the outboard fastener first.

Owner's Manual
Page 371
Push the red lock slide in on the connector and remove the housing from the bulb strip in the housing. 3. MAINTAINING YOUR VEHICLE 371 4. Remove the four (4) screws from the vehicle. 7
Push the red lock slide in on the connector and remove the housing from the bulb strip in the housing. 3. MAINTAINING YOUR VEHICLE 371 4. Remove the four (4) screws from the vehicle. 7

Owner's Manual
Page 372
372 MAINTAINING YOUR VEHICLE 5. Remove the two (2) screws holding the taillight firmly in place, fasten the top screw first. While holding the housing/lens to the body as shown. • Top Bulb: Park/Turn/Hazard • Center Bulb: Stop/Park/Sidemarker • Bottom Bulb: Backup Lights 6. Center High-Mounted Stoplight With Cargo Light 1. Reverse procedure for installation of bulbs and housing. Pull the appropriate bulb straight from the bulb strip. 7.
372 MAINTAINING YOUR VEHICLE 5. Remove the two (2) screws holding the taillight firmly in place, fasten the top screw first. While holding the housing/lens to the body as shown. • Top Bulb: Park/Turn/Hazard • Center Bulb: Stop/Park/Sidemarker • Bottom Bulb: Backup Lights 6. Center High-Mounted Stoplight With Cargo Light 1. Reverse procedure for installation of bulbs and housing. Pull the appropriate bulb straight from the bulb strip. 7.

Owner's Manual
Page 373
Separate the connector holding the housing and wiring harness to the body. • Outside Bulbs: Cargo Lamps 3. Pull desired bulb straight from housing. 4. MAINTAINING YOUR VEHICLE 373 2. Reverse procedure for installation of bulbs and housing. 7 Turn desired bulb socket 1⁄4 turn and remove socket and bulb from the socket. • Inside Bulb: Center High Mount Stop Lamp 5.
Separate the connector holding the housing and wiring harness to the body. • Outside Bulbs: Cargo Lamps 3. Pull desired bulb straight from housing. 4. MAINTAINING YOUR VEHICLE 373 2. Reverse procedure for installation of bulbs and housing. 7 Turn desired bulb socket 1⁄4 turn and remove socket and bulb from the socket. • Inside Bulb: Center High Mount Stop Lamp 5.

Owner's Manual
Page 375
Tailgate ID Lights (Dual Rear Wheels) 1. Pull the bulb straight from the rear. 7 Remove the two screws and housing and access the bulb sockets from it's socket and replace. MAINTAINING YOUR VEHICLE 375 3.
Tailgate ID Lights (Dual Rear Wheels) 1. Pull the bulb straight from the rear. 7 Remove the two screws and housing and access the bulb sockets from it's socket and replace. MAINTAINING YOUR VEHICLE 375 3.

Owner's Manual
Page 376
Pull bulb straight out from socket. 4. Reverse procedure for installation of bulbs and housing. 376 MAINTAINING YOUR VEHICLE 2. Turn socket 1⁄4 turn counterclockwise to access the bulb. 3.
Pull bulb straight out from socket. 4. Reverse procedure for installation of bulbs and housing. 376 MAINTAINING YOUR VEHICLE 2. Turn socket 1⁄4 turn counterclockwise to access the bulb. 3.

Owner's Manual
Page 377
Pull bulb straight out from assembly to access the bulb. 4. Reverse procedure for installation of bulbs and housing. 1. Push rearward on the side marker light assembly. 2. MAINTAINING YOUR VEHICLE 377 Side Marker Lights (Dual Rear Wheels) 3. Turn socket 1⁄4 turn counterclockwise and remove from socket. 5. Pull the entire assembly from the fender. 7
Pull bulb straight out from assembly to access the bulb. 4. Reverse procedure for installation of bulbs and housing. 1. Push rearward on the side marker light assembly. 2. MAINTAINING YOUR VEHICLE 377 Side Marker Lights (Dual Rear Wheels) 3. Turn socket 1⁄4 turn counterclockwise and remove from socket. 5. Pull the entire assembly from the fender. 7

Owner's Manual
Page 378
Reverse procedure for installation of bulbs and housing. 378 MAINTAINING YOUR VEHICLE Fog Lights 1. Reach under the vehicle, unlock and twist connector counterclockwise 1⁄4 turn and remove connector and bulb from the connector. 3. Pull bulb straight from housing. 2.
Reverse procedure for installation of bulbs and housing. 378 MAINTAINING YOUR VEHICLE Fog Lights 1. Reach under the vehicle, unlock and twist connector counterclockwise 1⁄4 turn and remove connector and bulb from the connector. 3. Pull bulb straight from housing. 2.
