
Owner Manual Convertible
Page 255
... is above idle speed. • Before shifting the gear selector lever into any gear, make sure your foot is bundled under the hood between the headlight assembly and the Totally Integrated Power Module (Fuse Box) on the brake pedal. Connect the cord to a complete stop . • Shift the gear selector lever into...
... is above idle speed. • Before shifting the gear selector lever into any gear, make sure your foot is bundled under the hood between the headlight assembly and the Totally Integrated Power Module (Fuse Box) on the brake pedal. Connect the cord to a complete stop . • Shift the gear selector lever into...
Owner Manual Convertible
Page 345
... contaminated area immediately with large quantities of water. • A battery generates hydrogen gas, which is a corrosive acid solution; Access is stored between the left front headlight assembly and the left front wheel splash shield. WHAT TO DO IN EMERGENCIES 345 WARNING! • Battery fluid is flammable and explosive. If acid splashes in...
... contaminated area immediately with large quantities of water. • A battery generates hydrogen gas, which is a corrosive acid solution; Access is stored between the left front headlight assembly and the left front wheel splash shield. WHAT TO DO IN EMERGENCIES 345 WARNING! • Battery fluid is flammable and explosive. If acid splashes in...
Owner Manual Convertible
Page 401
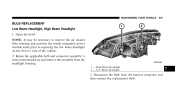
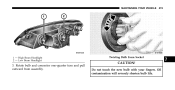
High Beam Headlight 2 - MAINTAINING YOUR VEHICLE 401 BULB REPLACEMENT Low Beam Headlight, High Beam Headlight 1. Rotate the applicable bulb and connector assembly 1⁄4 turn counterclockwise and remove the assembly from the harness connector and then connect the replacement bulb. Disconnect the bulb from the headlight housing. 1 - NOTE: It may be necessary to remove the air cleaner filter housing and position the totally integrated power module aside prior to replacing the low beam headlight on the driver's side of the vehicle. 2. Low Beam Headlight 7 3. Open the hood.
High Beam Headlight 2 - MAINTAINING YOUR VEHICLE 401 BULB REPLACEMENT Low Beam Headlight, High Beam Headlight 1. Rotate the applicable bulb and connector assembly 1⁄4 turn counterclockwise and remove the assembly from the harness connector and then connect the replacement bulb. Disconnect the bulb from the headlight housing. 1 - NOTE: It may be necessary to remove the air cleaner filter housing and position the totally integrated power module aside prior to replacing the low beam headlight on the driver's side of the vehicle. 2. Low Beam Headlight 7 3. Open the hood.
Owner Manual Convertible
Page 402
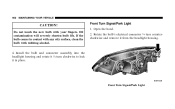
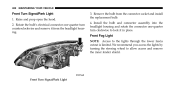
Do not touch the new bulb with rubbing alcohol. 4. 402 MAINTAINING YOUR VEHICLE CAUTION! If the bulb comes in place. Install the bulb and connector assembly into the headlight housing and rotate it 1⁄4 turn counterclockwise and remove it in contact with any oily surface, clean the bulb with your fingers. Rotate the bulb's electrical connector 1⁄4 turn clockwise to lock it from the headlight housing. Front Turn Signal/Park Light 1. Oil contamination will severely shorten bulb life. Front Turn Signal/Park Light Open the hood. 2.
Do not touch the new bulb with rubbing alcohol. 4. 402 MAINTAINING YOUR VEHICLE CAUTION! If the bulb comes in place. Install the bulb and connector assembly into the headlight housing and rotate it 1⁄4 turn counterclockwise and remove it in contact with any oily surface, clean the bulb with your fingers. Rotate the bulb's electrical connector 1⁄4 turn clockwise to lock it from the headlight housing. Front Turn Signal/Park Light 1. Oil contamination will severely shorten bulb life. Front Turn Signal/Park Light Open the hood. 2.
Owner Manual Convertible
Page 403
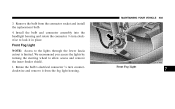
... connector 1⁄4 turn clockwise to lock it from the connector socket and install the replacement bulb. 4. Front Fog Light 7 Install the bulb and connector assembly into the headlight housing and rotate the connector 1⁄4 turn counterclockwise and remove it in place. Remove the bulb from the fog light housing. MAINTAINING YOUR VEHICLE...
... connector 1⁄4 turn clockwise to lock it from the connector socket and install the replacement bulb. 4. Front Fog Light 7 Install the bulb and connector assembly into the headlight housing and rotate the connector 1⁄4 turn counterclockwise and remove it in place. Remove the bulb from the fog light housing. MAINTAINING YOUR VEHICLE...
Owner Manual Sedan
Page 271
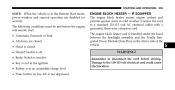
... engine block heater warms engine coolant and permits quicker starts in cold weather. The engine block heater cord is bundled under the hood between the headlight assembly and the Totally Integrated Power Module (Fuse Box) on key fob is at an acceptable charge level • Panic button on the driver side of...
... engine block heater warms engine coolant and permits quicker starts in cold weather. The engine block heater cord is bundled under the hood between the headlight assembly and the Totally Integrated Power Module (Fuse Box) on key fob is at an acceptable charge level • Panic button on the driver side of...
Owner Manual Sedan
Page 366
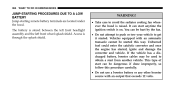
... vehicle. If the vehicle has a discharged battery, booster cables may be used to obtain a start anytime the ignition switch is stored between the left front headlight assembly and the left front wheel splash shield. Access is raised. WARNING! • Take care to get it started. This type of start can be started...
... vehicle. If the vehicle has a discharged battery, booster cables may be used to obtain a start anytime the ignition switch is stored between the left front headlight assembly and the left front wheel splash shield. Access is raised. WARNING! • Take care to get it started. This type of start can be started...
Owner Manual Sedan
Page 374
... ...411 Ⅵ Fuses/Totally Integrated Power Module (TIPM) ...412 Ⅵ Vehicle Storage ...417 Ⅵ Replacement Bulbs ...417 Ⅵ Bulb Replacement ...418 ▫ Headlight Bulb Replacement ...418 ▫ Head Light Assembly Removal - 372 MAINTAINING YOUR VEHICLE ▫ A/C Air Filter - Bulb Replacement ...420 ▫ Front Turn Signal/Park Light ...422 ▫ Front Fog Light...
... ...411 Ⅵ Fuses/Totally Integrated Power Module (TIPM) ...412 Ⅵ Vehicle Storage ...417 Ⅵ Replacement Bulbs ...417 Ⅵ Bulb Replacement ...418 ▫ Headlight Bulb Replacement ...418 ▫ Head Light Assembly Removal - 372 MAINTAINING YOUR VEHICLE ▫ A/C Air Filter - Bulb Replacement ...420 ▫ Front Turn Signal/Park Light ...422 ▫ Front Fog Light...

Owner Manual Sedan
Page 420
... the totally integrated power module aside prior to access constraints. Reach into engine compartment and from behind the headlight. Locate the connector behind the lamp assembly and grasp the connector. Rear View See "Head Light Assembly Removal - NOTE: It may be necessary to remove the head light housing due to replacing the low...
... the totally integrated power module aside prior to access constraints. Reach into engine compartment and from behind the headlight. Locate the connector behind the lamp assembly and grasp the connector. Rear View See "Head Light Assembly Removal - NOTE: It may be necessary to remove the head light housing due to replacing the low...
Owner Manual Sedan
Page 421
Do not touch the new bulb with your fingers. MAINTAINING YOUR VEHICLE 419 1 - Low Beam Headlight Twisting Bulb From Socket 3. Oil contamination will severely shorten bulb life. 7 High Beam Headlight 2 - CAUTION! Rotate bulb and connector one-quarter turn and pull outward from assembly.
Do not touch the new bulb with your fingers. MAINTAINING YOUR VEHICLE 419 1 - Low Beam Headlight Twisting Bulb From Socket 3. Oil contamination will severely shorten bulb life. 7 High Beam Headlight 2 - CAUTION! Rotate bulb and connector one-quarter turn and pull outward from assembly.

Owner Manual Sedan
Page 422
If the bulb comes in fasteners by prying under the head of the socket and replace the bulb. Head Light Assembly Removal - Removing Halogen Bulb From Assembly 5. Mounting Screw Location 2. Pull the bulb out of the fasteners with rubbing alcohol. 6. Remove the push-in contact with any oily surface, clean the bulb with a flat bladed tool. Reinsert the bulb and socket assembly and rotate clockwise one-quarter turn to secure. Raise and prop open the hood. 420 MAINTAINING YOUR VEHICLE 4. Bulb Replacement 1. Remove the headlight mounting screws.
If the bulb comes in fasteners by prying under the head of the socket and replace the bulb. Head Light Assembly Removal - Removing Halogen Bulb From Assembly 5. Mounting Screw Location 2. Pull the bulb out of the fasteners with rubbing alcohol. 6. Remove the push-in contact with any oily surface, clean the bulb with a flat bladed tool. Reinsert the bulb and socket assembly and rotate clockwise one-quarter turn to secure. Raise and prop open the hood. 420 MAINTAINING YOUR VEHICLE 4. Bulb Replacement 1. Remove the headlight mounting screws.

Owner Manual Sedan
Page 423
MAINTAINING YOUR VEHICLE 421 3. This will free the ball stud from its retainer in the picture. Follow Steps 3 - 6 in the above . 7 Gently Pry Out Headlight Gently pry the headlight assembly away from the vehicle. 4. Pull the headlight assembly away from the fender as shown in the fender. Reinstall Head Light Assembly by reversing steps 2 and 3 above "Headlight Bulb Replacement" section. 5.
MAINTAINING YOUR VEHICLE 421 3. This will free the ball stud from its retainer in the picture. Follow Steps 3 - 6 in the above . 7 Gently Pry Out Headlight Gently pry the headlight assembly away from the vehicle. 4. Pull the headlight assembly away from the fender as shown in the fender. Reinstall Head Light Assembly by reversing steps 2 and 3 above "Headlight Bulb Replacement" section. 5.
Owner Manual Sedan
Page 424
... it from the connector socket and install the replacement bulb. 4. Remove the bulb from the headlight housing. 3. Raise and prop open the hood. 2. Front Turn Signal/Park Light Install the bulb and connector assembly into the headlight housing and rotate the connector one -quarter turn clockwise to the lights through the lower fascia...
... it from the connector socket and install the replacement bulb. 4. Remove the bulb from the headlight housing. 3. Raise and prop open the hood. 2. Front Turn Signal/Park Light Install the bulb and connector assembly into the headlight housing and rotate the connector one -quarter turn clockwise to the lights through the lower fascia...


