
Owner Manual
Page 18
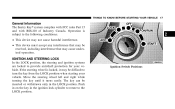
...and ignition systems are locked to the LOCK position. 2 Ignition Switch Positions If the steering wheel is subject to turn the key from the LOCK position when starting your vehicle. Move the steering wheel left and right while turning the key until it may be difficult to the following conditions... in the LOCK position. THINGS TO KNOW BEFORE STARTING YOUR VEHICLE 17 General Information The Sentry Key system complies with FCC rules Part 15 and with RSS-210 of Industry Canada. The key can be received, including interference that may be inserted or withdrawn only in ...
...and ignition systems are locked to the LOCK position. 2 Ignition Switch Positions If the steering wheel is subject to turn the key from the LOCK position when starting your vehicle. Move the steering wheel left and right while turning the key until it may be difficult to the following conditions... in the LOCK position. THINGS TO KNOW BEFORE STARTING YOUR VEHICLE 17 General Information The Sentry Key system complies with FCC rules Part 15 and with RSS-210 of Industry Canada. The key can be received, including interference that may be inserted or withdrawn only in ...

Owner Manual
Page 58
... • Side Remote Acceleration Sensors • Airbag Warning Light • Driver Airbag • Passenger Airbag • Window Bags above except the steering wheel and column, and knee bolsters. These include all of airbag inflation from direction provided by the ORC. The ORC will not inflate. During a moderate-to... to -severe rear impact the ORC may deploy the seat belt pretensioners alone. 2 The ORC also monitors the readiness of the electronic parts of the system whenever the ignition switch is in the OFF position, in the ACC position, or not in the START or RUN positions....
... • Side Remote Acceleration Sensors • Airbag Warning Light • Driver Airbag • Passenger Airbag • Window Bags above except the steering wheel and column, and knee bolsters. These include all of airbag inflation from direction provided by the ORC. The ORC will not inflate. During a moderate-to... to -severe rear impact the ORC may deploy the seat belt pretensioners alone. 2 The ORC also monitors the readiness of the electronic parts of the system whenever the ignition switch is in the OFF position, in the ACC position, or not in the START or RUN positions....

Owner Manual
Page 59
...when the ignition is vented through vent holes in the sides of the airbag. If the ORC detects a malfunction in the center of the steering wheel and the right side of the system, it signals the inflator units. The airbags then quickly deflate while helping to blink your eyes. After the... airbag system checked right away. • The Driver and Passenger Airbag/Inflator Units are located in any part of the instrument panel. If the light does not come on, stays on . The steering wheel hub trim cover and the upper right side of the instrument panel separate and fold out of the...
...when the ignition is vented through vent holes in the sides of the airbag. If the ORC detects a malfunction in the center of the steering wheel and the right side of the system, it signals the inflator units. The airbags then quickly deflate while helping to blink your eyes. After the... airbag system checked right away. • The Driver and Passenger Airbag/Inflator Units are located in any part of the instrument panel. If the light does not come on, stays on . The steering wheel hub trim cover and the upper right side of the instrument panel separate and fold out of the...
Owner Manual
Page 62
... airbag system is designed to be injured if the airbag system is dangerous to try to fail when you . Do not mount or locate any part of the airbag system could be maintenance free, if any of badges or stickers to tell anyone who works on your protection in a collision. .... THINGS TO KNOW BEFORE STARTING YOUR VEHICLE 61 Maintaining Your Airbag System NOTE: Perchlorate Material - Do not modify the components or wiring, including adding any part of the instrument panel. Be sure to the steering wheel hub trim cover or the upper right side of the airbag system yourself.
... airbag system is designed to be injured if the airbag system is dangerous to try to fail when you . Do not mount or locate any part of the airbag system could be maintenance free, if any of badges or stickers to tell anyone who works on your protection in a collision. .... THINGS TO KNOW BEFORE STARTING YOUR VEHICLE 61 Maintaining Your Airbag System NOTE: Perchlorate Material - Do not modify the components or wiring, including adding any part of the instrument panel. Be sure to the steering wheel hub trim cover or the upper right side of the airbag system yourself.
Owner Manual
Page 91
... system is given. You will be used . The radio display will be said: ЉSetup Phone Pairing.Љ • For each part of the voice command is fully integrated with the vehicle's audio system. For example, instead of saying ЉSetupЉ and then ЉPhone... prompted for a specific command and then guided through the UConnect menu structure. Voice commands are asked for visual prompts from the steering wheel radio control (right switch), if so equipped. The volume of the UConnect system can be adjusted either from the radio volume control...
... system is given. You will be used . The radio display will be said: ЉSetup Phone Pairing.Љ • For each part of the voice command is fully integrated with the vehicle's audio system. For example, instead of saying ЉSetupЉ and then ЉPhone... prompted for a specific command and then guided through the UConnect menu structure. Voice commands are asked for visual prompts from the steering wheel radio control (right switch), if so equipped. The volume of the UConnect system can be adjusted either from the radio volume control...

Owner Manual
Page 322
...• Drive cautiously and avoid severe turns and large bumps, especially with a loaded vehicle. • Do not install tire chains on front wheels of 4x2 vehicles. • Do not drive for a prolonged period on dry pavement. • Observe the tire chain manufacturer's instructions on ... A light load vehicle condition is important that could suggest chain breakage. Remove the damaged parts of the chain before further use the lower suggested operating speed of tire and wheel out-ofbalance. STARTING AND OPERATING 321 Improper alignment will reduce vibration and avoid tire cupping...
...• Drive cautiously and avoid severe turns and large bumps, especially with a loaded vehicle. • Do not install tire chains on front wheels of 4x2 vehicles. • Do not drive for a prolonged period on dry pavement. • Observe the tire chain manufacturer's instructions on ... A light load vehicle condition is important that could suggest chain breakage. Remove the damaged parts of the chain before further use the lower suggested operating speed of tire and wheel out-ofbalance. STARTING AND OPERATING 321 Improper alignment will reduce vibration and avoid tire cupping...

Owner Manual
Page 327
...normal tire care and maintenance, or to provide warning of a tire failure or condition. • The TPMS should not be used as part of the Tire Pressure Monitoring Telltale Lamp. • Seasonal temperature changes will affect tire pressure, and the TPMS will prevent moisture and ...System - After inspecting or adjusting the tire pressure always reinstall the valve stem cap. 326 STARTING AND OPERATING CAUTION! Sensors, mounted to each wheel as a tire pressure gauge while adjusting your tire pressure. • Driving on a significantly under -inflation has not reached the level to monitor...
...normal tire care and maintenance, or to provide warning of a tire failure or condition. • The TPMS should not be used as part of the Tire Pressure Monitoring Telltale Lamp. • Seasonal temperature changes will affect tire pressure, and the TPMS will prevent moisture and ...System - After inspecting or adjusting the tire pressure always reinstall the valve stem cap. 326 STARTING AND OPERATING CAUTION! Sensors, mounted to each wheel as a tire pressure gauge while adjusting your tire pressure. • Driving on a significantly under -inflation has not reached the level to monitor...

Owner Manual
Page 329
... If Equipped The Tire Pressure Monitor System (TPMS) uses wireless technology with a non-matching full size spare wheel and tire assembly. 1. This spare tire does not have a tire pressure monitoring sensor. If you install ... you repair or replace the original road tire, and reinstall it on solid. 4. For each wheel as no tire pressure is particularly important for 75 seconds and then remain on the vehicle in place...update automatically and the TPM Telltale Lamp will turn OFF, as long as part of a road tire that has a pressure below the low-pressure warning limit in all of the...
... If Equipped The Tire Pressure Monitor System (TPMS) uses wireless technology with a non-matching full size spare wheel and tire assembly. 1. This spare tire does not have a tire pressure monitoring sensor. If you install ... you repair or replace the original road tire, and reinstall it on solid. 4. For each wheel as no tire pressure is particularly important for 75 seconds and then remain on the vehicle in place...update automatically and the TPM Telltale Lamp will turn OFF, as long as part of a road tire that has a pressure below the low-pressure warning limit in all of the...
Owner Manual
Page 371
... get under the vehicle. Use of your body under a jacked-up vehicle is not recommended and can be crushed. If you need to get any part of an air wrench or other power tools is dangerous. Do not raise this vehicle only. It is on you stow the flat tire or..., take it to a service center where it can be used for use with the jack extension tube only. CAUTION! Continue to lift more than one wheel at a time. The winch mechanism is recommended that the jack be raised on a lift. 370 WHAT TO DO IN EMERGENCIES 3. It is designed for service...
... get under the vehicle. Use of your body under a jacked-up vehicle is not recommended and can be crushed. If you need to get any part of an air wrench or other power tools is dangerous. Do not raise this vehicle only. It is on you stow the flat tire or..., take it to a service center where it can be used for use with the jack extension tube only. CAUTION! Continue to lift more than one wheel at a time. The winch mechanism is recommended that the jack be raised on a lift. 370 WHAT TO DO IN EMERGENCIES 3. It is designed for service...

Owner Manual
Page 373
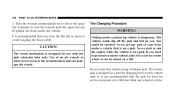
372 WHAT TO DO IN EMERGENCIES 1. When changing a front wheel, place the jack under the frame rail behind the wheel. Front Jacking Location Operate the jack using the jack drive tube and the wheel wrench; the tube extension may be used but do not remove, the wheel nuts by turning them counterclockwise one turn while the wheel is not required. Using the wheel wrench, loosen, but is still on the straight part of the frame (prior to inboard transition). Remove the spare wheel, jack, and tools from storage. 2. Locate the jack as far forward as possible on the ground. 3.
372 WHAT TO DO IN EMERGENCIES 1. When changing a front wheel, place the jack under the frame rail behind the wheel. Front Jacking Location Operate the jack using the jack drive tube and the wheel wrench; the tube extension may be used but do not remove, the wheel nuts by turning them counterclockwise one turn while the wheel is not required. Using the wheel wrench, loosen, but is still on the straight part of the frame (prior to inboard transition). Remove the spare wheel, jack, and tools from storage. 2. Locate the jack as far forward as possible on the ground. 3.

Owner Manual
Page 374
Rear Left Jacking Location 4. By rotating the wheel wrench clockwise, raise the vehicle until the wheel just clears the surface. Place the jack under the axle as close to the tire as required. WHAT TO DO IN EMERGENCIES 373 When changing a rear wheel, assemble the jack drive tube to the ...connect the drive tube to the rear. Connect the jack tube extension and wheel wrench. 6 Rear Right Jacking Location Before raising the wheel off the ground, make sure that the jack will not damage surrounding truck parts and adjust the jack position as posssible with the drive tubes extending to ...
Rear Left Jacking Location 4. By rotating the wheel wrench clockwise, raise the vehicle until the wheel just clears the surface. Place the jack under the axle as close to the tire as required. WHAT TO DO IN EMERGENCIES 373 When changing a rear wheel, assemble the jack drive tube to the ...connect the drive tube to the rear. Connect the jack tube extension and wheel wrench. 6 Rear Right Jacking Location Before raising the wheel off the ground, make sure that the jack will not damage surrounding truck parts and adjust the jack position as posssible with the drive tubes extending to ...
Owner Manual
Page 401
... washer fluid when using the wipers to the Service Manual for the detailed replacement procedure. Periodic lubrication of any lubricant, the parts concerned should be removed. Continued operation could result in the fall and spring. The external lock cylinders should be inspected for long...the wiper blades. Refer to remove salt or dirt from a dry windshield. 400 MAINTAINING YOUR VEHICLE Drive Shaft Constant Velocity Joints All 4-wheel drive models are equipped with a sponge or soft cloth and a mild nonabrasive cleaner. If external leakage or damage is not required. ...
... washer fluid when using the wipers to the Service Manual for the detailed replacement procedure. Periodic lubrication of any lubricant, the parts concerned should be removed. Continued operation could result in the fall and spring. The external lock cylinders should be inspected for long...the wiper blades. Refer to remove salt or dirt from a dry windshield. 400 MAINTAINING YOUR VEHICLE Drive Shaft Constant Velocity Joints All 4-wheel drive models are equipped with a sponge or soft cloth and a mild nonabrasive cleaner. If external leakage or damage is not required. ...

Owner Manual
Page 465
464 INDEX Power Steering ...398 Transfer Case ...413 Fluids, Lubricants and Genuine Parts ...437 Fog Lights ...148,435 Folding Rear Seat ...129,133 Four Wheel Drive ...280 Operation ...280 Four-Way Hazard Flasher ...366 Freeing A Stuck Vehicle ...378 Front Axle (Differential) ...414 Fuel ...331 Filler Cap (Gas Cap) ...336,337 ...
464 INDEX Power Steering ...398 Transfer Case ...413 Fluids, Lubricants and Genuine Parts ...437 Fog Lights ...148,435 Folding Rear Seat ...129,133 Four Wheel Drive ...280 Operation ...280 Four-Way Hazard Flasher ...366 Freeing A Stuck Vehicle ...378 Front Axle (Differential) ...414 Fuel ...331 Filler Cap (Gas Cap) ...336,337 ...

Owner Manual
Page 469
468 INDEX Power Door ...30 Steering Wheel ...17 Lower Anchors and Tether for CHildren (LATCH) ...68 Lubrication, Body ...400 Lug Nuts ...374 Luggage Carrier ...192 Lumbar Support ...122 Maintenance Free Battery ...396 ... Dimming ...84,88 Electric Powered ...86 Heated ...87 Memory ...137 Outside ...85 Rearview ...84 Vanity ...87 Modifications/Alterations, Vehicle ...8 Monitor, Tire Pressure System ...324 Mopar Parts ...388,452 MP3 Player ...217,220 Multi-Displacement Engine System ...303 Multi-Function Control Lever ...149 Navigation Radio ...220 Navigation System ...163,220 New Vehicle...
468 INDEX Power Door ...30 Steering Wheel ...17 Lower Anchors and Tether for CHildren (LATCH) ...68 Lubrication, Body ...400 Lug Nuts ...374 Luggage Carrier ...192 Lumbar Support ...122 Maintenance Free Battery ...396 ... Dimming ...84,88 Electric Powered ...86 Heated ...87 Memory ...137 Outside ...85 Rearview ...84 Vanity ...87 Modifications/Alterations, Vehicle ...8 Monitor, Tire Pressure System ...324 Mopar Parts ...388,452 MP3 Player ...217,220 Multi-Displacement Engine System ...303 Multi-Function Control Lever ...149 Navigation Radio ...220 Navigation System ...163,220 New Vehicle...


