Owner's Manual
Page 10
... - If Equipped ...30 ▫ Child Protection Door Lock ...33 Liftgate ...34 ▫ Power Liftgate - If Equipped ...35 Seat Storage Bin Safety Warning ...38 ▫ Storage Bin Cover Emergency Release ...38 ▫ Reinstalling Storage Bin Cover Emergency Release ...39 Windows ...40 ▫ Power Vent Windows ...40 ▫ Power Windows ...40 Occupant Restraints ...41 ▫...
... - If Equipped ...30 ▫ Child Protection Door Lock ...33 Liftgate ...34 ▫ Power Liftgate - If Equipped ...35 Seat Storage Bin Safety Warning ...38 ▫ Storage Bin Cover Emergency Release ...38 ▫ Reinstalling Storage Bin Cover Emergency Release ...39 Windows ...40 ▫ Power Vent Windows ...40 ▫ Power Windows ...40 Occupant Restraints ...41 ▫...
Owner's Manual
Page 38
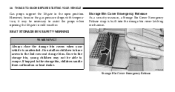
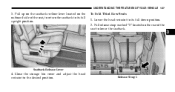
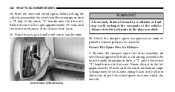
... your vehicle is built into the storage bin cover latching mechanism. SEAT STORAGE BIN SAFETY WARNING Storage Bin Cover Emergency Release As a security measure, a Storage Bin Cover Emergency Release strap is unattended. WARNING! Do not allow children to have access to escape. Storage Bin Cover Emergency Release Once in cold weather. If trapped in the... may be necessary to assist the props when opening the liftgate in the storage bin, young children may not be able to the 2nd row seat storage bins.
... your vehicle is built into the storage bin cover latching mechanism. SEAT STORAGE BIN SAFETY WARNING Storage Bin Cover Emergency Release As a security measure, a Storage Bin Cover Emergency Release strap is unattended. WARNING! Do not allow children to have access to escape. Storage Bin Cover Emergency Release Once in cold weather. If trapped in the... may be necessary to assist the props when opening the liftgate in the storage bin, young children may not be able to the 2nd row seat storage bins.
Owner's Manual
Page 54
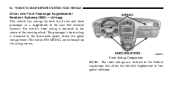
... front passenger as a supplement to the Federal regulations that allow less forceful deployment in low speed collisions. The words SRS AIRBAG are certified to the seat belt restraint systems. The driver's front airbag is mounted in the center of the steering wheel. Front Airbag Components NOTE: The front airbags are embossed...
... front passenger as a supplement to the Federal regulations that allow less forceful deployment in low speed collisions. The words SRS AIRBAG are certified to the seat belt restraint systems. The driver's front airbag is mounted in the center of the steering wheel. Front Airbag Components NOTE: The front airbags are embossed...
Owner's Manual
Page 56
... you . Do not add roof racks that require permanent attachments (bolts or screws) for any reason. Front airbags, along with the seat belts and front seat belt buckle pretensioners, work with the instrument panel knee bolsters to provide improved protection for the airbag cushions are designed to open them.... roof of the vehicle for installation on or around the airbag covers or attempt to manually open only when the airbags are inflating. • If your vehicle. The front airbags deploy in this section) has determined the seat is empty or is equipped with window bags, do not have...
... you . Do not add roof racks that require permanent attachments (bolts or screws) for any reason. Front airbags, along with the seat belts and front seat belt buckle pretensioners, work with the instrument panel knee bolsters to provide improved protection for the airbag cushions are designed to open them.... roof of the vehicle for installation on or around the airbag covers or attempt to manually open only when the airbags are inflating. • If your vehicle. The front airbags deploy in this section) has determined the seat is empty or is equipped with window bags, do not have...
Owner's Manual
Page 63
... of a collision for occupants classified into the empty or child size categories. Also, if you should take the vehicle to your trim cover and cushion needs to properly approximate occupant size. The PAD indicator light will not allow front airbag deployment in any way (including removal... warning light will illuminate indicating that weighs less than a predetermined threshold is a child. If there is a fault present in the passenger seat, if both the PAD indicator light and AIRBAG warning light are illuminated the airbag will remain OFF. (The PAD indicator light is empty or...
... of a collision for occupants classified into the empty or child size categories. Also, if you should take the vehicle to your trim cover and cushion needs to properly approximate occupant size. The PAD indicator light will not allow front airbag deployment in any way (including removal... warning light will illuminate indicating that weighs less than a predetermined threshold is a child. If there is a fault present in the passenger seat, if both the PAD indicator light and AIRBAG warning light are illuminated the airbag will remain OFF. (The PAD indicator light is empty or...
Owner's Manual
Page 65
... front passenger and calculate the proper airbag deployment. Also, when the Occupant Classification System detects either an empty seat or a weight less than the predetermined occupant threshold, the ORC will be classified as a larger occupant....The Bladder Assembly - If Equipped is located at the outboard passenger lap belt anchor. The front passenger seat assembly contains critical components that the resultant bladder pressure increase due to applied lap belt tension does not cause...Do not make any modifications to the front passenger seat components, assembly, or to the seat cover. 2
... front passenger and calculate the proper airbag deployment. Also, when the Occupant Classification System detects either an empty seat or a weight less than the predetermined occupant threshold, the ORC will be classified as a larger occupant....The Bladder Assembly - If Equipped is located at the outboard passenger lap belt anchor. The front passenger seat assembly contains critical components that the resultant bladder pressure increase due to applied lap belt tension does not cause...Do not make any modifications to the front passenger seat components, assembly, or to the seat cover. 2
Owner's Manual
Page 66
... Motor Vehicle Safety Standards (FMVSS). A modified vehicle may inadvertently change the airbag deployment in case of the bladder or seat cover assembly, always use the DaimlerChrysler service kit which are approved by DaimlerChrysler/Mopar. • At no time should any supplemental... replaced with an aftermarket seat cover. • Do not add a secondary seat cover other than those which includes the seat cover and bladder riveted together. Always use prior or future model year seat covers not designated for the vehicle. • Do not replace the seat cover with any way. &#...
... Motor Vehicle Safety Standards (FMVSS). A modified vehicle may inadvertently change the airbag deployment in case of the bladder or seat cover assembly, always use the DaimlerChrysler service kit which are approved by DaimlerChrysler/Mopar. • At no time should any supplemental... replaced with an aftermarket seat cover. • Do not add a secondary seat cover other than those which includes the seat cover and bladder riveted together. Always use prior or future model year seat covers not designated for the vehicle. • Do not replace the seat cover with any way. &#...
Owner's Manual
Page 68
...not modify the components or wiring, including adding any kind of badges or stickers to the steering wheel hub trim cover or the upper right side of seat attachment bolts), take the vehicle to modify an advanced airbag system for any part of your advanced airbag system. ... the airbags, front seat belt buckle pretensioners and driver inflatable knee blocker replaced by an authorized dealer as soon as well. In addition, approximately 10 seconds after an impact and the electrical system remains functional, vehicles equipped with disabilities, contact your trim cover and cushion needs to...
...not modify the components or wiring, including adding any kind of badges or stickers to the steering wheel hub trim cover or the upper right side of seat attachment bolts), take the vehicle to modify an advanced airbag system for any part of your advanced airbag system. ... the airbags, front seat belt buckle pretensioners and driver inflatable knee blocker replaced by an authorized dealer as soon as well. In addition, approximately 10 seconds after an impact and the electrical system remains functional, vehicles equipped with disabilities, contact your trim cover and cushion needs to...
Owner's Manual
Page 95
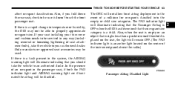
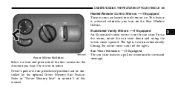
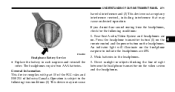
This feature is on the Rear Window Defrost. To use the mirror, rotate the sun visor down and swing the mirror cover upward. Closing the mirror cover turns off the lights. UNDERSTANDING THE FEATURES OF YOUR VEHICLE 95 Heated Remote Control Mirrors - If Equipped These mirrors are ...you want the mirror to melt frost or ice. Driver's power mirror preselected positions can be controlled by the optional Driver Memory Seat Feature. Refer to "Driver Memory Seat" in section 3 of the four arrows for increased coverage. 3 Power Mirror Switches Select a mirror and press one of this...
This feature is on the Rear Window Defrost. To use the mirror, rotate the sun visor down and swing the mirror cover upward. Closing the mirror cover turns off the lights. UNDERSTANDING THE FEATURES OF YOUR VEHICLE 95 Heated Remote Control Mirrors - If Equipped These mirrors are ...you want the mirror to melt frost or ice. Driver's power mirror preselected positions can be controlled by the optional Driver Memory Seat Feature. Refer to "Driver Memory Seat" in section 3 of the four arrows for increased coverage. 3 Power Mirror Switches Select a mirror and press one of this...
Owner's Manual
Page 124
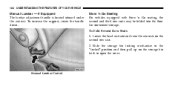
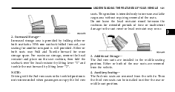
... YOUR VEHICLE Manual Lumbar - If Equipped The lumbar adjustment handle is located inboard under the armrest. Slide the storage bin locking mechanism to open the cover. Stow 'n Go Seating On vehicles equipped with Stow 'n Go seating, the second and third row seats may be folded into the floor for convenient storage.
... YOUR VEHICLE Manual Lumbar - If Equipped The lumbar adjustment handle is located inboard under the armrest. Slide the storage bin locking mechanism to open the cover. Stow 'n Go Seating On vehicles equipped with Stow 'n Go seating, the second and third row seats may be folded into the floor for convenient storage.
Owner's Manual
Page 126
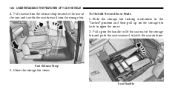
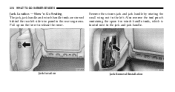
126 UNDERSTANDING THE FEATURES OF YOUR VEHICLE 4. Close the storage bin cover. Seat Handle To Unfold Second Row Seats 1. Slide the storage bin locking mechanism to the Locked position and then pull up on the handle to lift the seat out of the seat and tumble the seat forward into the storage bin. Seat Release Strap 5. Pull rearward on the storage bin latch to latch the seat anchors. Pull up on the release strap located at the rear of the storage bin and push the seat rearward to open the cover. 2.
126 UNDERSTANDING THE FEATURES OF YOUR VEHICLE 4. Close the storage bin cover. Seat Handle To Unfold Second Row Seats 1. Slide the storage bin locking mechanism to the Locked position and then pull up on the handle to lift the seat out of the seat and tumble the seat forward into the storage bin. Seat Release Strap 5. Pull rearward on the storage bin latch to latch the seat anchors. Pull up on the release strap located at the rear of the storage bin and push the seat rearward to open the cover. 2.
Owner's Manual
Page 127
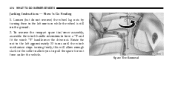
Lower the head restraint to lower the seatback. 3 Seatback Release Lever 4. Pull release strap marked "1" located on the outboard side of the seat to its full upright position. Release Strap 1 UNDERSTANDING THE FEATURES OF YOUR VEHICLE 127 3. To Fold Third Row Seats 1. Close the storage bin cover and adjust the head restraint to its full down position. 2. Pull up on the seatback recliner lever located on the rear of the seat, to return the seatback to the desired position.
Lower the head restraint to lower the seatback. 3 Seatback Release Lever 4. Pull release strap marked "1" located on the outboard side of the seat to its full upright position. Release Strap 1 UNDERSTANDING THE FEATURES OF YOUR VEHICLE 127 3. To Fold Third Row Seats 1. Close the storage bin cover and adjust the head restraint to its full down position. 2. Pull up on the seatback recliner lever located on the rear of the seat, to return the seatback to the desired position.
Owner's Manual
Page 141
... only to the seat cover or head restraint may Fold and Tumble forward for more storage space. For maximum storage, remove the head restraint and place on the seat cushion, then fold the seatback over the head restraint by lifting lever "1" and tumble the seat forward by folding ...either the rear or middle seat position. NOTE: Driving with the 2nd-row seats in the tumbled position is still provided. Either or both seats may occur. 2. Then the third row seats can be installed in the middle seating position. Auxiliary Seating- The 2nd row seats are removed from the vehicle....
... only to the seat cover or head restraint may Fold and Tumble forward for more storage space. For maximum storage, remove the head restraint and place on the seat cushion, then fold the seatback over the head restraint by lifting lever "1" and tumble the seat forward by folding ...either the rear or middle seat position. NOTE: Driving with the 2nd-row seats in the tumbled position is still provided. Either or both seats may occur. 2. Then the third row seats can be installed in the middle seating position. Auxiliary Seating- The 2nd row seats are removed from the vehicle....
Owner's Manual
Page 186
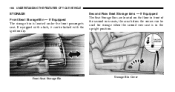
If equipped with a lock, it can be locked with the ignition key. Front Seat Storage Bin Storage Bin Cover 186 UNDERSTANDING THE FEATURES OF YOUR VEHICLE STORAGE Front Seat Storage Bin - If Equipped The storage bin is in the upright position. Second Row Seat Storage bins - If Equipped The Seat Storage Bins are located on the floor in front of the second row seats, the area below the covers can be used for storage when the second row seat is located under the front passenger's seat.
If equipped with a lock, it can be locked with the ignition key. Front Seat Storage Bin Storage Bin Cover 186 UNDERSTANDING THE FEATURES OF YOUR VEHICLE STORAGE Front Seat Storage Bin - If Equipped The storage bin is in the upright position. Second Row Seat Storage bins - If Equipped The Seat Storage Bins are located on the floor in front of the second row seats, the area below the covers can be used for storage when the second row seat is located under the front passenger's seat.
Owner's Manual
Page 187
... the vehicle is in motion. Do not drive the vehicle with the storage bin cover open the cover. Keep the storage bin cover closed and latched while the vehicle is in motion. The storage bins may be placed anywhere on the storage bin latch to open . In an ... bin locking mechanism to the Unlocked position to allow greater access to the Overhead Rail System. Failure to follow this could result if the seat storage bin covers are not properly latched. UNDERSTANDING THE FEATURES OF YOUR VEHICLE 187 Pull up on the overhead rail system. 3 CAUTION! Do not load objects over...
... the vehicle is in motion. Do not drive the vehicle with the storage bin cover open the cover. Keep the storage bin cover closed and latched while the vehicle is in motion. The storage bins may be placed anywhere on the storage bin latch to open . In an ... bin locking mechanism to the Unlocked position to allow greater access to the Overhead Rail System. Failure to follow this could result if the seat storage bin covers are not properly latched. UNDERSTANDING THE FEATURES OF YOUR VEHICLE 187 Pull up on the overhead rail system. 3 CAUTION! Do not load objects over...
Owner's Manual
Page 271
... 4 2. Operation is subject to indicate the headphones are on the headphones. The headphones require two AAA batteries. Weak batteries in each earpiece and reinstall the cover. General Information This device complies with part 15 of the FCC rules and RSS 210 of sight between the headphone transmitter on the video screen... of Industry Canada. UNDERSTANDING YOUR INSTRUMENT PANEL 271 harmful interference and (2) This device must accept any interference received, including interference that may not cause Rear Seat Audio/Video System and headphones are ON.
... 4 2. Operation is subject to indicate the headphones are on the headphones. The headphones require two AAA batteries. Weak batteries in each earpiece and reinstall the cover. General Information This device complies with part 15 of the FCC rules and RSS 210 of sight between the headphone transmitter on the video screen... of Industry Canada. UNDERSTANDING YOUR INSTRUMENT PANEL 271 harmful interference and (2) This device must accept any interference received, including interference that may not cause Rear Seat Audio/Video System and headphones are ON.
Owner's Manual
Page 372
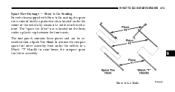
Jack Location Jack Removal/Installation Remove the scissors jack and jack handle by rotating the small wing nut to release the cover. 372 WHAT TO DO IN EMERGENCIES Jack Location - Stow 'n Go Seating The jack, jack handle and winch handle tools are stowed behind the rear left . Pull up on the lever to the left side trim panel in the rear cargo area. Also remove the tool pouch containing the spare tire winch handle tools, which is located next to the jack and jack handle.
Jack Location Jack Removal/Installation Remove the scissors jack and jack handle by rotating the small wing nut to release the cover. 372 WHAT TO DO IN EMERGENCIES Jack Location - Stow 'n Go Seating The jack, jack handle and winch handle tools are stowed behind the rear left . Pull up on the lever to the left side trim panel in the rear cargo area. Also remove the tool pouch containing the spare tire winch handle tools, which is located next to the jack and jack handle.
Owner's Manual
Page 373
...be assembled into a Spare Tire Hook to raise/lower the compact spare tire/cover assembly. 6 Stow 'n Go Tools WHAT TO DO IN EMERGENCIES 373 Spare Tire Stowage - Stow 'n Go Seating For vehicles equipped with Stow 'n Go seating, the spare tire is located on the floor, under a plastic cap ...between the front seats. The "spare tire drive" nut is stowed inside a protective cover located under the vehicle or a Winch "T" Handle to...
...be assembled into a Spare Tire Hook to raise/lower the compact spare tire/cover assembly. 6 Stow 'n Go Tools WHAT TO DO IN EMERGENCIES 373 Spare Tire Stowage - Stow 'n Go Seating For vehicles equipped with Stow 'n Go seating, the spare tire is located on the floor, under a plastic cap ...between the front seats. The "spare tire drive" nut is stowed inside a protective cover located under the vehicle or a Winch "T" Handle to...
Owner's Manual
Page 374
Rotate the nut to the left one turn while the wheel is still on the ground. 2. Loosen (but do not remove) the wheel lug nuts by turning them to the left approximately 33 turns until the winch mechanism stops turning freely, this will allow enough slack in the cable to allow you to form a "T' and fit the winch "T" handle over the drive nut. To remove the compact spare tire/cover assembly, assemble the winch handle extensions to pull the spare tire out from under the vehicle. Spare Tire Removal 374 WHAT TO DO IN EMERGENCIES Jacking Instructions - Stow 'n Go Seating 1.
Rotate the nut to the left one turn while the wheel is still on the ground. 2. Loosen (but do not remove) the wheel lug nuts by turning them to the left approximately 33 turns until the winch mechanism stops turning freely, this will allow enough slack in the cable to allow you to form a "T' and fit the winch "T" handle over the drive nut. To remove the compact spare tire/cover assembly, assemble the winch handle extensions to pull the spare tire out from under the vehicle. Spare Tire Removal 374 WHAT TO DO IN EMERGENCIES Jacking Instructions - Stow 'n Go Seating 1.
Owner's Manual
Page 380
WARNING! A loose jack, thrown forward in the place provided. 16. Correct pressure as possible. To stow the compact spare tire/cover assembly on vehicles equipped with Stow 'n Go seating, assemble the winch handle extensions to form a "T' and fit the winch "T" handle over the drive nut. Rotate the nut to the right approximately 33...
WARNING! A loose jack, thrown forward in the place provided. 16. Correct pressure as possible. To stow the compact spare tire/cover assembly on vehicles equipped with Stow 'n Go seating, assemble the winch handle extensions to form a "T' and fit the winch "T" handle over the drive nut. Rotate the nut to the right approximately 33...


