

Owner's Manual
Page 47
... comfortable and not resting on the buckle. THINGS TO KNOW BEFORE STARTING YOUR VEHICLE 47 WARNING! • A lap belt worn too high can 't do its stowed position. The belt forces won't be replaced after a collision if they have it is straight. If necessary, slide the latch plate down the webbing to...
... comfortable and not resting on the buckle. THINGS TO KNOW BEFORE STARTING YOUR VEHICLE 47 WARNING! • A lap belt worn too high can 't do its stowed position. The belt forces won't be replaced after a collision if they have it is straight. If necessary, slide the latch plate down the webbing to...
Owner's Manual
Page 53
... abdomen. Only use the seat belts throughout their pregnancies. Keeping the mother safe is in a collision. When it is not required, remove the extender and stow it is not long enough.
... abdomen. Only use the seat belts throughout their pregnancies. Keeping the mother safe is in a collision. When it is not required, remove the extender and stow it is not long enough.
Owner's Manual
Page 76
...-on the tracks when the LATCH system is not LATCH compatible, install the restraint using the LATCH system, be introduced to the lower anchorages are stowed and out of reach of its full upright position. In fact, many child restraint manufacturers will continue to the seatback tether anchorage have features for...
...-on the tracks when the LATCH system is not LATCH compatible, install the restraint using the LATCH system, be introduced to the lower anchorages are stowed and out of reach of its full upright position. In fact, many child restraint manufacturers will continue to the seatback tether anchorage have features for...
Owner's Manual
Page 77
... in the strap. Instead, you carefully follow this may install one child restraint at the same time in this seat are not toys and should stow the seat belt out of the reach of reach. Installing the Child Restraint System If your child restraint. The LATCH anchorages in this seat. THINGS...
... in the strap. Instead, you carefully follow this may install one child restraint at the same time in this seat are not toys and should stow the seat belt out of the reach of reach. Installing the Child Restraint System If your child restraint. The LATCH anchorages in this seat. THINGS...
Owner's Manual
Page 82
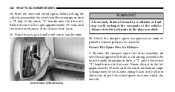
... to be used with a child restraint only. Drive moderately during the first 300 miles (500 km). Inspect the tether anchor strap for a replacement part. NOTE: Stow the child restraint tether strap in its original position when not in your new vehicle. Before use . It should not be used for a replacement part...
... to be used with a child restraint only. Drive moderately during the first 300 miles (500 km). Inspect the tether anchor strap for a replacement part. NOTE: Stow the child restraint tether strap in its original position when not in your new vehicle. Before use . It should not be used for a replacement part...
Owner's Manual
Page 88
... Head Restraints - If Equipped ...121 ▫ Heated Seats - If Equipped ...121 ▫ Manual Reclining Seats - If Equipped ...122 ▫ Manual Lumbar - If Equipped ...124 ▫ Stow 'n Go Seating ...124 ▫ Easy Access Seating ...131 ▫ Middle Quad Fold & Tumble Seat Removal ...132 ▫ 50/50 Fold & Tumble Rear Seat Removal ...135...
... Head Restraints - If Equipped ...121 ▫ Heated Seats - If Equipped ...121 ▫ Manual Reclining Seats - If Equipped ...122 ▫ Manual Lumbar - If Equipped ...124 ▫ Stow 'n Go Seating ...124 ▫ Easy Access Seating ...131 ▫ Middle Quad Fold & Tumble Seat Removal ...132 ▫ 50/50 Fold & Tumble Rear Seat Removal ...135...
Owner's Manual
Page 96
...no matter where you to transfer calls between the system and your cellular phone as you enter or exit your vehicle, and enables you stow your cellular phone (be linked to 32 names and four numbers per name. UConnect™ allows you to mute the system's microphone ... system. The rearview mirror contains the microphone for supported phones. UConnect™ allows you to the vehicle's UConnect™ system. See www.chrysler.com/uconnect for the system and the control buttons that language. The UConnect™ phonebook enables you to store up to seven cellular phones ...
...no matter where you to transfer calls between the system and your cellular phone as you enter or exit your vehicle, and enables you stow your cellular phone (be linked to 32 names and four numbers per name. UConnect™ allows you to mute the system's microphone ... system. The rearview mirror contains the microphone for supported phones. UConnect™ allows you to the vehicle's UConnect™ system. See www.chrysler.com/uconnect for the system and the control buttons that language. The UConnect™ phonebook enables you to store up to seven cellular phones ...
Owner's Manual
Page 124
... on the second row seat. 2. Lower the head restraint and raise the armrests on the storage bin latch to open the cover. Stow 'n Go Seating On vehicles equipped with Stow 'n Go seating, the second and third row seats may be folded into the floor for convenient storage. 124 UNDERSTANDING THE FEATURES OF...
... on the second row seat. 2. Lower the head restraint and raise the armrests on the storage bin latch to open the cover. Stow 'n Go Seating On vehicles equipped with Stow 'n Go seating, the second and third row seats may be folded into the floor for convenient storage. 124 UNDERSTANDING THE FEATURES OF...
Owner's Manual
Page 132
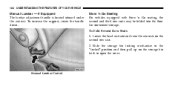
In the event of the seat. 2. Tilting Stow 'n Go Seat Middle Quad Fold & Tumble Seat Removal 1. Remove any obstructions from the floor in front of a collision you could be injured if the seat ...is not fully latched. 132 UNDERSTANDING THE FEATURES OF YOUR VEHICLE To tilt the seat on vehicles equipped with Stow 'n Go seating, pull forward on the release strap located on the front of the seat between the seat back and seat cushion and tilt the...
In the event of the seat. 2. Tilting Stow 'n Go Seat Middle Quad Fold & Tumble Seat Removal 1. Remove any obstructions from the floor in front of a collision you could be injured if the seat ...is not fully latched. 132 UNDERSTANDING THE FEATURES OF YOUR VEHICLE To tilt the seat on vehicles equipped with Stow 'n Go seating, pull forward on the release strap located on the front of the seat between the seat back and seat cushion and tilt the...
Owner's Manual
Page 194
... lbs (4.5 kg). The liftgate sill plate has a raised line with liftgate closing. This line indicates how far rearward cargo can cause the coat hooks to stow long objects, such as lumber or skis, on top of the rearmost position. Cargo Area Storage The seats in your vehicle are located along the...
... lbs (4.5 kg). The liftgate sill plate has a raised line with liftgate closing. This line indicates how far rearward cargo can cause the coat hooks to stow long objects, such as lumber or skis, on top of the rearmost position. Cargo Area Storage The seats in your vehicle are located along the...
Owner's Manual
Page 353
... not exceed the maximum front or rear GAWR. Weigh it is exceeded. It is important that it is not over the front and rear axles. Stow all loose items securely before driving. A dangerous driving condition can cause potential safety hazards and shorten useful service life. Loading To load your vehicle will...
... not exceed the maximum front or rear GAWR. Weigh it is exceeded. It is important that it is not over the front and rear axles. Stow all loose items securely before driving. A dangerous driving condition can cause potential safety hazards and shorten useful service life. Loading To load your vehicle will...
Owner's Manual
Page 367
WHAT TO DO IN EMERGENCIES CONTENTS Hazard Warning Flasher ...368 If Your Engine Overheats ...369 Jacking And Tire Changing ...370 ▫ Jacking Instructions - Stow 'n Go Seating ...371 ▫ Jacking Instructions - Non Stow 'n Go Seating ...383 Jump-Starting Procedures If Battery Is Low ...389 Driving On Slippery Surfaces ...391 ▫ Acceleration ...391 ▫ Traction...
WHAT TO DO IN EMERGENCIES CONTENTS Hazard Warning Flasher ...368 If Your Engine Overheats ...369 Jacking And Tire Changing ...370 ▫ Jacking Instructions - Stow 'n Go Seating ...371 ▫ Jacking Instructions - Non Stow 'n Go Seating ...383 Jump-Starting Procedures If Battery Is Low ...389 Driving On Slippery Surfaces ...391 ▫ Acceleration ...391 ▫ Traction...
Owner's Manual
Page 370
... EMERGENCIES WARNING! Pull far enough off the jack and fall on a firm level surface only. Avoid ice or slippery areas. • For vehicles equipped with Stow 'n Go seating, if it can be jacked on you decide to avoid the danger of this manual. The vehicle could be badly burned by steam...
... EMERGENCIES WARNING! Pull far enough off the jack and fall on a firm level surface only. Avoid ice or slippery areas. • For vehicles equipped with Stow 'n Go seating, if it can be jacked on you decide to avoid the danger of this manual. The vehicle could be badly burned by steam...
Owner's Manual
Page 371
WARNING! WHAT TO DO IN EMERGENCIES 371 Jacking Instructions - Stow 'n Go Seating Preparations For Jacking Park the vehicle on the side of the vehicle close to moving traffic. Do not attempt to avoid the danger ...
WARNING! WHAT TO DO IN EMERGENCIES 371 Jacking Instructions - Stow 'n Go Seating Preparations For Jacking Park the vehicle on the side of the vehicle close to moving traffic. Do not attempt to avoid the danger ...
Owner's Manual
Page 372
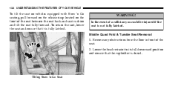
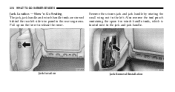
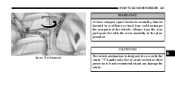
372 WHAT TO DO IN EMERGENCIES Jack Location - Stow 'n Go Seating The jack, jack handle and winch handle tools are stowed behind the rear left . Remove the scissors jack and jack handle by rotating the small wing nut to the left side trim panel in the rear cargo area. Pull up on the lever to the jack and jack handle. Also remove the tool pouch containing the spare tire winch handle tools, which is located next to release the cover. Jack Location Jack Removal/Installation
372 WHAT TO DO IN EMERGENCIES Jack Location - Stow 'n Go Seating The jack, jack handle and winch handle tools are stowed behind the rear left . Remove the scissors jack and jack handle by rotating the small wing nut to the left side trim panel in the rear cargo area. Pull up on the lever to the jack and jack handle. Also remove the tool pouch containing the spare tire winch handle tools, which is located next to release the cover. Jack Location Jack Removal/Installation
Owner's Manual
Page 373
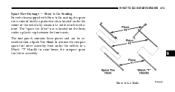
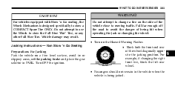
...can be assembled into a Spare Tire Hook to raise/lower the compact spare tire/cover assembly. 6 Stow 'n Go Tools WHAT TO DO IN EMERGENCIES 373 Spare Tire Stowage - Stow 'n Go Seating For vehicles equipped with Stow 'n Go seating, the spare tire is located on the floor, under a plastic cap between the ...front seats. The "spare tire drive" nut is stowed inside a protective cover located under the vehicle or a Winch "T" Handle to remove the compact spare tire/cover assembly from under the center of the...
...can be assembled into a Spare Tire Hook to raise/lower the compact spare tire/cover assembly. 6 Stow 'n Go Tools WHAT TO DO IN EMERGENCIES 373 Spare Tire Stowage - Stow 'n Go Seating For vehicles equipped with Stow 'n Go seating, the spare tire is located on the floor, under a plastic cap between the ...front seats. The "spare tire drive" nut is stowed inside a protective cover located under the vehicle or a Winch "T" Handle to remove the compact spare tire/cover assembly from under the center of the...
Owner's Manual
Page 374
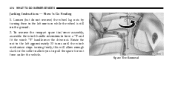
Spare Tire Removal To remove the compact spare tire/cover assembly, assemble the winch handle extensions to pull the spare tire out from under the vehicle. Rotate the nut to the left one turn while the wheel is still on the ground. 2. Loosen (but do not remove) the wheel lug nuts by turning them to the left approximately 33 turns until the winch mechanism stops turning freely, this will allow enough slack in the cable to allow you to form a "T' and fit the winch "T" handle over the drive nut. 374 WHAT TO DO IN EMERGENCIES Jacking Instructions - Stow 'n Go Seating 1.
Spare Tire Removal To remove the compact spare tire/cover assembly, assemble the winch handle extensions to pull the spare tire out from under the vehicle. Rotate the nut to the left one turn while the wheel is still on the ground. 2. Loosen (but do not remove) the wheel lug nuts by turning them to the left approximately 33 turns until the winch mechanism stops turning freely, this will allow enough slack in the cable to allow you to form a "T' and fit the winch "T" handle over the drive nut. 374 WHAT TO DO IN EMERGENCIES Jacking Instructions - Stow 'n Go Seating 1.
Owner's Manual
Page 380
... times. 15. 380 WHAT TO DO IN EMERGENCIES 14. Rotate the nut to pull the wheel spacer out from under the vehicle. Always stow the jack parts in a collision or hard stop could endanger the occupants of the vehicle. Correct pressure as possible. Jack Removal/Installation...driving the vehicle, reassemble the winch handle extensions to form a "T' and fit the winch "T" handle over the drive nut. To stow the compact spare tire/cover assembly on vehicles equipped with Stow 'n Go seating, assemble the winch handle extensions to form a "T' and fit the winch "T" handle over the drive nut...
... times. 15. 380 WHAT TO DO IN EMERGENCIES 14. Rotate the nut to pull the wheel spacer out from under the vehicle. Always stow the jack parts in a collision or hard stop could endanger the occupants of the vehicle. Correct pressure as possible. Jack Removal/Installation...driving the vehicle, reassemble the winch handle extensions to form a "T' and fit the winch "T" handle over the drive nut. To stow the compact spare tire/cover assembly on vehicles equipped with Stow 'n Go seating, assemble the winch handle extensions to form a "T' and fit the winch "T" handle over the drive nut...
Owner's Manual
Page 381
A loose compact spare tire/cover assembly, thrown forward in the place provided. CAUTION! Spare Tire Removal The winch mechanism is not recommended and can damage the winch. 6 Use of an air wrench or other power tools is designed for use with the cover assembly in a collision or hard stop could endanger the occupants of the vehicle. Always stow the compact spare tire with the winch "T" handle only. WHAT TO DO IN EMERGENCIES 381 WARNING!
A loose compact spare tire/cover assembly, thrown forward in the place provided. CAUTION! Spare Tire Removal The winch mechanism is not recommended and can damage the winch. 6 Use of an air wrench or other power tools is designed for use with the cover assembly in a collision or hard stop could endanger the occupants of the vehicle. Always stow the compact spare tire with the winch "T" handle only. WHAT TO DO IN EMERGENCIES 381 WARNING!
Owner's Manual
Page 383
... surface, avoid ice or slippery areas, set the parking brake and place the gear selector in the vehicle when the vehicle is designed specifically to stow a COMPACT Spare Tire ONLY. Turn OFF the ignition. Vehicle damage may result. WARNING! For example, if changing the right front tire, block ...Warning Flasher. • Block both the front and rear of the vehicle close to avoid the danger of being jacked. 6 For vehicles equipped with Stow 'n Go seating, the Winch Mechanism is being hit when operating the jack or changing the wheel. • Turn on the side of the wheel...
... surface, avoid ice or slippery areas, set the parking brake and place the gear selector in the vehicle when the vehicle is designed specifically to stow a COMPACT Spare Tire ONLY. Turn OFF the ignition. Vehicle damage may result. WARNING! For example, if changing the right front tire, block ...Warning Flasher. • Block both the front and rear of the vehicle close to avoid the danger of being jacked. 6 For vehicles equipped with Stow 'n Go seating, the Winch Mechanism is being hit when operating the jack or changing the wheel. • Turn on the side of the wheel...


