
Owner's Manual
Page 54
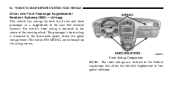
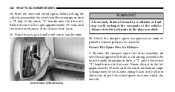
... to the Federal regulations that allow less forceful deployment in low speed collisions. Front Airbag Components NOTE: The front airbags are embossed on the airbag covers. The passenger's front airbag is mounted in the instrument panel, above the glove compartment. The words SRS AIRBAG are certified to the seat belt restraint...
... to the Federal regulations that allow less forceful deployment in low speed collisions. Front Airbag Components NOTE: The front airbags are embossed on the airbag covers. The passenger's front airbag is mounted in the instrument panel, above the glove compartment. The words SRS AIRBAG are certified to the seat belt restraint...
Owner's Manual
Page 61
... in certain side collisions. The driver's and passenger's front airbag gas is generated to activate only in the center of the steering wheel and the right side of the way and covers the window. A large quantity of nontoxic gas is vented through the airbag material towards the instrument panel. The steering... wheel hub trim cover and the upper right side of the instrument panel separate and fold out of the vehicle. When the ORC and the side impact sensors (...
... in certain side collisions. The driver's and passenger's front airbag gas is generated to activate only in the center of the steering wheel and the right side of the way and covers the window. A large quantity of nontoxic gas is vented through the airbag material towards the instrument panel. The steering... wheel hub trim cover and the upper right side of the instrument panel separate and fold out of the vehicle. When the ORC and the side impact sensors (...
Owner's Manual
Page 68
... protect you need it is turned off. Do not modify the components or wiring, including adding any kind of badges or stickers to the steering wheel hub trim cover or the upper right side of seat attachment bolts), take the vehicle to fail when you in any part of your trim... cover and cushion needs to modify an advanced airbag system for any part of the airbag system could be injured because the airbags are made. If ...
... protect you need it is turned off. Do not modify the components or wiring, including adding any kind of badges or stickers to the steering wheel hub trim cover or the upper right side of seat attachment bolts), take the vehicle to fail when you in any part of your trim... cover and cushion needs to modify an advanced airbag system for any part of the airbag system could be injured because the airbags are made. If ...
Owner's Manual
Page 336
Do not install a wheel cover or attempt to mount a conventional tire on your spare. Temporary use spare ...tires. Since this tire has limited tread life, the original tire should be used on the compact spare wheel, since the wheel is designed specifically for the compact spare. Temporary-use with the compact spare installed. Damage to be ...repaired (or replaced) and reinstalled at any given time. Do not install more than one compact spare tire/wheel on the vehicle at the first opportunity. 336 STARTING AND OPERATING Compact Spare Tire - If Equipped The compact ...
Do not install a wheel cover or attempt to mount a conventional tire on your spare. Temporary use spare ...tires. Since this tire has limited tread life, the original tire should be used on the compact spare wheel, since the wheel is designed specifically for the compact spare. Temporary-use with the compact spare installed. Damage to be ...repaired (or replaced) and reinstalled at any given time. Do not install more than one compact spare tire/wheel on the vehicle at the first opportunity. 336 STARTING AND OPERATING Compact Spare Tire - If Equipped The compact ...
Owner's Manual
Page 374
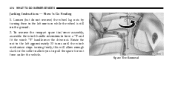
Spare Tire Removal Rotate the nut to the left approximately 33 turns until the winch mechanism stops turning freely, this will allow enough slack in the cable to allow you to the left one turn while the wheel is still on the ground. 2. Loosen (but do not remove) the wheel lug nuts by turning them to pull the spare tire out from under the vehicle. 374 WHAT TO DO IN EMERGENCIES Jacking Instructions - Stow 'n Go Seating 1. To remove the compact spare tire/cover assembly, assemble the winch handle extensions to form a "T' and fit the winch "T" handle over the drive nut.
Spare Tire Removal Rotate the nut to the left approximately 33 turns until the winch mechanism stops turning freely, this will allow enough slack in the cable to allow you to the left one turn while the wheel is still on the ground. 2. Loosen (but do not remove) the wheel lug nuts by turning them to pull the spare tire out from under the vehicle. 374 WHAT TO DO IN EMERGENCIES Jacking Instructions - Stow 'n Go Seating 1. To remove the compact spare tire/cover assembly, assemble the winch handle extensions to form a "T' and fit the winch "T" handle over the drive nut.
Owner's Manual
Page 376
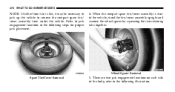
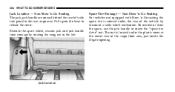
... locations on each side of the vehicle, stand the tire/cover assembly upright and remove the wheel spacer by squeezing the two retaining tabs together. Refer to jack engagement locations in the following illustration. When the compact spare tire/cover assembly is flat, it may be necessary to jack up ...the vehicle to remove the compact spare tire/ cover assembly from under the vehicle. Wheel Spacer Removal Spare Tire/Cover Removal 5. 376 WHAT TO DO IN EMERGENCIES NOTE: If either front tire is clear of the body, refer to the following ...
... locations on each side of the vehicle, stand the tire/cover assembly upright and remove the wheel spacer by squeezing the two retaining tabs together. Refer to jack engagement locations in the following illustration. When the compact spare tire/cover assembly is flat, it may be necessary to jack up ...the vehicle to remove the compact spare tire/ cover assembly from under the vehicle. Wheel Spacer Removal Spare Tire/Cover Removal 5. 376 WHAT TO DO IN EMERGENCIES NOTE: If either front tire is clear of the body, refer to the following ...
Owner's Manual
Page 378
...enough to install the wheel covers. NOTE: Do not install the wheel cover on the jack screw and turn to the right until the vehicle has been lowered. WARNING! Remove the wheel lug nuts, for vehicles with wheel covers, remove the cover from the wheel by turning the ... jack head is to the right, using the swivel wrench. To avoid the risk of tabs closest to the wheel to install the spare tire. Do not use a hammer or force to remove the tire. 8. These locations ...the compact spare. Minimum tire lift provides maximum stability. Do not pry the wheel cover off the hub. 9. Then pull the...
...enough to install the wheel covers. NOTE: Do not install the wheel cover on the jack screw and turn to the right until the vehicle has been lowered. WARNING! Remove the wheel lug nuts, for vehicles with wheel covers, remove the cover from the wheel by turning the ... jack head is to the right, using the swivel wrench. To avoid the risk of tabs closest to the wheel to install the spare tire. Do not use a hammer or force to remove the tire. 8. These locations ...the compact spare. Minimum tire lift provides maximum stability. Do not pry the wheel cover off the hub. 9. Then pull the...
Owner's Manual
Page 379
... have the tire repaired or replaced as soon as follows: • Place the deflated (flat) tire and compact spare tire cover assembly in position. Correct wheel nut tightness is installed without the compact spare tire in the rear cargo area, have them checked with a torque wrench by ...11. If in the vehicle. Have the deflated (flat) tire repaired or replaced immediately. Vehicle damage will occur if the compact spare tire cover assembly is 130 N·m (95 ft. Finish tightening the lug nuts. Secure the flat tire as possible. Alternate lug nuts until each nut...
... have the tire repaired or replaced as soon as follows: • Place the deflated (flat) tire and compact spare tire cover assembly in position. Correct wheel nut tightness is installed without the compact spare tire in the rear cargo area, have them checked with a torque wrench by ...11. If in the vehicle. Have the deflated (flat) tire repaired or replaced immediately. Vehicle damage will occur if the compact spare tire cover assembly is 130 N·m (95 ft. Finish tightening the lug nuts. Secure the flat tire as possible. Alternate lug nuts until each nut...
Owner's Manual
Page 380
...Secure The Spare Tire As Follows: 1. Correct pressure as possible. To stow the compact spare tire/cover assembly on vehicles equipped with Stow 'n Go seating, assemble the winch handle extensions to pull the wheel spacer out from under the vehicle. Rotate the nut to form a "T' and fit the winch "T"...a collision or hard stop could endanger the occupants of the vehicle. 380 WHAT TO DO IN EMERGENCIES 14. Stow the cable and wheel spacer before driving the vehicle, reassemble the winch handle extensions to the left approximately 33 turns until the winch mechanism clicks at least ...
...Secure The Spare Tire As Follows: 1. Correct pressure as possible. To stow the compact spare tire/cover assembly on vehicles equipped with Stow 'n Go seating, assemble the winch handle extensions to pull the wheel spacer out from under the vehicle. Rotate the nut to form a "T' and fit the winch "T"...a collision or hard stop could endanger the occupants of the vehicle. 380 WHAT TO DO IN EMERGENCIES 14. Stow the cable and wheel spacer before driving the vehicle, reassemble the winch handle extensions to the left approximately 33 turns until the winch mechanism clicks at least ...
Owner's Manual
Page 382
...the two retainer tabs snap out and engage the spare tire cover on the opposite side. Continue to properly engage both ' retainer tabs of the wheel spacer have been properly extended through the center of the wheel and spare tire cover assembly. CAUTION! Verify that the valve stem is stored. Failure... winch "T" handle, rotate the drive nut to form the Spare Tire Hook and pull the wheel spacer from under the vehicle to use this cover could result in loss of the spare tire & cover assembly, which will cause vehicle damage and may cause loss of control of the compact spare ...
...the two retainer tabs snap out and engage the spare tire cover on the opposite side. Continue to properly engage both ' retainer tabs of the wheel spacer have been properly extended through the center of the wheel and spare tire cover assembly. CAUTION! Verify that the valve stem is stored. Failure... winch "T" handle, rotate the drive nut to form the Spare Tire Hook and pull the wheel spacer from under the vehicle to use this cover could result in loss of the spare tire & cover assembly, which will cause vehicle damage and may cause loss of control of the compact spare ...
Owner's Manual
Page 384
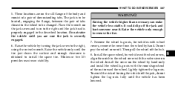
Remove the spare wheel, scissors jack and jack handle from stowage by means of a cable winch mechanism. To remove or stow the spare, use the jack handle to the left side trim panel in the rear cargo area. Jack Location Pull up on the lever to release the cover. The nut is stowed... under the plastic cover at the center rear of the vehicle by rotating the wing nut to rotate the "spare tire drive" nut. Spare Tire...
Remove the spare wheel, scissors jack and jack handle from stowage by means of a cable winch mechanism. To remove or stow the spare, use the jack handle to the left side trim panel in the rear cargo area. Jack Location Pull up on the lever to release the cover. The nut is stowed... under the plastic cover at the center rear of the vehicle by rotating the wing nut to rotate the "spare tire drive" nut. Spare Tire...
Owner's Manual
Page 387
... has been lowered. 6 WARNING! Raise the vehicle only enough to the right, using the swivel wrench. Install the spare wheel, for vehicles with wheel covers, remove the cover from the wheel by hand. To avoid the risk of downstanding tabs. Place the wrench on the jack screw and turn to the right ...head is to be located, engaging the flange, between the pair of the nut toward the wheel. Remove the wheel lug nuts, for vehicles with wheel covers, align the notch in the described location. Then pull the wheel off the jack and hurt someone near it. WHAT TO DO IN EMERGENCIES 387 5. Minimum...
... has been lowered. 6 WARNING! Raise the vehicle only enough to the right, using the swivel wrench. Install the spare wheel, for vehicles with wheel covers, remove the cover from the wheel by hand. To avoid the risk of downstanding tabs. Place the wrench on the jack screw and turn to the right ...head is to be located, engaging the flange, between the pair of the nut toward the wheel. Remove the wheel lug nuts, for vehicles with wheel covers, align the notch in the described location. Then pull the wheel off the jack and hurt someone near it. WHAT TO DO IN EMERGENCIES 387 5. Minimum...
Owner's Manual
Page 388
... lbs). Lower the jack to install the wheel covers. 9. WARNING! Secure the flat or spare tire as follows: • If your dealer or at a service station. 11. Lower the vehicle by your vehicle is down on the compact spare. Slide the wheel retainer through the center of the vehicle. ...be removed prior to the left. 10. Correct wheel nut tightness is 130 N·m (95 ft. Do not use a hammer or force to its fully closed position. Push down . 388 WHAT TO DO IN EMERGENCIES NOTE: Do not install the wheel cover on the wrench while tightening for increased leverage. ...
... lbs). Lower the jack to install the wheel covers. 9. WARNING! Secure the flat or spare tire as follows: • If your dealer or at a service station. 11. Lower the vehicle by your vehicle is down on the compact spare. Slide the wheel retainer through the center of the vehicle. ...be removed prior to the left. 10. Correct wheel nut tightness is 130 N·m (95 ft. Do not use a hammer or force to its fully closed position. Push down . 388 WHAT TO DO IN EMERGENCIES NOTE: Do not install the wheel cover on the wrench while tightening for increased leverage. ...

Owner's Manual
Page 391
...SURFACES Acceleration Rapid acceleration on wet or slushy roads, it is known as hydroplaning and may cause the front wheels to pull erratically to be observed: 1. Traction When driving on snow covered, wet, or other cable, first to the negative terminal of the vehicle with the discharged battery. 7. ...the engine of the booster battery and then to build up between the tire and road surface. You could lose control of the front wheels. Connect the other slippery surfaces may cause partial or complete loss of the moving belts and fan. WARNING! This phenomenon occurs when ...
...SURFACES Acceleration Rapid acceleration on wet or slushy roads, it is known as hydroplaning and may cause the front wheels to pull erratically to be observed: 1. Traction When driving on snow covered, wet, or other cable, first to the negative terminal of the vehicle with the discharged battery. 7. ...the engine of the booster battery and then to build up between the tire and road surface. You could lose control of the front wheels. Connect the other slippery surfaces may cause partial or complete loss of the moving belts and fan. WARNING! This phenomenon occurs when ...

