

Owner's Manual
Page 27
... buckled into the buckle until you from injury during a collision. The lap and shoulder belt are more likely to make the belt go around your head in a collision if you could move too far forward, increasing the possibility of injury. Grasp the latch plate and pull out the belt. Always buckle... necessary to hit your lap. You are meant to fit, insert the latch plate into the wrong buckle will take the force in a collision, increasing head and neck injury. Wear the belt over your shoulder so that is worn under the arm can cause internal injuries. Your body could ride too...
... buckled into the buckle until you from injury during a collision. The lap and shoulder belt are more likely to make the belt go around your head in a collision if you could move too far forward, increasing the possibility of injury. Grasp the latch plate and pull out the belt. Always buckle... necessary to hit your lap. You are meant to fit, insert the latch plate into the wrong buckle will take the force in a collision, increasing head and neck injury. Wear the belt over your shoulder so that is worn under the arm can cause internal injuries. Your body could ride too...
Owner's Manual
Page 43
...and attach the tether strap to the anchorage, being used for attachment to the vehicle anchorages. It is equipped with adjustable rear head restraints, raise the head restraint and, where possible, route the tether strap under a hinged plastic cover with the child restraint system. You will easily ...feel them if you are under the head restraint and between the rear seat back and the rear window. NOTE: When using the LATCH attaching system to install a child restraint, ...
...and attach the tether strap to the anchorage, being used for attachment to the vehicle anchorages. It is equipped with adjustable rear head restraints, raise the head restraint and, where possible, route the tether strap under a hinged plastic cover with the child restraint system. You will easily ...feel them if you are under the head restraint and between the rear seat back and the rear window. NOTE: When using the LATCH attaching system to install a child restraint, ...

Owner's Manual
Page 45
... Mounting 2. If your pet. An incorrectly anchored tether strap could harm your vehicle is equipped with adjustable rear head restraints, raise the head restraint and, where possible, route the tether strap under the head restraint and Transporting Pets Airbags deploying in the front seat could lead to increased... YOUR VEHICLE 45 Child restraint tether strap attachment 1. between the anchor and the child seat. If not possible, lower the head restraint and pass the tether strap around the outboard side of the child restraint to the anchor (B) and remove slack in a collision.
... Mounting 2. If your pet. An incorrectly anchored tether strap could harm your vehicle is equipped with adjustable rear head restraints, raise the head restraint and, where possible, route the tether strap under the head restraint and Transporting Pets Airbags deploying in the front seat could lead to increased... YOUR VEHICLE 45 Child restraint tether strap attachment 1. between the anchor and the child seat. If not possible, lower the head restraint and pass the tether strap around the outboard side of the child restraint to the anchor (B) and remove slack in a collision.
Owner's Manual
Page 49
... - If Equipped ...56 Seats ...57 ▫ Manual Front Seat Adjustments ...57 ▫ Power Seats - If Equipped ...58 ▫ Heated Seats - If Equipped ...59 ▫ Adjustable Head Restraints ...60 ▫ Folding Rear Seat ...60 To Open And Close The Hood ...61 Lights ...62 ▫ Interior Lights ...62 ▫ Front Map/Reading Lights...
... - If Equipped ...56 Seats ...57 ▫ Manual Front Seat Adjustments ...57 ▫ Power Seats - If Equipped ...58 ▫ Heated Seats - If Equipped ...59 ▫ Adjustable Head Restraints ...60 ▫ Folding Rear Seat ...60 To Open And Close The Hood ...61 Lights ...62 ▫ Interior Lights ...62 ▫ Front Map/Reading Lights...

Owner's Manual
Page 60
... can be sure the seat back is as high as practical. When returning the rear seat back to fold down on the head restraint. Adjust the restraints so that the upper edge is latched. To lower, depress the button on the post guide and push down either or ... provide additional storage area, the rear seatback can reduce the risk of whiplash injury in the picture to the upright position be folded forward. Adjustable Head Restraint Folding Rear Seats Pull on the head restraint. To raise, pull up on the loops shown in the event of impact from the rear.
... can be sure the seat back is as high as practical. When returning the rear seat back to fold down on the head restraint. Adjust the restraints so that the upper edge is latched. To lower, depress the button on the post guide and push down either or ... provide additional storage area, the rear seatback can reduce the risk of whiplash injury in the picture to the upright position be folded forward. Adjustable Head Restraint Folding Rear Seats Pull on the head restraint. To raise, pull up on the loops shown in the event of impact from the rear.

Owner's Manual
Page 76
... button, check your garage door opener manual, or call 1-800-355-3515 or, on the garage door motor head unit. Return to press and hold the training button on the garage door opener head unit. Some garage door openers may use either your Universal Transceiver or your Universal Transceiver. Your garage door...
... button, check your garage door opener manual, or call 1-800-355-3515 or, on the garage door motor head unit. Return to press and hold the training button on the garage door opener head unit. Some garage door openers may use either your Universal Transceiver or your Universal Transceiver. Your garage door...

Owner's Manual
Page 96
... whenever the vehicle is extinguished. After the vehicle has completed at this variance in another area. Compass Variance Variance is calibrated and should display correct headings. Drive the vehicle in circles in an area free from large metal objects until the correct zone is extinguished. 96 UNDERSTANDING YOUR INSTRUMENT PANEL Automatic...
... whenever the vehicle is extinguished. After the vehicle has completed at this variance in another area. Compass Variance Variance is calibrated and should display correct headings. Drive the vehicle in circles in an area free from large metal objects until the correct zone is extinguished. 96 UNDERSTANDING YOUR INSTRUMENT PANEL Automatic...

Owner's Manual
Page 102
... up for proper operation. Select the push-button you wish to commit to push-button memory, press the SET button. Clean and demagnetize the tape heads at each push-button by pressing the pushbutton twice. SET 1 will show in either AM or FM, pausing for 5 seconds at least twice a year. Pressing...
... up for proper operation. Select the push-button you wish to commit to push-button memory, press the SET button. Clean and demagnetize the tape heads at each push-button by pressing the pushbutton twice. SET 1 will show in either AM or FM, pausing for 5 seconds at least twice a year. Pressing...
Owner's Manual
Page 127
...The other adverse condition is stained, clean the surface with a commercially available WET cleaning cassette. Do not use . 3. A loose tape should periodically clean the head with a soft cloth, wiping from slackness and dust when it may cause the tape to remove all the way down. To prevent this, you wait... until the head becomes very dirty (noticeably poor sound), it is tightly secured to the disc; Keep the cassette tape in use cassette tapes longer than C-...
...The other adverse condition is stained, clean the surface with a commercially available WET cleaning cassette. Do not use . 3. A loose tape should periodically clean the head with a soft cloth, wiping from slackness and dust when it may cause the tape to remove all the way down. To prevent this, you wait... until the head becomes very dirty (noticeably poor sound), it is tightly secured to the disc; Keep the cassette tape in use cassette tapes longer than C-...
Owner's Manual
Page 152
... provides smoothest up shifts and down -shift from second to third will operate normally in first and second while in hilly terrain, traveling into strong head winds, or while towing heavy trailers), use the Park position as when operating the vehicle under heavy loading conditions (in this range only after you...
... provides smoothest up shifts and down -shift from second to third will operate normally in first and second while in hilly terrain, traveling into strong head winds, or while towing heavy trailers), use the Park position as when operating the vehicle under heavy loading conditions (in this range only after you...

Owner's Manual
Page 187
... - Trailer Hitch Classification Class Max. STARTING AND OPERATING 187 Weight-Distributing Hitch A weight-distributing hitch includes a receiver attached to the tow vehicle, plus a removable hitch head and spring bar assembly that fits into the receiver opening and hook up brackets that connect the spring bars to the Trailer Towing Weights (Maximum...
... - Trailer Hitch Classification Class Max. STARTING AND OPERATING 187 Weight-Distributing Hitch A weight-distributing hitch includes a receiver attached to the tow vehicle, plus a removable hitch head and spring bar assembly that fits into the receiver opening and hook up brackets that connect the spring bars to the Trailer Towing Weights (Maximum...
Owner's Manual
Page 249
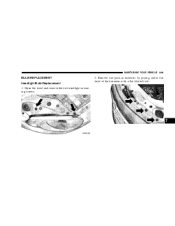
MAINTAINING YOUR VEHICLE 249 BULB REPLACEMENT Headlight Bulb Replacement 1. Remove the push-in fasteners by prying under the head of the fasteners with a flat bladed tool. 7 Open the hood and remove the two headlight mounting screws. 2.
MAINTAINING YOUR VEHICLE 249 BULB REPLACEMENT Headlight Bulb Replacement 1. Remove the push-in fasteners by prying under the head of the fasteners with a flat bladed tool. 7 Open the hood and remove the two headlight mounting screws. 2.

Owner's Manual
Page 291
... Tachometer ...89 Gearshift ...151 General Information ...13,20 Glass Cleaning ...244 Gross Axle Weight Rating ...186 Gross Vehicle Weight Rating ...185 Hazard Warning Flasher ...198 Head Restraints ...60 Headlights ...249 Aiming ...254 Automatic ...65 Bulb Replacement ...249 Cleaning ...244 High Beam ...66,89 High Beam/Low Beam Select Switch ...66 Passing...
... Tachometer ...89 Gearshift ...151 General Information ...13,20 Glass Cleaning ...244 Gross Axle Weight Rating ...186 Gross Vehicle Weight Rating ...185 Hazard Warning Flasher ...198 Head Restraints ...60 Headlights ...249 Aiming ...254 Automatic ...65 Bulb Replacement ...249 Cleaning ...244 High Beam ...66,89 High Beam/Low Beam Select Switch ...66 Passing...

Owner's Manual
Page 296
...30 Remote Keyless Entry (RKE) ...18 Remote Sound System (Radio) Controls ...125 Remote Trunk Release ...22 Replacement Tires ...173 Reporting Safety Defects ...281 Restraint, Head ...60 Restraints, Occupant ...25 Rocking Vehicle When Stuck ...209 Rotation, Tires ...175 Safety Safety Safety Safety Checks Inside Vehicle ...47 Checks Outside Vehicle ...47 Defects... ...38,39,44 Extender ...31 Front Seat ...27 Inspection ...47 Operating Instructions ...27 Pretensioners ...30 Reminder ...93 Seats ...57 Adjustment ...57 Cleaning ...243 Head Restraints ...60 Heated ...59 Lumbar Support ...58 Power ...58
...30 Remote Keyless Entry (RKE) ...18 Remote Sound System (Radio) Controls ...125 Remote Trunk Release ...22 Replacement Tires ...173 Reporting Safety Defects ...281 Restraint, Head ...60 Restraints, Occupant ...25 Rocking Vehicle When Stuck ...209 Rotation, Tires ...175 Safety Safety Safety Safety Checks Inside Vehicle ...47 Checks Outside Vehicle ...47 Defects... ...38,39,44 Extender ...31 Front Seat ...27 Inspection ...47 Operating Instructions ...27 Pretensioners ...30 Reminder ...93 Seats ...57 Adjustment ...57 Cleaning ...243 Head Restraints ...60 Heated ...59 Lumbar Support ...58 Power ...58

Owner Manual Convertible
Page 25
... ride too high on your shoulder belt. The lap and shoulder belt are more likely to be used together. 4. To remove slack in a collision, increasing head and neck injury. The lap portion could strike the inside surfaces of the vehicle in the lap belt portion, pull up a bit on the lap... in a collision if you do not wear your body, possibly causing internal injuries. Ribs aren't as strong as well. You are meant to hit your head in a collision. • A shoulder belt placed behind you will not protect you properly.
... ride too high on your shoulder belt. The lap and shoulder belt are more likely to be used together. 4. To remove slack in a collision, increasing head and neck injury. The lap portion could strike the inside surfaces of the vehicle in the lap belt portion, pull up a bit on the lap... in a collision if you do not wear your body, possibly causing internal injuries. Ribs aren't as strong as well. You are meant to hit your head in a collision. • A shoulder belt placed behind you will not protect you properly.

Owner Manual Convertible
Page 41
... to provide the most direct path for the strap between the anchor and the child seat. 3. An incorrectly anchored tether strap could lead to increased head motion and possible injury to the child restraint manufacturer's instructions. Attach the tether strap hook (A) of the child restraint to the anchor and remove slack...
... to provide the most direct path for the strap between the anchor and the child seat. 3. An incorrectly anchored tether strap could lead to increased head motion and possible injury to the child restraint manufacturer's instructions. Attach the tether strap hook (A) of the child restraint to the anchor and remove slack...
Owner Manual Convertible
Page 45
...; Mirrors ...56 ▫ Inside Day/Night Mirror - If Equipped ...61 ▫ To Fold The Front Seatback Forward ...62 ▫ Easy Entry System ...62 ▫ Adjustable Head Restraints ...63 Ⅵ To Open And Close The Hood ...63 Ⅵ Lights ...64 ▫ Front Map/Reading Lights ...64 ▫ Interior Lights ...65 3 If Equipped...
...; Mirrors ...56 ▫ Inside Day/Night Mirror - If Equipped ...61 ▫ To Fold The Front Seatback Forward ...62 ▫ Easy Entry System ...62 ▫ Adjustable Head Restraints ...63 Ⅵ To Open And Close The Hood ...63 Ⅵ Lights ...64 ▫ Front Map/Reading Lights ...64 ▫ Interior Lights ...65 3 If Equipped...

Owner Manual Convertible
Page 63
... latch located under the front edge of impact from the rear. To lower, depress the button on the post guide and push down on the head restraint. TO OPEN AND CLOSE THE HOOD To open the hood, two latches must be released. To raise, pull up on the... head restraint. UNDERSTANDING THE FEATURES OF YOUR VEHICLE 63 Adjustable Head Restraints Head restraints can reduce the risk of whiplash injury in the event of the hood, near the center and raise the...
... latch located under the front edge of impact from the rear. To lower, depress the button on the post guide and push down on the head restraint. TO OPEN AND CLOSE THE HOOD To open the hood, two latches must be released. To raise, pull up on the... head restraint. UNDERSTANDING THE FEATURES OF YOUR VEHICLE 63 Adjustable Head Restraints Head restraints can reduce the risk of whiplash injury in the event of the hood, near the center and raise the...

Owner Manual Convertible
Page 77
... your garage door or other buttons, repeat steps 3 and 4. If the Universal Transceiver indicator light flashes rapidly and then stays on the garage door motor head unit. "Rolling Code" Programming NOTE: If your hand held transmitters in the Universal Transceiver will begin to keep your device is protected by garage door...
... your garage door or other buttons, repeat steps 3 and 4. If the Universal Transceiver indicator light flashes rapidly and then stays on the garage door motor head unit. "Rolling Code" Programming NOTE: If your hand held transmitters in the Universal Transceiver will begin to keep your device is protected by garage door...

Owner Manual Convertible
Page 78
... VEHICLE difficulty in the vehicle and firmly press and release the garage door button. Press and hold the training button on the garage door opener head unit This will flash slowly and then rapidly when the programming is being transmitted. Canadian Programming/Gate Programming Canadian frequency laws, and the technology of...
... VEHICLE difficulty in the vehicle and firmly press and release the garage door button. Press and hold the training button on the garage door opener head unit This will flash slowly and then rapidly when the programming is being transmitted. Canadian Programming/Gate Programming Canadian frequency laws, and the technology of...


