

Owner's Manual
Page 64
... - If Equipped ...103 ▫ Headlights On With Wipers (Available With Auto Headlights Only) ...103 ▫ Smartbeams - If Equipped ...98 Ⅵ To Open And Close The Hood ...99 Ⅵ Lights ...100 ▫ Overhead Console Map/Reading Lights ...100 ▫ Interior Lights ...101 ▫ Headlight Switch ...102 ▫ Multi-Function Lever ...102 ▫...
... - If Equipped ...103 ▫ Headlights On With Wipers (Available With Auto Headlights Only) ...103 ▫ Smartbeams - If Equipped ...98 Ⅵ To Open And Close The Hood ...99 Ⅵ Lights ...100 ▫ Overhead Console Map/Reading Lights ...100 ▫ Interior Lights ...101 ▫ Headlight Switch ...102 ▫ Multi-Function Lever ...102 ▫...

Owner's Manual
Page 99
... use your remote keyless entry transmitter or the memory switch on the driver's door panel to return the adjustable pedals to open the hood. First, pull the hood release lever located under the adjustable pedals or impede its ability to move as it may become limited if movement is locked out: "...YOUR VEHICLE 99 • The pedals cannot be released to pre-programmed positions. Cruise Control Engaged" or "Adjustable Pedal Disabled - TO OPEN AND CLOSE THE HOOD Two latches must be adjusted when the vehicle is in the adjustable pedal's path. One of the instrument panel. 3 CAUTION...
... use your remote keyless entry transmitter or the memory switch on the driver's door panel to return the adjustable pedals to open the hood. First, pull the hood release lever located under the adjustable pedals or impede its ability to move as it may become limited if movement is locked out: "...YOUR VEHICLE 99 • The pedals cannot be released to pre-programmed positions. Cruise Control Engaged" or "Adjustable Pedal Disabled - TO OPEN AND CLOSE THE HOOD Two latches must be adjusted when the vehicle is in the adjustable pedal's path. One of the instrument panel. 3 CAUTION...

Owner's Manual
Page 100
...catch to turn on the overhead console. Press the lens a second time to the left. To prevent possible damage, do not slam the hood to secure the hood in the open approximately 6 inches (15 cm) and then drop it could have a collision. Never drive your forward vision. The lights ...door is opened or the dimmer control is open position. The safety catch is turned ON by pressing the lens. Lower the hood until it . Hood Safety Catch Use the hood prop rod (if equipped) to close it is turned fully upward, past the second detent. 100 UNDERSTANDING THE FEATURES OF YOUR...
...catch to turn on the overhead console. Press the lens a second time to the left. To prevent possible damage, do not slam the hood to secure the hood in the open approximately 6 inches (15 cm) and then drop it could have a collision. Never drive your forward vision. The lights ...door is opened or the dimmer control is open position. The safety catch is turned ON by pressing the lens. Lower the hood until it . Hood Safety Catch Use the hood prop rod (if equipped) to close it is turned fully upward, past the second detent. 100 UNDERSTANDING THE FEATURES OF YOUR...

Owner's Manual
Page 146
... 117 for service. If the pointer remains on the accelerator. WARNING! Temperature Gauge The temperature gauge shows engine coolant temperature. Follow the warnings under the hood yourself, see Section 7 of the normal operating range. It should not be badly burned by steam or boiling coolant. Electronic Stability Program (ESP) Indicator Light...
... 117 for service. If the pointer remains on the accelerator. WARNING! Temperature Gauge The temperature gauge shows engine coolant temperature. Follow the warnings under the hood yourself, see Section 7 of the normal operating range. It should not be badly burned by steam or boiling coolant. Electronic Stability Program (ESP) Indicator Light...
Owner's Manual
Page 210
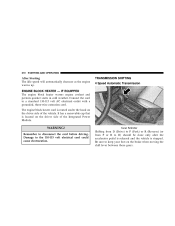
...) to P (Park) or R (Reverse) (or from P or R to D) should be done only after the accelerator pedal is released and the vehicle is routed under the hood on the driver side of the Integrated Power Module. Be sure to the 110-115 volt electrical cord could cause electrocution. IF EQUIPPED The engine...
...) to P (Park) or R (Reverse) (or from P or R to D) should be done only after the accelerator pedal is released and the vehicle is routed under the hood on the driver side of the Integrated Power Module. Be sure to the 110-115 volt electrical cord could cause electrocution. IF EQUIPPED The engine...

Owner's Manual
Page 275
... being hit when operating the jack or changing the wheel. You or others could damage your air conditioner is dangerous. Follow the warnings under the hood yourself, see Section 7, Maintenance, of the vehicle close to change a tire on the side of this heat. Pull far enough off . If your vehicle. If...
... being hit when operating the jack or changing the wheel. You or others could damage your air conditioner is dangerous. Follow the warnings under the hood yourself, see Section 7, Maintenance, of the vehicle close to change a tire on the side of this heat. Pull far enough off . If your vehicle. If...

Owner's Manual
Page 282
... Cover Installation (If Required) 2. Align the valve notch in alignment with the valve stem on . Take care to avoid the radiator cooling fan whenever the hood is in the wheel cover with the valve stem. Do not use a hammer or excessive force to Changing a Tire Section, Item #9 above.
... Cover Installation (If Required) 2. Align the valve notch in alignment with the valve stem on . Take care to avoid the radiator cooling fan whenever the hood is in the wheel cover with the valve stem. Do not use a hammer or excessive force to Changing a Tire Section, Item #9 above.
Owner's Manual
Page 308
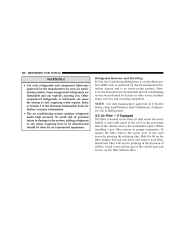
... WARNING! • Use only refrigerants and compressor lubricants approved by the manufacturer for further warranty information. • The air conditioning system contains refrigerant under the hood, behind a removable panel in the cowl on the filter adapter forward and down and remove used filter. Refer to Section 3 of the vehicle, next to...
... WARNING! • Use only refrigerants and compressor lubricants approved by the manufacturer for further warranty information. • The air conditioning system contains refrigerant under the hood, behind a removable panel in the cowl on the filter adapter forward and down and remove used filter. Refer to Section 3 of the vehicle, next to...
Owner's Manual
Page 309
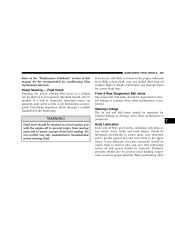
...or the system is not required. after lubricating excess oil and grease should also be removed. Particular attention should be given to hood latching components to remove dust and grit; Prior to protect against rust and wear. Do not overfill. Fluid Check Checking the power... steering fluid level at a defined service interval is not functioning as seat tracks, doors, trunk and hood hinges, should be lubricated periodically to assure quiet, easy operation and to the application of this manual for correct fluid type. Coordinate ...
...or the system is not required. after lubricating excess oil and grease should also be removed. Particular attention should be given to hood latching components to remove dust and grit; Prior to protect against rust and wear. Do not overfill. Fluid Check Checking the power... steering fluid level at a defined service interval is not functioning as seat tracks, doors, trunk and hood hinges, should be lubricated periodically to assure quiet, easy operation and to the application of this manual for correct fluid type. Coordinate ...
Owner's Manual
Page 310
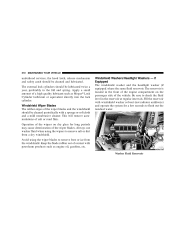
... equivalent directly into the lock cylinder. Be sure to flush out the residual water. Windshield Washers/Headlight Washers - 310 MAINTAINING YOUR VEHICLE underhood services, the hood latch, release mechanism and safety catch should be cleaned and lubricated. If Equipped The windshield washer and the headlight washer (if equipped) share the same...
... equivalent directly into the lock cylinder. Be sure to flush out the residual water. Windshield Washers/Headlight Washers - 310 MAINTAINING YOUR VEHICLE underhood services, the hood latch, release mechanism and safety catch should be cleaned and lubricated. If Equipped The windshield washer and the headlight washer (if equipped) share the same...

Owner's Manual
Page 312
... fresh coolant. Never try to cool. Check the front of the A/C condenser for proper vacuum sealing by gently spraying water from under the hood, don't open the hood until the radiator has had time to open a cooling system pressure cap when the radiator is dirty or rusty in the ON position. •...
... fresh coolant. Never try to cool. Check the front of the A/C condenser for proper vacuum sealing by gently spraying water from under the hood, don't open the hood until the radiator has had time to open a cooling system pressure cap when the radiator is dirty or rusty in the ON position. •...

Owner's Manual
Page 334
Pull the bulb out of the vehicle. • Replace the bulb and push into socket assembly. Exterior (300C Models) Bulb Number Low Beam Headlight (Standard Halogen) ...9006XS Low Beam Headlight - NOTE: Removal of the air cleaner filter housing may be necessary prior to ... License ...W5W BULB REPLACEMENT Low Beam Headlight, High Beam Headlight, Park/Turn Light, Inner Park Light, and Outer Park Light - 300 Models • Open the hood. • Twist the appropriate bulb socket assembly counterclockwise and pull out.
Pull the bulb out of the vehicle. • Replace the bulb and push into socket assembly. Exterior (300C Models) Bulb Number Low Beam Headlight (Standard Halogen) ...9006XS Low Beam Headlight - NOTE: Removal of the air cleaner filter housing may be necessary prior to ... License ...W5W BULB REPLACEMENT Low Beam Headlight, High Beam Headlight, Park/Turn Light, Inner Park Light, and Outer Park Light - 300 Models • Open the hood. • Twist the appropriate bulb socket assembly counterclockwise and pull out.

Owner's Manual
Page 337
... socket assembly. NOTE: Removal of the socket assembly. This diminishes and becomes more white after approximately 10 seconds, as the system charges. • Open the hood. • Twist the appropriate bulb socket assembly counterclockwise and pull out.
... socket assembly. NOTE: Removal of the socket assembly. This diminishes and becomes more white after approximately 10 seconds, as the system charges. • Open the hood. • Twist the appropriate bulb socket assembly counterclockwise and pull out.

Owner's Manual
Page 379
..., Engine Block ...210 High Beam/Low Beam Select (Dimmer) Switch ...106 Hitches Trailer Towing ...264 Holder, Cup ...133 HomeLink (Garage Door Opener) Transmitter ...123 Hood Release ...99 Horn ...12 Hoses ...316,319 Ignition Key ...Illuminated Entry ...Immobilizer (Sentry Key) ...Infant Restraint ...
..., Engine Block ...210 High Beam/Low Beam Select (Dimmer) Switch ...106 Hitches Trailer Towing ...264 Holder, Cup ...133 HomeLink (Garage Door Opener) Transmitter ...123 Hood Release ...99 Horn ...12 Hoses ...316,319 Ignition Key ...Illuminated Entry ...Immobilizer (Sentry Key) ...Infant Restraint ...

Owner's Manual
Page 380
380 INDEX Lap/Shoulder Belts ...32 LATCH (Lower Anchors and Tether for CHildren) ...56 Latch Plate ...33 Latches Hood ...99 Lead Free Gasoline ...253 Life of Tires ...249 Lights ...61,100 Airbag ...44,51,61,144 Anti-Lock ...144 Automatic Headlights ...103 Brake Warning ......
380 INDEX Lap/Shoulder Belts ...32 LATCH (Lower Anchors and Tether for CHildren) ...56 Latch Plate ...33 Latches Hood ...99 Lead Free Gasoline ...253 Life of Tires ...249 Lights ...61,100 Airbag ...44,51,61,144 Anti-Lock ...144 Automatic Headlights ...103 Brake Warning ......