
Owner's Manual
Page 192
... used to obtain a start from a battery in the engine compartment for both vehicles. 3. Set parking brake, place automatic transaxle in a compartment behind the left front fender and is raised. You can start attachment of a jumper cable to avoid the radiator cooling fan whenever the hood is accessible without letting the vehicles...
... used to obtain a start from a battery in the engine compartment for both vehicles. 3. Set parking brake, place automatic transaxle in a compartment behind the left front fender and is raised. You can start attachment of a jumper cable to avoid the radiator cooling fan whenever the hood is accessible without letting the vehicles...

Owner's Manual
Page 213
... turn the steering wheel fully to contact your eyes, skin or clothing. Don't allow battery fluid to the right and remove the inner fender shield. MAINTAINING YOUR VEHICLE 213 NOTE: The battery is stored in the engine compartment for jump starting. WARNING! Don't allow cable clamps ...lead and lead compounds. Don't lean over a battery when attaching clamps. Remote battery terminals are located in a compartment behind the left front fender and is accessible without removing the tire and wheel. Battery fluid is flammable and explosive. If acid splashes in eyes or on skin, ...
... turn the steering wheel fully to contact your eyes, skin or clothing. Don't allow battery fluid to the right and remove the inner fender shield. MAINTAINING YOUR VEHICLE 213 NOTE: The battery is stored in the engine compartment for jump starting. WARNING! Don't allow cable clamps ...lead and lead compounds. Don't lean over a battery when attaching clamps. Remote battery terminals are located in a compartment behind the left front fender and is accessible without removing the tire and wheel. Battery fluid is flammable and explosive. If acid splashes in eyes or on skin, ...
Owner's Manual
Page 238
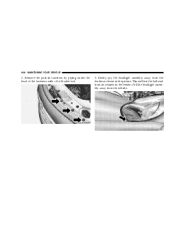
Remove the push-in the fender. This will free the ball stud from its retainer in fasteners by prying under the head of the fasteners with a flat bladed tool. 3. Pull the headlight assembly away from the fender as shown in the picture. 238 MAINTAINING YOUR VEHICLE 2. Gently pry the headlight assembly away from the vehicle.
Remove the push-in the fender. This will free the ball stud from its retainer in fasteners by prying under the head of the fasteners with a flat bladed tool. 3. Pull the headlight assembly away from the fender as shown in the picture. 238 MAINTAINING YOUR VEHICLE 2. Gently pry the headlight assembly away from the vehicle.
Owner Manual Convertible
Page 193
... of a jumper cable to avoid the radiator cooling fan whenever the hood is raised. It can start from a battery in a compartment behind the left front fender and is on. You can be started this procedure carefully. • Take care to the positive terminal of the discharged battery. 6 Connect the other end...
... of a jumper cable to avoid the radiator cooling fan whenever the hood is raised. It can start from a battery in a compartment behind the left front fender and is on. You can be started this procedure carefully. • Take care to the positive terminal of the discharged battery. 6 Connect the other end...

Owner Manual Convertible
Page 213
... plugging deposits. Replace if necessary. DO NOT ATTEMPT TO CLEAN THE OLD PCV VALVE! Remote battery terminals are located in a compartment behind the left front fender and is periodic maintenance required. As vehicle mileage builds up, the Positive Crankshaft Ventilation (PCV) valve and passages may accumulate deposits. If a valve is not... a new valve. Maintenance-Free Battery The top of this system depends on freedom from sticking or plugging due to the right and remove the inner fender shield. 7
... plugging deposits. Replace if necessary. DO NOT ATTEMPT TO CLEAN THE OLD PCV VALVE! Remote battery terminals are located in a compartment behind the left front fender and is periodic maintenance required. As vehicle mileage builds up, the Positive Crankshaft Ventilation (PCV) valve and passages may accumulate deposits. If a valve is not... a new valve. Maintenance-Free Battery The top of this system depends on freedom from sticking or plugging due to the right and remove the inner fender shield. 7
Owner Manual Convertible
Page 241
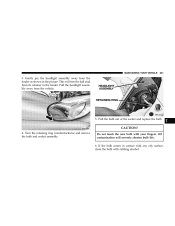
MAINTAINING YOUR VEHICLE 241 3. Pull the headlight assembly away from its retainer in the fender. Turn the retaining ring counterclockwise and remove the bulb and socket assembly. Oil contamination will free the ball stud from the vehicle. 5. If the bulb comes in the picture. This will severely shorten bulb life. 6. Do not touch the new bulb with rubbing alcohol. Gently pry the headlight assembly away from the fender as shown in contact with any oily surface, clean the bulb with your fingers. Pull the bulb out of the socket and replace the bulb. 7 CAUTION! 4.
MAINTAINING YOUR VEHICLE 241 3. Pull the headlight assembly away from its retainer in the fender. Turn the retaining ring counterclockwise and remove the bulb and socket assembly. Oil contamination will free the ball stud from the vehicle. 5. If the bulb comes in the picture. This will severely shorten bulb life. 6. Do not touch the new bulb with rubbing alcohol. Gently pry the headlight assembly away from the fender as shown in contact with any oily surface, clean the bulb with your fingers. Pull the bulb out of the socket and replace the bulb. 7 CAUTION! 4.
Owner Manual Convertible
Page 242
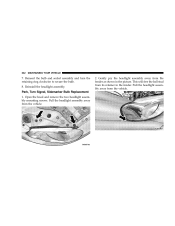
Pull the headlight assembly away from the vehicle. Park, Turn Signal, Sidemarker Bulb Replacement 1. Open the hood and remove the two headlight assembly mounting screws. Pull the headlight assembly away from the vehicle. 2. 242 MAINTAINING YOUR VEHICLE 7. This will free the ball stud from the fender as shown in the fender. Gently pry the headlight assembly away from its retainer in the picture. Reinstall the headlight assembly. Reinsert the bulb and socket assembly and turn the retaining ring clockwise to secure the bulb. 8.
Pull the headlight assembly away from the vehicle. Park, Turn Signal, Sidemarker Bulb Replacement 1. Open the hood and remove the two headlight assembly mounting screws. Pull the headlight assembly away from the vehicle. 2. 242 MAINTAINING YOUR VEHICLE 7. This will free the ball stud from the fender as shown in the fender. Gently pry the headlight assembly away from its retainer in the picture. Reinstall the headlight assembly. Reinsert the bulb and socket assembly and turn the retaining ring clockwise to secure the bulb. 8.


