
Owner's Manual
Page 20
... and hold the Lock button on the transmitter to unlatch the trunk. Release both buttons. Press and hold the Lock button on the transmitter. 2. The headlights will flash once to acknowledge the unlock signal. Press and hold the Lock button, wait at least 4 but no longer than 10 seconds, then press...
... and hold the Lock button on the transmitter to unlatch the trunk. Release both buttons. Press and hold the Lock button on the transmitter. 2. The headlights will flash once to acknowledge the unlock signal. Press and hold the Lock button, wait at least 4 but no longer than 10 seconds, then press...
Owner's Manual
Page 21
Panic Alarm The panic mode unlocks the driver's door, turns on the interior lights, flashes the headlights, and sounds the horn for at least 1 second to deactivate the alarm. To Program Additional Transmitters: Up to 4 transmitters can proceed with RS-210 of ...
Panic Alarm The panic mode unlocks the driver's door, turns on the interior lights, flashes the headlights, and sounds the horn for at least 1 second to deactivate the alarm. To Program Additional Transmitters: Up to 4 transmitters can proceed with RS-210 of ...
Owner's Manual
Page 23
... is still present, the lights will stop and if the source of the vehicle. 2. For the first three minutes the horn will sound and the headlights and interior lights will not arm if you unlock a front door using either the key or the Keyless Entry Transmitter. Tamper Alert If the horn...
... is still present, the lights will stop and if the source of the vehicle. 2. For the first three minutes the horn will sound and the headlights and interior lights will not arm if you unlock a front door using either the key or the Keyless Entry Transmitter. Tamper Alert If the horn...
Owner's Manual
Page 52
... Lights (Canada Only) ...67 ▫ Lights-On Reminder ...67 ▫ Fog Lights - If Equipped ...67 ▫ Turn Signals ...67 ▫ Headlight Beam Select Switch ...68 ▫ Flash To Pass ...68 ▫ Headlight Time Delay ...68 Windshield Wipers And Washers ...68 ▫ Mist ...69 ▫ Speed Sensitive Intermittent Wiper System ...69 Tilt Steering...
... Lights (Canada Only) ...67 ▫ Lights-On Reminder ...67 ▫ Fog Lights - If Equipped ...67 ▫ Turn Signals ...67 ▫ Headlight Beam Select Switch ...68 ▫ Flash To Pass ...68 ▫ Headlight Time Delay ...68 Windshield Wipers And Washers ...68 ▫ Mist ...69 ▫ Speed Sensitive Intermittent Wiper System ...69 Tilt Steering...
Owner's Manual
Page 56
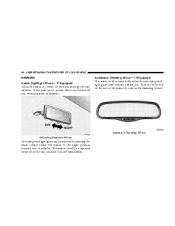
Automatic Dimming Mirror Adjusting Rearview Mirror Annoying headlight glare can be adjusted while set in the button on the view through the rear window. The mirror should be reduced by moving the small ... OF YOUR VEHICLE MIRRORS Inside Day/Night Mirror- If Equipped Adjust the mirror to activate the dimming feature. A two point pivot system allows for annoying headlight glare from vehicles behind you. Automatic Dimming Mirror- If Equipped This mirror will automatically adjust for horizontal and vertical mirror adjustment. Push in the day...
Automatic Dimming Mirror Adjusting Rearview Mirror Annoying headlight glare can be adjusted while set in the button on the view through the rear window. The mirror should be reduced by moving the small ... OF YOUR VEHICLE MIRRORS Inside Day/Night Mirror- If Equipped Adjust the mirror to activate the dimming feature. A two point pivot system allows for annoying headlight glare from vehicles behind you. Automatic Dimming Mirror- If Equipped This mirror will automatically adjust for horizontal and vertical mirror adjustment. Push in the day...

Owner's Manual
Page 64
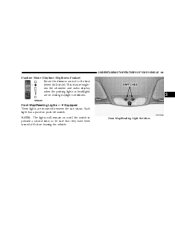
... signal control stalk) is not fully latched it could have a "fade to the extreme bottom full-circle position. Dimmer Control With the parking lights or headlights on, rotating the dimmer control for the interior lights on the interior lights. Dome Light Position Rotate the dimmer control completely upward to the second...
... signal control stalk) is not fully latched it could have a "fade to the extreme bottom full-circle position. Dimmer Control With the parking lights or headlights on, rotating the dimmer control for the interior lights on the interior lights. Dome Light Position Rotate the dimmer control completely upward to the second...
Owner's Manual
Page 65
...-circle). Each light has a push-on push-off before leaving the vehicle. This feature brightens the odometer and radio display when the parking lights or headlights are mounted between the sun visors. NOTE: The lights will remain on during daylight conditions. 3 Front Map/Reading Lights - If Equipped These lights are on...
...-circle). Each light has a push-on push-off before leaving the vehicle. This feature brightens the odometer and radio display when the parking lights or headlights are mounted between the sun visors. NOTE: The lights will remain on during daylight conditions. 3 Front Map/Reading Lights - If Equipped These lights are on...

Owner's Manual
Page 66
... panel light dimming, courtesy lights, passing lights, dome light and fog lights. Turning the dimmer control to the first detent for headlight operation. 66 UNDERSTANDING THE FEATURES OF YOUR VEHICLE Multi-Function Control Lever Multi-Function Lever Multi-Function Lever The Multi-Function lever controls... the operation of the headlights, turn the center portion of the lever up position also turns on when a door is opened. To change the brightness of ...
... panel light dimming, courtesy lights, passing lights, dome light and fog lights. Turning the dimmer control to the first detent for headlight operation. 66 UNDERSTANDING THE FEATURES OF YOUR VEHICLE Multi-Function Control Lever Multi-Function Lever Multi-Function Lever The Multi-Function lever controls... the operation of the headlights, turn the center portion of the lever up position also turns on when a door is opened. To change the brightness of ...

Owner's Manual
Page 67
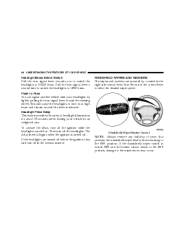
...the off the fog lights. Turn Signals Move the turn signal lights. UNDERSTANDING THE FEATURES OF YOUR VEHICLE 67 Automatic Headlights-If Equipped This system automatically turns your headlights will stay on for more than 10 seconds. To activate the fog lights, turn the control lever clockwise, to ...turn on the fog lights only if the low beam headlights are on. The headlight switch must be used for normal night time driving. Fog Lights - If Equipped The fog light switch is engaged. You can signal...
...the off the fog lights. Turn Signals Move the turn signal lights. UNDERSTANDING THE FEATURES OF YOUR VEHICLE 67 Automatic Headlights-If Equipped This system automatically turns your headlights will stay on for more than 10 seconds. To activate the fog lights, turn the control lever clockwise, to ...turn on the fog lights only if the low beam headlights are on. The headlight switch must be used for normal night time driving. Fog Lights - If Equipped The fog light switch is engaged. You can signal...
Owner's Manual
Page 68
... may occur. Windshield Wiper/Washer Control NOTE: Always remove any build-up of the control lever to the OFF position. Pull the turn off the headlights. To activate the delay, turn off in an unlighted area. If the windshield wiper switch is turned off the ignition while the... windshield wiper blades from returning to select the desired wiper speed. Flash to LOW beam. This will turn signal lever a second time to switch the headlights to Pass You can signal another vehicle with your vehicle in the normal manner. 68 UNDERSTANDING THE FEATURES OF YOUR VEHICLE...
... may occur. Windshield Wiper/Washer Control NOTE: Always remove any build-up of the control lever to the OFF position. Pull the turn off the headlights. To activate the delay, turn off in an unlighted area. If the windshield wiper switch is turned off the ignition while the... windshield wiper blades from returning to select the desired wiper speed. Flash to LOW beam. This will turn signal lever a second time to switch the headlights to Pass You can signal another vehicle with your vehicle in the normal manner. 68 UNDERSTANDING THE FEATURES OF YOUR VEHICLE...
Owner's Manual
Page 91
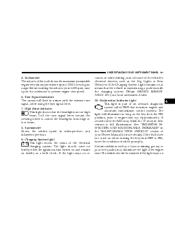
... light after engine start up on high beam. UNDERSTANDING YOUR INSTRUMENT PANEL 91 5. See your Owner Manual for 10 seconds then resume to switch the headlights from OFF to engine start . Tachometer The red area of the electrical charging system. Certain conditions such as the Fog Lights or Rear Defroster. Before... reaching the red area (over 6,500 rpm), ease up . If the Charging System Light remains on, it means that the headlights are on the accelerator to prevent engine over speed. 6.
... light after engine start up on high beam. UNDERSTANDING YOUR INSTRUMENT PANEL 91 5. See your Owner Manual for 10 seconds then resume to switch the headlights from OFF to engine start . Tachometer The red area of the electrical charging system. Certain conditions such as the Fog Lights or Rear Defroster. Before... reaching the red area (over 6,500 rpm), ease up . If the Charging System Light remains on, it means that the headlights are on the accelerator to prevent engine over speed. 6.
Owner's Manual
Page 200
... Fuses (Power Distribution Center) ...234 ▫ Interior Fuses ...234 Vehicle Storage ...236 Replacement Light Bulbs ...237 Bulb Replacement ...237 ▫ Headlight Bulb Replacement ...237 ▫ Park, Turn Signal, Sidemarker Bulb Replacement ...239 ▫ Fog Light Bulb Replacement ...240 ▫ Center Stoplight Bulb... Replacement ...241 ▫ Rear Light Bulb Replacement ...242 ▫ License Plate Bulb Replacement ...242 ▫ Headlight Aiming ...243 Fluids And Capacities ...243 Recommended Fluids, Lubricants And Genuine Parts ...244 ▫ Engine ...244 ▫ Chassis ...244
... Fuses (Power Distribution Center) ...234 ▫ Interior Fuses ...234 Vehicle Storage ...236 Replacement Light Bulbs ...237 Bulb Replacement ...237 ▫ Headlight Bulb Replacement ...237 ▫ Park, Turn Signal, Sidemarker Bulb Replacement ...239 ▫ Fog Light Bulb Replacement ...240 ▫ Center Stoplight Bulb... Replacement ...241 ▫ Rear Light Bulb Replacement ...242 ▫ License Plate Bulb Replacement ...242 ▫ Headlight Aiming ...243 Fluids And Capacities ...243 Recommended Fluids, Lubricants And Genuine Parts ...244 ▫ Engine ...244 ▫ Chassis ...244
Owner's Manual
Page 232
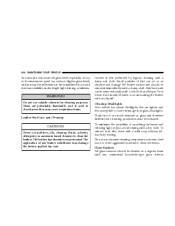
...in closed areas they may damage the factory applied top coat. Many are lighter and less susceptible to stone breakage than glass headlights. Plastic is best preserved by rinsing. Glass Surfaces All glass surfaces should be removed immediately with any commercial household-type glass... MAINTAINING YOUR VEHICLE You should be taken to avoid soaking the leather with a damp soft cloth. Cleaning Headlights Your vehicle has plastic headlights that are potentially flammable, and if used in the windshield that could decrease visibility under bright light driving conditions.
...in closed areas they may damage the factory applied top coat. Many are lighter and less susceptible to stone breakage than glass headlights. Plastic is best preserved by rinsing. Glass Surfaces All glass surfaces should be removed immediately with any commercial household-type glass... MAINTAINING YOUR VEHICLE You should be taken to avoid soaking the leather with a damp soft cloth. Cleaning Headlights Your vehicle has plastic headlights that are potentially flammable, and if used in the windshield that could decrease visibility under bright light driving conditions.
Owner's Manual
Page 235
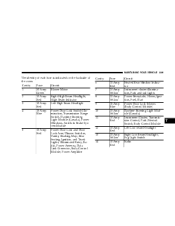
... is indicated on the backside of the cover. Cavity Fuse Circuit 1 30 Amp Blower Motor Green 2 10 Amp Right High Beam Headlight, Red High Beam Indicator 3 10 Amp Left High Beam Headlight Red 4 15 Amp Power Door Lock Switch IlluBlue mination, Transmission Range Switch, Daytime Running Light Module (Canada), Power Windows, Anti... Power Door Lock Motors (Body Control Module) Daytime Running Light Module (Canada) Instrument Cluster, Transmission Control, Park/Neutral Switch, Body Control Module Left Low beam Headlight Right Low Beam Headlight, Fog Light Switch Radio 7
... is indicated on the backside of the cover. Cavity Fuse Circuit 1 30 Amp Blower Motor Green 2 10 Amp Right High Beam Headlight, Red High Beam Indicator 3 10 Amp Left High Beam Headlight Red 4 15 Amp Power Door Lock Switch IlluBlue mination, Transmission Range Switch, Daytime Running Light Module (Canada), Power Windows, Anti... Power Door Lock Motors (Body Control Module) Daytime Running Light Module (Canada) Instrument Cluster, Transmission Control, Park/Neutral Switch, Body Control Module Left Low beam Headlight Right Low Beam Headlight, Fog Light Switch Radio 7
Owner's Manual
Page 237
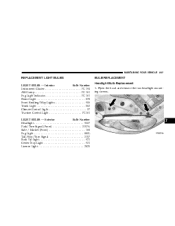
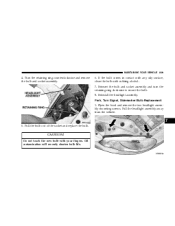
Open the hood and remove the two headlight mounting screws. 7 MAINTAINING YOUR VEHICLE 237 REPLACEMENT LIGHT BULBS LIGHT BULBS - Interior Bulb Number Instrument Cluster ...PC 194 ABS Lamp ...PC 161 Fog Light Indicator...... 161 Dome Light ...578 Front Reading/Map Lights...906 Trunk Light ...562 Climate Control Light ...37 Traction Control Light ...PC161 LIGHT BULBS - Exterior Bulb Number Headlight ...9007 Park/Turn Signal (Front) ...3157A Side / Marker (Front) ...168 Fog Light ...880L Tail/Stop/Turn Signal ...3157 Back Up Light...921 Center Stop Light...
Open the hood and remove the two headlight mounting screws. 7 MAINTAINING YOUR VEHICLE 237 REPLACEMENT LIGHT BULBS LIGHT BULBS - Interior Bulb Number Instrument Cluster ...PC 194 ABS Lamp ...PC 161 Fog Light Indicator...... 161 Dome Light ...578 Front Reading/Map Lights...906 Trunk Light ...562 Climate Control Light ...37 Traction Control Light ...PC161 LIGHT BULBS - Exterior Bulb Number Headlight ...9007 Park/Turn Signal (Front) ...3157A Side / Marker (Front) ...168 Fog Light ...880L Tail/Stop/Turn Signal ...3157 Back Up Light...921 Center Stop Light...
Owner's Manual
Page 238
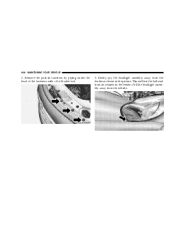
Pull the headlight assembly away from its retainer in the fender. Gently pry the headlight assembly away from the fender as shown in fasteners by prying under the head of the fasteners with a flat bladed tool. 3. 238 MAINTAINING YOUR VEHICLE 2. Remove the push-in the picture. This will free the ball stud from the vehicle.
Pull the headlight assembly away from its retainer in the fender. Gently pry the headlight assembly away from the fender as shown in fasteners by prying under the head of the fasteners with a flat bladed tool. 3. 238 MAINTAINING YOUR VEHICLE 2. Remove the push-in the picture. This will free the ball stud from the vehicle.
Owner's Manual
Page 239
... mounting screws. If the bulb comes in contact with any oily surface, clean the bulb with your fingers. Pull the headlight assembly away from the vehicle. 7 5. Pull the bulb out of the socket and replace the bulb. CAUTION! Do not touch the new bulb ...with rubbing alcohol. 7. MAINTAINING YOUR VEHICLE 239 4. Reinstall the headlight assembly. Park, Turn Signal, Sidemarker Bulb Replacement 1. Oil contamination will severely shorten bulb life. Turn the retaining ring counterclockwise and remove the bulb and ...
... mounting screws. If the bulb comes in contact with any oily surface, clean the bulb with your fingers. Pull the headlight assembly away from the vehicle. 7 5. Pull the bulb out of the socket and replace the bulb. CAUTION! Do not touch the new bulb ...with rubbing alcohol. 7. MAINTAINING YOUR VEHICLE 239 4. Reinstall the headlight assembly. Park, Turn Signal, Sidemarker Bulb Replacement 1. Oil contamination will severely shorten bulb life. Turn the retaining ring counterclockwise and remove the bulb and ...
Owner's Manual
Page 240
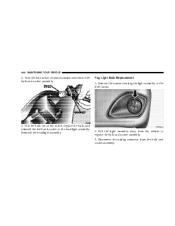
Remove the screws securing the light assembly to the headlight assembly. Pull the bulb out of the socket, replace the bulb, and reinstall the bulb and socket to the front fascia. 3. Reinstall the headlight assembly. 2. Disconnect the wiring connector from the vehicle to expose the bulb and socket assembly. 3. Fog Light Bulb Replacement 1. Pull the light assembly away from the bulb and socket assembly. Turn the bulb socket counterclockwise and remove the bulb and socket assembly. 240 MAINTAINING YOUR VEHICLE 2.
Remove the screws securing the light assembly to the headlight assembly. Pull the bulb out of the socket, replace the bulb, and reinstall the bulb and socket to the front fascia. 3. Reinstall the headlight assembly. 2. Disconnect the wiring connector from the vehicle to expose the bulb and socket assembly. 3. Fog Light Bulb Replacement 1. Pull the light assembly away from the bulb and socket assembly. Turn the bulb socket counterclockwise and remove the bulb and socket assembly. 240 MAINTAINING YOUR VEHICLE 2.

Owner's Manual
Page 243
... a Service Manual can be necessary to the engine oil fill cap for coolant tank. 7 To readjust the headlights first mark the position of the headlights on a wall prior to the original position. If any further adjustments are necessary contact your new vehicle were aimed... and 2.7 Liter Engines (87 16 Gallons 61 Liters Octane) Engine Oil-With Filter 2.4 and 2.7 Liter Engines (Re5 qts. 4.7 Liters fer to readjust the headlights if carrying an excessive amount of this Owner's Manual. for the correct SAE grade) Cooling System * 2.4 Liter Engines* (Mopar 8 qts. 7.5 Liters Antifreeze/...
... a Service Manual can be necessary to the engine oil fill cap for coolant tank. 7 To readjust the headlights first mark the position of the headlights on a wall prior to the original position. If any further adjustments are necessary contact your new vehicle were aimed... and 2.7 Liter Engines (87 16 Gallons 61 Liters Octane) Engine Oil-With Filter 2.4 and 2.7 Liter Engines (Re5 qts. 4.7 Liters fer to readjust the headlights if carrying an excessive amount of this Owner's Manual. for the correct SAE grade) Cooling System * 2.4 Liter Engines* (Mopar 8 qts. 7.5 Liters Antifreeze/...
Owner's Manual
Page 278
...Lock Brake) System ...153 Adding Engine Coolant (Antifreeze) ...222 Adding Fuel ...178 Adding Washer Fluid ...218 Additives, Fuel ...176 Aiming Headlights ...243 Air Cleaner, Engine (Engine Air Cleaner Filter) . 211 Air Conditioner Maintenance ...214 Air Conditioning ...126,133 Air Conditioning Controls ...... Light ...93 Anti-Theft Security Alarm ...23 Appearance Care ...229 Automatic Dimming Mirror ...56 Automatic Door Locks ...17,18 Automatic Headlights ...67 Automatic Temperature Control ...126 Automatic Transaxle ...147,149,227,244 Adding Fluid ...244 Filter ...228 Fluid and Filter Changes ...
...Lock Brake) System ...153 Adding Engine Coolant (Antifreeze) ...222 Adding Fuel ...178 Adding Washer Fluid ...218 Additives, Fuel ...176 Aiming Headlights ...243 Air Cleaner, Engine (Engine Air Cleaner Filter) . 211 Air Conditioner Maintenance ...214 Air Conditioning ...126,133 Air Conditioning Controls ...... Light ...93 Anti-Theft Security Alarm ...23 Appearance Care ...229 Automatic Dimming Mirror ...56 Automatic Door Locks ...17,18 Automatic Headlights ...67 Automatic Temperature Control ...126 Automatic Transaxle ...147,149,227,244 Adding Fluid ...244 Filter ...228 Fluid and Filter Changes ...


