Owner's Manual
Page 200
... ▫ Interior Fuses ...234 Vehicle Storage ...236 Replacement Light Bulbs ...237 Bulb Replacement ...237 ▫ Headlight Bulb Replacement ...237 ▫ Park, Turn Signal, Sidemarker Bulb Replacement ...239 ▫ Fog Light Bulb Replacement ...240 ▫ Center Stoplight Bulb Replacement ...241 ▫ Rear Light Bulb Replacement ...242 ▫ License Plate Bulb Replacement ...242 ▫ Headlight Aiming ...243 Fluids And Capacities ...243 Recommended...
... ▫ Interior Fuses ...234 Vehicle Storage ...236 Replacement Light Bulbs ...237 Bulb Replacement ...237 ▫ Headlight Bulb Replacement ...237 ▫ Park, Turn Signal, Sidemarker Bulb Replacement ...239 ▫ Fog Light Bulb Replacement ...240 ▫ Center Stoplight Bulb Replacement ...241 ▫ Rear Light Bulb Replacement ...242 ▫ License Plate Bulb Replacement ...242 ▫ Headlight Aiming ...243 Fluids And Capacities ...243 Recommended...
Owner's Manual
Page 237
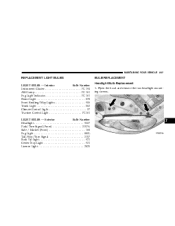
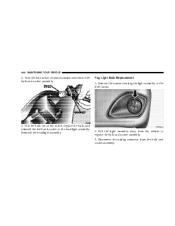
Open the hood and remove the two headlight mounting screws. 7 MAINTAINING YOUR VEHICLE 237 REPLACEMENT LIGHT BULBS LIGHT BULBS - Interior Bulb Number Instrument Cluster ...PC 194 ABS Lamp ...PC 161 Fog Light Indicator...PC 161 Dome Light ...Trunk Light ...562 Climate Control Light ...37 Traction Control Light ...PC161 LIGHT BULBS - Exterior Bulb Number Headlight ...9007 Park/Turn Signal (Front) ...3157A Side / Marker (Front) ...168 Fog Light ...880L Tail/Stop/Turn Signal ...3157 Back Up Light...921 Center Stop Light ...921 License Light...2825 BULB REPLACEMENT Headlight Bulb Replacement 1.
Open the hood and remove the two headlight mounting screws. 7 MAINTAINING YOUR VEHICLE 237 REPLACEMENT LIGHT BULBS LIGHT BULBS - Interior Bulb Number Instrument Cluster ...PC 194 ABS Lamp ...PC 161 Fog Light Indicator...PC 161 Dome Light ...Trunk Light ...562 Climate Control Light ...37 Traction Control Light ...PC161 LIGHT BULBS - Exterior Bulb Number Headlight ...9007 Park/Turn Signal (Front) ...3157A Side / Marker (Front) ...168 Fog Light ...880L Tail/Stop/Turn Signal ...3157 Back Up Light...921 Center Stop Light ...921 License Light...2825 BULB REPLACEMENT Headlight Bulb Replacement 1.
Owner's Manual
Page 239
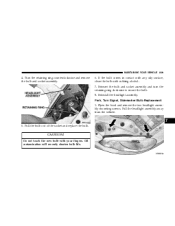
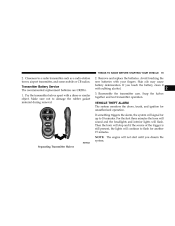
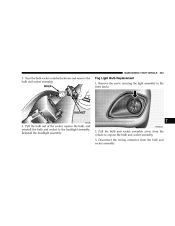
Turn the retaining ring counterclockwise and remove the bulb and socket assembly. 6. Open the hood and remove the two headlight assembly mounting screws. Reinstall the headlight assembly. CAUTION! MAINTAINING YOUR VEHICLE 239 4. Reinsert the bulb and socket assembly and turn the retaining ring clockwise to... secure the bulb. 8. Do not touch the new bulb with rubbing alcohol. 7. Pull the headlight assembly away from the vehicle. 7 5. Oil contamination will severely shorten bulb life. If the bulb comes in contact with any oily surface...
Turn the retaining ring counterclockwise and remove the bulb and socket assembly. 6. Open the hood and remove the two headlight assembly mounting screws. Reinstall the headlight assembly. CAUTION! MAINTAINING YOUR VEHICLE 239 4. Reinsert the bulb and socket assembly and turn the retaining ring clockwise to... secure the bulb. 8. Do not touch the new bulb with rubbing alcohol. 7. Pull the headlight assembly away from the vehicle. 7 5. Oil contamination will severely shorten bulb life. If the bulb comes in contact with any oily surface...
Owner's Manual
Page 240
Remove the screws securing the light assembly to the headlight assembly. Pull the bulb out of the socket, replace the bulb, and reinstall the bulb and socket to the front fascia. 3. Reinstall the headlight assembly. 2. Fog Light Bulb Replacement 1. Disconnect the wiring connector from the vehicle to expose the bulb and socket assembly. 3. 240 MAINTAINING YOUR VEHICLE 2. Pull the light assembly away from the bulb and socket assembly. Turn the bulb socket counterclockwise and remove the bulb and socket assembly.
Remove the screws securing the light assembly to the headlight assembly. Pull the bulb out of the socket, replace the bulb, and reinstall the bulb and socket to the front fascia. 3. Reinstall the headlight assembly. 2. Fog Light Bulb Replacement 1. Disconnect the wiring connector from the vehicle to expose the bulb and socket assembly. 3. 240 MAINTAINING YOUR VEHICLE 2. Pull the light assembly away from the bulb and socket assembly. Turn the bulb socket counterclockwise and remove the bulb and socket assembly.
Owner's Manual
Page 283
... Fuel ...90 Speedometer ...91 Tachometer ...91 Gearshift ...149 General Information ...14,21 Glass Cleaning ...232 Hazard Warning Flasher ...186 Head Restraints ...61 Headlights ...237 Aiming ...243 Automatic ...67 Bulb Replacement ...237 Cleaning ...232 High Beam ...68,91 High Beam/Low Beam Select Switch ...68 Passing ...68 Switch ...66 Time Delay ...67,68...
... Fuel ...90 Speedometer ...91 Tachometer ...91 Gearshift ...149 General Information ...14,21 Glass Cleaning ...232 Hazard Warning Flasher ...186 Head Restraints ...61 Headlights ...237 Aiming ...243 Automatic ...67 Bulb Replacement ...237 Cleaning ...232 High Beam ...68,91 High Beam/Low Beam Select Switch ...68 Passing ...68 Switch ...66 Time Delay ...67,68...
Owner's Manual
Page 284
... Plate ...28 Latches Hood ...63,216 Lead Free Gasoline ...174 Leaks, Fluid ...49 Lights ...49,64 Airbag ...38,40,49,90 Anti-Lock ...93 Automatic Headlights ...67 Brake Warning ...94,151 284 INDEX Hood Prop ...63 Hood Release ...63 Hoses ...224,227 Ignition Key ...11 Lock ...11 Illuminated Entry ...15 Immobilizer... Lighting ...64 Interior Lights ...64 Introduction ...4 Jack Location ...188 Jack Operation ...188 Jump Starting ...192 14 13 13 12 19 11 34 Key, Programming ...Key, Replacement ...Key, Sentry ...Key-In Reminder ...Keyless Entry System ...Keys ...Knee Bolster ...
... Plate ...28 Latches Hood ...63,216 Lead Free Gasoline ...174 Leaks, Fluid ...49 Lights ...49,64 Airbag ...38,40,49,90 Anti-Lock ...93 Automatic Headlights ...67 Brake Warning ...94,151 284 INDEX Hood Prop ...63 Hood Release ...63 Hoses ...224,227 Ignition Key ...11 Lock ...11 Illuminated Entry ...15 Immobilizer... Lighting ...64 Interior Lights ...64 Introduction ...4 Jack Location ...188 Jack Operation ...188 Jump Starting ...192 14 13 13 12 19 11 34 Key, Programming ...Key, Replacement ...Key, Sentry ...Key-In Reminder ...Keyless Entry System ...Keys ...Knee Bolster ...
Owner's Manual
Page 285
...,68 Engine Temperature Warning ...92 Exterior Check ...49 Fog ...67,92,240 Front Replacement ...240 Headlight Switch ...66 Headlights ...66 High Beam ...68 High Beam Indicator ...91 Illuminated Entry ...15 Instrument Cluster ...66 Interior ...64 License ...242 Lights On Reminder ...67 Low Fuel ...95 ...
...,68 Engine Temperature Warning ...92 Exterior Check ...49 Fog ...67,92,240 Front Replacement ...240 Headlight Switch ...66 Headlights ...66 High Beam ...68 High Beam Indicator ...91 Illuminated Entry ...15 Instrument Cluster ...66 Interior ...64 License ...242 Lights On Reminder ...67 Low Fuel ...95 ...
Owner Manual Coupe
Page 31
The headlights will automatically occur. The keyless transmitter will operate within approximately 30 seconds, re-locking will blink on and off the alarm, press any button on ... vehicle and feel threatened, you are closed and no door is located near your transmitter is in the keyless transmitter may be exposed to be replaced. • The doors cannot be locked or unlocked. • The trunk lid cannot be unlocked. • The panic alarm cannot be operated. 5. The keyless entry...
The headlights will automatically occur. The keyless transmitter will operate within approximately 30 seconds, re-locking will blink on and off the alarm, press any button on ... vehicle and feel threatened, you are closed and no door is located near your transmitter is in the keyless transmitter may be exposed to be replaced. • The doors cannot be locked or unlocked. • The trunk lid cannot be unlocked. • The panic alarm cannot be operated. 5. The keyless entry...
Owner Manual Coupe
Page 123
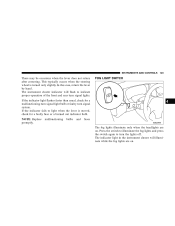
... lights are on . If the indicator fails to light when the lever is turned only slightly. NOTE: Replace promptly. malfunctioning bulbs and fuses FOG LIGHT SWITCH 4 E18A0550 The fog lights illuminate only when the headlights are on . If the indicator light flashes faster than usual, check for a faulty fuse or a burned out...
... lights are on . If the indicator fails to light when the lever is turned only slightly. NOTE: Replace promptly. malfunctioning bulbs and fuses FOG LIGHT SWITCH 4 E18A0550 The fog lights illuminate only when the headlights are on . If the indicator light flashes faster than usual, check for a faulty fuse or a burned out...

Owner Manual Coupe
Page 202
...sharp inclines as the transaxle reaches a normal operating temperature. Replace tires before they are at first to allow the transaxle oil to see if the engine runs at the proper speed and if the headlights are excessively worn. 3. OPERATION DURING COLD WEATHER 1. Before ... gives off explosive hydrogen gas. Check the engine antifreeze. This ratio provides adequate corrosion, boiling, and freeze protection. Charge or replace the battery if necessary. Maintain specified tire inflation pressures. Maintain low-speed operation at their usual intensity. If there is possible ...
...sharp inclines as the transaxle reaches a normal operating temperature. Replace tires before they are at first to allow the transaxle oil to see if the engine runs at the proper speed and if the headlights are excessively worn. 3. OPERATION DURING COLD WEATHER 1. Before ... gives off explosive hydrogen gas. Check the engine antifreeze. This ratio provides adequate corrosion, boiling, and freeze protection. Charge or replace the battery if necessary. Maintain specified tire inflation pressures. Maintain low-speed operation at their usual intensity. If there is possible ...
Owner Manual Coupe
Page 291
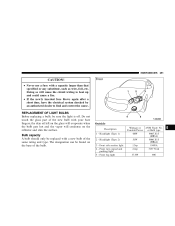
...touch the glass part of the bulb. The designation can be found on the base of the new bulb with your bare fingers; Headlight (Type 2) 3 - Doing so will condense on the glass will evaporate when the bulb gets hot and the vapor will cause ...marker light 4 - N10B2800 Outside Description 1 - Front fog light Wattage or ANSI Trade No. REPLACEMENT OF LIGHT BULBS Before replacing a bulb, be replaced with a capacity larger than that specified or any substitute, such as wire, foil, etc. Headlight (Type 1) 2 - Front turn signal and parking light 5 - Candela Power or Bulb type...
...touch the glass part of the bulb. The designation can be found on the base of the new bulb with your bare fingers; Headlight (Type 2) 3 - Doing so will condense on the glass will evaporate when the bulb gets hot and the vapor will cause ...marker light 4 - N10B2800 Outside Description 1 - Front fog light Wattage or ANSI Trade No. REPLACEMENT OF LIGHT BULBS Before replacing a bulb, be replaced with a capacity larger than that specified or any substitute, such as wire, foil, etc. Headlight (Type 1) 2 - Front turn signal and parking light 5 - Candela Power or Bulb type...
Owner Manual Convertible
Page 19
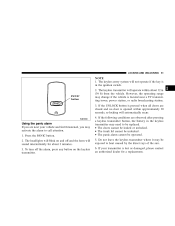
... will flash. Snap the halves together and test transmitter operation. For the first three minutes the horn will sound and the headlights and interior lights will not start until you touch the battery, clean it with rubbing alcohol. 3. Pry the transmitter halves apart... with your fingers. Remove and replace the batteries. Avoid touching the new batteries with a dime or similar object. Transmitter Battery Service The recommended replacement batteries are CR2016. 1. If you disarm the system. 2 Separating Transmitter Halves If...
... will flash. Snap the halves together and test transmitter operation. For the first three minutes the horn will sound and the headlights and interior lights will not start until you touch the battery, clean it with rubbing alcohol. 3. Pry the transmitter halves apart... with your fingers. Remove and replace the batteries. Avoid touching the new batteries with a dime or similar object. Transmitter Battery Service The recommended replacement batteries are CR2016. 1. If you disarm the system. 2 Separating Transmitter Halves If...

Owner Manual Convertible
Page 200
... ...237 Ⅵ Vehicle Storage ...239 Ⅵ Replacement Light Bulbs ...239 Ⅵ Bulb Replacement ...240 ▫ Headlight Bulb Replacement ...240 ▫ Park, Turn Signal, Sidemarker Bulb Replacement ...242 ▫ Fog Light Bulb Replacement ...243 ▫ Center Stoplight Bulb Replacement ...244 ▫ Rear Light Bulb Replacement ...244 ▫ License Plate Bulb Replacement ...245 ▫ Headlight Aiming ...245 Ⅵ Fluids And Capacities ...246...
... ...237 Ⅵ Vehicle Storage ...239 Ⅵ Replacement Light Bulbs ...239 Ⅵ Bulb Replacement ...240 ▫ Headlight Bulb Replacement ...240 ▫ Park, Turn Signal, Sidemarker Bulb Replacement ...242 ▫ Fog Light Bulb Replacement ...243 ▫ Center Stoplight Bulb Replacement ...244 ▫ Rear Light Bulb Replacement ...244 ▫ License Plate Bulb Replacement ...245 ▫ Headlight Aiming ...245 Ⅵ Fluids And Capacities ...246...
Owner Manual Convertible
Page 238
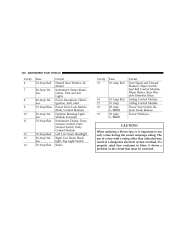
... Lock Motors (Body Control Module) Daytime Running Light Module (Canada) Instrument Cluster, Transmission Control, Park/ Neutral Switch, Body Control Module Left Low beam Headlight Right Low Beam Headlight, Fog Light Switch Radio Cavity 15 Fuse 10 Amp Red 16 17 18 19 10 Amp Red 10 Amp 20 Amp C/BRKR 30 Amp... a fuse with a rating other than indicated may result in the circuit that must be corrected. The use only a fuse having the correct amperage rating. When replacing a blown fuse, it is important to blow, it shows a problem in a dangerous electrical system overload.
... Lock Motors (Body Control Module) Daytime Running Light Module (Canada) Instrument Cluster, Transmission Control, Park/ Neutral Switch, Body Control Module Left Low beam Headlight Right Low Beam Headlight, Fog Light Switch Radio Cavity 15 Fuse 10 Amp Red 16 17 18 19 10 Amp Red 10 Amp 20 Amp C/BRKR 30 Amp... a fuse with a rating other than indicated may result in the circuit that must be corrected. The use only a fuse having the correct amperage rating. When replacing a blown fuse, it is important to blow, it shows a problem in a dangerous electrical system overload.

Owner Manual Convertible
Page 239
... or more than 21 days you store your battery. vacation) for about five minutes in the fresh air and high blower setting. Exterior Bulb Number Headlight ...9007 Park/Turn Signal (Front) ...3157A Side/Marker (Front) ...168 Turn Signal (Rear) ...3757A Fog Light ...880L Center Stop Light (CHMSL) ...Dealer Service Item Tail... of service (i.e. This will insure adequate system lubrication to protect your vehicle, or keep it out of compressor damage when the system is started again. REPLACEMENT LIGHT BULBS LIGHT BULBS -
... or more than 21 days you store your battery. vacation) for about five minutes in the fresh air and high blower setting. Exterior Bulb Number Headlight ...9007 Park/Turn Signal (Front) ...3157A Side/Marker (Front) ...168 Turn Signal (Rear) ...3757A Fog Light ...880L Center Stop Light (CHMSL) ...Dealer Service Item Tail... of service (i.e. This will insure adequate system lubrication to protect your vehicle, or keep it out of compressor damage when the system is started again. REPLACEMENT LIGHT BULBS LIGHT BULBS -
Owner Manual Convertible
Page 240
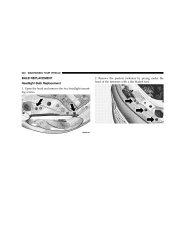
Remove the push-in fasteners by prying under the head of the fasteners with a flat bladed tool. Open the hood and remove the two headlight mounting screws. 2. 240 MAINTAINING YOUR VEHICLE BULB REPLACEMENT Headlight Bulb Replacement 1.
Remove the push-in fasteners by prying under the head of the fasteners with a flat bladed tool. Open the hood and remove the two headlight mounting screws. 2. 240 MAINTAINING YOUR VEHICLE BULB REPLACEMENT Headlight Bulb Replacement 1.
Owner Manual Convertible
Page 241
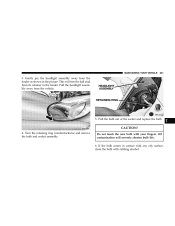
Turn the retaining ring counterclockwise and remove the bulb and socket assembly. Do not touch the new bulb with rubbing alcohol. Oil contamination will free the ball stud from the fender as shown in contact with any oily surface, clean the bulb with your fingers. Gently pry the headlight assembly away from its retainer in the fender. This will severely shorten bulb life. 6. If the bulb comes in the picture. Pull the bulb out of the socket and replace the bulb. 7 CAUTION! 4. Pull the headlight assembly away from the vehicle. 5. MAINTAINING YOUR VEHICLE 241 3.
Turn the retaining ring counterclockwise and remove the bulb and socket assembly. Do not touch the new bulb with rubbing alcohol. Oil contamination will free the ball stud from the fender as shown in contact with any oily surface, clean the bulb with your fingers. Gently pry the headlight assembly away from its retainer in the fender. This will severely shorten bulb life. 6. If the bulb comes in the picture. Pull the bulb out of the socket and replace the bulb. 7 CAUTION! 4. Pull the headlight assembly away from the vehicle. 5. MAINTAINING YOUR VEHICLE 241 3.
Owner Manual Convertible
Page 242
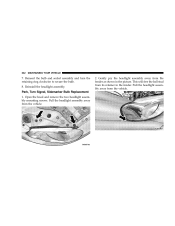
242 MAINTAINING YOUR VEHICLE 7. Pull the headlight assembly away from the vehicle. 2. Open the hood and remove the two headlight assembly mounting screws. Park, Turn Signal, Sidemarker Bulb Replacement 1. This will free the ball stud from the fender as shown in the fender. Reinsert the bulb and socket assembly and turn the retaining ring clockwise to secure the bulb. 8. Pull the headlight assembly away from the vehicle. Gently pry the headlight assembly away from its retainer in the picture. Reinstall the headlight assembly.
242 MAINTAINING YOUR VEHICLE 7. Pull the headlight assembly away from the vehicle. 2. Open the hood and remove the two headlight assembly mounting screws. Park, Turn Signal, Sidemarker Bulb Replacement 1. This will free the ball stud from the fender as shown in the fender. Reinsert the bulb and socket assembly and turn the retaining ring clockwise to secure the bulb. 8. Pull the headlight assembly away from the vehicle. Gently pry the headlight assembly away from its retainer in the picture. Reinstall the headlight assembly.
Owner Manual Convertible
Page 243
Pull the bulb and socket assembly away from the bulb and socket assembly. Turn the bulb socket counterclockwise and remove the bulb and socket assembly. Remove the screw securing the light assembly to expose the bulb and socket assembly. 3. Fog Light Bulb Replacement 1. Pull the bulb out of the socket, replace the bulb, and reinstall the bulb and socket to the headlight assembly. Disconnect the wiring connector from the vehicle to the front fascia. 7 4. MAINTAINING YOUR VEHICLE 243 3. Reinstall the headlight assembly. 2.
Pull the bulb and socket assembly away from the bulb and socket assembly. Turn the bulb socket counterclockwise and remove the bulb and socket assembly. Remove the screw securing the light assembly to expose the bulb and socket assembly. 3. Fog Light Bulb Replacement 1. Pull the bulb out of the socket, replace the bulb, and reinstall the bulb and socket to the headlight assembly. Disconnect the wiring connector from the vehicle to the front fascia. 7 4. MAINTAINING YOUR VEHICLE 243 3. Reinstall the headlight assembly. 2.
Owner Manual Convertible
Page 245
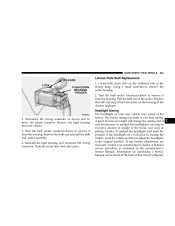
... Remove the bulb and reinstall the bulb and socket assembly. 4. Turn the bulb socket counterclockwise to loading the vehicle. To readjust the headlights first mark the position of weight in the trunk, rear seats or pulling a trailer. Reinstall the light housing and reconnect the wiring ...place. 7 MAINTAINING YOUR VEHICLE 245 License Plate Bulb Replacement 1. Using a small screwdriver, remove the entire housing. 2. Replace the bulb and snap it may be found at a no load setting. Load the vehicle and then readjust the headlights to remove it from the housing. Turn the bulb...
... Remove the bulb and reinstall the bulb and socket assembly. 4. Turn the bulb socket counterclockwise to loading the vehicle. To readjust the headlights first mark the position of weight in the trunk, rear seats or pulling a trailer. Reinstall the light housing and reconnect the wiring ...place. 7 MAINTAINING YOUR VEHICLE 245 License Plate Bulb Replacement 1. Using a small screwdriver, remove the entire housing. 2. Replace the bulb and snap it may be found at a no load setting. Load the vehicle and then readjust the headlights to remove it from the housing. Turn the bulb...


