
Owner's Manual
Page 125
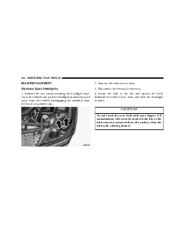
...is moved, it would suggest that the fuse or indicator bulb is released. 3 If an indicator fails to LOW beam. Passing Light You can signal a lane change by lightly pulling the Multi-Function Lever toward you to switch the headlights to turn off the fog lights. You can signal ...another vehicle with the headlights on low beam. If either light has a very fast flash rate, check for a defective outside light bulb. Turn Signals Move the Multi-Function Lever up or...
...is moved, it would suggest that the fuse or indicator bulb is released. 3 If an indicator fails to LOW beam. Passing Light You can signal a lane change by lightly pulling the Multi-Function Lever toward you to switch the headlights to turn off the fog lights. You can signal ...another vehicle with the headlights on low beam. If either light has a very fast flash rate, check for a defective outside light bulb. Turn Signals Move the Multi-Function Lever up or...
Owner's Manual
Page 171
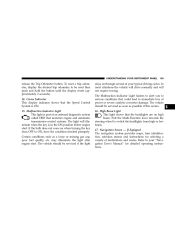
... be checked under the hood. 20. UNDERSTANDING YOUR INSTRUMENT PANEL 171 The Malfunction Indicator Light flashes to alert you to serious conditions that the headlights are ON. 19. Front Fog Light Indicator - If Equipped This light shows the front fog lights are on momentarily when the engine is started... oil is unbuckled, a chime will flash or remain on for more information. 4 Refer to switch the headlights from high or low beam. 17. If the light turns on . After the bulb check or when driving, if the driver seat belt remains unbuckled, the Seat Belt Warning Light will sound....
... be checked under the hood. 20. UNDERSTANDING YOUR INSTRUMENT PANEL 171 The Malfunction Indicator Light flashes to alert you to serious conditions that the headlights are ON. 19. Front Fog Light Indicator - If Equipped This light shows the front fog lights are on momentarily when the engine is started... oil is unbuckled, a chime will flash or remain on for more information. 4 Refer to switch the headlights from high or low beam. 17. If the light turns on . After the bulb check or when driving, if the driver seat belt remains unbuckled, the Seat Belt Warning Light will sound....
Owner's Manual
Page 318
...; Appearance Care And Protection From Corrosion ...354 ▫ Cleaning The Center Console Cup Holders ...358 Integrated Power Module (IPM) ...359 Vehicle Storage ...362 Replacement Light Bulbs ...363 Bulb Replacement ...364 ▫ Standard Quad Headlights ...364
...; Appearance Care And Protection From Corrosion ...354 ▫ Cleaning The Center Console Cup Holders ...358 Integrated Power Module (IPM) ...359 Vehicle Storage ...362 Replacement Light Bulbs ...363 Bulb Replacement ...364 ▫ Standard Quad Headlights ...364
Owner's Manual
Page 363
... not approved and should not be used for replacement instructions. Aluminum base bulbs are glass wedge base or glass cartridge types. MAINTAINING YOUR VEHICLE 363 REPLACEMENT LIGHT BULBS LIGHT BULBS - Interior Bulb Number Center & Rear Reading Lights ...578 Front Door Courtesy Light ...578 Liftgate ...Overhead Console Reading Lights ...212-2 Visor Vanity Lights...V26377 NOTE: For lighted switches, see your dealer for replacement. LIGHT BULBS - Exterior Bulb Number Back-up ...921 Rear Stop, Turn Signal ...3157 Rear Sidemarker ...168 Fog Light ...9145 Front Turn Signal...3157A Front...
... not approved and should not be used for replacement instructions. Aluminum base bulbs are glass wedge base or glass cartridge types. MAINTAINING YOUR VEHICLE 363 REPLACEMENT LIGHT BULBS LIGHT BULBS - Interior Bulb Number Center & Rear Reading Lights ...578 Front Door Courtesy Light ...578 Liftgate ...Overhead Console Reading Lights ...212-2 Visor Vanity Lights...V26377 NOTE: For lighted switches, see your dealer for replacement. LIGHT BULBS - Exterior Bulb Number Back-up ...921 Rear Stop, Turn Signal ...3157 Rear Sidemarker ...168 Fog Light ...9145 Front Turn Signal...3157A Front...
Owner's Manual
Page 364
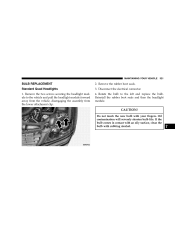
..., disengaging the assembly from the lower attachment clip. 2. Do not touch the new bulb with rubbing alcohol. If the bulb comes in contact with an oily surface, clean the bulb with your fingers. Reinstall the rubber boot seals and then the headlight module. Remove the rubber boot seals. 3. Disconnect the electrical connector. 4. Oil contamination...
..., disengaging the assembly from the lower attachment clip. 2. Do not touch the new bulb with rubbing alcohol. If the bulb comes in contact with an oily surface, clean the bulb with your fingers. Reinstall the rubber boot seals and then the headlight module. Remove the rubber boot seals. 3. Disconnect the electrical connector. 4. Oil contamination...
Owner's Manual
Page 365
... tube. See your vehicle to the lights. A transient high tension occurs at the bulb sockets of this, you should not attempt to service a headlight bulb yourself. If a headlight bulb fails, take your authorized dealer for service. NOTE: On vehicles equipped with the headlight switch off and the key removed. It may cause serious electrical shock or...
... tube. See your vehicle to the lights. A transient high tension occurs at the bulb sockets of this, you should not attempt to service a headlight bulb yourself. If a headlight bulb fails, take your authorized dealer for service. NOTE: On vehicles equipped with the headlight switch off and the key removed. It may cause serious electrical shock or...
Owner's Manual
Page 366
... from the fog light module. 3. Do not touch the new bulb with rubbing alcohol. 2. Twist the front fog light bulb to remove from the headlight module and pull the bulb from socket. Twist the bulb socket to remove from the lower attachment clip. 3. Disconnect the ...electrical connector and replace the bulb. Oil contamination will severely shorten bulb life. Front Fog Light 1. If the bulb comes in contact with an oily surface, clean the bulb with your fingers. Replace the bulb, reinstall the socket and then reinstall the headlight module. 366 MAINTAINING YOUR VEHICLE...
... from the fog light module. 3. Do not touch the new bulb with rubbing alcohol. 2. Twist the front fog light bulb to remove from the headlight module and pull the bulb from socket. Twist the bulb socket to remove from the lower attachment clip. 3. Disconnect the ...electrical connector and replace the bulb. Oil contamination will severely shorten bulb life. Front Fog Light 1. If the bulb comes in contact with an oily surface, clean the bulb with your fingers. Replace the bulb, reinstall the socket and then reinstall the headlight module. 366 MAINTAINING YOUR VEHICLE...

Owner's Manual
Page 410
... ...115 Gross Axle Weight Rating ...292 Gross Vehicle Weight Rating ...292 Hands-Free Phone ...79 Hazard Warning Flasher ...300 Head Phones ...211 Head Restraints ...104 Headlights ...365 Bulb Replacement ...364 High Beam ...125 High Beam/Low Beam Select Switch ...125 Passing ...125 Replacing ...364 Switch ...122 Time Delay ...124 Heated Seats ...105...
... ...115 Gross Axle Weight Rating ...292 Gross Vehicle Weight Rating ...292 Hands-Free Phone ...79 Hazard Warning Flasher ...300 Head Phones ...211 Head Restraints ...104 Headlights ...365 Bulb Replacement ...364 High Beam ...125 High Beam/Low Beam Select Switch ...125 Passing ...125 Replacing ...364 Switch ...122 Time Delay ...124 Heated Seats ...105...

Owner's Manual
Page 412
412 INDEX Anti-Lock ...166 Automatic Headlights ...123 Back-Up ...367 Brake Warning ...167 Bulb Replacement ...363,364 Courtesy/Reading ...120 Cruise ...170 Daytime Running ...124 Dimmer Switch, Headlight ...122 Door Ajar ...173 Engine Temperature Warning ...173 Fog ...124,171,366 Hazard Warning Flasher ...300 Headlight Switch ...122 Headlights ...122,364,365 High Beam Indicator ...171...
412 INDEX Anti-Lock ...166 Automatic Headlights ...123 Back-Up ...367 Brake Warning ...167 Bulb Replacement ...363,364 Courtesy/Reading ...120 Cruise ...170 Daytime Running ...124 Dimmer Switch, Headlight ...122 Door Ajar ...173 Engine Temperature Warning ...173 Fog ...124,171,366 Hazard Warning Flasher ...300 Headlight Switch ...122 Headlights ...122,364,365 High Beam Indicator ...171...

Owner Manual Touring
Page 112
... lights or the low beam headlights and pull out the end of the Multi-Function Lever. To activate the front fog lights, turn on the Multi-Function Lever. If an indicator fails to light when the lever is moved, it would suggest that the fuse or indicator bulb is turned on low... proper operation of the front and rear turn signal lights. If either light has a very fast flash rate, check for a defective outside light bulb. Selecting high beam headlights will turn off in the normal manner. Turn Signals Move the Multi-Function Lever up or down without moving the lever partially up or...
... lights or the low beam headlights and pull out the end of the Multi-Function Lever. To activate the front fog lights, turn on the Multi-Function Lever. If an indicator fails to light when the lever is moved, it would suggest that the fuse or indicator bulb is turned on low... proper operation of the front and rear turn signal lights. If either light has a very fast flash rate, check for a defective outside light bulb. Selecting high beam headlights will turn off in the normal manner. Turn Signals Move the Multi-Function Lever up or down without moving the lever partially up or...
Owner Manual Touring
Page 149
...instructions. 4 Cruise Indicator This display indicator shows that the Speed Control System is part of an onboard diagnostic system called OBD that the headlights are on through several of your "Navigation User's Manual" for selecting a variety of power or severe catalytic converter damage. Refer to immediate... loss of destinations and routes. If the bulb does not come on when turning the key from OFF to switch the headlights from high or low beam. 17. The vehicle should be serviced if the light stays on high...
...instructions. 4 Cruise Indicator This display indicator shows that the Speed Control System is part of an onboard diagnostic system called OBD that the headlights are on through several of your "Navigation User's Manual" for selecting a variety of power or severe catalytic converter damage. Refer to immediate... loss of destinations and routes. If the bulb does not come on when turning the key from OFF to switch the headlights from high or low beam. 17. The vehicle should be serviced if the light stays on high...
Owner Manual Touring
Page 278
... The Center Console Cup Holders ...316 Ⅵ Integrated Power Module (IPM) ...316 Ⅵ Vehicle Storage ...319 Ⅵ Replacement Light Bulbs ...320 Ⅵ Bulb Replacement ...321 ▫ Standard Quad Headlights ...321 ▫ High Intensity Discharge Headlights (HID) - 278 MAINTAINING YOUR VEHICLE ▫ Steering Shaft Seal ...295 ▫ Steering Linkage ...295 ▫ Drive Shaft Universal Joints...
... The Center Console Cup Holders ...316 Ⅵ Integrated Power Module (IPM) ...316 Ⅵ Vehicle Storage ...319 Ⅵ Replacement Light Bulbs ...320 Ⅵ Bulb Replacement ...321 ▫ Standard Quad Headlights ...321 ▫ High Intensity Discharge Headlights (HID) - 278 MAINTAINING YOUR VEHICLE ▫ Steering Shaft Seal ...295 ▫ Steering Linkage ...295 ▫ Drive Shaft Universal Joints...

Owner Manual Touring
Page 320
...used for replacement instructions. Exterior Bulb Number Back-up ...921 Rear Stop, Turn Signal ...3157 Rear Sidemarker ...168 Fog Light ...9045 Front Turn Signal...3157A Front Sidemarker...194 Standard Headlight ...H7 License ...168 Aluminum base bulbs are glass wedge base or ...glass cartridge types. 320 MAINTAINING YOUR VEHICLE REPLACEMENT LIGHT BULBS LIGHT BULBS - Interior Bulb Number Center & Rear Reading Lights ...578 Front Door Courtesy...
...used for replacement instructions. Exterior Bulb Number Back-up ...921 Rear Stop, Turn Signal ...3157 Rear Sidemarker ...168 Fog Light ...9045 Front Turn Signal...3157A Front Sidemarker...194 Standard Headlight ...H7 License ...168 Aluminum base bulbs are glass wedge base or ...glass cartridge types. 320 MAINTAINING YOUR VEHICLE REPLACEMENT LIGHT BULBS LIGHT BULBS - Interior Bulb Number Center & Rear Reading Lights ...578 Front Door Courtesy...
Owner Manual Touring
Page 321
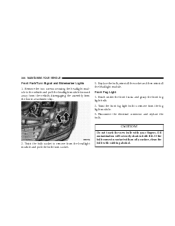
... the two screws securing the headlight module to the left and replace the bulb. Do not touch the new bulb with rubbing alcohol. 7 Remove the rubber boot seals. 3. Disconnect the electrical connector. 4. Rotate the bulb to the vehicle and pull the headlight module forward away from the... vehicle, disengaging the assembly from the lower attachment clip. 2. Reinstall the rubber boot seals and then the headlight module. If the bulb comes in contact with an oily surface...
... the two screws securing the headlight module to the left and replace the bulb. Do not touch the new bulb with rubbing alcohol. 7 Remove the rubber boot seals. 3. Disconnect the electrical connector. 4. Rotate the bulb to the vehicle and pull the headlight module forward away from the... vehicle, disengaging the assembly from the lower attachment clip. 2. Reinstall the rubber boot seals and then the headlight module. If the bulb comes in contact with an oily surface...
Owner Manual Touring
Page 322
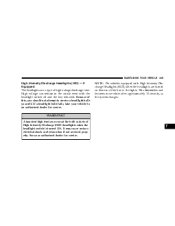
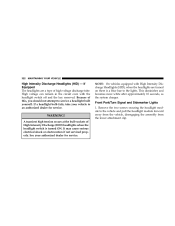
Remove the two screws securing the headlight module to service a headlight bulb yourself. 322 MAINTAINING YOUR VEHICLE High Intensity Discharge Headlights (HID) - A transient high tension occurs at the bulb sockets of High Intensity Discharge (HID) headlights when the headlight switch is a blue hue to an authorized dealer for service. If a headlight bulb fails, take your authorized dealer for service. Front...
Remove the two screws securing the headlight module to service a headlight bulb yourself. 322 MAINTAINING YOUR VEHICLE High Intensity Discharge Headlights (HID) - A transient high tension occurs at the bulb sockets of High Intensity Discharge (HID) headlights when the headlight switch is a blue hue to an authorized dealer for service. If a headlight bulb fails, take your authorized dealer for service. Front...

Owner Manual Touring
Page 323
Twist the front fog light bulb to remove from the headlight module and pull the bulb from the fog light module. 3. Do not touch the new bulb with rubbing alcohol. 7 Replace the bulb, reinstall the socket and then reinstall the headlight module. CAUTION! 2. Twist the bulb socket to remove from socket. 3. Remove the screw from the front of...
Twist the front fog light bulb to remove from the headlight module and pull the bulb from the fog light module. 3. Do not touch the new bulb with rubbing alcohol. 7 Replace the bulb, reinstall the socket and then reinstall the headlight module. CAUTION! 2. Twist the bulb socket to remove from socket. 3. Remove the screw from the front of...

Owner Manual Touring
Page 366
366 INDEX Head Phones ...183 Head Restraints ...94 Headlights ...322 Bulb Replacement ...321 High Beam ...113 High Beam/Low Beam Select Switch ...113 Passing ...113 Replacing ...321 Switch ...110 Time Delay ...111 Heated Seats ...94 Heater, ...
366 INDEX Head Phones ...183 Head Restraints ...94 Headlights ...322 Bulb Replacement ...321 High Beam ...113 High Beam/Low Beam Select Switch ...113 Passing ...113 Replacing ...321 Switch ...110 Time Delay ...111 Heated Seats ...94 Heater, ...

Owner Manual Touring
Page 367
...,108 Airbag ...46,51,61,151 Anti-Lock ...145 Automatic Headlights ...111 Back-Up ...324 Brake Warning ...146 Bulb Replacement ...320,321 Courtesy/Reading ...108 Cruise ...149 Daytime Running ...111 Dimmer Switch, Headlight ...109 Engine Temperature Warning ...151 Fog ...112,150,323 Hazard... Warning Flasher ...262 Headlight Switch ...110 Headlights ...110,321,322 High Beam Indicator ...
...,108 Airbag ...46,51,61,151 Anti-Lock ...145 Automatic Headlights ...111 Back-Up ...324 Brake Warning ...146 Bulb Replacement ...320,321 Courtesy/Reading ...108 Cruise ...149 Daytime Running ...111 Dimmer Switch, Headlight ...109 Engine Temperature Warning ...151 Fog ...112,150,323 Hazard... Warning Flasher ...262 Headlight Switch ...110 Headlights ...110,321,322 High Beam Indicator ...


