Owner's Manual
Page 1
SECTION 1 2 3 4 5 6 7 8 9 10 TABLE OF CONTENTS PAGE INTRODUCTION ...3 THINGS TO KNOW BEFORE STARTING YOUR VEHICLE ...9 UNDERSTANDING THE FEATURES OF YOUR VEHICLE ...63 UNDERSTANDING YOUR INSTRUMENT PANEL ...129 STARTING AND OPERATING ...193 WHAT TO DO IN EMERGENCIES ...245 MAINTAINING YOUR VEHICLE ...261 MAINTENANCE SCHEDULES ...315 IF YOU NEED CONSUMER ASSISTANCE ...339 INDEX ...349 1 2 3 4 5 6 7 8 9 10
SECTION 1 2 3 4 5 6 7 8 9 10 TABLE OF CONTENTS PAGE INTRODUCTION ...3 THINGS TO KNOW BEFORE STARTING YOUR VEHICLE ...9 UNDERSTANDING THE FEATURES OF YOUR VEHICLE ...63 UNDERSTANDING YOUR INSTRUMENT PANEL ...129 STARTING AND OPERATING ...193 WHAT TO DO IN EMERGENCIES ...245 MAINTAINING YOUR VEHICLE ...261 MAINTENANCE SCHEDULES ...315 IF YOU NEED CONSUMER ASSISTANCE ...339 INDEX ...349 1 2 3 4 5 6 7 8 9 10
Owner's Manual
Page 10
...Keyless Entry - If Equipped ...22 ▫ To Unlock The Doors And Liftgate ...22 ▫ To Lock The Doors ...23 ▫ Horn Chirp Feature ...23 ▫ Using The Panic Alarm ...23 ▫ To Program Transmitters ...24 ▫ General Information ...24 ▫ Transmitter Battery Service ......The System ...27 ▫ Security System Manual Override ...27 Liftgate ...28 Emergency Seat Back Release ...29 Power Windows ...31 ▫ Auto Down Feature ...32 ▫ Rear Window Switches ...32 ▫ Wind Buffeting ...33 Occupant Restraints ...33 ▫ Lap/Shoulder Belts ...34 ▫ Adjustable ...
...Keyless Entry - If Equipped ...22 ▫ To Unlock The Doors And Liftgate ...22 ▫ To Lock The Doors ...23 ▫ Horn Chirp Feature ...23 ▫ Using The Panic Alarm ...23 ▫ To Program Transmitters ...24 ▫ General Information ...24 ▫ Transmitter Battery Service ......The System ...27 ▫ Security System Manual Override ...27 Liftgate ...28 Emergency Seat Back Release ...29 Power Windows ...31 ▫ Auto Down Feature ...32 ▫ Rear Window Switches ...32 ▫ Wind Buffeting ...33 Occupant Restraints ...33 ▫ Lap/Shoulder Belts ...34 ▫ Adjustable ...
Owner's Manual
Page 13
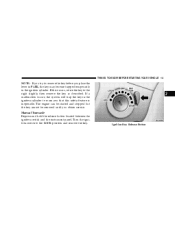
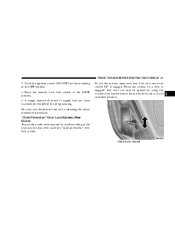
If a malfunction occurs, the system will trap the key in the ignition cylinder. If this occurs, rotate the key to warn you that this safety feature is inoperable. THINGS TO KNOW BEFORE STARTING YOUR VEHICLE 13 NOTE: If you try to the LOCK position and remove the key. 2 Ignition Key Release ...
If a malfunction occurs, the system will trap the key in the ignition cylinder. If this occurs, rotate the key to warn you that this safety feature is inoperable. THINGS TO KNOW BEFORE STARTING YOUR VEHICLE 13 NOTE: If you try to the LOCK position and remove the key. 2 Ignition Key Release ...

Owner's Manual
Page 20
...will sound to UNLOCK all the doors and liftgate with the first turn of the key to the UNLOCK position. 4. The double unlock activation feature requires you to turn the key in the ignition switch. 2. Cycle the ignition switch ON/OFF four times ending in the ignition switch. ... turn of the key by repeating the above 15 mph (24 km/h), 3. A single chime will lock automatically if: 1. You may turn the feature back on by following procedure: NOTE: Steps 2 and 3 must be completed within five seconds to signify that you have successfully disabled the double activation...
...will sound to UNLOCK all the doors and liftgate with the first turn of the key to the UNLOCK position. 4. The double unlock activation feature requires you to turn the key in the ignition switch. 2. Cycle the ignition switch ON/OFF four times ending in the ignition switch. ... turn of the key by repeating the above 15 mph (24 km/h), 3. A single chime will lock automatically if: 1. You may turn the feature back on by following procedure: NOTE: Steps 2 and 3 must be completed within five seconds to signify that you have successfully disabled the double activation...
Owner's Manual
Page 21
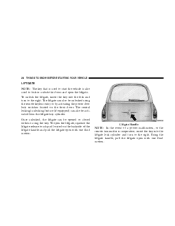
... system, open each rear door and move the control UP to the LOCK position. 4. A single chime will sound to signify that door can turn the feature back on a door is in the unlocked position. 2 Child Lock Control THINGS TO KNOW BEFORE STARTING YOUR VEHICLE 21 2.
... system, open each rear door and move the control UP to the LOCK position. 4. A single chime will sound to signify that door can turn the feature back on a door is in the unlocked position. 2 Child Lock Control THINGS TO KNOW BEFORE STARTING YOUR VEHICLE 21 2.
Owner's Manual
Page 23
...will sound to signify that the doors have to be turned on the transmitter for 3 minutes unless you may turn on the panic alarm feature, press and release the PANIC button. Continue to acknowledge the signal. When the panic alarm is complete. Release both buttons. THINGS TO KNOW...using the following the procedure shown in the Central Locking/Unlocking paragraph. A chime will chirp to hold the Unlock button on or off this feature and unlock all doors and liftgate. NOTE: When you turn the switch to the radio frequency noises of the button by following procedure: 1....
...will sound to signify that the doors have to be turned on the transmitter for 3 minutes unless you may turn on the panic alarm feature, press and release the PANIC button. Continue to acknowledge the signal. When the panic alarm is complete. Release both buttons. THINGS TO KNOW...using the following the procedure shown in the Central Locking/Unlocking paragraph. A chime will chirp to hold the Unlock button on or off this feature and unlock all doors and liftgate. NOTE: When you turn the switch to the radio frequency noises of the button by following procedure: 1....
Owner's Manual
Page 28
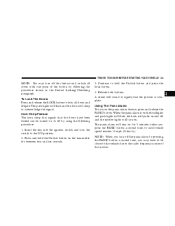
... the doors and open the liftgate, squeeze the liftgate release touch pad located on the front doors. To open the liftgate. The central locking/unlocking feature (if equipped) can also be opened or closed without using the remote keyless entry or by activating the power door lock switches located on the...
... the doors and open the liftgate, squeeze the liftgate release touch pad located on the front doors. To open the liftgate. The central locking/unlocking feature (if equipped) can also be opened or closed without using the remote keyless entry or by activating the power door lock switches located on the...

Owner's Manual
Page 32
Rear Window Switches There are also rear passenger window switches located at the rear of the center console near the floor. Auto Down Feature The driver's and passenger's front window switches have an auto down automatically. Such entrapment may result in the ignition switch. To open the window... by the windows while operating the power window switches. Press the window switch past the detent, release, and the window will go down feature. 32 THINGS TO KNOW BEFORE STARTING YOUR VEHICLE WARNING! Press the switch a second time in either direction to stop the window.
Rear Window Switches There are also rear passenger window switches located at the rear of the center console near the floor. Auto Down Feature The driver's and passenger's front window switches have an auto down automatically. Such entrapment may result in the ignition switch. To open the window... by the windows while operating the power window switches. Press the window switch past the detent, release, and the window will go down feature. 32 THINGS TO KNOW BEFORE STARTING YOUR VEHICLE WARNING! Press the switch a second time in either direction to stop the window.

Owner's Manual
Page 33
If the buffeting occurs with the sunroof open positions. OCCUPANT RESTRAINTS Some of the most important safety features in the ears. THINGS TO KNOW BEFORE STARTING YOUR VEHICLE 33 Wind Buffeting Wind buffeting can be described as possible. 2 WARNING! If you are not ... too small for both the driver and front passenger and if equipped, side airbags for adult-size seat belts, your seat belts or the LATCH feature also, can be thrown out of pressure on the ears or a helicopter type sound in your vehicle are buckled up . This is a normal occurrence and...
If the buffeting occurs with the sunroof open positions. OCCUPANT RESTRAINTS Some of the most important safety features in the ears. THINGS TO KNOW BEFORE STARTING YOUR VEHICLE 33 Wind Buffeting Wind buffeting can be described as possible. 2 WARNING! If you are not ... too small for both the driver and front passenger and if equipped, side airbags for adult-size seat belts, your seat belts or the LATCH feature also, can be thrown out of pressure on the ears or a helicopter type sound in your vehicle are buckled up . This is a normal occurrence and...

Owner's Manual
Page 34
... the vehicle. Research has shown that is not equipped with seats and seat belts. • Be sure everyone in your vehicle is in a collision. This feature allows the shoulder part of a vehicle. Some of the vehicle. In a collision, people riding in any area of your own street. WARNING! • It is...
... the vehicle. Research has shown that is not equipped with seats and seat belts. • Be sure everyone in your vehicle is in a collision. This feature allows the shoulder part of a vehicle. Some of the vehicle. In a collision, people riding in any area of your own street. WARNING! • It is...

Owner's Manual
Page 39
...upright and locked position when occupied. The rear center lap/shoulder belt is equipped with a lock-out feature to ensure that the rear seat back is fully latched. • If the rear seat back is...THINGS TO KNOW BEFORE STARTING YOUR VEHICLE 39 Rear Center Lap/Shoulder Belt Retractor Lock-Out This feature is designed to lock the retractor whenever the rear seat back is not fully latched. WARNING! ...not be pulled out, the Automatic-Locking Retractor (ALR) system may be able to follow this feature you must let all of the belt webbing return into the retractor. Failure to pull out more ...
...upright and locked position when occupied. The rear center lap/shoulder belt is equipped with a lock-out feature to ensure that the rear seat back is fully latched. • If the rear seat back is...THINGS TO KNOW BEFORE STARTING YOUR VEHICLE 39 Rear Center Lap/Shoulder Belt Retractor Lock-Out This feature is designed to lock the retractor whenever the rear seat back is not fully latched. WARNING! ...not be pulled out, the Automatic-Locking Retractor (ALR) system may be able to follow this feature you must let all of the belt webbing return into the retractor. Failure to pull out more ...

Owner's Manual
Page 56
... pushing on the excess webbing to tighten the lap portion about the child restraint. Disconnect the latch plate from the retractor. NOTE: To reset this feature you to pass through the child restraint and slide the latch plate into the seat according to the child restraint manufacturer's directions. • When your...
... pushing on the excess webbing to tighten the lap portion about the child restraint. Disconnect the latch plate from the retractor. NOTE: To reset this feature you to pass through the child restraint and slide the latch plate into the seat according to the child restraint manufacturer's directions. • When your...
Owner's Manual
Page 58
Tether anchorage kits are urged to the top tether anchorage have features for installation in any vehicle. Forward-facing toddler restraints and some rearward-facing infant restraints will also be introduced to passenger carrying vehicles over a period ...
Tether anchorage kits are urged to the top tether anchorage have features for installation in any vehicle. Forward-facing toddler restraints and some rearward-facing infant restraints will also be introduced to passenger carrying vehicles over a period ...
Owner's Manual
Page 63
... Equipped ...69 ▫ Illuminated Vanity Mirrors - If Equipped ...70 ▫ Sun Visor Sliding Feature ...70 Hands-Free Communication (UConnect™) - If Equipped ...70 ▫ Operation ...72 ▫ Phone Call Features ...76 ▫ Advanced Phone Connectivity ...78 ▫ UConnect™ System Features ...80 Seats ...82 ▫ Front Seat Adjustment ...82 ▫ Driver's Power Seat...
... Equipped ...69 ▫ Illuminated Vanity Mirrors - If Equipped ...70 ▫ Sun Visor Sliding Feature ...70 Hands-Free Communication (UConnect™) - If Equipped ...70 ▫ Operation ...72 ▫ Phone Call Features ...76 ▫ Advanced Phone Connectivity ...78 ▫ UConnect™ System Features ...80 Seats ...82 ▫ Front Seat Adjustment ...82 ▫ Driver's Power Seat...

Owner's Manual
Page 64
64 UNDERSTANDING THE FEATURES OF YOUR VEHICLE ▫ Folding Front Passenger Seat - If Equipped ...84 ▫ Adjustable Head Restraints ...85 ▫ Heated Seats - If Equipped ...86 ▫ Folding Rear ... ▫ Turn Signals ...98 ▫ Highbeam/Lowbeam Select Switch ...98 ▫ Passing Light ...98 Windshield Wipers And Washers ...98 ▫ Windshield Washers ...99 ▫ Mist Feature ...99 ▫ Windshield Wiper Operation ...100 ▫ Intermittent Wiper System ...100 Tilt Steering Column ...100 Traction Control Switch - If Equipped ...101
64 UNDERSTANDING THE FEATURES OF YOUR VEHICLE ▫ Folding Front Passenger Seat - If Equipped ...84 ▫ Adjustable Head Restraints ...85 ▫ Heated Seats - If Equipped ...86 ▫ Folding Rear ... ▫ Turn Signals ...98 ▫ Highbeam/Lowbeam Select Switch ...98 ▫ Passing Light ...98 Windshield Wipers And Washers ...98 ▫ Windshield Washers ...99 ▫ Mist Feature ...99 ▫ Windshield Wiper Operation ...100 ▫ Intermittent Wiper System ...100 Tilt Steering Column ...100 Traction Control Switch - If Equipped ...101

Owner's Manual
Page 65
UNDERSTANDING THE FEATURES OF YOUR VEHICLE 65 Electronic Speed Control - If Equipped ...102 ▫ To Activate ...102 ▫ To Set At A Desired Speed ...103 ▫ To Deactivate ...103 &#... Compass Calibration ...113 ▫ Compass Variance Selection ...113 ▫ Manual Compass Calibration ...114 ▫ Outside Temperature ...114 Power Sunroof - If Equipped ...114 ▫ Express Open Feature ...115 ▫ Wind Buffeting ...117 ▫ Sunroof Maintenance ...117 Electrical Power Outlets ...117 3
UNDERSTANDING THE FEATURES OF YOUR VEHICLE 65 Electronic Speed Control - If Equipped ...102 ▫ To Activate ...102 ▫ To Set At A Desired Speed ...103 ▫ To Deactivate ...103 &#... Compass Calibration ...113 ▫ Compass Variance Selection ...113 ▫ Manual Compass Calibration ...114 ▫ Outside Temperature ...114 Power Sunroof - If Equipped ...114 ▫ Express Open Feature ...115 ▫ Wind Buffeting ...117 ▫ Sunroof Maintenance ...117 Electrical Power Outlets ...117 3
Owner's Manual
Page 66
66 UNDERSTANDING THE FEATURES OF YOUR VEHICLE ▫ Electrical Outlet Use With Engine Off ...119 Console Features ...120 Storage ...121 ▫ Front Seat Storage Bin - If Equipped ...121 ▫ Storage Pockets ...122 Rear Shelf Panel ...122 ▫ Position 1 (Top) ...122 ▫ Position 2 (Middle) ...123 ▫ Position 3 (Floor) ...124 ▫ Position 4 (Vertical) ...124 ▫ Position 5 (Table) ...125 Roof Luggage Rack - If Equipped ...126
66 UNDERSTANDING THE FEATURES OF YOUR VEHICLE ▫ Electrical Outlet Use With Engine Off ...119 Console Features ...120 Storage ...121 ▫ Front Seat Storage Bin - If Equipped ...121 ▫ Storage Pockets ...122 Rear Shelf Panel ...122 ▫ Position 1 (Top) ...122 ▫ Position 2 (Middle) ...123 ▫ Position 3 (Floor) ...124 ▫ Position 4 (Vertical) ...124 ▫ Position 5 (Table) ...125 Roof Luggage Rack - If Equipped ...126

Owner's Manual
Page 67
UNDERSTANDING THE FEATURES OF YOUR VEHICLE 67 MIRRORS Inside Day/Night Mirror Adjust the mirror to the night position (toward windshield). Adjusting Rear View Mirror 3 Annoying headlight glare can be adjusted while set in the day position (toward rear of vehicle). A two point pivot system allows for horizontal and vertical mirror adjustment. The mirror should be reduced by moving the small control under the mirror to center on the view through the rear window.
UNDERSTANDING THE FEATURES OF YOUR VEHICLE 67 MIRRORS Inside Day/Night Mirror Adjust the mirror to the night position (toward windshield). Adjusting Rear View Mirror 3 Annoying headlight glare can be adjusted while set in the day position (toward rear of vehicle). A two point pivot system allows for horizontal and vertical mirror adjustment. The mirror should be reduced by moving the small control under the mirror to center on the view through the rear window.

Owner's Manual
Page 68
... objects seen in the passenger side convex mirror will look smaller and farther away than they really are. Use your inside mirror. 68 UNDERSTANDING THE FEATURES OF YOUR VEHICLE Outside Mirror-Driver's Side Adjust the outside mirror so you can just see the side of your passenger side mirror could cause...
... objects seen in the passenger side convex mirror will look smaller and farther away than they really are. Use your inside mirror. 68 UNDERSTANDING THE FEATURES OF YOUR VEHICLE Outside Mirror-Driver's Side Adjust the outside mirror so you can just see the side of your passenger side mirror could cause...

Owner's Manual
Page 69
Press the L or R button for the direction you want the mirror to move. 3 Power Mirror Switches Select a mirror and press one of the steering column on the instrument panel, to adjust the view obtained in the outside mirrors. Use the center off position to guard against accidentally moving a mirror position. UNDERSTANDING THE FEATURES OF YOUR VEHICLE 69 Electric Remote-Control Mirrors - If Equipped Use the mirror select switch, located to the left of the four arrows for Left or Right mirror selection.
Press the L or R button for the direction you want the mirror to move. 3 Power Mirror Switches Select a mirror and press one of the steering column on the instrument panel, to adjust the view obtained in the outside mirrors. Use the center off position to guard against accidentally moving a mirror position. UNDERSTANDING THE FEATURES OF YOUR VEHICLE 69 Electric Remote-Control Mirrors - If Equipped Use the mirror select switch, located to the left of the four arrows for Left or Right mirror selection.
