
Owner's Manual
Page 1
SECTION 1 2 3 4 5 6 7 8 9 10 TABLE OF CONTENTS PAGE INTRODUCTION ...3 THINGS TO KNOW BEFORE STARTING YOUR VEHICLE ...7 UNDERSTANDING THE FEATURES OF YOUR VEHICLE ...49 UNDERSTANDING YOUR INSTRUMENT PANEL ...97 STARTING AND OPERATING ...129 WHAT TO DO IN EMERGENCIES ...171 MAINTAINING YOUR VEHICLE ...195 MAINTENANCE SCHEDULES ...247 IF YOU NEED CONSUMER ASSISTANCE ...257 INDEX ...273 1 2 3 4 5 6 7 8 9 10
SECTION 1 2 3 4 5 6 7 8 9 10 TABLE OF CONTENTS PAGE INTRODUCTION ...3 THINGS TO KNOW BEFORE STARTING YOUR VEHICLE ...7 UNDERSTANDING THE FEATURES OF YOUR VEHICLE ...49 UNDERSTANDING YOUR INSTRUMENT PANEL ...97 STARTING AND OPERATING ...129 WHAT TO DO IN EMERGENCIES ...171 MAINTAINING YOUR VEHICLE ...195 MAINTENANCE SCHEDULES ...247 IF YOU NEED CONSUMER ASSISTANCE ...257 INDEX ...273 1 2 3 4 5 6 7 8 9 10

Owner's Manual
Page 3
INTRODUCTION CONTENTS Introduction ...4 How To Use This Manual ...4 Warnings And Cautions ...6 Vehicle Identification Number ...6 1
INTRODUCTION CONTENTS Introduction ...4 How To Use This Manual ...4 Warnings And Cautions ...6 Vehicle Identification Number ...6 1
Owner's Manual
Page 4
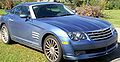
... be used on your vehicle or throughout this manual will help assure safe and enjoyable operation of the symbols that your authorized dealer knows your Crossfire.
... be used on your vehicle or throughout this manual will help assure safe and enjoyable operation of the symbols that your authorized dealer knows your Crossfire.

Owner's Manual
Page 5
INTRODUCTION 5 1
INTRODUCTION 5 1

Owner's Manual
Page 6
VEHICLE IDENTIFICATION NUMBER The vehicle identification number (VIN) is located beneath the left front corner of your vehicle identification number and optional equipment. Save this entire manual you do not read this label as a convenient record of the instrument panel, visible through the windshield. It also contains CAUTIONS against operating procedures which could result in damage to a window on your vehicle. 6 INTRODUCTION WARNINGS AND CAUTIONS This manual contains WARNINGS against procedures which could result in an accident or bodily injury. This number also ...
VEHICLE IDENTIFICATION NUMBER The vehicle identification number (VIN) is located beneath the left front corner of your vehicle identification number and optional equipment. Save this entire manual you do not read this label as a convenient record of the instrument panel, visible through the windshield. It also contains CAUTIONS against operating procedures which could result in damage to a window on your vehicle. 6 INTRODUCTION WARNINGS AND CAUTIONS This manual contains WARNINGS against procedures which could result in an accident or bodily injury. This number also ...

Owner's Manual
Page 7
Roadster ...19 2 THINGS TO KNOW BEFORE STARTING YOUR VEHICLE CONTENTS A Word About Your Keys ...9 ▫ Keys ...9 ▫ Obtaining Replacement Keys ...10 ▫ Ignition Key Removal ...10 ▫ Key-In-Ignition Reminder ...10 Glove Compartment Lock ...11 Door Locks ...11 ▫ Central Locking Switch ...12 ▫ Automatic Central Locking ...13 ▫ General Notes On The Central Locking System ...13 ▫ Emergency Unlocking Feature ...14 ▫ Start Lockout ...14 Remote Keyless Entry ...14 ▫ To Unlock The Doors ...14 ▫ To Lock The Doors ...15 ▫ Panic Alarm ...
Roadster ...19 2 THINGS TO KNOW BEFORE STARTING YOUR VEHICLE CONTENTS A Word About Your Keys ...9 ▫ Keys ...9 ▫ Obtaining Replacement Keys ...10 ▫ Ignition Key Removal ...10 ▫ Key-In-Ignition Reminder ...10 Glove Compartment Lock ...11 Door Locks ...11 ▫ Central Locking Switch ...12 ▫ Automatic Central Locking ...13 ▫ General Notes On The Central Locking System ...13 ▫ Emergency Unlocking Feature ...14 ▫ Start Lockout ...14 Remote Keyless Entry ...14 ▫ To Unlock The Doors ...14 ▫ To Lock The Doors ...15 ▫ Panic Alarm ...

Owner's Manual
Page 8
Airbag . .28 ▫ Child Restraint ...39 Engine Break-In Recommendations ...46 Safety Tips ...46 ▫ Exhaust Gas ...46 ▫ Safety Checks You Should Make Inside The Vehicle ...47 ▫ Periodic Safety Checks You Should Make Outside The Vehicle ...47 8 THINGS TO KNOW BEFORE STARTING YOUR VEHICLE Power Windows ...20 ▫ Power Window Operation With The Convertible Top Switch (Roadster Only) ...21 Rear Liftgate/Decklid Release ...21 Occupant Restraints ...21 ▫ Lap/Shoulder Belts ...22 ▫ Seat Belts And Pregnant Women ...27 ▫ Seat Belt Extender ...27 ▫ ...
Airbag . .28 ▫ Child Restraint ...39 Engine Break-In Recommendations ...46 Safety Tips ...46 ▫ Exhaust Gas ...46 ▫ Safety Checks You Should Make Inside The Vehicle ...47 ▫ Periodic Safety Checks You Should Make Outside The Vehicle ...47 8 THINGS TO KNOW BEFORE STARTING YOUR VEHICLE Power Windows ...20 ▫ Power Window Operation With The Convertible Top Switch (Roadster Only) ...21 Rear Liftgate/Decklid Release ...21 Occupant Restraints ...21 ▫ Lap/Shoulder Belts ...22 ▫ Seat Belts And Pregnant Women ...27 ▫ Seat Belt Extender ...27 ▫ ...
Owner's Manual
Page 9
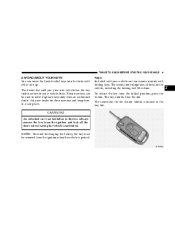
The dealer that sold you your new vehicle has the key code numbers for your vehicle are two remote controls with folding keys. These numbers can insert the double-sided keys into the locks with your vehicle locks. An unlocked car is located in a safe place. Keys Included with either side up. The remote control operates all the doors when leaving the vehicle unattended. To release the key from an authorized dealer. NOTE: To avoid discharging the battery, the key must be used to thieves. THINGS TO KNOW BEFORE STARTING YOUR VEHICLE 9 A WORD ABOUT YOUR KEYS You can be ...
The dealer that sold you your new vehicle has the key code numbers for your vehicle are two remote controls with folding keys. These numbers can insert the double-sided keys into the locks with your vehicle locks. An unlocked car is located in a safe place. Keys Included with either side up. The remote control operates all the doors when leaving the vehicle unattended. To release the key from an authorized dealer. NOTE: To avoid discharging the battery, the key must be used to thieves. THINGS TO KNOW BEFORE STARTING YOUR VEHICLE 9 A WORD ABOUT YOUR KEYS You can be ...

Owner's Manual
Page 10
For security reasons, replacement keys can only be started , and START and ERROR are shown in the ignition sounds a signal to remind you place the shift lever in PARK, the key may become trapped temporarily in the steering lock to the LOCK position and remove the key. Removing the key from your authorized dealer. Contact an authorized dealer. NOTE: In case the engine cannot be started . If this occurs, turn the key clockwise slightly, then remove the key as described. Key-In-Ignition Reminder Opening the driver's door when the key is in the odometer display field, the system is ...
For security reasons, replacement keys can only be started , and START and ERROR are shown in the ignition sounds a signal to remind you place the shift lever in PARK, the key may become trapped temporarily in the steering lock to the LOCK position and remove the key. Removing the key from your authorized dealer. Contact an authorized dealer. NOTE: In case the engine cannot be started . If this occurs, turn the key clockwise slightly, then remove the key as described. Key-In-Ignition Reminder Opening the driver's door when the key is in the odometer display field, the system is ...
Owner's Manual
Page 11
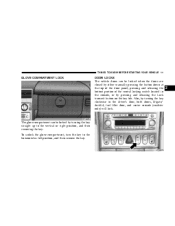
To unlock the glove compartment, turn the key to the vertical or right position, and then removing the key. Also, by turning the key clockwise in the console, or by turning the key straight up to the horizontal or left position, and then remove the key. THINGS TO KNOW BEFORE STARTING YOUR VEHICLE 11 GLOVE COMPARTMENT LOCK DOOR LOCKS The vehicle doors can be locked when the doors are closed by either manually pressing the button down at the top of the door panel, pressing and releasing the bottom portion of the central locking switch located in the driver's door, both doors, liftgate...
To unlock the glove compartment, turn the key to the vertical or right position, and then removing the key. Also, by turning the key clockwise in the console, or by turning the key straight up to the horizontal or left position, and then remove the key. THINGS TO KNOW BEFORE STARTING YOUR VEHICLE 11 GLOVE COMPARTMENT LOCK DOOR LOCKS The vehicle doors can be locked when the doors are closed by either manually pressing the button down at the top of the door panel, pressing and releasing the bottom portion of the central locking switch located in the driver's door, both doors, liftgate...
Owner's Manual
Page 12
To unlock, turn the key in the driver's door lock clockwise, or push down . WARNING! Each individual door can be locked when it is opened from the inside will unlock, and the alarm will remain locked. the driver's door can only be locked with the central locking switch if both door lock buttons should then unlock the vehicle, open and reclose the door, and lock the vehicle again. For personal security and safety in the event of an accident, lock the vehicle doors as you drive and when you lock the vehicle, both doors are closed. If the vehicle was previously locked...
To unlock, turn the key in the driver's door lock clockwise, or push down . WARNING! Each individual door can be locked when it is opened from the inside will unlock, and the alarm will remain locked. the driver's door can only be locked with the central locking switch if both door lock buttons should then unlock the vehicle, open and reclose the door, and lock the vehicle again. For personal security and safety in the event of an accident, lock the vehicle doors as you drive and when you lock the vehicle, both doors are closed. If the vehicle was previously locked...
Owner's Manual
Page 13
Automatic Central Locking The central locking switch also operates the automatic central locking feature. To activate this feature, turn the key to change the batteries in adjustment. 2 NOTE: If you attempt to the ON/RUN position and hold the lower portion of the switch for a minimum of five seconds. Make sure that remote transmitter is in the ignition and the driver's door open, the doors will not lock. General Notes On the Central Locking System If the key in the ignition switch is operating and that the rear liftgate/decklid, hood and doors are unlocked with the remote ...
Automatic Central Locking The central locking switch also operates the automatic central locking feature. To activate this feature, turn the key to change the batteries in adjustment. 2 NOTE: If you attempt to the ON/RUN position and hold the lower portion of the switch for a minimum of five seconds. Make sure that remote transmitter is in the ignition and the driver's door open, the doors will not lock. General Notes On the Central Locking System If the key in the ignition switch is operating and that the rear liftgate/decklid, hood and doors are unlocked with the remote ...

Owner's Manual
Page 14
If the engine cannot be in the odometer display field, the system is not activated, the vehicle will automatically lock. See your authorized dealer for service. Start Lockout Removing the key from remote locations using the remote control. REMOTE KEYLESS ENTRY This feature allows you to unlock driver's door, rear liftgate/decklid, fuel filler door, and center console (roadster only). To Unlock the Doors: Press and release the unlock button on the key fob once to lock or unlock the vehicle from the ignition switch activates the start lockout. Press the Unlock transmit ...
If the engine cannot be in the odometer display field, the system is not activated, the vehicle will automatically lock. See your authorized dealer for service. Start Lockout Removing the key from remote locations using the remote control. REMOTE KEYLESS ENTRY This feature allows you to unlock driver's door, rear liftgate/decklid, fuel filler door, and center console (roadster only). To Unlock the Doors: Press and release the unlock button on the key fob once to lock or unlock the vehicle from the ignition switch activates the start lockout. Press the Unlock transmit ...

Owner's Manual
Page 15
All turn signal lights do not blink, a door or rear liftgate/decklid is not closed properly. The vehicle can be locked or unlocked by pressing the central locking switch located in the driver's door. THINGS TO KNOW BEFORE STARTING YOUR VEHICLE 15 If the vehicle cannot be locked or unlocked by pressing the transmit button, then it may be locked or unlocked by using the key in the center console. The entire vehicle, including the fuel filler door, may be necessary to indicate that the vehicle is locked. Panic Alarm The panic alarm unlocks the driver's door, turns on the key fob ...
All turn signal lights do not blink, a door or rear liftgate/decklid is not closed properly. The vehicle can be locked or unlocked by pressing the central locking switch located in the driver's door. THINGS TO KNOW BEFORE STARTING YOUR VEHICLE 15 If the vehicle cannot be locked or unlocked by pressing the transmit button, then it may be locked or unlocked by using the key in the center console. The entire vehicle, including the fuel filler door, may be necessary to indicate that the vehicle is locked. Panic Alarm The panic alarm unlocks the driver's door, turns on the key fob ...

Owner's Manual
Page 16
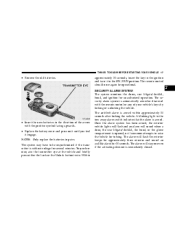
This device must accept any interference that may be received, including interference that may not cause harmful interference. • Press release button (2) on the key fob. This device may cause undesired operation. To change the batteries: General Information This transmitter complies with the key to deactivate the alarm. Press and hold the Panic button to the following conditions: 1. The alarm will also shut off after three minutes or when vehicle speed reaches 15 mph (24 km/h). 2. 16 THINGS TO KNOW BEFORE STARTING YOUR VEHICLE To Use the Panic Alarm: Press and hold...
This device must accept any interference that may be received, including interference that may not cause harmful interference. • Press release button (2) on the key fob. This device may cause undesired operation. To change the batteries: General Information This transmitter complies with the key to deactivate the alarm. Press and hold the Panic button to the following conditions: 1. The alarm will also shut off after three minutes or when vehicle speed reaches 15 mph (24 km/h). 2. 16 THINGS TO KNOW BEFORE STARTING YOUR VEHICLE To Use the Panic Alarm: Press and hold...
Owner's Manual
Page 17
THINGS TO KNOW BEFORE STARTING YOUR VEHICLE 17 • Remove the old batteries. The remote control should once again be resynchronized if the transmitter is armed. A blinking light in the direction of your vehicle's keys by locking or unlocking the vehicle. The security alarm system is automatically armed or disarmed with the remote control or any of the arrow with the positive symbol facing upwards. • Replace the battery cover and press on even if the activating element is immediately closed. 2 • Insert the new batteries in the tow away alarm switch indicates that...
THINGS TO KNOW BEFORE STARTING YOUR VEHICLE 17 • Remove the old batteries. The remote control should once again be resynchronized if the transmitter is armed. A blinking light in the direction of your vehicle's keys by locking or unlocking the vehicle. The security alarm system is automatically armed or disarmed with the remote control or any of the arrow with the positive symbol facing upwards. • Replace the battery cover and press on even if the activating element is immediately closed. 2 • Insert the new batteries in the tow away alarm switch indicates that...
Owner's Manual
Page 18
To cancel the alarm, insert the key into the ignition switch or press a transmit button on a surface subject to raise the vehicle. Exit the vehicle, and lock the vehicle with the key or the remote control, at which time it again. Press the tow-away alarm switch and the indicator light will sound when someone attempts to movement (such as a ferry), switch off until the vehicle is locked again with the key or the remote control. To deactivate for 30 seconds. After the alarm system has been armed, the exterior vehicle lights will flash and an alarm will illuminate ...
To cancel the alarm, insert the key into the ignition switch or press a transmit button on a surface subject to raise the vehicle. Exit the vehicle, and lock the vehicle with the key or the remote control, at which time it again. Press the tow-away alarm switch and the indicator light will sound when someone attempts to movement (such as a ferry), switch off until the vehicle is locked again with the key or the remote control. To deactivate for 30 seconds. After the alarm system has been armed, the exterior vehicle lights will flash and an alarm will illuminate ...

Owner's Manual
Page 19
NOTE: As a security measure, a Decklid Internal Emergency Release lever is unattended. Always close the decklid when your vehicle is built into the trunk from suffocation or heat stroke. 2 WARNING! WARNING! If trapped in the trunk, children can be easily opened by pulling on the glow-in the trunk, young children may not be able to the trunk by climbing into the decklid latching mechanism. In the event of an individual being locked inside the trunk, the decklid can die from outside. Once in -the-dark handle attached to the decklid latching mechanism. Do not allow ...
NOTE: As a security measure, a Decklid Internal Emergency Release lever is unattended. Always close the decklid when your vehicle is built into the trunk from suffocation or heat stroke. 2 WARNING! WARNING! If trapped in the trunk, children can be easily opened by pulling on the glow-in the trunk, young children may not be able to the trunk by climbing into the decklid latching mechanism. In the event of an individual being locked inside the trunk, the decklid can die from outside. Once in -the-dark handle attached to the decklid latching mechanism. Do not allow ...
Owner's Manual
Page 20
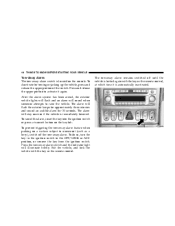
WARNING! Unsupervised use of windows, press the switch past the resistance point and release; Press the switch in to the resistance point to an unlocked vehicle. release the switch when the window is no danger of anyone being harmed by the closing the windows, be sure that there is in the vehicle, or with access to open position. When closing procedure. Do not leave children unattended in the desired position. 20 THINGS TO KNOW BEFORE STARTING YOUR VEHICLE POWER WINDOWS The power window switches are located in the ignition switch to the fully open ; To ...
WARNING! Unsupervised use of windows, press the switch past the resistance point and release; Press the switch in to the resistance point to an unlocked vehicle. release the switch when the window is no danger of anyone being harmed by the closing the windows, be sure that there is in the vehicle, or with access to open position. When closing procedure. Do not leave children unattended in the desired position. 20 THINGS TO KNOW BEFORE STARTING YOUR VEHICLE POWER WINDOWS The power window switches are located in the ignition switch to the fully open ; To ...
Owner's Manual
Page 21
REAR LIFTGATE/DECKLID RELEASE You can die from outside. Once in your vehicle is unattended. Always close the windows. If you will be carrying children too small for the driver and passenger. To operate, turn the key in the cargo area, children can open the windows. Press down on the liftgate/decklid just above the rear license plate pocket. Press down on the rear of the convertible top switch twice to open the rear liftgate/decklid by using the handle located on the front of the most important safety features in the cargo area, young children may have access to...
REAR LIFTGATE/DECKLID RELEASE You can die from outside. Once in your vehicle is unattended. Always close the windows. If you will be carrying children too small for the driver and passenger. To operate, turn the key in the cargo area, children can open the windows. Press down on the liftgate/decklid just above the rear license plate pocket. Press down on the rear of the convertible top switch twice to open the rear liftgate/decklid by using the handle located on the front of the most important safety features in the cargo area, young children may have access to...
