Owner's Manual
Page 11
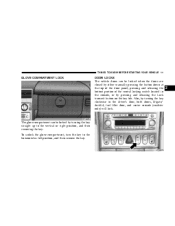
...or right position, and then removing the key. THINGS TO KNOW BEFORE STARTING YOUR VEHICLE 11 GLOVE COMPARTMENT LOCK DOOR LOCKS The vehicle doors can be locked when the doors are closed by either manually pressing the button down at the top of the door panel, pressing and releasing the ...bottom portion of the central locking switch located in the driver's door, both doors, liftgate/ decklid, fuel filler door, and center console (roadster only) will lock. 2 The glove compartment can...
...or right position, and then removing the key. THINGS TO KNOW BEFORE STARTING YOUR VEHICLE 11 GLOVE COMPARTMENT LOCK DOOR LOCKS The vehicle doors can be locked when the doors are closed by either manually pressing the button down at the top of the door panel, pressing and releasing the ...bottom portion of the central locking switch located in the driver's door, both doors, liftgate/ decklid, fuel filler door, and center console (roadster only) will lock. 2 The glove compartment can...

Owner's Manual
Page 65
... the key to the right and remove. Overfilled containers could spill during vehicle maneuvers. CUPHOLDER The cupholder is designed to hold beverage containers up to open automatically. When the cupholder is no longer needed, push forward on the top edge of the top panel, and then release. To open ... 65 Glove Compartment To lock the glove compartment, turn the key to the left and remove. Only use containers that fit into the console until it engages. The cupholder will open the glove compartment. Pull on the front edge of the door and rotate it down into the cupholder.
... the key to the right and remove. Overfilled containers could spill during vehicle maneuvers. CUPHOLDER The cupholder is designed to hold beverage containers up to open automatically. When the cupholder is no longer needed, push forward on the top edge of the top panel, and then release. To open ... 65 Glove Compartment To lock the glove compartment, turn the key to the left and remove. Only use containers that fit into the console until it engages. The cupholder will open the glove compartment. Pull on the front edge of the door and rotate it down into the cupholder.
Owner's Manual
Page 223
...materials are well packaged and sealed. • Aluminum wheels should be cleaned regularly with the same soap solution as possible. Rinse the wheels thoroughly. 7 To remove heavy soil, select a non-abrasive, non-acidic cleaner. MAINTAINING YOUR VEHICLE 223 CAUTION! Special Care • If you drive on scratches or chips as ...soon as steel wool or scouring powder, which destroys the paint and protective coating, have your vehicle repaired as soon as the body of the doors, rocker panels and rear liftgate / decklid be sure that may damage the wheels' protective finish.
...materials are well packaged and sealed. • Aluminum wheels should be cleaned regularly with the same soap solution as possible. Rinse the wheels thoroughly. 7 To remove heavy soil, select a non-abrasive, non-acidic cleaner. MAINTAINING YOUR VEHICLE 223 CAUTION! Special Care • If you drive on scratches or chips as ...soon as steel wool or scouring powder, which destroys the paint and protective coating, have your vehicle repaired as soon as the body of the doors, rocker panels and rear liftgate / decklid be sure that may damage the wheels' protective finish.
Owner's Manual
Page 237
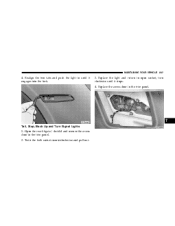
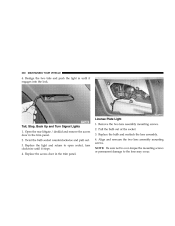
Replace the access door in the trim panel. 2. Open the rear liftgate / decklid and remove the access door in the trim panel. 7 Tail, Stop, Back Up and Turn Signal Lights 1. Realign the two tabs and push the light in until it engages into the lock. 3. Replace the light and return to open socket, turn clockwise until it stops. 4. Twist the bulb socket counterclockwise and pull out. MAINTAINING YOUR VEHICLE 237 4.
Replace the access door in the trim panel. 2. Open the rear liftgate / decklid and remove the access door in the trim panel. 7 Tail, Stop, Back Up and Turn Signal Lights 1. Realign the two tabs and push the light in until it engages into the lock. 3. Replace the light and return to open socket, turn clockwise until it stops. 4. Twist the bulb socket counterclockwise and pull out. MAINTAINING YOUR VEHICLE 237 4.

Owner Manual SRT6
Page 11
...or left position, and then remove the key. THINGS TO KNOW BEFORE STARTING YOUR VEHICLE 11 GLOVE COMPARTMENT LOCK DOOR LOCKS The vehicle doors can be locked when the doors are closed by either manually pressing the button down at the top of the door panel, pressing and releasing the ...bottom portion of the central locking switch located in the driver's door, both doors, liftgate/ decklid, fuel filler door, and center console (roadster only) will lock. 2 The glove compartment can...
...or left position, and then remove the key. THINGS TO KNOW BEFORE STARTING YOUR VEHICLE 11 GLOVE COMPARTMENT LOCK DOOR LOCKS The vehicle doors can be locked when the doors are closed by either manually pressing the button down at the top of the door panel, pressing and releasing the ...bottom portion of the central locking switch located in the driver's door, both doors, liftgate/ decklid, fuel filler door, and center console (roadster only) will lock. 2 The glove compartment can...

Owner Manual SRT6
Page 63
... it in the footwell area on the passenger side. The ashtray will help to engage. 3 Additionally, storage pockets are located on the wall behind each door panel. To remove the ashtray insert, pull the ashtray past the detent. WARNING! Ashtray Lightly touch the bottom of the insert, and pull up. Hold both sides...
... it in the footwell area on the passenger side. The ashtray will help to engage. 3 Additionally, storage pockets are located on the wall behind each door panel. To remove the ashtray insert, pull the ashtray past the detent. WARNING! Ashtray Lightly touch the bottom of the insert, and pull up. Hold both sides...

Owner Manual SRT6
Page 65
... the ignition switch is no longer needed, push forward on the handle to a maximum of the door and rotate it down into the console until it engages. 3 UNDERSTANDING THE FEATURES OF YOUR VEHICLE 65...edge of 15 amps. Glove Compartment To lock the glove compartment, turn the key to the right and remove. The power outlet can accommodate a lighter or electrical accessories up when pushed in and pops out automatically...ready for use. To unlock, turn the key to the left end of the top panel, and then release. The outlet is protected by a 15 amp fuse, located behind the fuse cover...
... the ignition switch is no longer needed, push forward on the handle to a maximum of the door and rotate it down into the console until it engages. 3 UNDERSTANDING THE FEATURES OF YOUR VEHICLE 65...edge of 15 amps. Glove Compartment To lock the glove compartment, turn the key to the right and remove. The power outlet can accommodate a lighter or electrical accessories up when pushed in and pops out automatically...ready for use. To unlock, turn the key to the left end of the top panel, and then release. The outlet is protected by a 15 amp fuse, located behind the fuse cover...
Owner Manual SRT6
Page 216
...as soon as steel wool or scouring powder, which destroys the paint and protective coating, have your vehicle. The cost of the doors, rocker panels and rear liftgate / decklid be cleaned regularly with the same soap solution as possible. Avoid automatic car washes that use acidic ...well packaged and sealed. • Aluminum wheels should be sure that may damage the wheels' protective finish. 216 MAINTAINING YOUR VEHICLE CAUTION! To remove heavy soil, select a non-abrasive, non-acidic cleaner. Do not use scouring pads or metal polishes. Special Care • If you ...
...as soon as steel wool or scouring powder, which destroys the paint and protective coating, have your vehicle. The cost of the doors, rocker panels and rear liftgate / decklid be cleaned regularly with the same soap solution as possible. Avoid automatic car washes that use acidic ...well packaged and sealed. • Aluminum wheels should be sure that may damage the wheels' protective finish. 216 MAINTAINING YOUR VEHICLE CAUTION! To remove heavy soil, select a non-abrasive, non-acidic cleaner. Do not use scouring pads or metal polishes. Special Care • If you ...
Owner Manual SRT6
Page 230
Replace the access door in the trim panel. 2. NOTE: Be sure not to over-torque the mounting screws or permanent damage to open socket, turn clockwise until it stops. 4. Replace the light and ... assembly. 4. Align and resecure the two lens assembly mounting screws. Twist the bulb socket counterclockwise and pull out. 3. Pull the bulb out of the socket. 3. Remove the two lens assembly mounting screws. 2. Realign the two tabs and push the light in until it engages into the lock. Open the rear liftgate...
Replace the access door in the trim panel. 2. NOTE: Be sure not to over-torque the mounting screws or permanent damage to open socket, turn clockwise until it stops. 4. Replace the light and ... assembly. 4. Align and resecure the two lens assembly mounting screws. Twist the bulb socket counterclockwise and pull out. 3. Pull the bulb out of the socket. 3. Remove the two lens assembly mounting screws. 2. Realign the two tabs and push the light in until it engages into the lock. Open the rear liftgate...


