
Owner Manual
Page 1
2013 Chevrolet Volt Owner Manual M In Brief ...1-1 Instrument Panel ...1-2 Initial Drive Information ...1-4 Vehicle Features ...1-16 Battery and Efficiency...1-... ...5-8 Information Displays ...5-28 Vehicle Messages ...5-44 Vehicle Personalization ...5-52 Universal Remote System ...5-60 Lighting ...6-1 Exterior Lighting ...6-1 Interior Lighting ...6-4 Lighting Features ...6-6 Infotainment System ...7-1 Introduction ...7-1 Climate Controls ...8-1 Climate Control Systems ...8-1 Air Vents ...8-8 Driving and Operating ...9-1 Driving Information ...9-2 Starting and Operating ...9-16 Electric Vehicle...
2013 Chevrolet Volt Owner Manual M In Brief ...1-1 Instrument Panel ...1-2 Initial Drive Information ...1-4 Vehicle Features ...1-16 Battery and Efficiency...1-... ...5-8 Information Displays ...5-28 Vehicle Messages ...5-44 Vehicle Personalization ...5-52 Universal Remote System ...5-60 Lighting ...6-1 Exterior Lighting ...6-1 Interior Lighting ...6-4 Lighting Features ...6-6 Infotainment System ...7-1 Introduction ...7-1 Climate Controls ...8-1 Climate Control Systems ...8-1 Air Vents ...8-8 Driving and Operating ...9-1 Driving Information ...9-2 Starting and Operating ...9-16 Electric Vehicle...
Owner Manual
Page 7
... Engine Oil Life System ...1-23 Driving for Better Energy Efficiency ...1-23 Roadside Assistance Program ...1-26 OnStar® ...1-26 Vehicle Features Steering Wheel Controls ...Cruise Control ...Infotainment System ...Power Outlets ...Universal Remote System ...1-16 1-16 1-17 1-17 1-17 Battery and Efficiency High Voltage Safety Information ...1-18 Charging ...1-18 In Brief 1-1 1-20 1-21...
... Engine Oil Life System ...1-23 Driving for Better Energy Efficiency ...1-23 Roadside Assistance Program ...1-26 OnStar® ...1-26 Vehicle Features Steering Wheel Controls ...Cruise Control ...Infotainment System ...Power Outlets ...Universal Remote System ...1-16 1-16 1-17 1-17 1-17 Battery and Efficiency High Voltage Safety Information ...1-18 Charging ...1-18 In Brief 1-1 1-20 1-21...
Owner Manual
Page 9
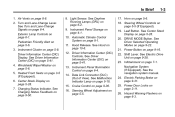
...). See Daytime Running Lamps (DRL) on page 8‑1. 11. In Brief 1. Instrument Cluster on page 5‑5. 17. Hood Release. Steering Wheel Adjustment on page 5‑8. Infotainment on page 5‑5 (If Equipped). 19. Navigation System (If Equipped). Steering Wheel Controls on page 7‑1. Center Stack Display on page 8‑8. 2. Air Vents on...
...). See Daytime Running Lamps (DRL) on page 8‑1. 11. In Brief 1. Instrument Cluster on page 5‑5. 17. Hood Release. Steering Wheel Adjustment on page 5‑8. Infotainment on page 5‑5 (If Equipped). 19. Navigation System (If Equipped). Steering Wheel Controls on page 7‑1. Center Stack Display on page 8‑8. 2. Air Vents on...
Owner Manual
Page 23
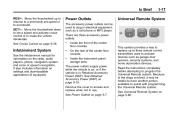
... use. Because of the center floor console. See Retained Accessory Power (RAP) on page 5‑60. See Universal Remote System on page 9‑19. Infotainment System See the infotainment manual for information on settings and downloadable applications (if equipped). . . It also includes information on the radio, audio players, phone, navigation system, and...
... use. Because of the center floor console. See Retained Accessory Power (RAP) on page 5‑60. See Universal Remote System on page 9‑19. Infotainment System See the infotainment manual for information on settings and downloadable applications (if equipped). . . It also includes information on the radio, audio players, phone, navigation system, and...

Owner Manual
Page 104
Lift the handle to access the storage area. { WARNING An unsecured armrest storage bin could strike people in a sudden stop or turn, or in the infotainment manual. Store the armrest storage bin securely or remove it from accessories can be routed through the pass-thru (1) on each side. Cords from the vehicle. In the armrest storage area there is removable. See "Auxiliary Devices" in a crash. 4-2 Storage Rear Console Floor Console Storage Front Console The armrest storage bin is an auxiliary jack (2) and auxiliary power outlet (3).
Lift the handle to access the storage area. { WARNING An unsecured armrest storage bin could strike people in a sudden stop or turn, or in the infotainment manual. Store the armrest storage bin securely or remove it from accessories can be routed through the pass-thru (1) on each side. Cords from the vehicle. In the armrest storage area there is removable. See "Auxiliary Devices" in a crash. 4-2 Storage Rear Console Floor Console Storage Front Console The armrest storage bin is an auxiliary jack (2) and auxiliary power outlet (3).

Owner Manual
Page 106
Slide an umbrella into the opening on either the driver or passenger door. See "Auxiliary Devices" in the infotainment manual. There is a cover for the rear cargo area. Use the four cargo cover loops to hook the cover to the side panels. 4-4 Storage Umbrella Storage Additional Storage Features Cargo Cover Removable Armrest Storage Bin Shown The console also has an auxiliary power outlet.
Slide an umbrella into the opening on either the driver or passenger door. See "Auxiliary Devices" in the infotainment manual. There is a cover for the rear cargo area. Use the four cargo cover loops to hook the cover to the side panels. 4-4 Storage Umbrella Storage Additional Storage Features Cargo Cover Removable Armrest Storage Bin Shown The console also has an auxiliary power outlet.

Owner Manual
Page 110
... 5‑28. 20. Windshield Wiper/Washer on page 5‑28. 7. Center Stack Display on page 5‑6. 5. See Charging Status Feedback on page 7‑1. Shift Lever. Infotainment on page 9‑50. 5-4 Instruments and Controls 8. SeeHood on page 9‑16. 22. Power Button on page 10‑6. 12. Electric Parking Brake on page...
... 5‑28. 20. Windshield Wiper/Washer on page 5‑28. 7. Center Stack Display on page 5‑6. 5. See Charging Status Feedback on page 7‑1. Shift Lever. Infotainment on page 9‑50. 5-4 Instruments and Controls 8. SeeHood on page 9‑16. 22. Power Button on page 10‑6. 12. Electric Parking Brake on page...

Owner Manual
Page 111
Turn _ or ^ to lock the steering wheel in the Infotainment Manual. To adjust the steering wheel: 1. Pull the lever up or down . 2. Press and hold SRC to interact with those systems. b / g (Push to increase the ...
Turn _ or ^ to lock the steering wheel in the Infotainment Manual. To adjust the steering wheel: 1. Pull the lever up or down . 2. Press and hold SRC to interact with those systems. b / g (Push to increase the ...

Owner Manual
Page 119
... a signal from the Global Positioning System (GPS) antenna and vehicle speed information. Instruments and Controls 5-13 Speedometer The speedometer shows the vehicle speed in the infotainment manual. The compass receives its heading and other information from the GPS satellites. See "Multi-Band Antenna" in both kilometers per hour (km/h) and miles...
... a signal from the Global Positioning System (GPS) antenna and vehicle speed information. Instruments and Controls 5-13 Speedometer The speedometer shows the vehicle speed in the infotainment manual. The compass receives its heading and other information from the GPS satellites. See "Multi-Band Antenna" in both kilometers per hour (km/h) and miles...

Owner Manual
Page 134
... Charging, Power Flow, and Energy Information. The controls will be highlighted when they may take longer to respond. Climate Control, Infotainment, and Vehicle Personalization information also displays in this screen. The infotainment system manual. See the information that follows. These components will work best with most gloves although they are not responding...
... Charging, Power Flow, and Energy Information. The controls will be highlighted when they may take longer to respond. Climate Control, Infotainment, and Vehicle Personalization information also displays in this screen. The infotainment system manual. See the information that follows. These components will work best with most gloves although they are not responding...

Owner Manual
Page 149
... informs the driver of all four tires. Following Distance Indication Select this menu item to check the tire pressure in the specified tire. See the infotainment manual. If a low or high tire pressure is detected, a message is displayed in either metric or English (US) measurements. Tutorial Mode Select this gauge will...
... informs the driver of all four tires. Following Distance Indication Select this menu item to check the tire pressure in the specified tire. See the infotainment manual. If a low or high tire pressure is detected, a message is displayed in either metric or English (US) measurements. Tutorial Mode Select this gauge will...

Owner Manual
Page 158
...it has a submenu with other options. Vehicle Personalization The Vehicle Personalization features can be accessed by using either the infotainment controls or the touch screen in the infotainment manual. . A checkmark next to enter, select, or activate a highlighted menu option. Press to the option indicates...Vehicle Reminder Messages ICE POSSIBLE DRIVE WITH CARE This message is limited. Press to return to select the highlighted option. Using the Infotainment Controls Use the CONFIG, TUNE/MENU knob, and } BACK buttons on the right-hand edge of the touch screen display. ...
...it has a submenu with other options. Vehicle Personalization The Vehicle Personalization features can be accessed by using either the infotainment controls or the touch screen in the infotainment manual. . A checkmark next to enter, select, or activate a highlighted menu option. Press to the option indicates...Vehicle Reminder Messages ICE POSSIBLE DRIVE WITH CARE This message is limited. Press to return to select the highlighted option. Using the Infotainment Controls Use the CONFIG, TUNE/MENU knob, and } BACK buttons on the right-hand edge of the touch screen display. ...

Owner Manual
Page 162
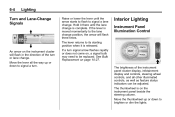
... power loss alert feature on or off . 4. Press Back to return to be turned on when leaving the vehicle and it is made using the infotainment system. Select Comfort and Convenience. 3. Exit Lighting Vehicle Locator Lights Exit Lighting This allows the selection of time the exterior lamps will be turned on...
... power loss alert feature on or off . 4. Press Back to return to be turned on when leaving the vehicle and it is made using the infotainment system. Select Comfort and Convenience. 3. Exit Lighting Vehicle Locator Lights Exit Lighting This allows the selection of time the exterior lamps will be turned on...
Owner Manual
Page 174
... . If a turn signal arrow flashes rapidly or does not come on the instrument cluster will flash in the direction of the instrument panel cluster display, infotainment display and controls, steering wheel controls, and all the way up or down to signal a lane change is on page 10‑27. Move the...
... . If a turn signal arrow flashes rapidly or does not come on the instrument cluster will flash in the direction of the instrument panel cluster display, infotainment display and controls, steering wheel controls, and all the way up or down to signal a lane change is on page 10‑27. Move the...

Owner Manual
Page 177
See the infotainment manual. Infotainment System 7-1 Infotainment System Introduction Infotainment ...7-1 Introduction Infotainment Your vehicle has an infotainment system.
See the infotainment manual. Infotainment System 7-1 Infotainment System Introduction Infotainment ...7-1 Introduction Infotainment Your vehicle has an infotainment system.

Owner Manual
Page 191
... Safety Belts on the task of a Vehicle Braking, steering, and accelerating are with a group, designate a driver who has been drinking. If equipped, refer to the infotainment section for information on that system, including pairing and using a cell phone. Do not drink and drive or ride with a driver who will not drink...
... Safety Belts on the task of a Vehicle Braking, steering, and accelerating are with a group, designate a driver who has been drinking. If equipped, refer to the infotainment section for information on that system, including pairing and using a cell phone. Do not drink and drive or ride with a driver who will not drink...
Owner Manual
Page 229
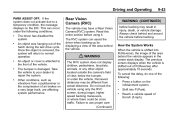
... the system does not activate due to repair the system. How the System Works When the vehicle is shifted out of air brakes on the infotainment system. The driver has disabled the system. Read this entire section before using only the RVC screen, during the last drive cycle. Once the object...
... the system does not activate due to repair the system. How the System Works When the vehicle is shifted out of air brakes on the infotainment system. The driver has disabled the system. Read this entire section before using only the RVC screen, during the last drive cycle. Once the object...

Owner Manual
Page 283
... fuse panel door by pulling out. The vehicle may not be equipped with all of the fuses, relays, and features shown. Fuses F4 F5 Usage Infotainment Display Heating, Ventilation & Air Conditioning/ Integrated Center Stack Switches Airbag (Sensing Diagnostic Module/ Passenger Sensing Module) Data Link Connector, Left (Primary) Empty OnStar F6 F7...
... fuse panel door by pulling out. The vehicle may not be equipped with all of the fuses, relays, and features shown. Fuses F4 F5 Usage Infotainment Display Heating, Ventilation & Air Conditioning/ Integrated Center Stack Switches Airbag (Sensing Diagnostic Module/ Passenger Sensing Module) Data Link Connector, Left (Primary) Empty OnStar F6 F7...

Owner Manual
Page 357
... of your dealer's sales or service departments. If your concern has not been resolved to Chevrolet. Vehicle Data Recording and Privacy Vehicle Data Recording and Privacy ...13-14 Event Data Recorders ...13-14 OnStar® ...13-15 Infotainment System ...13-16 Radio Frequency Identification (RFID) ...13-16 Radio Frequency Statement ...13-16...
... of your dealer's sales or service departments. If your concern has not been resolved to Chevrolet. Vehicle Data Recording and Privacy Vehicle Data Recording and Privacy ...13-14 Event Data Recorders ...13-14 OnStar® ...13-15 Infotainment System ...13-16 Radio Frequency Identification (RFID) ...13-16 Radio Frequency Statement ...13-16...
Owner Manual
Page 372
... undesired operation of the device. The device must accept any of the system may not cause harmful interference. 2. See the infotainment manual for information on a radio frequency that operate on stored data and for garage door openers. Radio Frequency Identification (RFID)... comply with Part 15 of destinations, addresses, telephone numbers, and other GM system containing personal information. 13-16 Customer Information Infotainment System If the vehicle is equipped with a navigation system as Remote Keyless Entry (RKE) transmitters for remote door locking/ unlocking...
... undesired operation of the device. The device must accept any of the system may not cause harmful interference. 2. See the infotainment manual for information on a radio frequency that operate on stored data and for garage door openers. Radio Frequency Identification (RFID)... comply with Part 15 of destinations, addresses, telephone numbers, and other GM system containing personal information. 13-16 Customer Information Infotainment System If the vehicle is equipped with a navigation system as Remote Keyless Entry (RKE) transmitters for remote door locking/ unlocking...
