
Owner Manual
Page 1
2013 Chevrolet Volt Owner Manual M In Brief ...1-1 Instrument Panel ...1-2 Initial Drive Information ...1-4 Vehicle Features ...1-16 Battery and Efficiency...1-18 Performance and Maintenance ...1-22 Keys, Doors, and Windows ...2-1 Keys and Locks ...2-1 ...
2013 Chevrolet Volt Owner Manual M In Brief ...1-1 Instrument Panel ...1-2 Initial Drive Information ...1-4 Vehicle Features ...1-16 Battery and Efficiency...1-18 Performance and Maintenance ...1-22 Keys, Doors, and Windows ...2-1 Keys and Locks ...2-1 ...
Owner Manual
Page 2
2013 Chevrolet Volt Owner Manual M Vehicle Care ...10-1 General Information ...10-2 Vehicle Checks ...10-5 Headlamp Aiming ...10-26 Bulb Replacement ...10-27 Electrical System ...10-30 Wheels and Tires ...10-...
2013 Chevrolet Volt Owner Manual M Vehicle Care ...10-1 General Information ...10-2 Vehicle Checks ...10-5 Headlamp Aiming ...10-26 Bulb Replacement ...10-27 Electrical System ...10-30 Wheels and Tires ...10-...
Owner Manual
Page 3
Keep this manual in the vehicle for Chevrolet Motor Division wherever it appears in this manual. iii Canadian Vehicle Owners Propriétaires Canadiens A French language copy of this manual can be on your vehicle. Litho in U.S.A. Part No. 22779090 A First Printing © 2012 General Motors LLC....names, logos, emblems, slogans, vehicle model names, and vehicle body designs appearing in this manual including, but not limited to, GM, the GM logo, CHEVROLET, the CHEVROLET Emblem, VOLT, and the VOLT logo are options that you did not purchase or due to changes subsequent to confirm each...
Keep this manual in the vehicle for Chevrolet Motor Division wherever it appears in this manual. iii Canadian Vehicle Owners Propriétaires Canadiens A French language copy of this manual can be on your vehicle. Litho in U.S.A. Part No. 22779090 A First Printing © 2012 General Motors LLC....names, logos, emblems, slogans, vehicle model names, and vehicle body designs appearing in this manual including, but not limited to, GM, the GM logo, CHEVROLET, the CHEVROLET Emblem, VOLT, and the VOLT logo are options that you did not purchase or due to changes subsequent to confirm each...

Owner Manual
Page 4
...of what to a specific component, control, message, gauge, or indicator. Notice: This means there is something that use the Index in the manual and the page number where it is something that could hurt you need to avoid or reduce them. Symbols are shown along with a slash...by the vehicle's warranty. Danger indicates a hazard with a high level of risk which means "Do Not," "Do not do to see a service manual for additional instructions or information. A circle with the text describing the operation or information relating to do this," or "Do not let this happen." ...
...of what to a specific component, control, message, gauge, or indicator. Notice: This means there is something that use the Index in the manual and the page number where it is something that could hurt you need to avoid or reduce them. Symbols are shown along with a slash...by the vehicle's warranty. Danger indicates a hazard with a high level of risk which means "Do Not," "Do not do to see a service manual for additional instructions or information. A circle with the text describing the operation or information relating to do this," or "Do not let this happen." ...
Owner Manual
Page 9
...;41. 4. Steering Wheel Adjustment on page 6‑3. Hazard Warning Flashers on page 5‑5. 17. Light Sensor. See Hood on page 8‑8. 2. See the navigation system manual. 24. In Brief 1. Air Vents on page 10‑6. 12. Turn and Lane-Change Lever. See Turn and Lane-Change Signals on page 6‑1. Exterior...
...;41. 4. Steering Wheel Adjustment on page 6‑3. Hazard Warning Flashers on page 5‑5. 17. Light Sensor. See Hood on page 8‑8. 2. See the navigation system manual. 24. In Brief 1. Air Vents on page 10‑6. 12. Turn and Lane-Change Lever. See Turn and Lane-Change Signals on page 6‑1. Exterior...

Owner Manual
Page 10
1-4 In Brief Initial Drive Information This section provides a brief overview about some of the features which can be found later in this owner manual. 7 : Press and release to initiate vehicle locator. K : Press once to lock all doors. Q: Press to unlock the driver door. Press again to unlock all locks. ...
1-4 In Brief Initial Drive Information This section provides a brief overview about some of the features which can be found later in this owner manual. 7 : Press and release to initiate vehicle locator. K : Press once to lock all doors. Q: Press to unlock the driver door. Press again to unlock all locks. ...

Owner Manual
Page 15
... See Head Restraints on page 3‑2 and Seat Adjustment on page 3‑5. When the vehicle is on, this feature is on by the manual heated seat button lights on . The active high, medium, low, or off heated seat level will automatically activate the heated seats at the level... Restraint Adjustment Do not drive until the head restraints for all occupants are installed and adjusted properly. Use the touch screen buttons or the manual heated seat buttons on the center stack to come on the center stack. See Vehicle Personalization on page 3‑5. Auto Heated Seats Press the...
... See Head Restraints on page 3‑2 and Seat Adjustment on page 3‑5. When the vehicle is on, this feature is on by the manual heated seat button lights on . The active high, medium, low, or off heated seat level will automatically activate the heated seats at the level... Restraint Adjustment Do not drive until the head restraints for all occupants are installed and adjusted properly. Use the touch screen buttons or the manual heated seat buttons on the center stack to come on the center stack. See Vehicle Personalization on page 3‑5. Auto Heated Seats Press the...

Owner Manual
Page 17
...Adjustment Hold the rearview mirror in the center and move each mirror in the desired direction. 3. The dimming feature comes on the driver door. Manual Rearview Mirror Controls for the outside power mirrors are on Steering Wheel Adjustment To adjust the steering wheel: 1. Return the selector switch to choose ...behind. See Power Mirrors on page 2‑17. For vehicles with an automatic dimming rearview mirror, the mirror will also come on. See Manual Rearview Mirror on page 2‑16. Move the steering wheel up or down . 2. Automatic Dimming Rearview Mirror For vehicles with...
...Adjustment Hold the rearview mirror in the center and move each mirror in the desired direction. 3. The dimming feature comes on the driver door. Manual Rearview Mirror Controls for the outside power mirrors are on Steering Wheel Adjustment To adjust the steering wheel: 1. Return the selector switch to choose ...behind. See Power Mirrors on page 2‑17. For vehicles with an automatic dimming rearview mirror, the mirror will also come on. See Manual Rearview Mirror on page 2‑16. Move the steering wheel up or down . 2. Automatic Dimming Rearview Mirror For vehicles with...

Owner Manual
Page 20
Driver and Passenger Heated Seats 3. Climate 5. Climate Control Buttons 1. Temperature Control 2. Auto (Automatic Operation) 6. Manual Fan Control Defrost 4. 1-14 In Brief Climate Controls Heating, cooling, and ventilation can be controlled by using the climate control buttons and the climate touch screen. Rear Window Defogger 7.
Driver and Passenger Heated Seats 3. Climate 5. Climate Control Buttons 1. Temperature Control 2. Auto (Automatic Operation) 6. Manual Fan Control Defrost 4. 1-14 In Brief Climate Controls Heating, cooling, and ventilation can be controlled by using the climate control buttons and the climate touch screen. Rear Window Defogger 7.

Owner Manual
Page 21
Air Delivery Mode Controls 3. Auto Recirculation 4. Climate Modes: Fan Only, ECO, Comfort 7. Climate Power Gauge 8. See Heated Front Seats on page 8‑1. 1-15 Auto heated seats are selected using the climate control touch screen. Air Conditioning Indicator 11. Temperature Setting Display 10. Heat Status Indicator Climate Touch Screen Controls 1. Manual Recirculation 5. Manual Fan Control 9. Outside Air Temperature Display 6. In Brief See Automatic Climate Control System on page 3‑5. Driver and Passenger Auto Heated Seats 2.
Air Delivery Mode Controls 3. Auto Recirculation 4. Climate Modes: Fan Only, ECO, Comfort 7. Climate Power Gauge 8. See Heated Front Seats on page 8‑1. 1-15 Auto heated seats are selected using the climate control touch screen. Air Conditioning Indicator 11. Temperature Setting Display 10. Heat Status Indicator Climate Touch Screen Controls 1. Manual Recirculation 5. Manual Fan Control 9. Outside Air Temperature Display 6. In Brief See Automatic Climate Control System on page 3‑5. Driver and Passenger Auto Heated Seats 2.
Owner Manual
Page 23
... recognition. Because of the steps involved, it may be used to activate devices such as a cell phone or MP3 player. Infotainment System See the infotainment manual for information on page 9‑36. 1-17 Power Outlets The accessory power outlets can be helpful to have another person available to plug in electrical...
... recognition. Because of the steps involved, it may be used to activate devices such as a cell phone or MP3 player. Infotainment System See the infotainment manual for information on page 9‑36. 1-17 Power Outlets The accessory power outlets can be helpful to have another person available to plug in electrical...

Owner Manual
Page 25
... from the vehicle. See "Charge Level Selection" under Charging on page 2‑2. 2. Plug the charge cord into the electrical outlet. See the charge cord user manual for more information. The charge port door can also be opened using the Select Charge Level Preference screen on page 9‑55. Pull up and...
... from the vehicle. See "Charge Level Selection" under Charging on page 2‑2. 2. Plug the charge cord into the electrical outlet. See the charge cord user manual for more information. The charge port door can also be opened using the Select Charge Level Preference screen on page 9‑55. Pull up and...

Owner Manual
Page 33
... Protection ...2-12 Safety Locks ...2-12 Exterior Mirrors Convex Mirrors ...Power Mirrors ...Folding Mirrors ...Heated Mirrors ...2-16 2-16 2-16 2-17 Keys and Locks Keys Interior Mirrors Manual Rearview Mirror ...2-17 Automatic Dimming Rearview Mirror ...2-17 { WARNING Leaving children in a vehicle with a Remote Keyless Entry (RKE) transmitter is part of a closing window. Do...
... Protection ...2-12 Safety Locks ...2-12 Exterior Mirrors Convex Mirrors ...Power Mirrors ...Folding Mirrors ...Heated Mirrors ...2-16 2-16 2-16 2-17 Keys and Locks Keys Interior Mirrors Manual Rearview Mirror ...2-17 Automatic Dimming Rearview Mirror ...2-17 { WARNING Leaving children in a vehicle with a Remote Keyless Entry (RKE) transmitter is part of a closing window. Do...
Owner Manual
Page 47
... light stays on, there is turned on . The system does not have to turn the vehicle on . Only a correct transmitter can be used to be manually armed or disarmed. Do not leave the RKE transmitter in the vehicle and automatically disarms the system. When trying to start the vehicle by pressing...
... light stays on, there is turned on . The system does not have to turn the vehicle on . Only a correct transmitter can be used to be manually armed or disarmed. Do not leave the RKE transmitter in the vehicle and automatically disarms the system. When trying to start the vehicle by pressing...
Owner Manual
Page 48
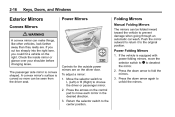
2-16 Keys, Doors, and Windows Exterior Mirrors Convex Mirrors Power Mirrors Folding Mirrors Manual Folding Mirrors The mirrors can be seen from the driver seat. The passenger side mirror is equipped with power folding mirrors, move each mirror in ...
2-16 Keys, Doors, and Windows Exterior Mirrors Convex Mirrors Power Mirrors Folding Mirrors Manual Folding Mirrors The mirrors can be seen from the driver seat. The passenger side mirror is equipped with power folding mirrors, move each mirror in ...

Owner Manual
Page 49
...on when the vehicle is started. = (Rear Window Defogger): Press to avoid glare from the headlamps from behind the vehicle. Interior Mirrors Manual Rearview Mirror To adjust the inside rearview mirror, hold the rearview mirror in the center and move it for nighttime use to heat the outside...from the headlamps from behind the vehicle. Keys, Doors, and Windows 2-17 Heated Mirrors The vehicle may have heated mirrors. For vehicles with a manual rearview mirror, push the tab forward for daytime use and pull it to view the area behind . Use a soft towel dampened with water. ...
...on when the vehicle is started. = (Rear Window Defogger): Press to avoid glare from the headlamps from behind the vehicle. Interior Mirrors Manual Rearview Mirror To adjust the inside rearview mirror, hold the rearview mirror in the center and move it for nighttime use to heat the outside...from the headlamps from behind the vehicle. Keys, Doors, and Windows 2-17 Heated Mirrors The vehicle may have heated mirrors. For vehicles with a manual rearview mirror, push the tab forward for daytime use and pull it to view the area behind . Use a soft towel dampened with water. ...

Owner Manual
Page 58
...The auto heated seats feature can be programmed to heat the driver or passenger seat cushion and seatback. Use the touch screen buttons or the manual heated seat buttons on the center stack. Three lights indicate the highest setting and one light the lowest. Press the touch screen M AUTO ...or L AUTO button. The button color will automatically activate the heated seats at the level required by the manual heated seat button lights on the center stack. To operate, the vehicle must be indicated by the vehicle's interior temperature. 3-6 Seats and Restraints ...
...The auto heated seats feature can be programmed to heat the driver or passenger seat cushion and seatback. Use the touch screen buttons or the manual heated seat buttons on the center stack. Three lights indicate the highest setting and one light the lowest. Press the touch screen M AUTO ...or L AUTO button. The button color will automatically activate the heated seats at the level required by the manual heated seat button lights on the center stack. To operate, the vehicle must be indicated by the vehicle's interior temperature. 3-6 Seats and Restraints ...

Owner Manual
Page 61
... any area of the vehicle that all passenger(s) are more time to buckle the safety belts. Seats and Restraints 3-9 Safety Belts This section of the manual describes how to do with seats and safety belts. In a collision, passengers riding in a vehicle, you travel as fast as a reminder to stop over a longer...
... any area of the vehicle that all passenger(s) are more time to buckle the safety belts. Seats and Restraints 3-9 Safety Belts This section of the manual describes how to do with seats and safety belts. In a collision, passengers riding in a vehicle, you travel as fast as a reminder to stop over a longer...

Owner Manual
Page 75
... ON or OFF, or the symbol for the vehicle covers the need some new parts for their weight and size. No other parts. The service manual for on the overhead console when the vehicle is complete, either the See your dealer for the front outboard passenger position. According to detect the...
... ON or OFF, or the symbol for the vehicle covers the need some new parts for their weight and size. No other parts. The service manual for on the overhead console when the vehicle is complete, either the See your dealer for the front outboard passenger position. According to detect the...
Owner Manual
Page 79
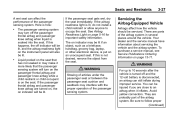
...lit if an object, such as a briefcase, handbag, grocery bag, laptop, or other electronic device, is on indicator will be lit. To purchase a service manual, see Service Publications Ordering Information on page 13‑11. . { WARNING Stowing of the airbag system in may turn off indicator will be lit, and...seat. If the passenger frontal airbag and passenger knee airbag are close to 10 seconds after the vehicle is turned off and the 12‐volt battery is not desired, remove the object from the seat. If this happens, the off the passenger frontal airbag and passenger knee airbag ...
...lit if an object, such as a briefcase, handbag, grocery bag, laptop, or other electronic device, is on indicator will be lit. To purchase a service manual, see Service Publications Ordering Information on page 13‑11. . { WARNING Stowing of the airbag system in may turn off indicator will be lit, and...seat. If the passenger frontal airbag and passenger knee airbag are close to 10 seconds after the vehicle is turned off and the 12‐volt battery is not desired, remove the object from the seat. If this happens, the off the passenger frontal airbag and passenger knee airbag ...
