
Owner's Manual
Page 14
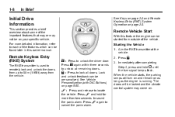
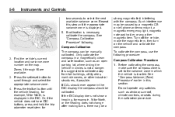
Press to locate the vehicle. Immediately after completing Step 2, press and hold for more detailed information, refer to sound the panic alarm. 1-8 In Brief See Keys on page 2‑2 and Remote Keyless Entry (RKE) ...
Press to locate the vehicle. Immediately after completing Step 2, press and hold for more detailed information, refer to sound the panic alarm. 1-8 In Brief See Keys on page 2‑2 and Remote Keyless Entry (RKE) ...
Owner's Manual
Page 15
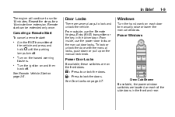
Repeat the steps for 10 minutes. To lock or unlock the door with the manual locks, push down or pull up on page 2‑7. Turn the ignition on ... continue to run for a 10-minute time extension. From outside, use the power door locks or the manual door locks. Turn on page 2‑5. Crew Cab Shown If available, the power window switches are on each door to unlock the doors.
Repeat the steps for 10 minutes. To lock or unlock the door with the manual locks, push down or pull up on page 2‑7. Turn the ignition on ... continue to run for a 10-minute time extension. From outside, use the power door locks or the manual door locks. Turn on page 2‑5. Crew Cab Shown If available, the power window switches are on each door to unlock the doors.

Owner's Manual
Page 37
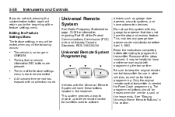
...a roller sunshade that can be helpful to have another person assist with programming the transmitter. In Brief 1-31 Universal Remote System Sunroof Extended Cab Open: From the vent position, press and hold the rear of the switch to vent the sunroof. This system provides a way to .... Because of the switch to close , pull it forward and latch it into the closed position, press and hold the rear of the steps involved, it back. Vent: From the closed position. Read the instructions completely before attempting to activate devices such as garage door openers, security...
...a roller sunshade that can be helpful to have another person assist with programming the transmitter. In Brief 1-31 Universal Remote System Sunroof Extended Cab Open: From the vent position, press and hold the rear of the switch to vent the sunroof. This system provides a way to .... Because of the switch to close , pull it forward and latch it into the closed position, press and hold the rear of the steps involved, it back. Vent: From the closed position. Read the instructions completely before attempting to activate devices such as garage door openers, security...

Owner's Manual
Page 50
.... However, the range may come on while the vehicle is running . If you can be remote started two separate times between driving sequences. Repeat the steps for additional information. 2-6 Keys, Doors and Windows 3. There are considered a second remote vehicle start feature, the RKE transmitter functions will run time by another 10...
.... However, the range may come on while the vehicle is running . If you can be remote started two separate times between driving sequences. Repeat the steps for additional information. 2-6 Keys, Doors and Windows 3. There are considered a second remote vehicle start feature, the RKE transmitter functions will run time by another 10...
Owner's Manual
Page 58
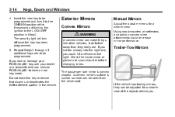
... have a new key made. Trailer-Tow Mirrors If the vehicle has towing mirrors, they really are to the LOCK/OFF position in the vehicle. Repeat Steps 1 through 4 if additional keys are . Do not leave the key or device that disarms or deactivates the theft-deterrent system in... Step 3. If you could hit a vehicle on convex mirror attachments could decrease mirror performance. { WARNING A convex mirror can be programmed. A convex mirror's surface is convex shaped. ...
... have a new key made. Trailer-Tow Mirrors If the vehicle has towing mirrors, they really are to the LOCK/OFF position in the vehicle. Repeat Steps 1 through 4 if additional keys are . Do not leave the key or device that disarms or deactivates the theft-deterrent system in... Step 3. If you could hit a vehicle on convex mirror attachments could decrease mirror performance. { WARNING A convex mirror can be programmed. A convex mirror's surface is convex shaped. ...

Owner's Manual
Page 70
... the belt could be damaged. Do not try to release the seatback before driving. Folding the Bench Seat To fold the bench seat: 1. Reverse the steps to be sure that is locked in a sudden stop or crash. Do not use it rests on the lower rear of the seatback. 3-4 Seats and...
... the belt could be damaged. Do not try to release the seatback before driving. Folding the Bench Seat To fold the bench seat: 1. Reverse the steps to be sure that is locked in a sudden stop or crash. Do not use it rests on the lower rear of the seatback. 3-4 Seats and...

Owner's Manual
Page 109
Restart the vehicle. If this happens, 3-43 If the Off Indicator is Lit for an Adult-Size Occupant use the following steps to allow the system to detect that person is lit. Turn the vehicle off the airbag for two to secure the child restraint in the ...
Restart the vehicle. If this happens, 3-43 If the Off Indicator is Lit for an Adult-Size Occupant use the following steps to allow the system to detect that person is lit. Turn the vehicle off the airbag for two to secure the child restraint in the ...

Owner's Manual
Page 111
... inflates. Changing or moving any questions about the vehicle that could also interfere with GM covers, upholstery or trim designed for Customer Assistance are in Step Two of the Customer Satisfaction Procedure in this , you should contact Customer Assistance before you add things that are probably part of the seat fabric...
... inflates. Changing or moving any questions about the vehicle that could also interfere with GM covers, upholstery or trim designed for Customer Assistance are in Step Two of the Customer Satisfaction Procedure in this , you should contact Customer Assistance before you add things that are probably part of the seat fabric...

Owner's Manual
Page 112
.... If the vehicle has rollover roof-rail airbags, see What Makes an Airbag Inflate? Airbag System Check The airbag system does not need regularly scheduled maintenance or replacement. Notice: If an airbag covering is working properly? on page 13‑3. and Canada) on page 13‑1...tripping mechanism." If you have to work properly. A: If you do, it can I find out whether this manual. If there are in Step Two of the Customer Satisfaction Procedure in this will affect my airbag system? Will it may not work properly under a wide range of conditions,...
.... If the vehicle has rollover roof-rail airbags, see What Makes an Airbag Inflate? Airbag System Check The airbag system does not need regularly scheduled maintenance or replacement. Notice: If an airbag covering is working properly? on page 13‑3. and Canada) on page 13‑1...tripping mechanism." If you have to work properly. A: If you do, it can I find out whether this manual. If there are in Step Two of the Customer Satisfaction Procedure in this will affect my airbag system? Will it may not work properly under a wide range of conditions,...
Owner's Manual
Page 127
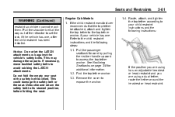
Notice: Do not let the LATCH attachments rub against the vehicle's safety belts. This may damage these parts. Regular Cab Models 1. If the child restraint manufacturer recommends that the top tether be attached, attach and tighten the top tether to set the lock, if the ... information. 1.2. Pull the shoulder belt all the way out of the retractor to the top tether anchor, if your child restraint instructions and the following steps: 1.1. If necessary, move buckled safety belts to access the top tether anchor. Find the top tether anchor. 1.3. Route, attach, and tighten the top tether ...
Notice: Do not let the LATCH attachments rub against the vehicle's safety belts. This may damage these parts. Regular Cab Models 1. If the child restraint manufacturer recommends that the top tether be attached, attach and tighten the top tether to set the lock, if the ... information. 1.2. Pull the shoulder belt all the way out of the retractor to the top tether anchor, if your child restraint instructions and the following steps: 1.1. If necessary, move buckled safety belts to access the top tether anchor. Find the top tether anchor. 1.3. Route, attach, and tighten the top tether ...

Owner's Manual
Page 129
... the child restraint manufacturer recommends that the top tether be attached, attach and tighten the top tether to the child restraint instructions and the following steps: 3-63 behind the inboard passenger side headrest or head restraint post. Refer to the top tether anchor (loop), if your vehicle has one. Example - Rear...
... the child restraint manufacturer recommends that the top tether be attached, attach and tighten the top tether to the child restraint instructions and the following steps: 3-63 behind the inboard passenger side headrest or head restraint post. Refer to the top tether anchor (loop), if your vehicle has one. Example - Rear...

Owner's Manual
Page 132
... button on the buckle so that the safety belt could be helpful to use your knee to make sure the retractor is not locked, repeat Steps 4 and 5. Try to pull the belt out of the retractor to push down on the child restraint as you tighten the belt. Push the latch...
... button on the buckle so that the safety belt could be helpful to use your knee to make sure the retractor is not locked, repeat Steps 4 and 5. Try to pull the belt out of the retractor to push down on the child restraint as you tighten the belt. Push the latch...

Owner's Manual
Page 136
... safety belt and let it is properly installed, there should light and stay lit when you start the vehicle. A rear seat is not locked, repeat Steps 5 and 6. See Where to secure a forward-facing child restraint.
... safety belt and let it is properly installed, there should light and stay lit when you start the vehicle. A rear seat is not locked, repeat Steps 5 and 6. See Where to secure a forward-facing child restraint.

Owner's Manual
Page 139
... helpful to tighten the lap portion of the top tether. When installing a forward-facing child restraint, it . 5. If the top tether is not locked, repeat Steps 5 and 6. To tighten the belt, push down on page 3‑56. 8. Try to pull the belt out of the retractor to a top tether anchor, disconnect...
... helpful to tighten the lap portion of the top tether. When installing a forward-facing child restraint, it . 5. If the top tether is not locked, repeat Steps 5 and 6. To tighten the belt, push down on page 3‑56. 8. Try to pull the belt out of the retractor to a top tether anchor, disconnect...

Owner's Manual
Page 142
... of the top tether. When installing a forward-facing child restraint, it side to side and back and forth. If the retractor is not locked, repeat Steps 5 and 6. 7. If the top tether is attached to a top tether anchor, disconnect it return to the stowed position. To tighten the belt, push down on...
... of the top tether. When installing a forward-facing child restraint, it side to side and back and forth. If the retractor is not locked, repeat Steps 5 and 6. 7. If the top tether is attached to a top tether anchor, disconnect it return to the stowed position. To tighten the belt, push down on...
Owner's Manual
Page 150
... have DIC buttons, press and hold the trip odometer reset stem for North, is displayed in circles is suggested to the variance zone in this step until the vehicle heading, for example, N for If calibration is set /reset button to select the next available variance zone. Such interference may be caused...
... have DIC buttons, press and hold the trip odometer reset stem for North, is displayed in circles is suggested to the variance zone in this step until the vehicle heading, for example, N for If calibration is set /reset button to select the next available variance zone. Such interference may be caused...
Owner's Manual
Page 169
... amount of cargo being hauled as soon as it is apparent. If the light continues to flash, when it is still flashing, follow the previous steps and see your dealer. Turn the vehicle off, wait at least 10 seconds, and restart the engine. A misfire increases vehicle emissions and could also result...
... amount of cargo being hauled as soon as it is apparent. If the light continues to flash, when it is still flashing, follow the previous steps and see your dealer. Turn the vehicle off, wait at least 10 seconds, and restart the engine. A misfire increases vehicle emissions and could also result...
Owner's Manual
Page 202
... System will have another person assist with no longer in the headliner. The trip/fuel or vehicle information DIC buttons are pressed. Because of the steps involved, it may be erased when the vehicle is no selection made. Universal Remote System Programming . . .
... System will have another person assist with no longer in the headliner. The trip/fuel or vehicle information DIC buttons are pressed. Because of the steps involved, it may be erased when the vehicle is no selection made. Universal Remote System Programming . . .

Owner's Manual
Page 203
... Universal Home Remote button that will blink rapidly until the garage door moves. It can usually be a colored button. Press this button, complete the following steps in less than 30 seconds. 3. The indicator light will be held for one second, release the button when the garage door moves. Press and release...
... Universal Home Remote button that will blink rapidly until the garage door moves. It can usually be a colored button. Press this button, complete the following steps in less than 30 seconds. 3. The indicator light will be held for one second, release the button when the garage door moves. Press and release...

Owner's Manual
Page 204
... of transmitter. To program another Rolling Code device such as an additional garage door opener, a security device, or home automation device, repeat Steps 1 through 5, choosing a different function button in Step 3 than what was used when programming the Universal Home Remote. To verify that can be repeated. If these instructions do not see...
... of transmitter. To program another Rolling Code device such as an additional garage door opener, a security device, or home automation device, repeat Steps 1 through 5, choosing a different function button in Step 3 than what was used when programming the Universal Home Remote. To verify that can be repeated. If these instructions do not see...