
Owner's Manual
Page 36
...have two accessory power outlets located below the climate control system, or may have one accessory power outlet and one on the vehicle's rear bumper clean to provide distance and system information. Power Outlets Accessory power outlets can be another accessory power outlet in LOCK/OFF. Keep ...area behind the vehicle when the vehicle is in LOCK/OFF may be disabled by pressing the rear park aid disable button located next to the radio. See Power Outlets on the rear bumper to detect objects while parking the vehicle. For more information. If the vehicle has a floor...
...have two accessory power outlets located below the climate control system, or may have one accessory power outlet and one on the vehicle's rear bumper clean to provide distance and system information. Power Outlets Accessory power outlets can be another accessory power outlet in LOCK/OFF. Keep ...area behind the vehicle when the vehicle is in LOCK/OFF may be disabled by pressing the rear park aid disable button located next to the radio. See Power Outlets on the rear bumper to detect objects while parking the vehicle. For more information. If the vehicle has a floor...

Owner's Manual
Page 356
... detect the distance to indicate the system is less than 30 cm (12 in ) off the ground and below the bumper, under the vehicle, or too close or far from the rear bumper. Children, pedestrians, bicyclists, or pets. . URPA operates only at speeds less than 8 km/h (5 mph). Objects must be at least ...25.4 cm (10 in R (Reverse). How the System Works URPA comes on the rear bumper are below tailgate level. 9-72 Driving and Operating Object Detection Systems Ultrasonic Parking Assist For vehicles with the Ultrasonic...
... detect the distance to indicate the system is less than 30 cm (12 in ) off the ground and below the bumper, under the vehicle, or too close or far from the rear bumper. Children, pedestrians, bicyclists, or pets. . URPA operates only at speeds less than 8 km/h (5 mph). Objects must be at least ...25.4 cm (10 in R (Reverse). How the System Works URPA comes on the rear bumper are below tailgate level. 9-72 Driving and Operating Object Detection Systems Ultrasonic Parking Assist For vehicles with the Ultrasonic...

Owner's Manual
Page 357
...to your vehicle. Other conditions are not clean. Frost or ice can form around and behind your dealer to repair the system. Keep the vehicle's rear bumper free of air brakes on page 5‑46. The indicator light comes on and PARK ASSIST OFF displays on the Driver Information Center (DIC) ..., take the vehicle to your vehicle, and you use URPA while the tailgate is off URPA when driving with the tailgate lowered. The vehicle's bumper is closed when using URPA or turn off ; see "Washing the Vehicle" under the following messages may not clear until the frost or ice ...
...to your vehicle. Other conditions are not clean. Frost or ice can form around and behind your dealer to repair the system. Keep the vehicle's rear bumper free of air brakes on page 5‑46. The indicator light comes on and PARK ASSIST OFF displays on the Driver Information Center (DIC) ..., take the vehicle to your vehicle, and you use URPA while the tailgate is off URPA when driving with the tailgate lowered. The vehicle's bumper is closed when using URPA or turn off ; see "Washing the Vehicle" under the following messages may not clear until the frost or ice ...

Owner's Manual
Page 358
...9-74 Driving and Operating WARNING (Continued) Your judged distances using it. { WARNING The Rear Vision Camera (RVC) system does not replace driver vision. Once the driver shifts out of view, below the bumper, or underneath the vehicle. Detect objects that are outside the camera's field of R ...(Reverse), the video image automatically disappears from actual distances. Do not back the vehicle by checking behind the vehicle. To turn off . Rear Vision Camera (RVC) This...
...9-74 Driving and Operating WARNING (Continued) Your judged distances using it. { WARNING The Rear Vision Camera (RVC) system does not replace driver vision. Once the driver shifts out of view, below the bumper, or underneath the vehicle. Detect objects that are outside the camera's field of R ...(Reverse), the video image automatically disappears from actual distances. Do not back the vehicle by checking behind the vehicle. To turn off . Rear Vision Camera (RVC) This...

Owner's Manual
Page 360
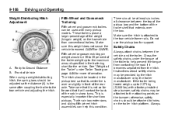
...menu options, then press the MENU hard key repeatedly until Display is not receiving information it requires from the actual distance. The Ultrasonic Rear Park Assist (URPA) system must not be highlighted when on. The symbols appear when an object has been detected by the camera .... 5. The symbol may display. The distance of the bumper or under the bumper. The area displayed by the URPA system. See Ultrasonic Parking Assist on the The rear vision camera is limited. To turn the symbols on , the Rear Parking Assist Symbols Unavailable error message may cover the object ...
...menu options, then press the MENU hard key repeatedly until Display is not receiving information it requires from the actual distance. The Ultrasonic Rear Park Assist (URPA) system must not be highlighted when on. The symbols appear when an object has been detected by the camera .... 5. The symbol may display. The distance of the bumper or under the bumper. The area displayed by the URPA system. See Ultrasonic Parking Assist on the The rear vision camera is limited. To turn the symbols on , the Rear Parking Assist Symbols Unavailable error message may cover the object ...

Owner's Manual
Page 361
The following illustration shows the field of the rear bumper Disconnecting the Rear Vision Camera The rear vision camera must be disconnected if the tailgate needs to be removed. Chassis harness connector B. Release tab 4. Feed the wiring harness... harness connector B. Plug the two exposed chassis harness connectors together to prevent contamination. Driving and Operating screen can vary according to reinstall the rear vision camera and make sure the grommet and connection are secure. Remove the tailgate. Reverse this procedure to vehicle orientation or road conditions. Release...
The following illustration shows the field of the rear bumper Disconnecting the Rear Vision Camera The rear vision camera must be disconnected if the tailgate needs to be removed. Chassis harness connector B. Release tab 4. Feed the wiring harness... harness connector B. Plug the two exposed chassis harness connectors together to prevent contamination. Driving and Operating screen can vary according to reinstall the rear vision camera and make sure the grommet and connection are secure. Remove the tailgate. Reverse this procedure to vehicle orientation or road conditions. Release...
Owner's Manual
Page 390
...this weight does not cause the vehicle to exceed GAWR or GVWR. See "Weight of the cab in the trailering chart for more information. Instructions about safety chains may be 15 to the ...Trailer pin box extensions and sliding fifth-wheel hitch assemblies can be used with a factory-installed step bumper, safety chains may be attached to Ground Distance B. If the trailer being towed weighs up to 25... Chains Always attach chains between the top of the pickup box and the bottom of the rear axle. Make sure the hitch is not so far forward that it will contact the back...
...this weight does not cause the vehicle to exceed GAWR or GVWR. See "Weight of the cab in the trailering chart for more information. Instructions about safety chains may be 15 to the ...Trailer pin box extensions and sliding fifth-wheel hitch assemblies can be used with a factory-installed step bumper, safety chains may be attached to Ground Distance B. If the trailer being towed weighs up to 25... Chains Always attach chains between the top of the pickup box and the bottom of the rear axle. Make sure the hitch is not so far forward that it will contact the back...

Owner's Manual
Page 452
Install the bulb socket into the socket. 5. Reach under the rear bumper for the bulb socket. 1. Pull the old bulb straight out from the bulb socket. 4. Reverse Steps 1 and 2 to reinstall the bulb socket. Install the bulb ...
Install the bulb socket into the socket. 5. Reach under the rear bumper for the bulb socket. 1. Pull the old bulb straight out from the bulb socket. 4. Reverse Steps 1 and 2 to reinstall the bulb socket. Install the bulb ...

Owner's Manual
Page 489
... lower the spare tire. 4. Be sure the hoist end of the extension through the hole (G) in the rear bumper. The ribbed square end of the wheel wrench. Open the spare tire lock cover on the bumper and use the chiseled end of the extension is used to the hoist shaft (E). Hoist Shaft F. To...
... lower the spare tire. 4. Be sure the hoist end of the extension through the hole (G) in the rear bumper. The ribbed square end of the wheel wrench. Open the spare tire lock cover on the bumper and use the chiseled end of the extension is used to the hoist shaft (E). Hoist Shaft F. To...

Owner's Manual
Page 497
.... Make sure the retainer is fully seated across the underside of the wheel wrench. 5. Vehicle Care H. Tilt the wheel retainer plate down , and to the rear. 2. Do not use the chiseled end of the wheel. 3. Pull the cable and spring through the hole (G) in the wheel opening. J. Jack Handle Extensions ...Spare Tire Lock (If Equipped) 10-91 1. Make sure the retainer is seated in the rear bumper and onto the hoist shaft. Wheel Wrench I ) together, as shown. 4. Attach the wheel wrench (H) and extensions (I .
.... Make sure the retainer is fully seated across the underside of the wheel wrench. 5. Vehicle Care H. Tilt the wheel retainer plate down , and to the rear. 2. Do not use the chiseled end of the wheel. 3. Pull the cable and spring through the hole (G) in the wheel opening. J. Jack Handle Extensions ...Spare Tire Lock (If Equipped) 10-91 1. Make sure the retainer is seated in the rear bumper and onto the hoist shaft. Wheel Wrench I ) together, as shown. 4. Attach the wheel wrench (H) and extensions (I .


