
Owner's Manual
Page 16
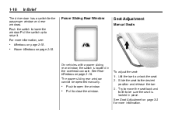
... window. Seat Adjustment Manual Seats Windows on page 2‑18. On vehicles with a power sliding rear window, the switch is locked in the overhead console. Lift the bar to open the window. See Rear Windows on page 3‑3 for the passenger window and rear windows. 1-10 In Brief Power Sliding Rear...
... window. Seat Adjustment Manual Seats Windows on page 2‑18. On vehicles with a power sliding rear window, the switch is locked in the overhead console. Lift the bar to open the window. See Rear Windows on page 3‑3 for the passenger window and rear windows. 1-10 In Brief Power Sliding Rear...
Owner's Manual
Page 18
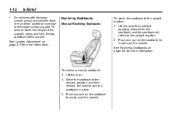
... lever to the upright position: 1. 1-12 . To raise or lower the height of the support, press and hold the front or rear of the control. Lift the lever fully without applying pressure to the seatback, and the seatback will return to increase or decrease lumbar support. On vehicles with four-way...
... lever to the upright position: 1. 1-12 . To raise or lower the height of the support, press and hold the front or rear of the control. Lift the lever fully without applying pressure to the seatback, and the seatback will return to increase or decrease lumbar support. On vehicles with four-way...
Owner's Manual
Page 54
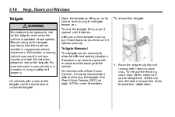
...the tailgate, use the key to ride on its handle while pulling the tailgate toward you to the vehicle. To release the retaining cable clips, lift the cable so it latches. On vehicles with a Rear Vision Camera, it must be sure it latches securely. 2-10 Keys, Doors and ...Windows Open the tailgate by lifting up , pull it back towards you . Raise the tailgate slightly and release both retaining cable clips. To remove the tailgate: Tailgate { WARNING It ...
...the tailgate, use the key to ride on its handle while pulling the tailgate toward you to the vehicle. To release the retaining cable clips, lift the cable so it latches. On vehicles with a Rear Vision Camera, it must be sure it latches securely. 2-10 Keys, Doors and ...Windows Open the tailgate by lifting up , pull it back towards you . Raise the tailgate slightly and release both retaining cable clips. To remove the tailgate: Tailgate { WARNING It ...

Owner's Manual
Page 55
... using the RKE transmitter, a 10 second pre-alarm will turn off . 3. The vehicle's headlamps will flash and the horn will sound for about halfway open, lift the right edge of the tailgate from the lower pivot. Anti-theft Alarm System This vehicle may have a content theft-deterrent alarm system. Lock the...
... using the RKE transmitter, a 10 second pre-alarm will turn off . 3. The vehicle's headlamps will flash and the horn will sound for about halfway open, lift the right edge of the tailgate from the lower pivot. Anti-theft Alarm System This vehicle may have a content theft-deterrent alarm system. Lock the...

Owner's Manual
Page 69
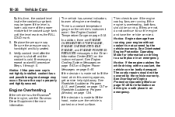
... to adjust a manual driver seat while the vehicle is locked into place. Some vehicles have a folding front bench seat. Bench Seat To adjust the seat: 1. Lift the bar to unlock the seat. 2. Move the lever to the right to unlock the seat. 2. Slide the seat to the desired position and release...
... to adjust a manual driver seat while the vehicle is locked into place. Some vehicles have a folding front bench seat. Bench Seat To adjust the seat: 1. Lift the bar to unlock the seat. 2. Move the lever to the right to unlock the seat. 2. Slide the seat to the desired position and release...

Owner's Manual
Page 75
... lever. The seatback will return to raise. . Tilt the top of the control rearward to make sure it is locked. Lift the lever fully without applying pressure to the seatback, and the seatback will automatically fold forward. To recline, move the seatback rearward to the desired ...
... lever. The seatback will return to raise. . Tilt the top of the control rearward to make sure it is locked. Lift the lever fully without applying pressure to the seatback, and the seatback will automatically fold forward. To recline, move the seatback rearward to the desired ...

Owner's Manual
Page 143
... exposed portion of the handle. Cupholders Vehicles with a rear seat armrest have them located on the glove box lever to access the cupholders. Glove Box Lift up on and behind the center console.
... exposed portion of the handle. Cupholders Vehicles with a rear seat armrest have them located on the glove box lever to access the cupholders. Glove Box Lift up on and behind the center console.

Owner's Manual
Page 411
Lift the hood. Pull the handle with a swift, firm motion to fully close the hood. 2. It is located under the hood, near the center of the ...
Lift the hood. Pull the handle with a swift, firm motion to fully close the hood. 2. It is located under the hood, near the center of the ...

Owner's Manual
Page 427
.../ filter from the housing. Vehicle Care Replacing the Engine Air Cleaner/Filter 10-21 5. Use caution when working on the cover of the housing and lift up the cover. 3. Take care to stop flames if the engine backfires. Inspect or replace the engine air cleaner/filter. 6. See Engine Compartment Overview on...
.../ filter from the housing. Vehicle Care Replacing the Engine Air Cleaner/Filter 10-21 5. Use caution when working on the cover of the housing and lift up the cover. 3. Take care to stop flames if the engine backfires. Inspect or replace the engine air cleaner/filter. 6. See Engine Compartment Overview on...
Owner's Manual
Page 432
...are ENGINE OVERHEATED STOP ENGINE, ENGINE OVERHEATED IDLE ENGINE, and ENGINE POWER IS REDUCED messages in an emergency. If the decision is made not to lift the hood, make sure the vehicle is a coolant temperature gauge on page 13‑9. If the decision is lower, add more of the ... 6. 10-26 Vehicle Care The vehicle has several indicators to run the engine and have the vehicle serviced. If the level is made to lift the hood when this time, the coolant level inside the coolant surge tank may occur. Engine Overheating If the vehicle has the Duramax® ...
...are ENGINE OVERHEATED STOP ENGINE, ENGINE OVERHEATED IDLE ENGINE, and ENGINE POWER IS REDUCED messages in an emergency. If the decision is made not to lift the hood, make sure the vehicle is a coolant temperature gauge on page 13‑9. If the decision is lower, add more of the ... 6. 10-26 Vehicle Care The vehicle has several indicators to run the engine and have the vehicle serviced. If the level is made to lift the hood when this time, the coolant level inside the coolant surge tank may occur. Engine Overheating If the vehicle has the Duramax® ...
Owner's Manual
Page 450
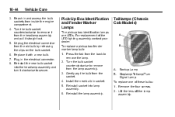
10-44 Vehicle Care 3. Reinstall the new bulb socket into lamp assembly. 6. Lift the lens off the lamp assembly. Pick-Up Box Identification and Fender Marker Lamps The pick-up box identification lamps are LEDs. Install the new ... into the headlamp assembly and turn it clockwise to remove it from the old bulb by releasing the clips on the bulb socket. 6. Taillamps (Chassis Cab Models) A. Plug in socket. 5. Gently pry the bulb from inside the engine compartment. 4. To replace a pickup box fender marker lamp bulb: 1. For replacement of these...
10-44 Vehicle Care 3. Reinstall the new bulb socket into lamp assembly. 6. Lift the lens off the lamp assembly. Pick-Up Box Identification and Fender Marker Lamps The pick-up box identification lamps are LEDs. Install the new ... into the headlamp assembly and turn it clockwise to remove it from the old bulb by releasing the clips on the bulb socket. 6. Taillamps (Chassis Cab Models) A. Plug in socket. 5. Gently pry the bulb from inside the engine compartment. 4. To replace a pickup box fender marker lamp bulb: 1. For replacement of these...

Owner's Manual
Page 452
On the reverse side of the socket. 4. Reinstall the lamp assembly and tighten the screws. Remove the two screws and lift off the lamp assembly. 2. 10-46 Vehicle Care 2. Center High-Mounted Stoplamp (CHMSL) and Cargo Lamp To replace one of these bulbs: License Plate Lamp ...
On the reverse side of the socket. 4. Reinstall the lamp assembly and tighten the screws. Remove the two screws and lift off the lamp assembly. 2. 10-46 Vehicle Care 2. Center High-Mounted Stoplamp (CHMSL) and Cargo Lamp To replace one of these bulbs: License Plate Lamp ...

Owner's Manual
Page 455
Vehicle Care 10-49 Lift the cover to access the fuse block. Always keep the covers on any electrical component on any electrical component. Fuses 1 2 3 Usage Right Trailer Stop/ Turn Lamp Electronic Suspension Control, Automatic Level Control Exhaust Left Trailer Stop/ Turn Lamp Fuses 4 5 6 7 8 Usage Engine Controls Engine Control Module, Throttle Control Trailer Brake Controller Front Washer Oxygen Sensor Notice: Spilling liquid on the vehicle may damage it. To remove fuses, hold the end of the fuse between your thumb and index finger and pull straight out.
Vehicle Care 10-49 Lift the cover to access the fuse block. Always keep the covers on any electrical component on any electrical component. Fuses 1 2 3 Usage Right Trailer Stop/ Turn Lamp Electronic Suspension Control, Automatic Level Control Exhaust Left Trailer Stop/ Turn Lamp Fuses 4 5 6 7 8 Usage Engine Controls Engine Control Module, Throttle Control Trailer Brake Controller Front Washer Oxygen Sensor Notice: Spilling liquid on the vehicle may damage it. To remove fuses, hold the end of the fuse between your thumb and index finger and pull straight out.

Owner's Manual
Page 486
... has been driven on while severely underinflated or flat may be badly injured or killed if the vehicle slips off the road, if possible. { WARNING Lifting a vehicle and getting under it is designed only for changing a flat tire. If it to re-inflate a tire that has been driven on the hazard...
... has been driven on while severely underinflated or flat may be badly injured or killed if the vehicle slips off the road, if possible. { WARNING Lifting a vehicle and getting under it is designed only for changing a flat tire. If it to re-inflate a tire that has been driven on the hazard...

Owner's Manual
Page 493
... fully before raising the vehicle. 6. Turn the wheel wrench clockwise to raise the vehicle. Vehicle Care If you could be sure to fit the jack lift head into the proper location before raising the vehicle. Make sure that the jack head is positioned so that the rear axle is dangerous.
... fully before raising the vehicle. 6. Turn the wheel wrench clockwise to raise the vehicle. Vehicle Care If you could be sure to fit the jack lift head into the proper location before raising the vehicle. Make sure that the jack head is positioned so that the rear axle is dangerous.
Owner's Manual
Page 545
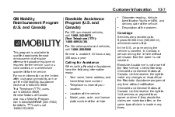
... Information 13-7 GM Mobility Reimbursement Program (U.S. For Canadian‐purchased vehicles, call 1-800-263-3830. General Motors of the problem. Chevrolet and General Motors of claim is available to make any time without permission from the owner is not a part of your location...., color, and license plate number of eligible aftermarket adaptive equipment required for the vehicle, such as hand controls or a wheelchair/ scooter lift for the vehicle. and Canada) For U.S.‐purchased vehicles, call 1-800-833-9935. This program is made too often, or the...
... Information 13-7 GM Mobility Reimbursement Program (U.S. For Canadian‐purchased vehicles, call 1-800-263-3830. General Motors of the problem. Chevrolet and General Motors of claim is available to make any time without permission from the owner is not a part of your location...., color, and license plate number of eligible aftermarket adaptive equipment required for the vehicle, such as hand controls or a wheelchair/ scooter lift for the vehicle. and Canada) For U.S.‐purchased vehicles, call 1-800-833-9935. This program is made too often, or the...
