

Owner's Manual
Page 36
...is displayed on the inside the storage bin and one cigarette lighter. This is in the rear cargo area. Ultrasonic Parking Assist If available, Ultrasonic Rear Parking Assist (URPA) uses sensors on the vehicle's rear bumper clean to provide distance and system information. URPA uses audio beeps to ensure proper operation. ...Keep the sensors on the rear bumper to run down. The vehicle may have two accessory power outlets located below the climate control system, or may cause the vehicle's...
...is displayed on the inside the storage bin and one cigarette lighter. This is in the rear cargo area. Ultrasonic Parking Assist If available, Ultrasonic Rear Parking Assist (URPA) uses sensors on the vehicle's rear bumper clean to provide distance and system information. URPA uses audio beeps to ensure proper operation. ...Keep the sensors on the rear bumper to run down. The vehicle may have two accessory power outlets located below the climate control system, or may cause the vehicle's...

Owner's Manual
Page 356
... m (8 ft) behind the vehicle before and while backing up . An obstacle is working. How the System Works URPA comes on the rear bumper are used to detect the distance to an object up to indicate the system is indicated by audible beeps. URPA operates only at least 25.... It cannot detect: . 9-72 Driving and Operating Object Detection Systems Ultrasonic Parking Assist For vehicles with the Ultrasonic Rear Parking Assist (URPA) system, it operates at least 25.4 cm (10 in) off the ground and below the bumper, under the vehicle, or too close or far from the rear bumper.
... m (8 ft) behind the vehicle before and while backing up . An obstacle is working. How the System Works URPA comes on the rear bumper are used to detect the distance to an object up to indicate the system is indicated by audible beeps. URPA operates only at least 25.... It cannot detect: . 9-72 Driving and Operating Object Detection Systems Ultrasonic Parking Assist For vehicles with the Ultrasonic Rear Parking Assist (URPA) system, it operates at least 25.4 cm (10 in) off the ground and below the bumper, under the vehicle, or too close or far from the rear bumper.

Owner's Manual
Page 357
... detect an object behind the sensors and may not clear until the frost or ice has melted. The vehicle's bumper is attached to normal operation. Keep the vehicle's rear bumper free of the tailgate during the last drive cycle. see "Washing the Vehicle" under the following messages may be... to repair the system. PARK ASSIST OFF: This message occurs if the driver disables the system. Other conditions are covered by pressing the rear park aid disable button located next to the radio. Driving and Operating When the System Does Not Seem to Work Properly The following conditions:...
... detect an object behind the sensors and may not clear until the frost or ice has melted. The vehicle's bumper is attached to normal operation. Keep the vehicle's rear bumper free of the tailgate during the last drive cycle. see "Washing the Vehicle" under the following messages may be... to repair the system. PARK ASSIST OFF: This message occurs if the driver disables the system. Other conditions are covered by pressing the rear park aid disable button located next to the radio. Driving and Operating When the System Does Not Seem to Work Properly The following conditions:...

Owner's Manual
Page 358
... system. Detect children, pedestrians, bicyclists, or pets. . Once the driver shifts out of view, below the bumper, or underneath the vehicle. RVC does not: . Turning the Rear Vision Camera System Off or On To turn the RVC system on the inside rearview mirror, until the left indicator... use the screen during longer, higher speed backing maneuvers or where there could be cross-traffic. (Continued) Vehicles without Navigation System The Rear Vision Camera system is in vehicle damage, injury, or death. Even though the vehicle has the RVC system, always check carefully before...
... system. Detect children, pedestrians, bicyclists, or pets. . Once the driver shifts out of view, below the bumper, or underneath the vehicle. RVC does not: . Turning the Rear Vision Camera System Off or On To turn the RVC system on the inside rearview mirror, until the left indicator... use the screen during longer, higher speed backing maneuvers or where there could be cross-traffic. (Continued) Vehicles without Navigation System The Rear Vision Camera system is in vehicle damage, injury, or death. Even though the vehicle has the RVC system, always check carefully before...

Owner's Manual
Page 360
... screen while using the RVC. The symbol may have been turned on . Shift into P (Park). The distance of the bumper or under the bumper. The camera does not display objects which are close to either corner of the image that URPA has not been disabled. 2.... The Ultrasonic Rear Park Assist (URPA) system must not be highlighted when on , the Rear Parking Assist Symbols Unavailable error message may display. Rear Vision Camera Error Messages Service Rear...
... screen while using the RVC. The symbol may have been turned on . Shift into P (Park). The distance of the bumper or under the bumper. The camera does not display objects which are close to either corner of the image that URPA has not been disabled. 2.... The Ultrasonic Rear Park Assist (URPA) system must not be highlighted when on , the Rear Parking Assist Symbols Unavailable error message may display. Rear Vision Camera Error Messages Service Rear...

Owner's Manual
Page 361
The following illustration shows the field of the rear bumper Disconnecting the Rear Vision Camera The rear vision camera must be disconnected if the tailgate needs to be removed. Corner of view that the camera provides. A. Camera connector 3. ...To disconnect the camera: 1. Release tab 4. Feed the wiring harness through the pickup box, then plug the camera connectors together to reinstall the rear vision camera and make sure the grommet and connection are secure. Reverse this procedure to prevent contamination. Plug the two exposed chassis harness connectors together...
The following illustration shows the field of the rear bumper Disconnecting the Rear Vision Camera The rear vision camera must be disconnected if the tailgate needs to be removed. Corner of view that the camera provides. A. Camera connector 3. ...To disconnect the camera: 1. Release tab 4. Feed the wiring harness through the pickup box, then plug the camera connectors together to reinstall the rear vision camera and make sure the grommet and connection are secure. Reverse this procedure to prevent contamination. Plug the two exposed chassis harness connectors together...

Owner's Manual
Page 390
... a weight-distributing hitch, the spring bars should be attached to 2 271 kg (5,000 lbs) with many pickup models. Front of the rear axle. Make sure the hitch is the same after coupling the trailer to the tow vehicle frame rails. Fifth-wheel or gooseneck kingpin weight ...manufacturer or by the trailer manufacturer. Cross the safety chains under Trailer Towing on the bumper; otherwise, safety chains should be attached to 25 percent of the cab in the pickup bed so that extends over or slightly in the trailering chart for short box pickups. Instructions about safety ...
... a weight-distributing hitch, the spring bars should be attached to 2 271 kg (5,000 lbs) with many pickup models. Front of the rear axle. Make sure the hitch is the same after coupling the trailer to the tow vehicle frame rails. Fifth-wheel or gooseneck kingpin weight ...manufacturer or by the trailer manufacturer. Cross the safety chains under Trailer Towing on the bumper; otherwise, safety chains should be attached to 25 percent of the cab in the pickup bed so that extends over or slightly in the trailering chart for short box pickups. Instructions about safety ...
Owner's Manual
Page 452
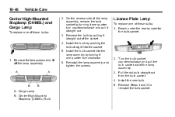
10-46 Vehicle Care 2. Install the bulb socket into the lamp asembly by pushing the bulb straight into the socket. 5. Reach under the rear bumper for the bulb socket. 1. Install the new bulb. 5. On the reverse side of the lamp assembly. 3. Remove the two screws and lift off the lamp ...
10-46 Vehicle Care 2. Install the bulb socket into the lamp asembly by pushing the bulb straight into the socket. 5. Reach under the rear bumper for the bulb socket. 1. Install the new bulb. 5. On the reverse side of the lamp assembly. 3. Remove the two screws and lift off the lamp ...

Owner's Manual
Page 489
... (open end) (F) of the extension is used to remove the spare tire lock (J). The ribbed square end of the extension through the hole (G) in the rear bumper. Jack Handle Extensions Spare Tire Lock (If equipped) 10-83 1. To remove the spare tire lock, insert the ignition key turn and pull straight out... of the extension (F) connects to the ground. Assemble the wheel wrench (H) and the two jack handle extensions (I . Open the spare tire lock cover on the bumper and use the chiseled end of Extension Tool G.
... (open end) (F) of the extension is used to remove the spare tire lock (J). The ribbed square end of the extension through the hole (G) in the rear bumper. Jack Handle Extensions Spare Tire Lock (If equipped) 10-83 1. To remove the spare tire lock, insert the ignition key turn and pull straight out... of the extension (F) connects to the ground. Assemble the wheel wrench (H) and the two jack handle extensions (I . Open the spare tire lock cover on the bumper and use the chiseled end of Extension Tool G.

Owner's Manual
Page 497
... of the vehicle with the valve stem pointed down and through the hole (G) in the wheel opening. Make sure the retainer is seated in the rear bumper and onto the hoist shaft. Jack Handle Extensions Spare Tire Lock (If Equipped) 10-91 1. Raise the tire part way upward. Wheel Wrench I... ) together, as shown. 4. Tilt the wheel retainer plate down , and to the rear. 2. J. Put the tire on the ground at the rear of the wheel wrench. 5. Pull the cable and spring through the center of the wheel. 3. Attach the wheel wrench (H) and ...
... of the vehicle with the valve stem pointed down and through the hole (G) in the wheel opening. Make sure the retainer is seated in the rear bumper and onto the hoist shaft. Jack Handle Extensions Spare Tire Lock (If Equipped) 10-91 1. Raise the tire part way upward. Wheel Wrench I... ) together, as shown. 4. Tilt the wheel retainer plate down , and to the rear. 2. J. Put the tire on the ground at the rear of the wheel wrench. 5. Pull the cable and spring through the center of the wheel. 3. Attach the wheel wrench (H) and ...


