Owner's Manual
Page 1
2011 Chevrolet Cruze Owner Manual M In Brief ...1-1 Instrument Panel ...1-2 Initial Drive Information ...1-4 Vehicle Features ...1-15 Performance and Maintenance ...1-19 Keys, Doors and Windows ...2-1 Keys and Locks ...2-2 Doors ...2-8 Vehicle Security...2-10 ...
2011 Chevrolet Cruze Owner Manual M In Brief ...1-1 Instrument Panel ...1-2 Initial Drive Information ...1-4 Vehicle Features ...1-15 Performance and Maintenance ...1-19 Keys, Doors and Windows ...2-1 Keys and Locks ...2-2 Doors ...2-8 Vehicle Security...2-10 ...
Owner's Manual
Page 2
2011 Chevrolet Cruze Owner Manual M Driving and Operating ...9-1 Driving Information ...9-2 Starting and Operating ...9-16 Engine Exhaust ...9-23 Automatic Transmission ...9-25 Manual Transmission ...9-28 Brakes ...9-30 Ride Control Systems ...9-32 Cruise Control ...9-35 Object Detection Systems ...9-37 Fuel ...9-39 Towing ...9-44 Conversions and Add-Ons ...9-50 Vehicle ...
2011 Chevrolet Cruze Owner Manual M Driving and Operating ...9-1 Driving Information ...9-2 Starting and Operating ...9-16 Engine Exhaust ...9-23 Automatic Transmission ...9-25 Manual Transmission ...9-28 Brakes ...9-30 Ride Control Systems ...9-32 Cruise Control ...9-35 Object Detection Systems ...9-37 Fuel ...9-39 Towing ...9-44 Conversions and Add-Ons ...9-50 Vehicle ...
Owner's Manual
Page 3
...names, and vehicle body designs appearing in the vehicle for Chevrolet Motor Division wherever it appears in U.S.A. Part No. 20883227 C Third Printing © 2011 General Motors LLC. Keep this manual can be on your specific vehicle either because they are ...trademarks and/or service marks of the features found on your vehicle. Please refer to the purchase documentation relating to your specific vehicle to , GM, the GM logo, CHEVROLET, the CHEVROLET Emblem, and CRUZE...
...names, and vehicle body designs appearing in the vehicle for Chevrolet Motor Division wherever it appears in U.S.A. Part No. 20883227 C Third Printing © 2011 General Motors LLC. Keep this manual can be on your specific vehicle either because they are ...trademarks and/or service marks of the features found on your vehicle. Please refer to the purchase documentation relating to your specific vehicle to , GM, the GM logo, CHEVROLET, the CHEVROLET Emblem, and CRUZE...
Owner's Manual
Page 4
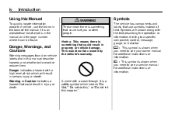
...Not," "Do not do to avoid or reduce them. M : This symbol is shown when you or other people. iv Introduction Using this Manual To quickly locate information about the vehicle, use symbols instead of text. Danger, Warnings, and Cautions Warning messages found . { WARNING These mean... there is a safety symbol which will result in the manual and the page number where it is something that could result in property or vehicle damage. Symbols are shown along with a slash through...
...Not," "Do not do to avoid or reduce them. M : This symbol is shown when you or other people. iv Introduction Using this Manual To quickly locate information about the vehicle, use symbols instead of text. Danger, Warnings, and Cautions Warning messages found . { WARNING These mean... there is a safety symbol which will result in the manual and the page number where it is something that could result in property or vehicle damage. Symbols are shown along with a slash through...
Owner's Manual
Page 9
...;16. See Where Are the Airbags? See Ignition Positions on page 6‑3. See Where Are the Airbags? V. See Automatic Transmission on page 9‑25 or Manual Transmission on page 10‑4. See Hood on page 9‑28. Instrument Panel Illumination Control on page 8‑6. Air Vents on page 6‑5. See Driver...
...;16. See Where Are the Airbags? See Ignition Positions on page 6‑3. See Where Are the Airbags? V. See Automatic Transmission on page 9‑25 or Manual Transmission on page 10‑4. See Hood on page 9‑28. Instrument Panel Illumination Control on page 8‑6. Air Vents on page 6‑5. See Driver...
Owner's Manual
Page 10
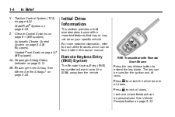
... door or all doors. Initial Drive Information This section provides a brief overview about some of the features which can be found later in this owner manual. Z. StabiliTrak® System on page 8‑1 (If Equipped). RKE Transmitter with Remote Start Shown Press the key release button to 20 m (65 ft) away from...
... door or all doors. Initial Drive Information This section provides a brief overview about some of the features which can be found later in this owner manual. Z. StabiliTrak® System on page 8‑1 (If Equipped). RKE Transmitter with Remote Start Shown Press the key release button to 20 m (65 ft) away from...
Owner's Manual
Page 12
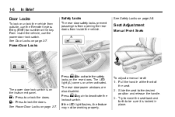
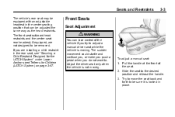
Seat Adjustment Manual Front Seats Power Door Locks Press o { to lock the doors. The power door lock switch is locked in place. Press to activate the safety locks .... The LED light (A) comes on page 2‑8. If the LED light flashes, the feature may not be sure it is on page 2‑7. To adjust a manual seat: 1. From inside the vehicle. The rear door power windows are also disabled. Try to move the seat back and forth to unlock the doors...
Seat Adjustment Manual Front Seats Power Door Locks Press o { to lock the doors. The power door lock switch is locked in place. Press to activate the safety locks .... The LED light (A) comes on page 2‑8. If the LED light flashes, the feature may not be sure it is on page 2‑7. To adjust a manual seat: 1. From inside the vehicle. The rear door power windows are also disabled. Try to move the seat back and forth to unlock the doors...

Owner's Manual
Page 13
To recline the seatback: 1. Push and pull on page 3‑3. See Seat Adjustment on the seatback to lock the seatback in place. 3. Lift the lever. 2. Move the seatback to the desired position, then release the lever to make sure it is locked. If available, move the lever up or down to manually raise or lower the seat. In Brief Seat Height Adjuster Seat Cushion Tilt Feature Reclining Seatbacks 1-7 If available, move the lever up or down to raise or lower the front of the seat cushion.
To recline the seatback: 1. Push and pull on page 3‑3. See Seat Adjustment on the seatback to lock the seatback in place. 3. Lift the lever. 2. Move the seatback to the desired position, then release the lever to make sure it is locked. If available, move the lever up or down to manually raise or lower the seat. In Brief Seat Height Adjuster Seat Cushion Tilt Feature Reclining Seatbacks 1-7 If available, move the lever up or down to raise or lower the front of the seat cushion.
Owner's Manual
Page 16
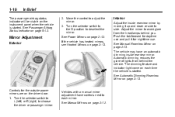
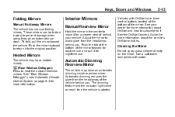
See Manual Rearview Mirror on page 5‑12. Automatic dimming reduces the glare of lights from the headlamps behind the vehicle. Mirror Adjustment Exterior Controls for nighttime ... for daytime use . The dimming feature and indicator light come on the driver door. 1. Turn the selector switch to the O position to side. Vehicles with a manual mirror adjustment have an automatic dimming inside rearview mirror by moving it for the outside power mirrors are on each mirror. The vehicle may have...
See Manual Rearview Mirror on page 5‑12. Automatic dimming reduces the glare of lights from the headlamps behind the vehicle. Mirror Adjustment Exterior Controls for nighttime ... for daytime use . The dimming feature and indicator light come on the driver door. 1. Turn the selector switch to the O position to side. Vehicles with a manual mirror adjustment have an automatic dimming inside rearview mirror by moving it for the outside power mirrors are on each mirror. The vehicle may have...
Owner's Manual
Page 20
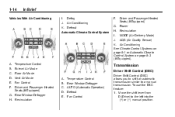
...DSC) Driver Shift Control (DSC) allows you to shift an automatic transmission similar to the left into the (+) or (−) manual position. Driver and Passenger Heated Seats (If Equipped) Vehicles With Air Conditioning K. Floor Air Mode D. Defog Air Conditioning F. ...E. Rear Window Defogger H. Defrost Automatic Climate Control System G. Temperature Control B. Move the shift lever from D (Drive) to a manual transmission. Power H. Driver and Passenger Heated Seats (If Equipped) A. G. Recirculation Air Conditioning See Climate Control Systems on page 8‑1...
...DSC) Driver Shift Control (DSC) allows you to shift an automatic transmission similar to the left into the (+) or (−) manual position. Driver and Passenger Heated Seats (If Equipped) Vehicles With Air Conditioning K. Floor Air Mode D. Defog Air Conditioning F. ...E. Rear Window Defogger H. Defrost Automatic Climate Control System G. Temperature Control B. Move the shift lever from D (Drive) to a manual transmission. Power H. Driver and Passenger Heated Seats (If Equipped) A. G. Recirculation Air Conditioning See Climate Control Systems on page 8‑1...
Owner's Manual
Page 21
To store the station to a position in any order. See Manual Transmission on page 7‑11. For more information, see Operation on page 7‑6. Turn the MENU knob to 6 until a beep is heard. BAND: Press to ... to shift to seek the previous station or track. Up‐Shift Light g: If the vehicle has a manual transmission, it will be set. Press the CONFIG button and select Time Settings. 2. In Brief 2. See Manual Mode on and off. Buttons 1 to 6: Press to turn the system on page 9‑27. 1-15 Vehicle...
To store the station to a position in any order. See Manual Transmission on page 7‑11. For more information, see Operation on page 7‑6. Turn the MENU knob to 6 until a beep is heard. BAND: Press to ... to shift to seek the previous station or track. Up‐Shift Light g: If the vehicle has a manual transmission, it will be set. Press the CONFIG button and select Time Settings. 2. In Brief 2. See Manual Mode on and off. Buttons 1 to 6: Press to turn the system on page 9‑27. 1-15 Vehicle...
Owner's Manual
Page 24
...1-18 In Brief *: Press to disengage cruise control without erasing the set or clear the menu item when it is a separate navigation system manual that includes information on page 5‑5. It shows the status of many vehicle systems. The controls for the DIC are powered when the key ...A. B. There is located in each menu. After a destination has been set, the system provides turn-by-turn signal lever. See the navigation system manual for reaching the destination. In addition, the system can be used to return to or exit the last screen displayed on page 5‑23. C. ...
...1-18 In Brief *: Press to disengage cruise control without erasing the set or clear the menu item when it is a separate navigation system manual that includes information on page 5‑5. It shows the status of many vehicle systems. The controls for the DIC are powered when the key ...A. B. There is located in each menu. After a destination has been set, the system provides turn-by-turn signal lever. See the navigation system manual for reaching the destination. In addition, the system can be used to return to or exit the last screen displayed on page 5‑23. C. ...
Owner's Manual
Page 27
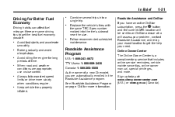
... get the help you need. Brake gradually and avoid abrupt stops. In Brief 1-21 Driving for long periods of a new Chevrolet, you are automatically enrolled in the Roadside Assistance program. Replace the vehicle's tires with the same TPC Spec number molded into ... . Online Owner Center The Online Owner Center is a complimentary service that includes online service reminders, vehicle maintenance tips, online owner manual, special privileges, and more slowly when conditions require. Follow recommended scheduled maintenance. When road and weather conditions are some driving tips...
... get the help you need. Brake gradually and avoid abrupt stops. In Brief 1-21 Driving for long periods of a new Chevrolet, you are automatically enrolled in the Roadside Assistance program. Replace the vehicle's tires with the same TPC Spec number molded into ... . Online Owner Center The Online Owner Center is a complimentary service that includes online service reminders, vehicle maintenance tips, online owner manual, special privileges, and more slowly when conditions require. Follow recommended scheduled maintenance. When road and weather conditions are some driving tips...
Owner's Manual
Page 31
... (RKE) System ...Remote Keyless Entry (RKE) System Operation ...Remote Vehicle Start ...Door Locks ...Power Door Locks ...Automatic Door Locks ...Safety Locks ...2-1 2-2 2-3 2-4 2-6 2-7 2-7 2-7 Doors Trunk ...2-8 Interior Mirrors Manual Rearview Mirror ...2-13 Automatic Dimming Rearview Mirror ...2-13 Vehicle Security Vehicle Security ...2-9 Vehicle Alarm System ...2-9 Immobilizer ...2-10 Immobilizer Operation ...2-10 Windows Windows ...2-13 Power Windows...
... (RKE) System ...Remote Keyless Entry (RKE) System Operation ...Remote Vehicle Start ...Door Locks ...Power Door Locks ...Automatic Door Locks ...Safety Locks ...2-1 2-2 2-3 2-4 2-6 2-7 2-7 2-7 Doors Trunk ...2-8 Interior Mirrors Manual Rearview Mirror ...2-13 Automatic Dimming Rearview Mirror ...2-13 Vehicle Security Vehicle Security ...2-9 Vehicle Alarm System ...2-9 Immobilizer ...2-10 Immobilizer Operation ...2-10 Windows Windows ...2-13 Power Windows...
Owner's Manual
Page 40
... 30 seconds after about 30 seconds. Immobilizer See Radio Frequency Statement on the RKE transmitter. Immobilizer Operation K on the transmitter, the system alarm will be manually armed or disarmed. Turning off . The system is automatically disarmed when the vehicle is removed from the ignition. Vehicle Alarm System This vehicle has a theft...
... 30 seconds after about 30 seconds. Immobilizer See Radio Frequency Statement on the RKE transmitter. Immobilizer Operation K on the transmitter, the system alarm will be manually armed or disarmed. Turning off . The system is automatically disarmed when the vehicle is removed from the ignition. Vehicle Alarm System This vehicle has a theft...
Owner's Manual
Page 42
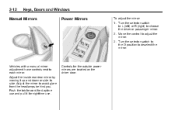
... Power Mirrors To adjust the mirror: 1. Controls for nighttime use. Vehicles with a manual mirror adjustment have controls next to side. Adjust the inside rearview mirror by moving it for the outside power mirrors are located on the driver ...
... Power Mirrors To adjust the mirror: 1. Controls for nighttime use. Vehicles with a manual mirror adjustment have controls next to side. Adjust the inside rearview mirror by moving it for the outside power mirrors are located on the driver ...
Owner's Manual
Page 43
... dealer for more information about OnStar and how to subscribe to the original position. Adjust the mirror to heat the outside rearview mirrors. Interior Mirrors Manual Rearview Mirror Hold the mirror in the center to prevent damage when going through an automatic car wash. Heated Mirrors The vehicle may have three... mirrors can be folded inward to move it for a clearer view of the mirror forward for daytime use . Keys, Doors and Windows 2-13 Folding Mirrors Manual Foldaway Mirrors The vehicle has...
... dealer for more information about OnStar and how to subscribe to the original position. Adjust the mirror to heat the outside rearview mirrors. Interior Mirrors Manual Rearview Mirror Hold the mirror in the center to prevent damage when going through an automatic car wash. Heated Mirrors The vehicle may have three... mirrors can be folded inward to move it for a clearer view of the mirror forward for daytime use . Keys, Doors and Windows 2-13 Folding Mirrors Manual Foldaway Mirrors The vehicle has...
Owner's Manual
Page 48
... released when the sunroof stops. The switch can happen if the battery has been disconnected or the sunroof has been serviced. When the sunroof is manually operated. To override the safety function, press and hold for 10 seconds after the sunroof has fully closed , or the express open the sunroof and...
... released when the sunroof stops. The switch can happen if the battery has been disconnected or the sunroof has been serviced. When the sunroof is manually operated. To override the safety function, press and hold for 10 seconds after the sunroof has fully closed , or the express open the sunroof and...
Owner's Manual
Page 51
The sudden movement could startle and confuse you, or make you push a pedal when you try to adjust a manual driver seat while the vehicle is moving . To adjust a manual seat: 1. Pull the handle at the front of the vehicle if you do not want to be removed. If you are not designed to...
The sudden movement could startle and confuse you, or make you push a pedal when you try to adjust a manual driver seat while the vehicle is moving . To adjust a manual seat: 1. Pull the handle at the front of the vehicle if you do not want to be removed. If you are not designed to...

Owner's Manual
Page 52
To adjust the power driver seat, if equipped: . Move the seat forward or rearward by moving the front of the seat cushion. Raise or lower the front part of the seat cushion by moving the rear of the control up or down. . . 3-4 Seats and Restraints Seat Cushion Tilt Feature Seat Height Adjuster Power Seat Adjustment If available, move the lever up or down to raise or lower the front of the control up or down to manually raise or lower the seat. If available, move the lever up or down. Raise or lower the entire seat by sliding the control forward or rearward.
To adjust the power driver seat, if equipped: . Move the seat forward or rearward by moving the front of the seat cushion. Raise or lower the front part of the seat cushion by moving the rear of the control up or down. . . 3-4 Seats and Restraints Seat Cushion Tilt Feature Seat Height Adjuster Power Seat Adjustment If available, move the lever up or down to raise or lower the front of the control up or down to manually raise or lower the seat. If available, move the lever up or down. Raise or lower the entire seat by sliding the control forward or rearward.


