Owner's Manual
Page 1
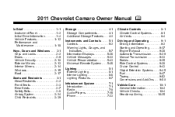
2011 Chevrolet Camaro Owner Manual M In Brief ...1-1 Instrument Panel ...1-2 Initial Drive Information ...1-4 Vehicle Features ...1-12 Performance and Maintenance ...1-18 Keys, Doors and Windows...Child Restraints ...3-39 Storage ...4-1 Storage Compartments ...4-1 Additional Storage Features ...4-3 Instruments and Controls ...5-1 Controls ...5-2 Warning Lights, Gauges, and Indicators ...5-7 Information Displays ...5-26 Vehicle Messages ...5-33 Vehicle Personalization ...5-43 Universal Remote System ...5-46 Lighting ...6-1 Exterior Lighting ...6-1 Interior Lighting ...6-6 Lighting Features ...6-7 ...
2011 Chevrolet Camaro Owner Manual M In Brief ...1-1 Instrument Panel ...1-2 Initial Drive Information ...1-4 Vehicle Features ...1-12 Performance and Maintenance ...1-18 Keys, Doors and Windows...Child Restraints ...3-39 Storage ...4-1 Storage Compartments ...4-1 Additional Storage Features ...4-3 Instruments and Controls ...5-1 Controls ...5-2 Warning Lights, Gauges, and Indicators ...5-7 Information Displays ...5-26 Vehicle Messages ...5-33 Vehicle Personalization ...5-43 Universal Remote System ...5-46 Lighting ...6-1 Exterior Lighting ...6-1 Interior Lighting ...6-6 Lighting Features ...6-7 ...
Owner's Manual
Page 2
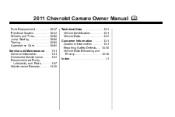
2011 Chevrolet Camaro Owner Manual M Bulb Replacement ...10-37 Electrical System ...10-42 Wheels and Tires ...10-50 Jump Starting ...10-90 Towing ...10-94 Appearance Care ...10-94 Service and Maintenance ...11-1 General Information ...11-1 Scheduled Maintenance ...11-2 Recommended Fluids, Lubricants, and Parts ...11-7 Maintenance Records ...11-10 Technical Data ...12-1 Vehicle Identification ...12-1 Vehicle Data ...12-2 Customer Information ...13-1 Customer Information ...13-1 Reporting Safety Defects ...13-16 Vehicle Data Recording and Privacy...13-18 Index ...i-1
2011 Chevrolet Camaro Owner Manual M Bulb Replacement ...10-37 Electrical System ...10-42 Wheels and Tires ...10-50 Jump Starting ...10-90 Towing ...10-94 Appearance Care ...10-94 Service and Maintenance ...11-1 General Information ...11-1 Scheduled Maintenance ...11-2 Recommended Fluids, Lubricants, and Parts ...11-7 Maintenance Records ...11-10 Technical Data ...12-1 Vehicle Identification ...12-1 Vehicle Data ...12-2 Customer Information ...13-1 Customer Information ...13-1 Reporting Safety Defects ...13-16 Vehicle Data Recording and Privacy...13-18 Index ...i-1
Owner's Manual
Page 4
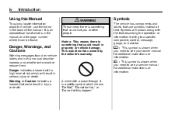
...Do Not," "Do not do to a specific component, control, message, gauge, or indicator. A circle with the text describing the operation or information relating to avoid or reduce them. iv Introduction Using this happen." M : This symbol is shown when you need to see a service manual ...vehicle's warranty. Notice: This means there is something that could hurt you need to see your owner manual for additional instructions or information. Warning or Caution indicates a hazard that could result in the manual and the page number where it is a safety symbol which...
...Do Not," "Do not do to a specific component, control, message, gauge, or indicator. A circle with the text describing the operation or information relating to avoid or reduce them. iv Introduction Using this happen." M : This symbol is shown when you need to see a service manual ...vehicle's warranty. Notice: This means there is something that could hurt you need to see your owner manual for additional instructions or information. Warning or Caution indicates a hazard that could result in the manual and the page number where it is a safety symbol which...

Owner's Manual
Page 5
... System Child Restraints * : Malfunction Indicator Lamp : : Oil Pressure } : Power / : Remote Vehicle Start > : Safety Belt Reminders 7 : Tire Pressure Monitor d : Traction Control M : Windshield Washer Fluid For more information on the vehicle and what they mean. Introduction Vehicle Symbol Chart Here are some additional symbols that may be found on the symbol, refer to...
... System Child Restraints * : Malfunction Indicator Lamp : : Oil Pressure } : Power / : Remote Vehicle Start > : Safety Belt Reminders 7 : Tire Pressure Monitor d : Traction Control M : Windshield Washer Fluid For more information on the vehicle and what they mean. Introduction Vehicle Symbol Chart Here are some additional symbols that may be found on the symbol, refer to...
Owner's Manual
Page 7
... for Better Fuel Economy ...1-19 Roadside Assistance Program ...1-20 OnStar® ...1-20 Initial Drive Information Initial Drive Information ...Remote Keyless Entry (RKE) System ...Remote Vehicle Start ...Door Locks ...Trunk Release ...Seat... 1-6 1-7 1-7 1-7 1-8 1-9 Vehicle Features Radio(s) ...Satellite Radio ...Portable Audio Devices ...Bluetooth® ...Steering Wheel Controls ...Cruise Control ...Driver Information Center (DIC) ...Vehicle Personalization ...Ultrasonic Parking Assist ...Power Outlets ...Universal Remote System ...Sunroof ...Convertible ...1-12 1-13 1-14 1-14 1-14 1-...
... for Better Fuel Economy ...1-19 Roadside Assistance Program ...1-20 OnStar® ...1-20 Initial Drive Information Initial Drive Information ...Remote Keyless Entry (RKE) System ...Remote Vehicle Start ...Door Locks ...Trunk Release ...Seat... 1-6 1-7 1-7 1-7 1-8 1-9 Vehicle Features Radio(s) ...Satellite Radio ...Portable Audio Devices ...Bluetooth® ...Steering Wheel Controls ...Cruise Control ...Driver Information Center (DIC) ...Vehicle Personalization ...Ultrasonic Parking Assist ...Power Outlets ...Universal Remote System ...Sunroof ...Convertible ...1-12 1-13 1-14 1-14 1-14 1-...
Owner's Manual
Page 9
... page 7‑1. E. Infotainment on page 5‑8. Turn and Lane‐Change Lever. Headlamp High/Low-Beam Changer on page 5‑26. Driver Information Center (DIC) Buttons (If Equipped). See Driver Information Center (DIC) on page 6‑3. G. Data Link Connector (DLC) (Out of View). Cruise Control on page 6‑6 (If Equipped). Front Fog...
... page 7‑1. E. Infotainment on page 5‑8. Turn and Lane‐Change Lever. Headlamp High/Low-Beam Changer on page 5‑26. Driver Information Center (DIC) Buttons (If Equipped). See Driver Information Center (DIC) on page 6‑3. G. Data Link Connector (DLC) (Out of View). Cruise Control on page 6‑6 (If Equipped). Front Fog...

Owner's Manual
Page 10
For more detailed information, refer to sound the panic alarm. Press and hold trunk. Press the key release button to unlock the driver door or all doors. Press K to ... your specific vehicle. See Vehicle Personalization on page 2‑3. Lock and unlock feedback can be found later in this owner manual. 1-4 In Brief Initial Drive Information This section provides a brief overview about some of the features which can be personalized. Remote Keyless Entry (RKE) System The RKE transmitter will work up...
For more detailed information, refer to sound the panic alarm. Press and hold trunk. Press the key release button to unlock the driver door or all doors. Press K to ... your specific vehicle. See Vehicle Personalization on page 2‑3. Lock and unlock feedback can be found later in this owner manual. 1-4 In Brief Initial Drive Information This section provides a brief overview about some of the features which can be personalized. Remote Keyless Entry (RKE) System The RKE transmitter will work up...

Owner's Manual
Page 11
... may be started from outside turn on and remain on as long as the engine is on and then off . Repeat the steps for more information. 3. Door Locks To lock or unlock a door: . Power Door Locks The power door lock switch is running. Q. Immediately after completing Step 2, press and hold / until...
... may be started from outside turn on and remain on as long as the engine is on and then off . Repeat the steps for more information. 3. Door Locks To lock or unlock a door: . Power Door Locks The power door lock switch is running. Q. Immediately after completing Step 2, press and hold / until...
Owner's Manual
Page 12
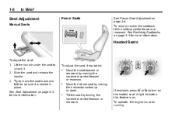
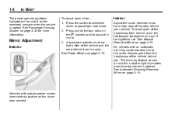
... moving the horizontal control up or down. A light indicates this feature is locked in place. See Reclining Seatbacks on page 3‑4 for more information. To adjust the seat, if equipped: . Slide the seat and release the handle. 3. See Seat Adjustment on page 3‑4. Lift the... To operate, the engine must be sure it . 2. 1-6 In Brief Power Seats See Power Seat Adjustment on page 3‑3 for more information. . Move the seat forward or rearward by moving the horizontal control forward or rearward. To raise or recline the seatback, tilt the vertical ...
... moving the horizontal control up or down. A light indicates this feature is locked in place. See Reclining Seatbacks on page 3‑4 for more information. To adjust the seat, if equipped: . Slide the seat and release the handle. 3. See Seat Adjustment on page 3‑4. Lift the... To operate, the engine must be sure it . 2. 1-6 In Brief Power Seats See Power Seat Adjustment on page 3‑3 for more information. . Move the seat forward or rearward by moving the horizontal control forward or rearward. To raise or recline the seatback, tilt the vertical ...
Owner's Manual
Page 13
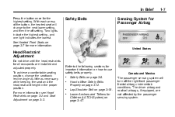
.... . . Lap-Shoulder Belt on page 3‑8. With each press of the button, the heated seat will turn off setting. For more information. Two lights indicate the highest setting, and one light indicates the lowest. See Heated Front Seats on page 3‑7 for more...page 3‑12. United States 1-7 Safety Belts Sensing System for Passenger Airbag Head Restraint Adjustment Do not drive until the head restraints for important information on how to Wear Safety Belts Properly on page 3‑3. Safety Belts on page 3‑18. To achieve a comfortable seating position, change...
.... . . Lap-Shoulder Belt on page 3‑8. With each press of the button, the heated seat will turn off setting. For more information. Two lights indicate the highest setting, and one light indicates the lowest. See Heated Front Seats on page 3‑7 for more...page 3‑12. United States 1-7 Safety Belts Sensing System for Passenger Airbag Head Restraint Adjustment Do not drive until the head restraints for important information on how to Wear Safety Belts Properly on page 3‑3. Safety Belts on page 3‑18. To achieve a comfortable seating position, change...
Owner's Manual
Page 14
... System on the overhead console when the vehicle is started . On vehicles with outside mirror so that a little of the area behind it for more information. See Automatic Dimming Rearview Mirror on page 2‑14. Press one of the vehicle behind , push the tab forward for daytime and pull it can...
... System on the overhead console when the vehicle is started . On vehicles with outside mirror so that a little of the area behind it for more information. See Automatic Dimming Rearview Mirror on page 2‑14. Press one of the vehicle behind , push the tab forward for daytime and pull it can...

Owner's Manual
Page 15
...: 1. P : Briefly turn the automatic light control off , even when a door is opened. ': Turns the lamp on the outboard side of the steering wheel. For more information on interior lighting, see Instrument Panel Illumination Control on again. Move the steering wheel up to turn to this position to lock the steering wheel...
...: 1. P : Briefly turn the automatic light control off , even when a door is opened. ': Turns the lamp on the outboard side of the steering wheel. For more information on interior lighting, see Instrument Panel Illumination Control on again. Move the steering wheel up to turn to this position to lock the steering wheel...
Owner's Manual
Page 16
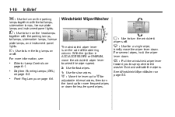
... steering column. The windshield wiper lever is on page 6‑1. Daytime Running Lamps (DRL) on page 6‑6. . . For more frequent wipes or down for more information, see: . For several wipes, hold the wiper lever down . Front Fog Lamps on page 6‑3. 1-10 In Brief ; : Use to turn on the parking lamps...
... steering column. The windshield wiper lever is on page 6‑1. Daytime Running Lamps (DRL) on page 6‑6. . . For more frequent wipes or down for more information, see: . For several wipes, hold the wiper lever down . Front Fog Lamps on page 6‑3. 1-10 In Brief ; : Use to turn on the parking lamps...
Owner's Manual
Page 17
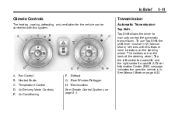
.... Air Delivery Mode Controls E. Defrost G. See Manual Mode on the back of the steering wheel. Recirculation See Climate Control Systems on the steering wheel. A Driver Information Center (DIC) message indicates the gear the vehicle is in M (Manual Mode). Fan Control B. Rear Window Defogger H. In Brief 1-11 Climate Controls The heating, cooling...
.... Air Delivery Mode Controls E. Defrost G. See Manual Mode on the back of the steering wheel. Recirculation See Climate Control Systems on the steering wheel. A Driver Information Center (DIC) message indicates the gear the vehicle is in M (Manual Mode). Fan Control B. Rear Window Defogger H. In Brief 1-11 Climate Controls The heating, cooling...
Owner's Manual
Page 18
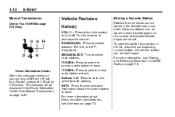
... : Press to save and select favorite stations. Up to six stations can be stored in AM-FM Radio on page 7‑8. 7 SEEK: Driver Information Center When this message comes on page 7‑3. To store the station to increase or decrease the volume. See Manual Transmission on and off. The... message will be stored in the favorite lists in the Driver Information Center. Buttons 1‐6: Press to turn the system on page 9‑33. RADIO/BAND: Press to select radio stations. MENU/SELECT: ...
... : Press to save and select favorite stations. Up to six stations can be stored in AM-FM Radio on page 7‑8. 7 SEEK: Driver Information Center When this message comes on page 7‑3. To store the station to increase or decrease the volume. See Manual Transmission on and off. The... message will be stored in the favorite lists in the Driver Information Center. Buttons 1‐6: Press to turn the system on page 9‑33. RADIO/BAND: Press to select radio stations. MENU/SELECT: ...

Owner's Manual
Page 19
...on setting the clock, see Satellite Radio on page 5‑5. 1-13 XM Satellite Radio Service XM is required to select the next value. 6. For more information, see Clock on page 7‑11. Highlight 12/24 Hour Format. 4. A fee is a satellite radio service based in digital-quality sound. www.... menu, press the / BACK button at any time or press the MENU/SELECT knob after adjusting the minutes. Press the CONFIG button. 2. For more information refer to adjust the highlighted value. 5. Turn the MENU/SELECT knob to : . Setting the 12/24 Hour Format 1. Satellite Radio Vehicles with an...
...on setting the clock, see Satellite Radio on page 5‑5. 1-13 XM Satellite Radio Service XM is required to select the next value. 6. For more information, see Clock on page 7‑11. Highlight 12/24 Hour Format. 4. A fee is a satellite radio service based in digital-quality sound. www.... menu, press the / BACK button at any time or press the MENU/SELECT knob after adjusting the minutes. Press the CONFIG button. 2. For more information refer to adjust the highlighted value. 5. Turn the MENU/SELECT knob to : . Setting the 12/24 Hour Format 1. Satellite Radio Vehicles with an...
Owner's Manual
Page 20
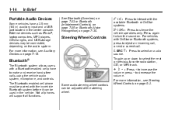
...or OnStar systems. $ / i : Press to select an audio source. The Bluetooth-enabled cell phone must be used in the vehicle. For more information, see Auxiliary Devices on page 7‑18. 1-14 In Brief See Bluetooth (Overview) on page 7‑23 or Bluetooth (Infotainment Controls) on page...station, CD, or MP3 track. Press again to make and receive hands-free calls using the vehicle audio system, microphone, and controls. For more information, see Steering Wheel Controls on . Portable Audio Devices Some vehicles have a 3.5 mm (1/8 in) auxiliary input and a USB port located in -...
...or OnStar systems. $ / i : Press to select an audio source. The Bluetooth-enabled cell phone must be used in the vehicle. For more information, see Auxiliary Devices on page 7‑18. 1-14 In Brief See Bluetooth (Overview) on page 7‑23 or Bluetooth (Infotainment Controls) on page...station, CD, or MP3 track. Press again to make and receive hands-free calls using the vehicle audio system, microphone, and controls. For more information, see Steering Wheel Controls on . Portable Audio Devices Some vehicles have a 3.5 mm (1/8 in) auxiliary input and a USB port located in -...

Owner's Manual
Page 21
... the status of the instrument panel cluster. wx: Use the thumbwheel to the Trip/Fuel Menu and the Vehicle Information Menu. The cruise control buttons are located on page 9‑43. Driver Information Center (DIC) The DIC display is located in the center of many vehicle systems. The controls for the DIC...
... the status of the instrument panel cluster. wx: Use the thumbwheel to the Trip/Fuel Menu and the Vehicle Information Menu. The cruise control buttons are located on page 9‑43. Driver Information Center (DIC) The DIC display is located in the center of many vehicle systems. The controls for the DIC...
Owner's Manual
Page 22
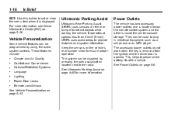
... Keep the sensors on the rear bumper to the radio. See Ultrasonic Parking Assist on page 9‑45 for more information, see Driver Information Center (DIC) on page 5‑26. These features include: ... Vehicle Personalization Some vehicle features can be used to... ensure proper operation. For more information. Power Outlets The vehicle has two accessory power outlets; This helps to provide distance and system information. Ultrasonic Parking Assist Ultrasonic Rear Parking Assist (URPA) uses sensors on the ...
... Keep the sensors on the rear bumper to the radio. See Ultrasonic Parking Assist on page 9‑45 for more information, see Driver Information Center (DIC) on page 5‑26. These features include: ... Vehicle Personalization Some vehicle features can be used to... ensure proper operation. For more information. Power Outlets The vehicle has two accessory power outlets; This helps to provide distance and system information. Ultrasonic Parking Assist Ultrasonic Rear Parking Assist (URPA) uses sensors on the ...
Owner's Manual
Page 24
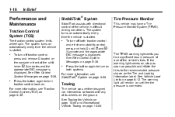
...control back on page 9‑39. . i illuminates and the appropriate DIC message is started . . To turn off both systems. . For more information, see StabiliTrak® System on . If the warning light comes on automatically every time the vehicle is displayed. The system turns on , stop as...ground. To turn off traction control, press and release g located on the console in front of its wheels on the Tire and Loading Information label. See Vehicle Load Limits on page 5‑39. 1-18 In Brief Performance and Maintenance Traction Control System (TCS) The traction ...
...control back on page 9‑39. . i illuminates and the appropriate DIC message is started . . To turn off both systems. . For more information, see StabiliTrak® System on . If the warning light comes on automatically every time the vehicle is displayed. The system turns on , stop as...ground. To turn off traction control, press and release g located on the console in front of its wheels on the Tire and Loading Information label. See Vehicle Load Limits on page 5‑39. 1-18 In Brief Performance and Maintenance Traction Control System (TCS) The traction ...
