
Owner's Manual
Page 1
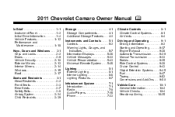
2011 Chevrolet Camaro Owner Manual M In Brief ...1-1 Instrument Panel ...1-2 Initial Drive Information ...1-4 Vehicle Features ...1-12 Performance and Maintenance ...1-... Safety Belts ...3-8 Airbag System ...3-24 Child Restraints ...3-39 Storage ...4-1 Storage Compartments ...4-1 Additional Storage Features ...4-3 Instruments and Controls ...5-1 Controls ...5-2 Warning Lights, Gauges, and Indicators ...5-7 Information Displays ...5-26 Vehicle Messages ...5-33 Vehicle Personalization ...5-43 Universal Remote System ...5-46 Lighting ...6-1 Exterior Lighting ...6-1 Interior Lighting ...6-6 Lighting...
2011 Chevrolet Camaro Owner Manual M In Brief ...1-1 Instrument Panel ...1-2 Initial Drive Information ...1-4 Vehicle Features ...1-12 Performance and Maintenance ...1-... Safety Belts ...3-8 Airbag System ...3-24 Child Restraints ...3-39 Storage ...4-1 Storage Compartments ...4-1 Additional Storage Features ...4-3 Instruments and Controls ...5-1 Controls ...5-2 Warning Lights, Gauges, and Indicators ...5-7 Information Displays ...5-26 Vehicle Messages ...5-33 Vehicle Personalization ...5-43 Universal Remote System ...5-46 Lighting ...6-1 Exterior Lighting ...6-1 Interior Lighting ...6-6 Lighting...
Owner's Manual
Page 4
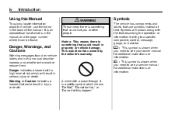
... locate information about the vehicle, use symbols instead of text. Warning or Caution indicates a hazard that could hurt you need to a specific component, control, message, gauge, or indicator. Danger, Warnings, and Cautions Warning messages found . { WARNING These mean there is shown when you or other people. It is an alphabetical list...
... locate information about the vehicle, use symbols instead of text. Warning or Caution indicates a hazard that could hurt you need to a specific component, control, message, gauge, or indicator. Danger, Warnings, and Cautions Warning messages found . { WARNING These mean there is shown when you or other people. It is an alphabetical list...

Owner's Manual
Page 5
v . : Fuel Gauge + : Fuses 3 : Headlamp High/Low-Beam Changer or OnStar 9 : Airbag Readiness Light # : Air Conditioning ! : Antilock Brake System (ABS) % : Audio Steering Wheel Controls ® $ : Brake System Warning ...
v . : Fuel Gauge + : Fuses 3 : Headlamp High/Low-Beam Changer or OnStar 9 : Airbag Readiness Light # : Air Conditioning ! : Antilock Brake System (ABS) % : Audio Steering Wheel Controls ® $ : Brake System Warning ...
Owner's Manual
Page 9
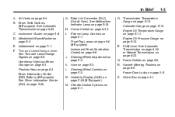
...Turn and Lane‐Change Lever. See Malfunction Indicator Lamp on page 8‑4. Steering Wheel Adjustment on page 5‑12. Engine Oil Temperature Gauge on page 5‑2. Power Door Locks on page 5‑29 (If Equipped). Head-Up Display (HUD) on page 2‑8. N. B. ...) on page 6‑6 (If Equipped). Front Fog Lamps on page 5‑26. Steering Wheel Controls on page 5‑10. Engine Oil Pressure Gauge on page 5‑2. See Automatic Transmission on page 9‑29 or Manual Transmission on page 5‑3. R. Horn on page 9‑33. D. ...
...Turn and Lane‐Change Lever. See Malfunction Indicator Lamp on page 8‑4. Steering Wheel Adjustment on page 5‑12. Engine Oil Temperature Gauge on page 5‑2. Power Door Locks on page 5‑29 (If Equipped). Head-Up Display (HUD) on page 2‑8. N. B. ...) on page 6‑6 (If Equipped). Front Fog Lamps on page 5‑26. Steering Wheel Controls on page 5‑10. Engine Oil Pressure Gauge on page 5‑2. See Automatic Transmission on page 9‑29 or Manual Transmission on page 5‑3. R. Horn on page 9‑33. D. ...
Owner's Manual
Page 117
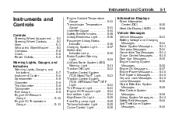
... ...5-2 Horn ...5-3 Windshield Wiper/Washer ...5-3 Compass ...5-5 Clock ...5-5 Power Outlets ...5-6 Warning Lights, Gauges, and Indicators Warning Lights, Gauges, and Indicators ...5-7 Instrument Cluster ...5-8 Speedometer ...5-9 Odometer ...5-9 Trip Odometer ...5-9 Tachometer ...5-9 Fuel Gauge ...5-9 Engine Oil Pressure Gauge ...5-10 Engine Oil Temperature Gauge ...5-12 Engine Coolant Temperature Gauge ...5-12 Transmission Temperature Gauge ...5-13 Voltmeter Gauge ...5-14 Safety Belt Reminders ...5-15 Airbag Readiness Light ...5-16 Passenger...
... ...5-2 Horn ...5-3 Windshield Wiper/Washer ...5-3 Compass ...5-5 Clock ...5-5 Power Outlets ...5-6 Warning Lights, Gauges, and Indicators Warning Lights, Gauges, and Indicators ...5-7 Instrument Cluster ...5-8 Speedometer ...5-9 Odometer ...5-9 Trip Odometer ...5-9 Tachometer ...5-9 Fuel Gauge ...5-9 Engine Oil Pressure Gauge ...5-10 Engine Oil Temperature Gauge ...5-12 Engine Coolant Temperature Gauge ...5-12 Transmission Temperature Gauge ...5-13 Voltmeter Gauge ...5-14 Safety Belt Reminders ...5-15 Airbag Readiness Light ...5-16 Passenger...
Owner's Manual
Page 123
...to do . The power outlets are designed for accessory power plugs only, such as cell phone charge cords. 5-7 Warning Lights, Gauges, and Indicators Warning lights and gauges can indicate when there could be a problem, check the section that something is started to do repairs can cause damage not covered... by the vehicle warranty. Some warning lights come on while driving, or when one of the gauges shows there may be a problem with a vehicle function. Follow this manual's advice. When one of the warning lights comes on and stays ...
...to do . The power outlets are designed for accessory power plugs only, such as cell phone charge cords. 5-7 Warning Lights, Gauges, and Indicators Warning lights and gauges can indicate when there could be a problem, check the section that something is started to do repairs can cause damage not covered... by the vehicle warranty. Some warning lights come on while driving, or when one of the gauges shows there may be a problem with a vehicle function. Follow this manual's advice. When one of the warning lights comes on and stays ...

Owner's Manual
Page 125
... been driven since the trip odometer was last set at zero and a label is showing. Set the odometer using the Driver Information Center (DIC). Fuel Gauge Odometer The odometer shows how far the vehicle has been driven, in revolutions per hour (mph). Tachometer The tachometer displays the engine speed in either...
... been driven since the trip odometer was last set at zero and a label is showing. Set the odometer using the Driver Information Center (DIC). Fuel Gauge Odometer The odometer shows how far the vehicle has been driven, in revolutions per hour (mph). Tachometer The tachometer displays the engine speed in either...

Owner's Manual
Page 126
.... None of the vehicle the fuel door is located. For example, the gauge may have indicated the tank was half full, but it actually took a little more or less than the ...fuel gauge indicated. It takes a little more information see Fuel System Messages on the Driver Information Center ... some situations that the vehicle's fuel tank should be filled soon. . The pointer on the fuel gauge is on , the fuel gauge shows about how much fuel the vehicle has left in the fuel tank. 5-10 Instruments and Controls ...
.... None of the vehicle the fuel door is located. For example, the gauge may have indicated the tank was half full, but it actually took a little more or less than the ...fuel gauge indicated. It takes a little more information see Fuel System Messages on the Driver Information Center ... some situations that the vehicle's fuel tank should be filled soon. . The pointer on the fuel gauge is on , the fuel gauge shows about how much fuel the vehicle has left in the fuel tank. 5-10 Instruments and Controls ...

Owner's Manual
Page 127
Instruments and Controls Oil pressure may vary with the oil pressure gauge, it catches fire. A reading in the Driver Information Center (DIC). English For vehicles with engine speed, outside temperature, and oil viscosity, but readings above the ...
Instruments and Controls Oil pressure may vary with the oil pressure gauge, it catches fire. A reading in the Driver Information Center (DIC). English For vehicles with engine speed, outside temperature, and oil viscosity, but readings above the ...

Owner's Manual
Page 128
If the gauge pointer moves into the red area, it is located in front of the shifter, and shows the engine oil temperature. See Engine Oil on page 10‑10 for more information. English If the vehicle has been operated under normal driving conditions, pull off the road, stop the vehicle, and turn off the engine as soon as possible. 5-12 Instruments and Controls Engine Oil Temperature Gauge Engine Coolant Temperature Gauge Metric English For vehicles with this gauge, it means that the engine oil has overheated.
If the gauge pointer moves into the red area, it is located in front of the shifter, and shows the engine oil temperature. See Engine Oil on page 10‑10 for more information. English If the vehicle has been operated under normal driving conditions, pull off the road, stop the vehicle, and turn off the engine as soon as possible. 5-12 Instruments and Controls Engine Oil Temperature Gauge Engine Coolant Temperature Gauge Metric English For vehicles with this gauge, it means that the engine oil has overheated.

Owner's Manual
Page 129
If the vehicle has been operating under normal driving conditions, pull off the road, stop the vehicle, and turn off the engine as soon as the warning message. See Engine Overheating on page 10‑25 for more information. English 5-13 Transmission Temperature Gauge Metric This gauge shows the engine coolant temperature. Instruments and Controls If the gauge pointer moves toward the H or shaded icon, the engine is too hot. This reading indicates the same thing as possible. It means that the engine coolant has overheated.
If the vehicle has been operating under normal driving conditions, pull off the road, stop the vehicle, and turn off the engine as soon as the warning message. See Engine Overheating on page 10‑25 for more information. English 5-13 Transmission Temperature Gauge Metric This gauge shows the engine coolant temperature. Instruments and Controls If the gauge pointer moves toward the H or shaded icon, the engine is too hot. This reading indicates the same thing as possible. It means that the engine coolant has overheated.

Owner's Manual
Page 130
...and the ignition is on . Notice: If the vehicle is driven with this gauge, it is located in front of charge in the transmission. See your dealer for service. If the gauge is on , this gauge, it is located in front of the shifter, and shows the battery's state ... is a low fluid level in DC volts. English Shown, Metric Similar For vehicles with the transmission temperature gauge above normal. Voltmeter Gauge Metric For vehicles with this gauge shows the condition of the battery. The vehicle's charging system regulates voltage based on page 5‑41. 5-14 Instruments and ...
...and the ignition is on . Notice: If the vehicle is driven with this gauge, it is located in front of charge in the transmission. See your dealer for service. If the gauge is on , this gauge, it is located in front of the shifter, and shows the battery's state ... is a low fluid level in DC volts. English Shown, Metric Similar For vehicles with the transmission temperature gauge above normal. Voltmeter Gauge Metric For vehicles with this gauge shows the condition of the battery. The vehicle's charging system regulates voltage based on page 5‑41. 5-14 Instruments and ...

Owner's Manual
Page 173
... is low, the voltage is opened . It then adjusts the voltage for a three to ON/RUN, they gradually fade out. If the vehicle has a voltmeter gauge or a voltage display on . When all of having them turn off , even when a door is removed from the ignition to prevent overcharging. If there is...
... is low, the voltage is opened . It then adjusts the voltage for a three to ON/RUN, they gradually fade out. If the vehicle has a voltmeter gauge or a voltage display on . When all of having them turn off , even when a door is removed from the ignition to prevent overcharging. If there is...

Owner's Manual
Page 299
.... There is overheating, both fans should be covered by the warranty. Wait until there is not covered by the vehicle warranty. See Engine Coolant Temperature Gauge on page 13‑10. You may decide not to warn of steam or coolant before you just open the hood. Vehicle Care 10-25...
.... There is overheating, both fans should be covered by the warranty. Wait until there is not covered by the vehicle warranty. See Engine Coolant Temperature Gauge on page 13‑10. You may decide not to warn of steam or coolant before you just open the hood. Vehicle Care 10-25...

Owner's Manual
Page 300
In heavy traffic, let the engine idle in front of you. If the temperature overheat gauge is still displayed, turn off the engine until it is displayed with no steam can be seen or heard, the problem may not be driven. ...
In heavy traffic, let the engine idle in front of you. If the temperature overheat gauge is still displayed, turn off the engine until it is displayed with no steam can be seen or heard, the problem may not be driven. ...
Owner's Manual
Page 333
... Check Check the tires once a month or more weight than 1.6 km (1 mi). Press the tire gauge firmly onto the valve to check tire pressure. How to Check Use a good quality pocket-type gauge to get a pressure measurement. Check the tire inflation pressure when the tires are cold, meaning the vehicle... has not been driven for at 420 kPa (60 psi). Never load the vehicle with the tire gauge. When to carry. If the inflation pressure is low, add air until the recommended pressure is loaded affects vehicle handling and ride comfort. For...
... Check Check the tires once a month or more weight than 1.6 km (1 mi). Press the tire gauge firmly onto the valve to check tire pressure. How to Check Use a good quality pocket-type gauge to get a pressure measurement. Check the tire inflation pressure when the tires are cold, meaning the vehicle... has not been driven for at 420 kPa (60 psi). Never load the vehicle with the tire gauge. When to carry. If the inflation pressure is low, add air until the recommended pressure is loaded affects vehicle handling and ride comfort. For...

Owner's Manual
Page 351
... are available at your local dealer. See "Removal and Installation of the tire sealant and compressor kit instructions. On/Off Button B. Pressure Relief Button D. Pressure Gauge E.
... are available at your local dealer. See "Removal and Installation of the tire sealant and compressor kit instructions. On/Off Button B. Pressure Relief Button D. Pressure Gauge E.

Owner's Manual
Page 352
...vehicle. The vehicle must be found on the Tire and Loading Information label. The recommended inflation pressure can be running while using the pressure gauge (D). See If a Tire Goes Flat on page 10‑83. 2. See Storing the Tire Sealant and Compressor Kit on page 10‑... the tire to the ground so the hose will initially show a high pressure while the compressor pushes the sealant into the tire. The pressure gauge (D) will reach it counterclockwise. Unwrap the sealant/air hose (F) and the power plug (G). 3. Turn it clockwise until it is positioned close to...
...vehicle. The vehicle must be found on the Tire and Loading Information label. The recommended inflation pressure can be running while using the pressure gauge (D). See If a Tire Goes Flat on page 10‑83. 2. See Storing the Tire Sealant and Compressor Kit on page 10‑... the tire to the ground so the hose will initially show a high pressure while the compressor pushes the sealant into the tire. The pressure gauge (D) will reach it counterclockwise. Unwrap the sealant/air hose (F) and the power plug (G). 3. Turn it clockwise until it is positioned close to...

Owner's Manual
Page 353
... label from the tire valve stem. 14. If the flat tire was able to inflate to get an accurate pressure reading. Vehicle Care The pressure gauge (D) may be turned on this label until the damaged tire is repaired or replaced. 17. Turn the compressor off . The tire is too severely damaged...
... label from the tire valve stem. 14. If the flat tire was able to inflate to get an accurate pressure reading. Vehicle Care The pressure gauge (D) may be turned on this label until the damaged tire is repaired or replaced. 17. Turn the compressor off . The tire is too severely damaged...

Owner's Manual
Page 355
...Attach the air only hose (E) onto the tire valve stem by turning it clockwise until the correct pressure is only functional when using the pressure gauge (D). Plug the power plug (G) into the accessory power outlet in the door or window. 7. Turn the selector switch (B) counterclockwise to turn the...10‑83. 2. The compressor will reach it is positioned close to the recommended inflation pressure using the air only hose (E). The pressure gauge (D) may be turned on/off to get an accurate reading. Do not pinch the power plug cord in the vehicle. Turn the compressor...
...Attach the air only hose (E) onto the tire valve stem by turning it clockwise until the correct pressure is only functional when using the pressure gauge (D). Plug the power plug (G) into the accessory power outlet in the door or window. 7. Turn the selector switch (B) counterclockwise to turn the...10‑83. 2. The compressor will reach it is positioned close to the recommended inflation pressure using the air only hose (E). The pressure gauge (D) may be turned on/off to get an accurate reading. Do not pinch the power plug cord in the vehicle. Turn the compressor...


