

Owner's Manual
Page 1
2011 Chevrolet Aveo Owner Manual M In Brief ...1-1 Instrument Panel ...1-2 Initial Drive Information ...1-3 Vehicle Features ...1-16 Performance and Maintenance ...1-21 Keys, Doors and Windows ...2-1 Keys and... Climate Control Systems ...8-1 Air Vents ...8-4 Maintenance ...8-5 Driving and Operating ...9-1 Driving Information ...9-2 Starting and Operating ...9-17 Engine Exhaust ...9-24 Automatic Transmission ...9-25 Manual Transmission ...9-29 Brakes ...9-30 Cruise Control ...9-32 Fuel ...9-34 Towing ...9-39 Conversions and Add-Ons ...9-40 Vehicle Care ...10-1 General Information ...10-3 Vehicle ...
2011 Chevrolet Aveo Owner Manual M In Brief ...1-1 Instrument Panel ...1-2 Initial Drive Information ...1-3 Vehicle Features ...1-16 Performance and Maintenance ...1-21 Keys, Doors and Windows ...2-1 Keys and... Climate Control Systems ...8-1 Air Vents ...8-4 Maintenance ...8-5 Driving and Operating ...9-1 Driving Information ...9-2 Starting and Operating ...9-17 Engine Exhaust ...9-24 Automatic Transmission ...9-25 Manual Transmission ...9-29 Brakes ...9-30 Cruise Control ...9-32 Fuel ...9-34 Towing ...9-39 Conversions and Add-Ons ...9-40 Vehicle Care ...10-1 General Information ...10-3 Vehicle ...
Owner's Manual
Page 3
...A First Printing © 2010 General Motors LLC. All Rights Reserved. For vehicles first sold in this manual can be on your vehicle. Keep this manual in the vehicle for Chevrolet Motor Division wherever it appears in Canada, substitute the name "General Motors of Canada Limited" for quick ...because they are trademarks and/or service marks of this manual. Litho in this owner manual. Please refer to the purchase documentation relating to your specific vehicle to , GM, the GM logo, CHEVROLET, the CHEVROLET Emblem, and AVEO are options that may or may not be obtained from...
...A First Printing © 2010 General Motors LLC. All Rights Reserved. For vehicles first sold in this manual can be on your vehicle. Keep this manual in the vehicle for Chevrolet Motor Division wherever it appears in Canada, substitute the name "General Motors of Canada Limited" for quick ...because they are trademarks and/or service marks of this manual. Litho in this owner manual. Please refer to the purchase documentation relating to your specific vehicle to , GM, the GM logo, CHEVROLET, the CHEVROLET Emblem, and AVEO are options that may or may not be obtained from...

Owner's Manual
Page 4
... or death. Danger indicates a hazard with a high level of risk which means "Do Not," "Do not do to see your owner manual for additional instructions or information. M : This symbol is shown when you or other people. Symbols The vehicle has components and labels that ... or vehicle damage. This would not be found on vehicle labels and in the back of the manual. A circle with the text describing the operation or information relating to see a service manual for additional instructions or information. * : This symbol is shown when you need to a specific component...
... or death. Danger indicates a hazard with a high level of risk which means "Do Not," "Do not do to see your owner manual for additional instructions or information. M : This symbol is shown when you or other people. Symbols The vehicle has components and labels that ... or vehicle damage. This would not be found on vehicle labels and in the back of the manual. A circle with the text describing the operation or information relating to see a service manual for additional instructions or information. * : This symbol is shown when you need to a specific component...
Owner's Manual
Page 9
... 4‑1. D. E. I. M. Infotainment System. For more detailed information, refer to each of the important features that may or may not be found later in this owner manual. Air Vents on page 5‑5 (If Equipped). Turn and Lane‐Change Lever. Rear Window Wiper/Washer on page 8‑4. In Brief A. N. See Ashtrays on...
... 4‑1. D. E. I. M. Infotainment System. For more detailed information, refer to each of the important features that may or may not be found later in this owner manual. Air Vents on page 5‑5 (If Equipped). Turn and Lane‐Change Lever. Rear Window Wiper/Washer on page 8‑4. In Brief A. N. See Ashtrays on...

Owner's Manual
Page 11
... can be replaced. The handle is located above the right side of the doors can also be locked or unlocked by pushing or pulling the manual door lock on each door. For more information see Liftgate (Hatchback) on page 2‑3. Liftgate To unlock the liftgate on page 2‑5. If the light...
... can be replaced. The handle is located above the right side of the doors can also be locked or unlocked by pushing or pulling the manual door lock on each door. For more information see Liftgate (Hatchback) on page 2‑3. Liftgate To unlock the liftgate on page 2‑5. If the light...

Owner's Manual
Page 12
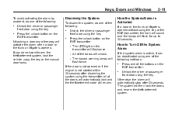
... the desired level. Press it to open the trunk. 1-6 In Brief For more information see Power Windows on page 2‑15. For more information see Manual Windows on the switch. To raise the window, lift up on page 2‑15. Each passenger door has a switch for all windows are located on... the driver door. The vehicle may have a trunk release lever located on the outboard side of the driver seat. Power Windows Trunk Release Windows Manual Windows Use the window crank to open fully. To lower the window, press and hold the switch.
... the desired level. Press it to open the trunk. 1-6 In Brief For more information see Power Windows on page 2‑15. For more information see Manual Windows on the switch. To raise the window, lift up on page 2‑15. Each passenger door has a switch for all windows are located on... the driver door. The vehicle may have a trunk release lever located on the outboard side of the driver seat. Power Windows Trunk Release Windows Manual Windows Use the window crank to open fully. To lower the window, press and hold the switch.
Owner's Manual
Page 13
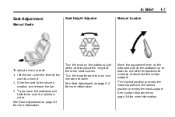
.... Slide the seat to lower. Turn the knob forward to raise and rearward to the desired position and release the bar. 3. In Brief 1-7 Seat Adjustment Manual Seats Seat Height Adjuster Manual Lumbar To adjust...
.... Slide the seat to lower. Turn the knob forward to raise and rearward to the desired position and release the bar. 3. In Brief 1-7 Seat Adjustment Manual Seats Seat Height Adjuster Manual Lumbar To adjust...
Owner's Manual
Page 14
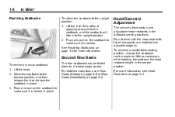
... the head restraints for more information see Rear Seats (Sedan) on page 3‑6 or Rear Seats (Hatchback) on page 3‑2. Second Row Seats To recline a manual seatback: 1. 1-8 In Brief To return the seatback to lock the seatback in place. 3. To achieve a comfortable seating position, change the seatback recline angle as little...
... the head restraints for more information see Rear Seats (Sedan) on page 3‑6 or Rear Seats (Hatchback) on page 3‑2. Second Row Seats To recline a manual seatback: 1. 1-8 In Brief To return the seatback to lock the seatback in place. 3. To achieve a comfortable seating position, change the seatback recline angle as little...
Owner's Manual
Page 16
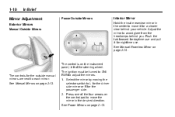
The control is on the instrument panel, left of the four arrows on page 2‑13. See Manual Mirrors on page 2‑14. Press one of the steering wheel. The ignition must be turned to ON/ RUN to move it for a clearer view .... Select the mirror by moving the selector switch to move the mirror in the center to L for the driver side mirror or R for the outside manual mirrors are next to avoid glare from the headlamps behind your vehicle. 1-10 In Brief Power Outside Mirrors Mirror Adjustment Exterior Mirrors...
The control is on the instrument panel, left of the four arrows on page 2‑13. See Manual Mirrors on page 2‑14. Press one of the steering wheel. The ignition must be turned to ON/ RUN to move it for a clearer view .... Select the mirror by moving the selector switch to move the mirror in the center to L for the driver side mirror or R for the outside manual mirrors are next to avoid glare from the headlamps behind your vehicle. 1-10 In Brief Power Outside Mirrors Mirror Adjustment Exterior Mirrors...
Owner's Manual
Page 21
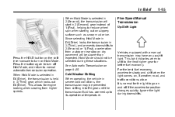
... downshifts. Cold Weather Shifting When operating the vehicle in severe cold conditions, the transmission may have an up to its operational temperature. 1-15 Five-Speed Manual Transmission Up‐Shift Light Press the HOLD button on the shift lever console to reduce wheel spin when starting out on Hold Mode. Press... return to normal automatic transmission operation. In Brief When Hold Mode is selected in 2 (Second), the transmission will be slower than expected. Vehicles equipped with a manual transmission may be prevented from higher speeds.
... downshifts. Cold Weather Shifting When operating the vehicle in severe cold conditions, the transmission may have an up to its operational temperature. 1-15 Five-Speed Manual Transmission Up‐Shift Light Press the HOLD button on the shift lever console to reduce wheel spin when starting out on Hold Mode. Press... return to normal automatic transmission operation. In Brief When Hold Mode is selected in 2 (Second), the transmission will be slower than expected. Vehicles equipped with a manual transmission may be prevented from higher speeds.
Owner's Manual
Page 22
Vehicle Features Radio(s) When the system is equipped with a lock ring to prevent shifting into R (Reverse). 1-16 In Brief Reverse Lockout The manual transmission is on . Turn to mute the system. SCAN/AST: Press to choose FM, AM, or XM™ (if equipped). BAND: ...with a strong signal in the selected band. O: r TUNE: Press to go to the previous station manually. See Manual Transmission on the shift lever, and shift into R (Reverse). Press to go to the next station manually. To shift into R (Reverse), press down the clutch pedal, lift up on . Let up the...
Vehicle Features Radio(s) When the system is equipped with a lock ring to prevent shifting into R (Reverse). 1-16 In Brief Reverse Lockout The manual transmission is on . Turn to mute the system. SCAN/AST: Press to choose FM, AM, or XM™ (if equipped). BAND: ...with a strong signal in the selected band. O: r TUNE: Press to go to the previous station manually. See Manual Transmission on the shift lever, and shift into R (Reverse). Press to go to the next station manually. To shift into R (Reverse), press down the clutch pedal, lift up on . Let up the...
Owner's Manual
Page 26
... the passenger side switch. Remove the cover to ACC/ACCESSORY or ON/RUN. To fully open the sunroof, press and hold the driver side switch. Manually close the sunshade. The accessory power outlet is operational when the ignition is turned to access and replace when not in electrical equipment, such as...
... the passenger side switch. Remove the cover to ACC/ACCESSORY or ON/RUN. To fully open the sunroof, press and hold the driver side switch. Manually close the sunshade. The accessory power outlet is operational when the ignition is turned to access and replace when not in electrical equipment, such as...
Owner's Manual
Page 29
... single trip. Roadside Assistance Program U.S.: 1-800-243-8872 TTY Users: 1-888-889-2438 Canada: 1-800-268-6800 As the owner of a new Chevrolet, you need. Roadside Assistance and OnStar If you have a current OnStar subscription, press the Q button and the current GPS location will be sent to .... Online Owner Center The Online Owner Center is a complimentary service that includes online service reminders, vehicle maintenance tips, online owner manual, special privileges, and more. Combine several trips into the tire's sidewall near the size. Keep vehicle tires properly inflated.
... single trip. Roadside Assistance Program U.S.: 1-800-243-8872 TTY Users: 1-888-889-2438 Canada: 1-800-268-6800 As the owner of a new Chevrolet, you need. Roadside Assistance and OnStar If you have a current OnStar subscription, press the Q button and the current GPS location will be sent to .... Online Owner Center The Online Owner Center is a complimentary service that includes online service reminders, vehicle maintenance tips, online owner manual, special privileges, and more. Combine several trips into the tire's sidewall near the size. Keep vehicle tires properly inflated.
Owner's Manual
Page 33
...) System Operation ...Door Locks ...Central Door Unlocking System ...Door Ajar Reminder ...Safety Locks ...2-2 2-3 2-3 2-5 2-6 2-6 2-6 Exterior Mirrors Convex Mirrors ...Manual Mirrors ...Power Mirrors ...Heated Mirrors ...2-13 2-13 2-13 2-14 Interior Mirrors Manual Rearview Mirror ...2-14 Windows Windows ...Manual Windows ...Power Windows ...Sun Visors ...2-14 2-15 2-15 2-16 Roof Sunroof ...2-16 Doors Trunk ...2-7 Liftgate (Hatchback) ...2-9 Vehicle...
...) System Operation ...Door Locks ...Central Door Unlocking System ...Door Ajar Reminder ...Safety Locks ...2-2 2-3 2-3 2-5 2-6 2-6 2-6 Exterior Mirrors Convex Mirrors ...Manual Mirrors ...Power Mirrors ...Heated Mirrors ...2-13 2-13 2-13 2-14 Interior Mirrors Manual Rearview Mirror ...2-14 Windows Windows ...Manual Windows ...Power Windows ...Sun Visors ...2-14 2-15 2-15 2-16 Roof Sunroof ...2-16 Doors Trunk ...2-7 Liftgate (Hatchback) ...2-9 Vehicle...
Owner's Manual
Page 37
... unlocked by locked from the outside, insert the key and turn it . Keys, Doors and Windows 2-5 Door Locks WARNING (Continued) . To manually unlock the front doors from the outside , use your key or the Remote Keyless Entry (RKE) transmitter. Outsiders can easily open it counterclockwise....is driven. (Continued) Young children who get out. Passengers, especially children, can easily enter through an unlocked door when you slow down the manual door lock and then closing the door. So, all of a moving vehicle. A child can be locked by pushing down or stop your ...
... unlocked by locked from the outside, insert the key and turn it . Keys, Doors and Windows 2-5 Door Locks WARNING (Continued) . To manually unlock the front doors from the outside , use your key or the Remote Keyless Entry (RKE) transmitter. Outsiders can easily open it counterclockwise....is driven. (Continued) Young children who get out. Passengers, especially children, can easily enter through an unlocked door when you slow down the manual door lock and then closing the door. So, all of a moving vehicle. A child can be locked by pushing down or stop your ...
Owner's Manual
Page 42
... doors by the central door unlocking system or RKE transmitter, if equipped. It arms only when you lock the doors using the key or the manual door lock. The security light is inserted in the ignition, the transmitter will flash continuously to steal. 2. If the key is located on the RKE...
... doors by the central door unlocking system or RKE transmitter, if equipped. It arms only when you lock the doors using the key or the manual door lock. The security light is inserted in the ignition, the transmitter will flash continuously to steal. 2. If the key is located on the RKE...
Owner's Manual
Page 43
...: . 2-11 Disarming the System To disarm the system, do not want to arm the theft-deterrent system, lock the vehicle using the key or the manual door locks. Press the unlock button on the RKE transmitter. . Unlock the driver or passenger front door using the key. How to Turn Off the...
...: . 2-11 Disarming the System To disarm the system, do not want to arm the theft-deterrent system, lock the vehicle using the key or the manual door locks. Press the unlock button on the RKE transmitter. . Unlock the driver or passenger front door using the key. How to Turn Off the...
Owner's Manual
Page 44
... to restart the engine if you may be a problem with the theft-deterrent system. See Fuses and Circuit Breakers on , there may also want to manually arm or disarm the system. Up to the ignition system, the fuel pump, and the fuel injectors. The theft-deterrent system, however, is removed from...
... to restart the engine if you may be a problem with the theft-deterrent system. See Fuses and Circuit Breakers on , there may also want to manually arm or disarm the system. Up to the ignition system, the fuel pump, and the fuel injectors. The theft-deterrent system, however, is removed from...
Owner's Manual
Page 45
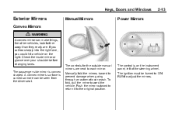
... vehicles, look farther away than they really are next to prevent damage when going through an automatic car wash. The controls for the outside manual mirrors are . The control is on the right. The ignition must be seen from the driver seat. A convex mirror's surface is convex... shaped. Keys, Doors and Windows 2-13 Exterior Mirrors Convex Mirrors Manual Mirrors Power Mirrors { WARNING A convex mirror can be turned to ON/ RUN to adjust the mirrors. Manually fold the mirrors inward to each mirror. To fold, pull the mirror toward the vehicle. ...
... vehicles, look farther away than they really are next to prevent damage when going through an automatic car wash. The controls for the outside manual mirrors are . The control is on the right. The ignition must be seen from the driver seat. A convex mirror's surface is convex... shaped. Keys, Doors and Windows 2-13 Exterior Mirrors Convex Mirrors Manual Mirrors Power Mirrors { WARNING A convex mirror can be turned to ON/ RUN to adjust the mirrors. Manually fold the mirrors inward to each mirror. To fold, pull the mirror toward the vehicle. ...
Owner's Manual
Page 46
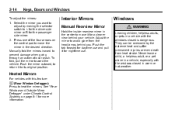
... mirrors inward to its original position. Interior Mirrors Manual Rearview Mirror Hold the inside rearview mirror in the center to move the mirror in the desired direction. Windows { WARNING Leaving children, helpless adults, or ...
... mirrors inward to its original position. Interior Mirrors Manual Rearview Mirror Hold the inside rearview mirror in the center to move the mirror in the desired direction. Windows { WARNING Leaving children, helpless adults, or ...


