Owner's Manual
Page 3
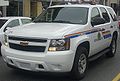
...Box 07130 Detroit, MI 48207 1-800-551-4123 Numéro de poste 6438 de langue française www.helminc.com Index To quickly locate information about the vehicle, use the index in U.S.A. iii Keep this manual can be obtained from your dealer or from: On peut obtenir un ... CHEVROLET Emblem, and the names TAHOE, SUBURBAN, and Z71 are options that you did not purchase or due to changes subsequent to confirm each of the features found . © 2010 General Motors LLC. Litho in the back of the manual. Canadian Owners Propriétaires Canadiens A French language copy of this ...
...Box 07130 Detroit, MI 48207 1-800-551-4123 Numéro de poste 6438 de langue française www.helminc.com Index To quickly locate information about the vehicle, use the index in U.S.A. iii Keep this manual can be obtained from your dealer or from: On peut obtenir un ... CHEVROLET Emblem, and the names TAHOE, SUBURBAN, and Z71 are options that you did not purchase or due to changes subsequent to confirm each of the features found . © 2010 General Motors LLC. Litho in the back of the manual. Canadian Owners Propriétaires Canadiens A French language copy of this ...

Owner's Manual
Page 10
... from outside of the features which can be found later in this owner manual. Press L and release to cancel the panic alarm. Press L again to locate the vehicle. See Keys on page 3‑3 and Remote Keyless Entry (RKE) System Operation on your specific vehicle. Initial Drive Information This section provides a brief...
... from outside of the features which can be found later in this owner manual. Press L and release to cancel the panic alarm. Press L again to locate the vehicle. See Keys on page 3‑3 and Remote Keyless Entry (RKE) System Operation on your specific vehicle. Initial Drive Information This section provides a brief...
Owner's Manual
Page 11
... Vehicle 1. Aim the RKE transmitter at the vehicle and press and hold / until the parking lamps turn signal lamps flash. Press Door Locks There are located on . Q. 3. When the vehicle starts, the parking lamps will turn on and remain on page 3‑8. 1-5 Remote start : . Canceling a Remote Start To cancel a remote start...
... Vehicle 1. Aim the RKE transmitter at the vehicle and press and hold / until the parking lamps turn signal lamps flash. Press Door Locks There are located on . Q. 3. When the vehicle starts, the parking lamps will turn on and remain on page 3‑8. 1-5 Remote start : . Canceling a Remote Start To cancel a remote start...
Owner's Manual
Page 13
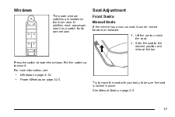
Windows The power window switches are located on page 2‑5. 1-7 Try to move the seat with your body to be moved forward or rearward. 1. See Manual Seats on the driver door. In ...
Windows The power window switches are located on page 2‑5. 1-7 Try to move the seat with your body to be moved forward or rearward. 1. See Manual Seats on the driver door. In ...

Owner's Manual
Page 14
Move the seat forward or rearward by turning the knob forward or rearward. See Power Seats on the outboard side of the front seats. Increase or decrease lumbar support by sliding the control forward or rearward. Raise or lower the entire seat by moving the entire control up or down . Raise or lower the front or rear part of the cushion by moving the front or rear part of the seat. If equipped, the power seat controls are located on page 2‑6. 1-8 Power Seats Manual Lumbar If equipped, this control is located on the outboard side of the control up or down .
Move the seat forward or rearward by turning the knob forward or rearward. See Power Seats on the outboard side of the front seats. Increase or decrease lumbar support by sliding the control forward or rearward. Raise or lower the entire seat by moving the entire control up or down . Raise or lower the front or rear part of the cushion by moving the front or rear part of the seat. If equipped, the power seat controls are located on page 2‑6. 1-8 Power Seats Manual Lumbar If equipped, this control is located on the outboard side of the control up or down .

Owner's Manual
Page 15
To decrease, press and hold the bottom of the control. To decrease, press and hold the rear of the control. To lower, press and hold the bottom of the control. On vehicles with two-way lumbar, press and hold the top of the control to increase lumbar support. To raise the height of the support, press and hold the top of the control. See Power Lumbar on the outboard side of the seat. 1-9 If equipped, this control is located on page 2‑7. Power Lumbar On vehicles with four-way lumbar, press and hold the front of the control to increase lumbar support.
To decrease, press and hold the bottom of the control. To decrease, press and hold the rear of the control. To lower, press and hold the bottom of the control. On vehicles with two-way lumbar, press and hold the top of the control to increase lumbar support. To raise the height of the support, press and hold the top of the control. See Power Lumbar on the outboard side of the seat. 1-9 If equipped, this control is located on page 2‑7. Power Lumbar On vehicles with four-way lumbar, press and hold the front of the control to increase lumbar support.
Owner's Manual
Page 16
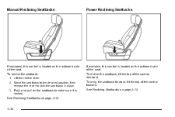
Move the seatback to the desired position, then release the lever to make sure it is located on the outboard side of the seat. Push and pull on the outboard side of the seat. If available, this control is locked. To bring ... 2‑12. See Reclining Seatbacks on page 2‑12. 1-10 Lift the recline lever. 2. Manual Reclining Seatbacks Power Reclining Seatbacks If equipped, this control is located on the seatback to lock the seatback in place. 3.
Move the seatback to the desired position, then release the lever to make sure it is located on the outboard side of the seat. Push and pull on the outboard side of the seat. If available, this control is locked. To bring ... 2‑12. See Reclining Seatbacks on page 2‑12. 1-10 Lift the recline lever. 2. Manual Reclining Seatbacks Power Reclining Seatbacks If equipped, this control is located on the seatback to lock the seatback in place. 3.
Owner's Manual
Page 17
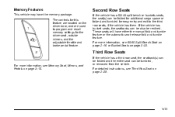
.... Third Row Seats For more information, see 60/40 Split Bench Seat on page 2‑16 or Bucket Seats on the driver door, and are located on page 2‑22. For detailed instructions, see Memory Seat, Mirrors, and Pedals on page 2‑28. 1-11 If the vehicle has bucket seats, the...
.... Third Row Seats For more information, see 60/40 Split Bench Seat on page 2‑16 or Bucket Seats on the driver door, and are located on page 2‑22. For detailed instructions, see Memory Seat, Mirrors, and Pedals on page 2‑28. 1-11 If the vehicle has bucket seats, the...

Owner's Manual
Page 18
z : Press to heat the seatback only. The heated rear seat controls are located on page 2‑16. M : Press to heat the seat cushion and to cycle through the three temperature settings. Rear Seats { (If Equipped): Press to cool ... seatback. See Heated Seats on the Rear Sear Audio (RSA) panel. Head Restraint Adjustment Do not drive until the head restraints for all occupants are located on the driver and passenger doors. See Heated Seats on page 2‑8 and Heated and Cooled Seats on page 2‑3. 1-12 For more information see...
z : Press to heat the seatback only. The heated rear seat controls are located on page 2‑16. M : Press to heat the seat cushion and to cycle through the three temperature settings. Rear Seats { (If Equipped): Press to cool ... seatback. See Heated Seats on the Rear Sear Audio (RSA) panel. Head Restraint Adjustment Do not drive until the head restraints for all occupants are located on the driver and passenger doors. See Heated Seats on page 2‑8 and Heated and Cooled Seats on page 2‑3. 1-12 For more information see...

Owner's Manual
Page 20
See Outside Towing Mirrors on the driver door. 1. Press one of the four arrows located on the control pad to deselect the mirror. 1-14 Press either (A) or (B) again to adjust the mirror. 3. If the vehicle has towing mirrors, they can .... Press (A) or (B) to extend it for a clearer view of the objects behind are seen. Vehicles with manual outside power mirrors and foldaway mirrors have controls located on page 3‑55. Manually pull out the mirror head to select the driver or passenger side mirror. 2.
See Outside Towing Mirrors on the driver door. 1. Press one of the four arrows located on the control pad to deselect the mirror. 1-14 Press either (A) or (B) again to adjust the mirror. 3. If the vehicle has towing mirrors, they can .... Press (A) or (B) to extend it for a clearer view of the objects behind are seen. Vehicles with manual outside power mirrors and foldaway mirrors have controls located on page 3‑55. Manually pull out the mirror head to select the driver or passenger side mirror. 2.
Owner's Manual
Page 22
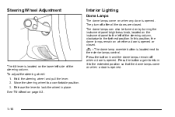
... after all the doors are closed . In this position, the dome lamps remain on the lower left of the steering column. The tilt lever is located on whether a door is opened . Hold the steering wheel and pull the lever. 2. The dome lamps can also be turned on by turning the ...instrument panel brightness knob, located on the instrument panel to the left side of the steering column, clockwise to the extended position so that the dome lamps come on when...
... after all the doors are closed . In this position, the dome lamps remain on the lower left of the steering column. The tilt lever is located on whether a door is opened . Hold the steering wheel and pull the lever. 2. The dome lamps can also be turned on by turning the ...instrument panel brightness knob, located on the instrument panel to the left side of the steering column, clockwise to the extended position so that the dome lamps come on when...

Owner's Manual
Page 23
... about interior lamps, see : ... Instrument Panel Brightness on page 4‑14. Reading Lamps For vehicles with reading lamps in the overhead console, press the button located next to the lamp to the left of the steering wheel. The lamps cannot be adjusted. Dome Lamps on page 4‑14. Exterior Lamps on... page 4‑12. Daytime Running Lamps (DRL) on page 4‑10. O: Turns off position will only work when the vehicle is located on the instrument panel to turn the automatic headlamps or DRL back on. 1-17 For vehicles first sold in other...
... about interior lamps, see : ... Instrument Panel Brightness on page 4‑14. Reading Lamps For vehicles with reading lamps in the overhead console, press the button located next to the lamp to the left of the steering wheel. The lamps cannot be adjusted. Dome Lamps on page 4‑14. Exterior Lamps on... page 4‑12. Daytime Running Lamps (DRL) on page 4‑10. O: Turns off position will only work when the vehicle is located on the instrument panel to turn the automatic headlamps or DRL back on. 1-17 For vehicles first sold in other...
Owner's Manual
Page 26
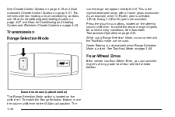
...feature, move the column shift lever to the M. current range will appear next to the M (Manual) position. Press the plus/minus buttons, located on the shift lever. Base trim shown (uplevel similar) The Range Selection Mode switch is the highest attainable range with rear heating and air conditioning...8209;21. See Climate Control System on page 4‑18 and Dual Automatic Climate Control System on page 4‑28. This is located on the steering column shift lever, to all lower gears accessible. For vehicles with all four wheels for current driving conditions. The 1-20
...feature, move the column shift lever to the M. current range will appear next to the M (Manual) position. Press the plus/minus buttons, located on the shift lever. Base trim shown (uplevel similar) The Range Selection Mode switch is the highest attainable range with rear heating and air conditioning...8209;21. See Climate Control System on page 4‑18 and Dual Automatic Climate Control System on page 4‑28. This is located on the steering column shift lever, to all lower gears accessible. For vehicles with all four wheels for current driving conditions. The 1-20

Owner's Manual
Page 27
N (Neutral): Vehicles with a two speed transfer case have a N (Neutral) position. Two Speed Transfer Case Single Speed Transfer Case The transfer case knob is located next to all four wheels. AUTO (Automatic Four-Wheel Drive): This setting is ideal for driving in most off -road in most street and highway ...
N (Neutral): Vehicles with a two speed transfer case have a N (Neutral) position. Two Speed Transfer Case Single Speed Transfer Case The transfer case knob is located next to all four wheels. AUTO (Automatic Four-Wheel Drive): This setting is ideal for driving in most off -road in most street and highway ...
Owner's Manual
Page 28
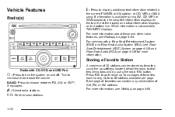
... INFO" displays. For more information. Each page of favorites can contain any combination of 36 stations can be stored as favorites using the six softkeys located below the radio station frequency tabs and by using the radio FAV button. O: Press to six pages of the display and artist information displays on...
... INFO" displays. For more information. Each page of favorites can contain any combination of 36 stations can be stored as favorites using the six softkeys located below the radio station frequency tabs and by using the radio FAV button. O: Press to six pages of the display and artist information displays on...

Owner's Manual
Page 29
... depending on the audio system. Press H to : . . Portable Audio Devices This vehicle may have an auxilliary input, located on the audio faceplate, and a USB port located on the instrument panel or in digital-quality sound. 1-23 External devices such as iPod®, laptop computers, MP3 players,...USB Port: 1. See "Using the Auxiliary Input Jack" and "Using the USB Port" under Radio(s) on page 4‑84. Press the softkey located under any one of programming and commercial-free music, coast-to turn f clockwise or counter‐clockwise. Satellite Radio XM is a satellite radio ...
... depending on the audio system. Press H to : . . Portable Audio Devices This vehicle may have an auxilliary input, located on the audio faceplate, and a USB port located on the instrument panel or in digital-quality sound. 1-23 External devices such as iPod®, laptop computers, MP3 players,...USB Port: 1. See "Using the Auxiliary Input Jack" and "Using the USB Port" under Radio(s) on page 4‑84. Press the softkey located under any one of programming and commercial-free music, coast-to turn f clockwise or counter‐clockwise. Satellite Radio XM is a satellite radio ...
Owner's Manual
Page 31
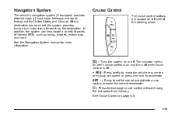
... side of interest (POI), such as banks, airports, restaurants, and more information. In addition, the system can help locate a variety of points of the steering wheel. Cruise Control The cruise control buttons are located on page 4‑8. 1-25 Navigation System The vehicle's navigation system (if equipped) provides detailed maps of most major...
... side of interest (POI), such as banks, airports, restaurants, and more information. In addition, the system can help locate a variety of points of the steering wheel. Cruise Control The cruise control buttons are located on page 4‑8. 1-25 Navigation System The vehicle's navigation system (if equipped) provides detailed maps of most major...

Owner's Manual
Page 32
... be disabled by mud, dirt, snow, ice, slush, or even heavy rainstorms. This message may alert you to vehicles located in your side blind zone. To clean the camera lense, located above the license plate, rinse it with water and wipe it with a soft cloth. The system can be blocked by... pressing the rear park aid disable button located next to provide distance and system information. Rear Vision Camera (RVC) The rear vision camera displays a view of the area behind the vehicle when the...
... be disabled by mud, dirt, snow, ice, slush, or even heavy rainstorms. This message may alert you to vehicles located in your side blind zone. To clean the camera lense, located above the license plate, rinse it with water and wipe it with a soft cloth. The system can be blocked by... pressing the rear park aid disable button located next to provide distance and system information. Rear Vision Camera (RVC) The rear vision camera displays a view of the area behind the vehicle when the...

Owner's Manual
Page 34
... more information, see StabiliTrak® System on page 4‑62. See DIC Warnings and Messages on page 5‑6. 1-28 Sunroof There are two sunroof switches located in difficult driving conditions.
... more information, see StabiliTrak® System on page 4‑62. See DIC Warnings and Messages on page 5‑6. 1-28 Sunroof There are two sunroof switches located in difficult driving conditions.
Owner's Manual
Page 36
...Owner Center The Online Owner Center is a complimentary service that have a current OnStar subscription, press the Q button and the current GPS location will be sent to an OnStar Advisor who are some driving tips to get you the help you are appropriate, use cruise control, if... use either unleaded gasoline or ethanol fuel containing up today at: www.gmownercenter.com/chevrolet (U.S.) or www.gm.ca (Canada). . 1-30 Brake gradually and avoid abrupt stops. Driving for long periods of a new Chevrolet, you need. . ... Avoid idling the engine for Better Fuel Economy Driving habits...
...Owner Center The Online Owner Center is a complimentary service that have a current OnStar subscription, press the Q button and the current GPS location will be sent to an OnStar Advisor who are some driving tips to get you the help you are appropriate, use cruise control, if... use either unleaded gasoline or ethanol fuel containing up today at: www.gmownercenter.com/chevrolet (U.S.) or www.gm.ca (Canada). . 1-30 Brake gradually and avoid abrupt stops. Driving for long periods of a new Chevrolet, you need. . ... Avoid idling the engine for Better Fuel Economy Driving habits...


