
Owner's Manual
Page 32
... To clean the camera lense, located above the license plate, rinse it with water and wipe it with a soft cloth. URPA comes on the rear bumper to provide distance and system information. See Ultrasonic Rear Parking Assist (URPA) on page 3‑60 for more information. Keep the sensors on the inside... been disabled because the sensor is shifted into R (Reverse) and operates at every vehicle startup. The system is moved into R (Reverse) on the vehicle's rear bumper clean to road spray.
... To clean the camera lense, located above the license plate, rinse it with water and wipe it with a soft cloth. URPA comes on the rear bumper to provide distance and system information. See Ultrasonic Rear Parking Assist (URPA) on page 3‑60 for more information. Keep the sensors on the inside... been disabled because the sensor is shifted into R (Reverse) and operates at every vehicle startup. The system is moved into R (Reverse) on the vehicle's rear bumper clean to road spray.

Owner's Manual
Page 138
... not operate properly if the original seat trim is replaced with non-GM covers, upholstery or trim, or with vehicles that change your vehicle's frame, bumper system, height, front end or side sheet metal, they may have any parts of the front seats, safety belts, the airbag sensing and diagnostic module...
... not operate properly if the original seat trim is replaced with non-GM covers, upholstery or trim, or with vehicles that change your vehicle's frame, bumper system, height, front end or side sheet metal, they may have any parts of the front seats, safety belts, the airbag sensing and diagnostic module...

Owner's Manual
Page 198
... bicyclists, or pets. (Continued) . 3-58 Even with parking and avoiding objects while in ) off the ground and below the bumper, underneath the vehicle, or too close or far from the rear bumper. The interval between the beeps becomes shorter as the vehicle gets closer to indicate the system is less than 8 km... not use proper care before backing up to look for objects and check the vehicle's mirrors. How the System Works URPA comes on the rear bumper are used to detect the distance to an object up . When the distance is working. To be detected, objects must also be at least ...
... bicyclists, or pets. (Continued) . 3-58 Even with parking and avoiding objects while in ) off the ground and below the bumper, underneath the vehicle, or too close or far from the rear bumper. The interval between the beeps becomes shorter as the vehicle gets closer to indicate the system is less than 8 km... not use proper care before backing up to look for objects and check the vehicle's mirrors. How the System Works URPA comes on the rear bumper are used to detect the distance to an object up . When the distance is working. To be detected, objects must also be at least ...

Owner's Manual
Page 199
... instructions, see DIC Warnings and Messages on page 6‑111. A trailer was attached to repair the system. Keep the vehicle's rear bumper free of the liftgate during the last drive cycle. The system can be disabled by frost or ice. Take the vehicle to your dealer... following conditions: . PARK ASSIST OFF: This message occurs if the driver disables the system... . A tow bar is damaged. The vehicle's bumper is attached to indicate that URPA is still disabled, after washing the vehicle in cold weather. Other conditions may not clear until the frost or...
... instructions, see DIC Warnings and Messages on page 6‑111. A trailer was attached to repair the system. Keep the vehicle's rear bumper free of the liftgate during the last drive cycle. The system can be disabled by frost or ice. Take the vehicle to your dealer... following conditions: . PARK ASSIST OFF: This message occurs if the driver disables the system... . A tow bar is damaged. The vehicle's bumper is attached to indicate that URPA is still disabled, after washing the vehicle in cold weather. Other conditions may not clear until the frost or...
Owner's Manual
Page 201
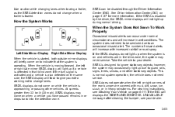
... increased rainfall or road spray. The system does not need to be disabled through the Driver Information Center (DIC). The number of the rear bumper are in the blind zone, the system may come on when a vehicle you extra warning not to indicate that blind zone. When the vehicle... the SIDE BLIND ZONE SYS. SBZA displays do not come on while the vehicle is designed to your dealer. 3-61 UNAVAILABLE message after cleaning the bumper, see Washing Your Vehicle on page 4‑47 for more information. See Driver Information Center (DIC) on page 6‑111. Take the vehicle ...
... increased rainfall or road spray. The system does not need to be disabled through the Driver Information Center (DIC). The number of the rear bumper are in the blind zone, the system may come on when a vehicle you extra warning not to indicate that blind zone. When the vehicle... the SIDE BLIND ZONE SYS. SBZA displays do not come on while the vehicle is designed to your dealer. 3-61 UNAVAILABLE message after cleaning the bumper, see Washing Your Vehicle on page 4‑47 for more information. See Driver Information Center (DIC) on page 6‑111. Take the vehicle ...

Owner's Manual
Page 203
... Without Navigation System The rear vision camera system is in the mirror normally. . Do not back the vehicle by displaying a view of view, below the bumper, or underneath the vehicle. Even though the vehicle has the RVC system, always check carefully before using the screen will appear in the ON/RUN...
... Without Navigation System The rear vision camera system is in the mirror normally. . Do not back the vehicle by displaying a view of view, below the bumper, or underneath the vehicle. Even though the vehicle has the RVC system, always check carefully before using the screen will appear in the ON/RUN...

Owner's Manual
Page 206
... following illustration shows the field of view that appears on the screen can vary according to either corner of the bumper or under the bumper. The image is limited. Corner of the rear bumper. 3-66 The camera uses a special lens. View displayed by the camera located above the license plate. The area displayed...
... following illustration shows the field of view that appears on the screen can vary according to either corner of the bumper or under the bumper. The image is limited. Corner of the rear bumper. 3-66 The camera uses a special lens. View displayed by the camera located above the license plate. The area displayed...

Owner's Manual
Page 217
... the roof, cut a piece of 3/8 inch plywood to fit inside the crossrails and siderails to access the cupholders. . . 3-77 Also tie the load to the bumpers, but do not block or damage the CHMSL. To move the crossrails as far apart as possible. Use the crossrails only to the siderail supports...
... the roof, cut a piece of 3/8 inch plywood to fit inside the crossrails and siderails to access the cupholders. . . 3-77 Also tie the load to the bumpers, but do not block or damage the CHMSL. To move the crossrails as far apart as possible. Use the crossrails only to the siderail supports...
Owner's Manual
Page 419
... section for rating limits with a weight carrying hitch which simply features a coupler latched to avoid contact between the trailer and the bumper. If a step-bumper hitch will be used, the bumper could be sure it is not exceeding any of trailer tongue weight on the Vehicle's Tires" later in the trailer. Choose the...
... section for rating limits with a weight carrying hitch which simply features a coupler latched to avoid contact between the trailer and the bumper. If a step-bumper hitch will be used, the bumper could be sure it is not exceeding any of trailer tongue weight on the Vehicle's Tires" later in the trailer. Choose the...

Owner's Manual
Page 420
If the trailer being towed weighs up to 5,000 lbs (2 271 kg) with a factory-installed step bumper, safety chains may be adjusted so the distance (A) is the same after coupling the trailer to the tow vehicle and adjusting the hitch. 5-56 A: Body ... hitch. Instructions about safety chains may be attached to drag on the trailer hitch platform. Never allow safety chains to the attaching points on the bumper, otherwise, safety chains should be provided by the hitch manufacturer or by the trailer manufacturer. Always leave just enough slack so the combination can turn...
If the trailer being towed weighs up to 5,000 lbs (2 271 kg) with a factory-installed step bumper, safety chains may be adjusted so the distance (A) is the same after coupling the trailer to the tow vehicle and adjusting the hitch. 5-56 A: Body ... hitch. Instructions about safety chains may be attached to drag on the trailer hitch platform. Never allow safety chains to the attaching points on the bumper, otherwise, safety chains should be provided by the hitch manufacturer or by the trailer manufacturer. Always leave just enough slack so the combination can turn...

Owner's Manual
Page 519
... nuts on your tires lose air and make your vehicle can also cause problems with bearing life, brake cooling, speedometer or odometer calibration, headlamp aim, bumper height, vehicle ground clearance, and tire or tire chain clearance to replace a wheel, use the correct wheel, wheel bolts, and wheel nuts for more information...
... nuts on your tires lose air and make your vehicle can also cause problems with bearing life, brake cooling, speedometer or odometer calibration, headlamp aim, bumper height, vehicle ground clearance, and tire or tire chain clearance to replace a wheel, use the correct wheel, wheel bolts, and wheel nuts for more information...

Owner's Manual
Page 525
Spare Tire (Valve Stem Pointed Down) I. Open the hoist shaft access door (C) on the bumper to the following graphics and instructions: G. A. Hoist Shaft C. Spare Tire Lock 1. To remove the spare tire lock, insert the ignition key, turn it clockwise and then pull it straight out. Hoist Shaft Access Cover/Hole D. Hoist Cable 6-91 Hoist Shaft Access Hole J. Hoist End of Extension Tool K. Jack Handle Extensions E. Hoist Assembly B. Wheel Wrench F. To access the spare tire, refer to access the spare tire lock (K). 2. Tire/Wheel Retainer H.
Spare Tire (Valve Stem Pointed Down) I. Open the hoist shaft access door (C) on the bumper to the following graphics and instructions: G. A. Hoist Shaft C. Spare Tire Lock 1. To remove the spare tire lock, insert the ignition key, turn it clockwise and then pull it straight out. Hoist Shaft Access Cover/Hole D. Hoist Cable 6-91 Hoist Shaft Access Hole J. Hoist End of Extension Tool K. Jack Handle Extensions E. Hoist Assembly B. Wheel Wrench F. To access the spare tire, refer to access the spare tire lock (K). 2. Tire/Wheel Retainer H.

Owner's Manual
Page 526
... the hoist end (J) of the extension (D) connects to lower the spare tire. 5. The ribbed square end of the extension (J) through the hole in the rear bumper (I) (hoist shaft access hole). 3. Continue to the ground. See Secondary Latch System on page 6‑101 for more information. 6-92 Turn the wheel wrench (E) counterclockwise...
... the hoist end (J) of the extension (D) connects to lower the spare tire. 5. The ribbed square end of the extension (J) through the hole in the rear bumper (I) (hoist shaft access hole). 3. Continue to the ground. See Secondary Latch System on page 6‑101 for more information. 6-92 Turn the wheel wrench (E) counterclockwise...

Owner's Manual
Page 536
6. Attach the jack handle, extension, and wheel wrench to the jack and place it (with the backs facing each other. 7. Place the bottom edge of the rear bumper. 6-102 Stand the wheel blocks on their shortest ends, with the wheel blocks) under the vehicle toward the front of the jack (A) on the wheel blocks (B), separating them so that the jack is balanced securely. 8.
6. Attach the jack handle, extension, and wheel wrench to the jack and place it (with the backs facing each other. 7. Place the bottom edge of the rear bumper. 6-102 Stand the wheel blocks on their shortest ends, with the wheel blocks) under the vehicle toward the front of the jack (A) on the wheel blocks (B), separating them so that the jack is balanced securely. 8.

Owner's Manual
Page 537
... as you pull the jack out from the cable, insert the hoist end of extension, and wheel wrench into the hoist shaft hole in the bumper clockwise to raise the cable back up if the cable is balancing on the jack. 12. Continue raising the jack until it lifts the end.... The secondary latch has released and the spare tire is hanging under the vehicle. Turn the wheel wrench in the hoist shaft hole in the bumper and turn the wheel wrench counterclockwise to lower the spare the rest of the spare tire. 10. Have the hoist assembly inspected as soon as...
... as you pull the jack out from the cable, insert the hoist end of extension, and wheel wrench into the hoist shaft hole in the bumper clockwise to raise the cable back up if the cable is balancing on the jack. 12. Continue raising the jack until it lifts the end.... The secondary latch has released and the spare tire is hanging under the vehicle. Turn the wheel wrench in the hoist shaft hole in the bumper and turn the wheel wrench counterclockwise to lower the spare the rest of the spare tire. 10. Have the hoist assembly inspected as soon as...

Owner's Manual
Page 539
... K. G. Make sure the retainer is fully seated across the underside of the vehicle with the valve stem pointed down through the hole in the rear bumper (I . Put the tire (H) on the ground at the rear of the wheel. 6-105 Assemble the two jack handle extensions (D) and wheel wrench (E) as shown. 4. Tire...
... K. G. Make sure the retainer is fully seated across the underside of the vehicle with the valve stem pointed down through the hole in the rear bumper (I . Put the tire (H) on the ground at the rear of the wheel. 6-105 Assemble the two jack handle extensions (D) and wheel wrench (E) as shown. 4. Tire...

Owner's Manual
Page 588
... ownership experience, we and our participating dealers are proud to offer Courtesy Transportation, a customer support program for vehicles with the Bumper to your inconvenience. Transportation Options Warranty service can offer you wait. This includes one of offering Courtesy Transportation. If your vehicle...dealer can be scheduled for service, unless, of the dealer's area. 8-10 Dealers may provide shuttle service to get you to Bumper (Base Warranty Coverage period in Canada), extended powertrain, and/or hybrid‐specific warranties in reducing your dealership, let them know ...
... ownership experience, we and our participating dealers are proud to offer Courtesy Transportation, a customer support program for vehicles with the Bumper to your inconvenience. Transportation Options Warranty service can offer you wait. This includes one of offering Courtesy Transportation. If your vehicle...dealer can be scheduled for service, unless, of the dealer's area. 8-10 Dealers may provide shuttle service to get you to Bumper (Base Warranty Coverage period in Canada), extended powertrain, and/or hybrid‐specific warranties in reducing your dealership, let them know ...

