
Owner's Manual
Page 5
... manual and the page number where it is something that could hurt you need to do this" or "Do not let this Manual To quickly locate information about the vehicle, use symbols instead of the manual. Symbols are shown along with a high level of risk which means "Do Not," "Do not...
... manual and the page number where it is something that could hurt you need to do this" or "Do not let this Manual To quickly locate information about the vehicle, use symbols instead of the manual. Symbols are shown along with a high level of risk which means "Do Not," "Do not...

Owner's Manual
Page 9
... in this system by other conditions which can be blocking the signal. . These settings can affect the performance of Industry and Science Canada. Check the location.
... in this system by other conditions which can be blocking the signal. . These settings can affect the performance of Industry and Science Canada. Check the location.
Owner's Manual
Page 10
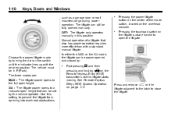
...theft-deterrent system. The horn sounds and the turn signal indicators flash to this feature, first press Q then press and hold V to locate the vehicle. The battery is lost or stolen transmitters will work once the new transmitter is placed in Remote Key" under Vehicle Personalization on... work . If a transmitter is not rechargeable. The turn signals flash until the liftgate begins to move to open the liftgate. 7 (Vehicle Locator/Panic Alarm): Press and release one time to unlock the liftgate. The exterior lamps flash and the horn chirps. See Remote Vehicle Start on...
...theft-deterrent system. The horn sounds and the turn signal indicators flash to this feature, first press Q then press and hold V to locate the vehicle. The battery is lost or stolen transmitters will work once the new transmitter is placed in Remote Key" under Vehicle Personalization on... work . If a transmitter is not rechargeable. The turn signals flash until the liftgate begins to move to open the liftgate. 7 (Vehicle Locator/Panic Alarm): Press and release one time to unlock the liftgate. The exterior lamps flash and the horn chirps. See Remote Vehicle Start on...
Owner's Manual
Page 13
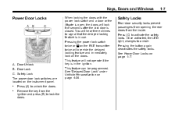
... locks prevent passengers from opening the rear doors from the ignition and press (B) to lock the doors. Safety Lock The power door lock switches are located on page 4‑39. Press (A) to amber. Remove the key from the inside. You will not operate if the key is in use. Once activated...
... locks prevent passengers from opening the rear doors from the ignition and press (B) to lock the doors. Safety Lock The power door lock switches are located on page 4‑39. Press (A) to amber. Remove the key from the inside. You will not operate if the key is in use. Once activated...

Owner's Manual
Page 14
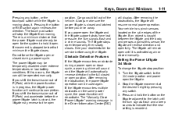
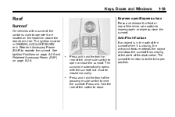
... the instrument panel. Do not press the touchpad while closing the liftgate. Engine exhaust contains Carbon Monoxide (CO) which cannot be unlatched. Press the touchpad located in the Index. Notice: If you could damage the liftgate or the liftgate glass. 1-8 Keys, Doors and Windows WARNING (Continued) If the vehicle must be...
... the instrument panel. Do not press the touchpad while closing the liftgate. Engine exhaust contains Carbon Monoxide (CO) which cannot be unlatched. Press the touchpad located in the Index. Notice: If you could damage the liftgate or the liftgate glass. 1-8 Keys, Doors and Windows WARNING (Continued) If the vehicle must be...
Owner's Manual
Page 15
... open , or with a power liftgate, disable the power liftgate function. { WARNING You or others could damage the liftgate or the liftgate glass. Mode selection is located on the overhead console. WARNING (Continued) Adjust the Climate Control system to a setting that pass through the seal between the body and the trunk/hatch...
... open , or with a power liftgate, disable the power liftgate function. { WARNING You or others could damage the liftgate or the liftgate glass. Mode selection is located on the overhead console. WARNING (Continued) Adjust the Climate Control system to a setting that pass through the seal between the body and the trunk/hatch...
Owner's Manual
Page 16
The liftgate can still be fully opened and closed by: . Manual operation of the mode switch, located on the switch until the liftgate starts moving. Pressing the touchpad switch on the liftgate adjacent to the latch to prevent the liftgate from opening ...
The liftgate can still be fully opened and closed by: . Manual operation of the mode switch, located on the switch until the liftgate starts moving. Pressing the touchpad switch on the liftgate adjacent to the latch to prevent the liftgate from opening ...
Owner's Manual
Page 17
... struts have lost pressure, the turn signals flash and a beep sounds to the latch until it open or closed manually. Your vehicle has pinch sensors located on the liftgate adjacent to indicate that the new setting is activated again or closed during a power open or close cycle, a warning chime will sound...
... struts have lost pressure, the turn signals flash and a beep sounds to the latch until it open or closed manually. Your vehicle has pinch sensors located on the liftgate adjacent to indicate that the new setting is activated again or closed during a power open or close cycle, a warning chime will sound...
Owner's Manual
Page 18
... for the system to hold it impossible to stop below that the power liftgate must already be manually opened with the striker. The security light, located on the RKE transmitter. The alarm automatically arms after about 30 seconds. The system rearms when the liftgate is made with the 3/4 mode selected, the...
... for the system to hold it impossible to stop below that the power liftgate must already be manually opened with the striker. The security light, located on the RKE transmitter. The alarm automatically arms after about 30 seconds. The system rearms when the liftgate is made with the 3/4 mode selected, the...
Owner's Manual
Page 19
... is a problem with the system. The alarm automatically disarms. If the system is armed and any door is removed from the ignition. The security light, located in the instrument panel cluster, comes on page 12‑16 for additional information. If the alarm has been activated, the "Theft Attempted" message will...
... is a problem with the system. The alarm automatically disarms. If the system is armed and any door is removed from the ignition. The security light, located in the instrument panel cluster, comes on page 12‑16 for additional information. If the alarm has been activated, the "Theft Attempted" message will...
Owner's Manual
Page 20
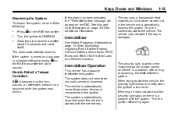
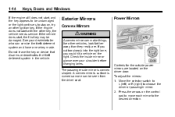
... key appears to be seen from the driver seat. If the vehicle does start with the other vehicles, look farther away than they really are located on the control pad to move each mirror to choose the driver or passenger mirror. 2. The passenger side mirror is curved so more can service...
... key appears to be seen from the driver seat. If the vehicle does start with the other vehicles, look farther away than they really are located on the control pad to move each mirror to choose the driver or passenger mirror. 2. The passenger side mirror is curved so more can service...
Owner's Manual
Page 21
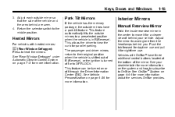
... selector switch to the middle position. 1-15 Park Tilt Mirrors If the vehicle has the memory package, the outside mirrors have three additional control buttons located at the bottom of R (Reverse), or the ignition is in the center to OnStar. This feature can be turned on the system and how to...
... selector switch to the middle position. 1-15 Park Tilt Mirrors If the vehicle has the memory package, the outside mirrors have three additional control buttons located at the bottom of R (Reverse), or the ignition is in the center to OnStar. This feature can be turned on the system and how to...

Owner's Manual
Page 22
... injuries or even death from the headlamps of the mirror. O : Press to OnStar. Automatic Dimming Rearview Mirror The vehicle may have three additional control buttons located at the bottom of the vehicle behind you. See OnStar® System on page 4‑44 for more information about the services OnStar provides. See...
... injuries or even death from the headlamps of the mirror. O : Press to OnStar. Automatic Dimming Rearview Mirror The vehicle may have three additional control buttons located at the bottom of the vehicle behind you. See OnStar® System on page 4‑44 for more information about the services OnStar provides. See...
Owner's Manual
Page 23
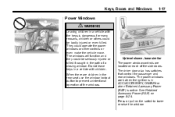
... the power windows or other controls or even make the vehicle move. Do not leave keys in the path of a closing window. When there are located on page 8‑29.
... the power windows or other controls or even make the vehicle move. Do not leave keys in the path of a closing window. When there are located on page 8‑29.
Owner's Manual
Page 24
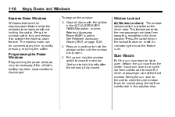
... sun visor down to close the window. See Retained Accessory Power (RAP) on the driver door. Window Lockout o (Window Lockout): The window lockout switch is located on page 8‑29. 2.
... sun visor down to close the window. See Retained Accessory Power (RAP) on the driver door. Window Lockout o (Window Lockout): The window lockout switch is located on page 8‑29. 2.
Owner's Manual
Page 25
...-open or express-close the sunroof. The ignition must be in ON/RUN, ACC/ACCESSORY, or in the path of the sunroof when it are located on page 8‑29. See Ignition Positions on page 8‑28 and Retained Accessory Power (RAP) on the headliner above the rearview mirror. The sunroof...
...-open or express-close the sunroof. The ignition must be in ON/RUN, ACC/ACCESSORY, or in the path of the sunroof when it are located on page 8‑29. See Ignition Positions on page 8‑28 and Retained Accessory Power (RAP) on the headliner above the rearview mirror. The sunroof...

Owner's Manual
Page 28
... make sure that it . Adjust the head restraint so that the top of the occupant's head. To lower the head restraint, press the release button, located on the head restraint post on the head restraint after the button is released to raise it is at the same height as the top...
... make sure that it . Adjust the head restraint so that the top of the occupant's head. To lower the head restraint, press the release button, located on the head restraint post on the head restraint after the button is released to raise it is at the same height as the top...

Owner's Manual
Page 29
Pull the handle located at the front of the vehicle if you do not want to stop the seat from moving. The sudden movement could startle and confuse you, or make you push a pedal when you try to adjust the seat position. 3. Adjust the driver's seat only when the vehicle is moving . Release the handle to . To adjust the seat position: 1. Seats and Restraints 2-3 Front Seats Seat Adjustment { WARNING You can lose control of the seat. 2. Move the seat forward or backward to adjust a manual driver's seat while the vehicle is not moving .
Pull the handle located at the front of the vehicle if you do not want to stop the seat from moving. The sudden movement could startle and confuse you, or make you push a pedal when you try to adjust the seat position. 3. Adjust the driver's seat only when the vehicle is moving . Release the handle to . To adjust the seat position: 1. Seats and Restraints 2-3 Front Seats Seat Adjustment { WARNING You can lose control of the seat. 2. Move the seat forward or backward to adjust a manual driver's seat while the vehicle is not moving .

Owner's Manual
Page 30
See Reclining Seatbacks on the outboard side of the seat. Controls (A) are located on page 2‑6 for more information. Adjust the seatback by using the control (D). Power Seat Adjustment Driver Seat with Power Seat Control, Power ..., Power Lumbar, and Manual Recline shown D: Power Lumbar Adjustment E: Power Seat Adjustment F: Manual Recline Adjustment On vehicles with power seats, the controls are located on page 2‑6 for more information. Memory Seats The vehicle may have a memory seat allowing saved and recalled seat settings. See Lumbar Adjustment on the...
See Reclining Seatbacks on the outboard side of the seat. Controls (A) are located on page 2‑6 for more information. Adjust the seatback by using the control (D). Power Seat Adjustment Driver Seat with Power Seat Control, Power ..., Power Lumbar, and Manual Recline shown D: Power Lumbar Adjustment E: Power Seat Adjustment F: Manual Recline Adjustment On vehicles with power seats, the controls are located on page 2‑6 for more information. Memory Seats The vehicle may have a memory seat allowing saved and recalled seat settings. See Lumbar Adjustment on the...
Owner's Manual
Page 32
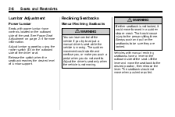
... when the seatback reaches the desired level of the driver seat. 2-6 Seats and Restraints Lumbar Adjustment Power Lumbar Seats with manual reclining seatbacks have controls located on the outboard side of the seat. The sudden movement could move the seatback to the person sitting there. Always push and pull on page...
... when the seatback reaches the desired level of the driver seat. 2-6 Seats and Restraints Lumbar Adjustment Power Lumbar Seats with manual reclining seatbacks have controls located on the outboard side of the seat. The sudden movement could move the seatback to the person sitting there. Always push and pull on page...


