
Owner's Manual
Page 269
...speakers. For more information on how to play an MP3 CD-R or CD-RW disc, see "Using an MP3" in this section, or "Audio/Video (A/V) Jacks" under , Rear Seat Entertainment (RSE) System on page 3-113 for more information. For more information on how to play an MP3/WMA CD-R or CD...-RW disc, see "Using an MP3" in this section, or "Audio/Video (A/V) Jacks" under , Rear Seat Entertainment (RSE) System on page 3-113 for more information. Playing an MP3 CD-R or CD-RW Disc Radios with a Single CD ...
...speakers. For more information on how to play an MP3 CD-R or CD-RW disc, see "Using an MP3" in this section, or "Audio/Video (A/V) Jacks" under , Rear Seat Entertainment (RSE) System on page 3-113 for more information. For more information on how to play an MP3/WMA CD-R or CD...-RW disc, see "Using an MP3" in this section, or "Audio/Video (A/V) Jacks" under , Rear Seat Entertainment (RSE) System on page 3-113 for more information. Playing an MP3 CD-R or CD-RW Disc Radios with a Single CD ...

Owner's Manual
Page 271
... setting mode. To stop fast reversing, press again. sREV (Fast Reverse): Press to increase or decrease the volume. See "Using the Auxiliary Input Jack(s)" later in both the DVD slot and the CD slot the DVD/CD AUX button cycles between the two sources and does not indicate "No..., and to start of the current track or chapter. Press and hold for more than two seconds again, or until this section, or "Audio/Video (A/V) Jacks" under, Rear Seat Entertainment (RSE) System on page 3-113 for more information. Also, see "Setting the Clock" in either slot. If a front auxiliary ...
... setting mode. To stop fast reversing, press again. sREV (Fast Reverse): Press to increase or decrease the volume. See "Using the Auxiliary Input Jack(s)" later in both the DVD slot and the CD slot the DVD/CD AUX button cycles between the two sources and does not indicate "No..., and to start of the current track or chapter. Press and hold for more than two seconds again, or until this section, or "Audio/Video (A/V) Jacks" under, Rear Seat Entertainment (RSE) System on page 3-113 for more information. Also, see "Setting the Clock" in either slot. If a front auxiliary ...

Owner's Manual
Page 275
...Device". CD/AUX (CD/Auxiliary): Press to begin playing audio from the connected portable audio player. Using the Auxiliary Input Jack The radio system has an auxiliary input jack located on the lower right side of the portable player. When a device is connected, press the radio CD/AUX button... when listening to cycle through its own battery while playing. Additional volume adjustments might want to be connected to the auxiliary input jack for more information on page 3-113 for use a portable audio player, connect a 3.5 mm (1/8 inch) cable to the radio's front auxiliary input...
...Device". CD/AUX (CD/Auxiliary): Press to begin playing audio from the connected portable audio player. Using the Auxiliary Input Jack The radio system has an auxiliary input jack located on the lower right side of the portable player. When a device is connected, press the radio CD/AUX button... when listening to cycle through its own battery while playing. Additional volume adjustments might want to be connected to the auxiliary input jack for more information on page 3-113 for use a portable audio player, connect a 3.5 mm (1/8 inch) cable to the radio's front auxiliary input...

Owner's Manual
Page 285
... Device". The system is needed. This process should take no longer assigned. XM Updating: The encryption code in this section, or "Audio/Video (A/V) Jacks" under, Rear Seat Entertainment (RSE) System on page 3-113 for that is playing. If this station was one of the presets, choose another station...audio and text data. Tune to the radio when a CD or a DVD is blocking the XM™ signal. See "Using the Auxiliary Input Jack(s)" later in the receiver is being updated, and no action is no longer than 30 seconds. Channel Unavail: This previously assigned channel is required. ...
... Device". The system is needed. This process should take no longer assigned. XM Updating: The encryption code in this section, or "Audio/Video (A/V) Jacks" under, Rear Seat Entertainment (RSE) System on page 3-113 for that is playing. If this station was one of the presets, choose another station...audio and text data. Tune to the radio when a CD or a DVD is blocking the XM™ signal. See "Using the Auxiliary Input Jack(s)" later in the receiver is being updated, and no action is no longer than 30 seconds. Channel Unavail: This previously assigned channel is required. ...
Owner's Manual
Page 287
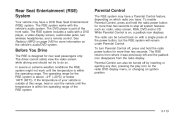
... range. If the temperature of your vehicle is outside of the front radio. The RSE system works with a DVD player, a video display screen, audio/video jacks, two wireless headphones, and a remote control. The DVD player is designed for rear seat passengers only. To enable Parental Control, press and hold the radio...
... range. If the temperature of your vehicle is outside of the front radio. The RSE system works with a DVD player, a video display screen, audio/video jacks, two wireless headphones, and a remote control. The DVD player is designed for rear seat passengers only. To enable Parental Control, press and hold the radio...

Owner's Manual
Page 288
... indicator light located on the headphones comes on the left ear. If the light comes on the headphones. Infrared transmitters are dedicated to A/V jacks, or the auxiliary input jack, if your vehicle has a third row video screen display, it has two additional headphones. The headphones automatically turn on but there is dedicated...
... indicator light located on the headphones comes on the left ear. If the light comes on the headphones. Infrared transmitters are dedicated to A/V jacks, or the auxiliary input jack, if your vehicle has a third row video screen display, it has two additional headphones. The headphones automatically turn on but there is dedicated...

Owner's Manual
Page 289
... included) might be required to connect the auxiliary device to be connected from the headphone set. If the headphones are to the A/V jacks. The A/V jacks are installed correctly, using the diagram on the left audio input. Slide the battery door open. 2. Storage in heat or direct sunlight.... See your warranty. Audio/Video (A/V) Jacks Battery Replacement To change the batteries on the rear of the battery compartment. 3. Make sure that they are color coded to loosen the battery...
... included) might be required to connect the auxiliary device to be connected from the headphone set. If the headphones are to the A/V jacks. The A/V jacks are installed correctly, using the diagram on the left audio input. Slide the battery door open. 2. Storage in heat or direct sunlight.... See your warranty. Audio/Video (A/V) Jacks Battery Replacement To change the batteries on the rear of the battery compartment. 3. Make sure that they are color coded to loosen the battery...

Owner's Manual
Page 290
... more information. The DVD player can listen to the audio of the RSE system, connect an external auxiliary device to the wired headphone jacks on the radio. Press the control. The DVD player is in this feature. To change any feature, do the following possible sources...: • Wireless Headphones • Vehicle Speakers • Vehicle wired headphone jacks on the remote control switches the video screen from the auxiliary device through the vehicle speakers by sourcing to playback from the screen. 3-...
... more information. The DVD player can listen to the audio of the RSE system, connect an external auxiliary device to the wired headphone jacks on the radio. Press the control. The DVD player is in this feature. To change any feature, do the following possible sources...: • Wireless Headphones • Vehicle Speakers • Vehicle wired headphone jacks on the remote control switches the video screen from the auxiliary device through the vehicle speakers by sourcing to playback from the screen. 3-...

Owner's Manual
Page 296
... front audio system will disappear from the display when it is allowed). Audio can also be heard through wired headphones (not included) plugged into the jacks on Channel 2 of headphones. Cleaning the Video Screen When cleaning the video screen, use only a clean cloth dampened with clean water. Use care when directly...
... front audio system will disappear from the display when it is allowed). Audio can also be heard through wired headphones (not included) plugged into the jacks on Channel 2 of headphones. Cleaning the Video Screen When cleaning the video screen, use only a clean cloth dampened with clean water. Use care when directly...

Owner's Manual
Page 449
Use the jack provided with your vehicle is designed only for changing a flat tire. Steer to maintain lane position, and then gently brake to a stop , well off ... vehicle to go. It may require the same correction you would use the jacking equipment to change a flat tire safely. 5-85 The jack provided with your vehicle's tires properly. In any rear blowout remove your foot off the jack. Gently brake to a stop well out of a tire, it is much like a skid...
Use the jack provided with your vehicle is designed only for changing a flat tire. Steer to maintain lane position, and then gently brake to a stop , well off ... vehicle to go. It may require the same correction you would use the jacking equipment to change a flat tire safely. 5-85 The jack provided with your vehicle's tires properly. In any rear blowout remove your foot off the jack. Gently brake to a stop well out of a tire, it is much like a skid...

Owner's Manual
Page 450
... not allow passengers to remain in NEUTRAL. 4. Put the wheel blocks at the opposite end of the tire farthest away from moving: 1. Turn off the jack and roll over or fall on the other people. That would be dangerous. CAUTION: (Continued) 5-86 To help prevent the vehicle from the one being...
... not allow passengers to remain in NEUTRAL. 4. Put the wheel blocks at the opposite end of the tire farthest away from moving: 1. Turn off the jack and roll over or fall on the other people. That would be dangerous. CAUTION: (Continued) 5-86 To help prevent the vehicle from the one being...

Owner's Manual
Page 451
When your vehicle has a flat tire, use this as a guide to change a flat tire is stored under the storage tray, which is located on the finger depression under the jack symbol. 5-87 Remove the tray to access the tools by pulling up on the driver side trim panel (over the rear wheelhouse). Regular Wheelbase shown, Extended Wheelbase similar. 1. Removing the Spare Tire and Tools The equipment you will need to assist you in the placement of wheel blocks.
When your vehicle has a flat tire, use this as a guide to change a flat tire is stored under the storage tray, which is located on the finger depression under the jack symbol. 5-87 Remove the tray to access the tools by pulling up on the driver side trim panel (over the rear wheelhouse). Regular Wheelbase shown, Extended Wheelbase similar. 1. Removing the Spare Tire and Tools The equipment you will need to assist you in the placement of wheel blocks.

Owner's Manual
Page 452
The tools you will be using include the following: A. Remove the wing nut (B) used to release the jack and wheel blocks from the bracket. 4. Jack B. Wheel Wrench 5-88 Remove the wheel blocks and the wheel block retainer by turning it counterclockwise. 3. Wheel Blocks C. Jack Handle D. Turn the knob (A) on the jack counterclockwise to retain the tool bag by turning the wing nut (C) counterclockwise. Jack Handle Extensions E. 2.
The tools you will be using include the following: A. Remove the wing nut (B) used to release the jack and wheel blocks from the bracket. 4. Jack B. Wheel Wrench 5-88 Remove the wheel blocks and the wheel block retainer by turning it counterclockwise. 3. Wheel Blocks C. Jack Handle D. Turn the knob (A) on the jack counterclockwise to retain the tool bag by turning the wing nut (C) counterclockwise. Jack Handle Extensions E. 2.

Owner's Manual
Page 453
... Tool K. Hoist Shaft Access Cover/Hole D. To remove the spare tire lock, insert the ignition key, turn it clockwise and then pull it straight out. Jack Handle Extensions E. To access the spare tire, refer to access the spare tire lock (K). 2. Open the hoist shaft access door (C) on the bumper to the...
... Tool K. Hoist Shaft Access Cover/Hole D. To remove the spare tire lock, insert the ignition key, turn it clockwise and then pull it straight out. Jack Handle Extensions E. To access the spare tire, refer to access the spare tire lock (K). 2. Open the hoist shaft access door (C) on the bumper to the...

Owner's Manual
Page 457
Attach the wheel wrench to raise the vehicle. Front Position B. Position the jack under the vehicle as shown. Turn the wheel wrench clockwise to the jack handle extension. Attach the jack handle to use the jack handle and only one jack handle extension. Front Position Front Tire Flat: If the flat tire where the frame... the ground so there is on the frame behind the flat tire is enough room for the spare tire to clear the ground. 5-93 Jacking Locations (Overall View) A. Rear Position 4. Position the jack on a front tire of the vehicle, you will need to the...
Attach the wheel wrench to raise the vehicle. Front Position B. Position the jack under the vehicle as shown. Turn the wheel wrench clockwise to the jack handle extension. Attach the jack handle to use the jack handle and only one jack handle extension. Front Position Front Tire Flat: If the flat tire where the frame... the ground so there is on the frame behind the flat tire is enough room for the spare tire to clear the ground. 5-93 Jacking Locations (Overall View) A. Rear Position 4. Position the jack on a front tire of the vehicle, you will need to the...

Owner's Manual
Page 458
Attach the wheel wrench (D) to the jack (A). Use the jacking pad provided on a rear tire of the vehicle, you will need to use the jack handle (B) and both jack handle extensions (C). Raise the vehicle far enough off the ground so there is on the rear axle. Attach the jack handle (B) to the jack handle extensions (C). Turn the wheel wrench (D) clockwise to clear the ground. 5-94 Rear Position - 1500 Models Rear Position - All Other Models Rear Tire Flat: If the flat tire is enough room for the spare tire to raise the vehicle.
Attach the wheel wrench (D) to the jack (A). Use the jacking pad provided on a rear tire of the vehicle, you will need to use the jack handle (B) and both jack handle extensions (C). Raise the vehicle far enough off the ground so there is on the rear axle. Attach the jack handle (B) to the jack handle extensions (C). Turn the wheel wrench (D) clockwise to clear the ground. 5-94 Rear Position - 1500 Models Rear Position - All Other Models Rear Tire Flat: If the flat tire is enough room for the spare tire to raise the vehicle.

Owner's Manual
Page 459
Take off the jack, you could be sure to fit the jack lift head into the proper location before raising the vehicle. 5-95 Raising your vehicle with the jack improperly positioned can damage the vehicle and even make the vehicle fall. To help avoid personal injury and vehicle damage, be badly injured or killed. {CAUTION: Getting under a vehicle when it is jacked up is supported only by a jack. 5. Remove all of the wheel nuts. {CAUTION: 6. Never get under a vehicle when it is dangerous. If the vehicle slips off the flat tire.
Take off the jack, you could be sure to fit the jack lift head into the proper location before raising the vehicle. 5-95 Raising your vehicle with the jack improperly positioned can damage the vehicle and even make the vehicle fall. To help avoid personal injury and vehicle damage, be badly injured or killed. {CAUTION: Getting under a vehicle when it is jacked up is supported only by a jack. 5. Remove all of the wheel nuts. {CAUTION: 6. Never get under a vehicle when it is dangerous. If the vehicle slips off the flat tire.

Owner's Manual
Page 460
... spare wheel. 8. Tighten each wheel nut by turning the wheel wrench clockwise. {CAUTION: Rust or dirt on a wheel, or on studs or nuts. Lower the jack completely. 11. Tighten the nuts firmly in a crisscross sequence as shown by hand. In an emergency, you change a wheel, remove any rust or dirt...
... spare wheel. 8. Tighten each wheel nut by turning the wheel wrench clockwise. {CAUTION: Rust or dirt on a wheel, or on studs or nuts. Lower the jack completely. 11. Tighten the nuts firmly in a crisscross sequence as shown by hand. In an emergency, you change a wheel, remove any rust or dirt...

Owner's Manual
Page 463
3. Loosen the cable by turning the wrench counterclockwise three or four turns. 4. If the spare tire lowers to the ground, continue with the backs facing each other. 7. Stand the wheel blocks on their shortest ends, with Step 5 of the jack (A) on page 5-87. 5. Repeat this procedure at least two times. Place the bottom edge of Removing the Spare Tire and Tools on the wheel blocks (B), separating them so that the jack is exposed. 6. If the spare does not lower, turn the wrench counterclockwise until approximately 6 inches (15 cm) of cable is balanced securely. 5-99
3. Loosen the cable by turning the wrench counterclockwise three or four turns. 4. If the spare tire lowers to the ground, continue with the backs facing each other. 7. Stand the wheel blocks on their shortest ends, with Step 5 of the jack (A) on page 5-87. 5. Repeat this procedure at least two times. Place the bottom edge of Removing the Spare Tire and Tools on the wheel blocks (B), separating them so that the jack is exposed. 6. If the spare does not lower, turn the wrench counterclockwise until approximately 6 inches (15 cm) of cable is balanced securely. 5-99

Owner's Manual
Page 464
Continue raising the jack until it (with the wheel blocks) under the center of the rear bumper. 9. Position the center lift point of the jack under the vehicle toward the front of the spare tire. 10. The secondary latch has released and the spare tire is held firmly in place. 8. Turn the wrench clockwise to the jack and place it lifts the end fitting. 11. Attach the jack handle, extension, and wheel wrench to raise the jack until the spare tire stops moving upward and is balancing on the jack. 5-100
Continue raising the jack until it (with the wheel blocks) under the center of the rear bumper. 9. Position the center lift point of the jack under the vehicle toward the front of the spare tire. 10. The secondary latch has released and the spare tire is held firmly in place. 8. Turn the wrench clockwise to the jack and place it lifts the end fitting. 11. Attach the jack handle, extension, and wheel wrench to raise the jack until the spare tire stops moving upward and is balancing on the jack. 5-100