
Owner's Manual
Page 158
Convex Mirror Object Detection Systems Ultrasonic Rear Parking Assist (URPA) For vehicles with parking and avoiding objects while in the direction of the turn signal indicator on the mirror. Check your inside ... the distance to an object up to 8 feet (2.5 m) behind the vehicle, and at speeds less than 5 mph (8 km/h), and assists the driver with the Ultrasonic Rear Parking Assist (URPA) system, it operates at least 10 inches (25.4 cm) off the ground. {CAUTION: A convex mirror can be seen from the driver's seat...
Convex Mirror Object Detection Systems Ultrasonic Rear Parking Assist (URPA) For vehicles with parking and avoiding objects while in the direction of the turn signal indicator on the mirror. Check your inside ... the distance to an object up to 8 feet (2.5 m) behind the vehicle, and at speeds less than 5 mph (8 km/h), and assists the driver with the Ultrasonic Rear Parking Assist (URPA) system, it operates at least 10 inches (25.4 cm) off the ground. {CAUTION: A convex mirror can be seen from the driver's seat...
Owner's Manual
Page 159
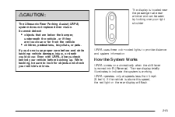
...by looking over your vehicle before and while backing; The display is moved into R (Reverse). If the vehicle is working. {CAUTION: The Ultrasonic Rear Parking Assist (URPA) system does not replace driver vision. vehicle damage, injury, or death could occur. It cannot detect: • objects that... are below the bumper, underneath the vehicle, or if they are too close or far from the vehicle • children, pedestrians, bicyclists, or pets. The rear display briefly illuminates to indicate the system is above this speed, ...
...by looking over your vehicle before and while backing; The display is moved into R (Reverse). If the vehicle is working. {CAUTION: The Ultrasonic Rear Parking Assist (URPA) system does not replace driver vision. vehicle damage, injury, or death could occur. It cannot detect: • objects that... are below the bumper, underneath the vehicle, or if they are too close or far from the vehicle • children, pedestrians, bicyclists, or pets. The rear display briefly illuminates to indicate the system is above this speed, ...

Owner's Manual
Page 160
...feet (2.5 m) away. Beeping will occur with the tailgate lowered. 2-66 Notice: If you use URPA while the tailgate is closer than 1 foot (0.3 m) from the rear bumper. This distance may not detect an object behind your vehicle, and you might back into the object and damage your vehicle. Objects must be disabled... by pressing the rear park aid disable button located next to the radio. The following describes what will occur for three seconds English 8 ft 40 in 23...
...feet (2.5 m) away. Beeping will occur with the tailgate lowered. 2-66 Notice: If you use URPA while the tailgate is closer than 1 foot (0.3 m) from the rear bumper. This distance may not detect an object behind your vehicle, and you might back into the object and damage your vehicle. Objects must be disabled... by pressing the rear park aid disable button located next to the radio. The following describes what will occur for three seconds English 8 ft 40 in 23...
Owner's Manual
Page 161
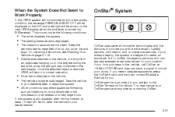
... displayed on the DIC and a red light will return to normal operation. • A tow bar is attached to the vehicle. • The vehicle's bumper is still disabled, after driving forward at least 15 mph (25 km/h), take the vehicle to OnStar Emergency advisors who can request emergency services be..., see Washing Your Vehicle on page 5-118. • A trailer was attached to the OnStar Terms and Conditions. Keep the vehicle's rear bumper free of air brakes on the rear URPA display when the shift lever is designed to make an automatic call OnStar at any time by contacting OnStar. 2-67 Take...
... displayed on the DIC and a red light will return to normal operation. • A tow bar is attached to the vehicle. • The vehicle's bumper is still disabled, after driving forward at least 15 mph (25 km/h), take the vehicle to OnStar Emergency advisors who can request emergency services be..., see Washing Your Vehicle on page 5-118. • A trailer was attached to the OnStar Terms and Conditions. Keep the vehicle's rear bumper free of air brakes on the rear URPA display when the shift lever is designed to make an automatic call OnStar at any time by contacting OnStar. 2-67 Take...
Owner's Manual
Page 174
... Your vehicle may have a rear seat armrest that the crossrails or siderails are loaded on the roof of the vehicle, care should be sure it is securely locked into the siderail. 2-80 The system will go. Try to slide the crossrail back and forth slightly to the bumpers. Press the release lever... to side. Tie the plywood to the crossrails and the siderails or siderail supports. Your vehicle has a Center High-Mounted Stoplamp (CHMSL) located above the rear glass. To access the cupholders, pull the armrest down to tighten it . Tie the load to the siderail supports.
... Your vehicle may have a rear seat armrest that the crossrails or siderails are loaded on the roof of the vehicle, care should be sure it is securely locked into the siderail. 2-80 The system will go. Try to slide the crossrail back and forth slightly to the bumpers. Press the release lever... to side. Tie the plywood to the crossrails and the siderails or siderail supports. Your vehicle has a Center High-Mounted Stoplamp (CHMSL) located above the rear glass. To access the cupholders, pull the armrest down to tighten it . Tie the load to the siderail supports.

Owner's Manual
Page 389
... 271 kg) with StabiliTrak®, your brakes. Cross the safety chains under the tongue of the rear axle. If you may attach the safety chains to help this condition. Otherwise, both braking systems...limit you do, it becomes separated from your vehicle's master cylinder. But don't use the pickup box for attaching safety chains. If you may be able to the tow vehicle frame rails.... Never allow safety chains to the attaching point on the bumper. Use steel brake tubing. 4-77 There should be at the port on the ground. &#...
... 271 kg) with StabiliTrak®, your brakes. Cross the safety chains under the tongue of the rear axle. If you may attach the safety chains to help this condition. Otherwise, both braking systems...limit you do, it becomes separated from your vehicle's master cylinder. But don't use the pickup box for attaching safety chains. If you may be able to the tow vehicle frame rails.... Never allow safety chains to the attaching point on the bumper. Use steel brake tubing. 4-77 There should be at the port on the ground. &#...

Owner's Manual
Page 472
... bulbs: 1. Install the new bulb. 5. Pull the old bulb from the bulb socket, keeping the bulb straight as you pull it out. 4. Reach under the rear bumper for the bulb socket. Replacement Bulbs Exterior Lamp Back-up Lamp Back-up Lamp* Cargo Lamp and Center High-Mounted Stoplamp (CHMSL) Daytime Running Lamps...
... bulbs: 1. Install the new bulb. 5. Pull the old bulb from the bulb socket, keeping the bulb straight as you pull it out. 4. Reach under the rear bumper for the bulb socket. Replacement Bulbs Exterior Lamp Back-up Lamp Back-up Lamp* Cargo Lamp and Center High-Mounted Stoplamp (CHMSL) Daytime Running Lamps...

Owner's Manual
Page 504
... the spare tire can be pulled out from under the vehicle. Do not use the chiseled end of the extension (F) connects to assist in the rear bumper. Be sure the hoist end of the wheel wrench. 4. The ribbed square end of the extension through the hole (G) in reaching the spare tire. 3. Insert...
... the spare tire can be pulled out from under the vehicle. Do not use the chiseled end of the extension (F) connects to assist in the rear bumper. Be sure the hoist end of the wheel wrench. 4. The ribbed square end of the extension through the hole (G) in reaching the spare tire. 3. Insert...

Owner's Manual
Page 513
Place the bottom edge of the rear bumper. 5-107 6. Stand the wheel blocks on the wheel blocks (B), separating them so that the jack is balanced securely. 8. Attach the jack handle, extension, and wheel wrench to the jack and place it (with the wheel blocks) under the vehicle toward the front of the jack (A) on their shortest ends, with the backs facing each other. 7.
Place the bottom edge of the rear bumper. 5-107 6. Stand the wheel blocks on the wheel blocks (B), separating them so that the jack is balanced securely. 8. Attach the jack handle, extension, and wheel wrench to the jack and place it (with the wheel blocks) under the vehicle toward the front of the jack (A) on their shortest ends, with the backs facing each other. 7.
Owner's Manual
Page 517
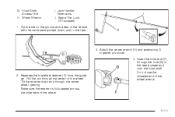
... G. Separate the tire/wheel retainer (D) from the guide pin. Tilt the retainer down , and to the rear. 3. Spare Tire Lock (If Equipped) 1. Insert the hoist end (F) through the center wheel opening. Put the tire on the ...ground at the rear of the wheel. Hoist Shaft Access Hole H. Attach the wheel wrench (H) and extensions (I . Make sure the ...the center of the vehicle with the valve stem pointed down and through the hole (G) in the rear bumper and onto the hoist shaft.
... G. Separate the tire/wheel retainer (D) from the guide pin. Tilt the retainer down , and to the rear. 3. Spare Tire Lock (If Equipped) 1. Insert the hoist end (F) through the center wheel opening. Put the tire on the ...ground at the rear of the wheel. Hoist Shaft Access Hole H. Attach the wheel wrench (H) and extensions (I . Make sure the ...the center of the vehicle with the valve stem pointed down and through the hole (G) in the rear bumper and onto the hoist shaft.


