
Owner's Manual
Page 1
2008 Chevrolet Silverado Owner Manual Seats and Restraint Systems ...1-1 Front Seats ...1-2 Rear Seats ...1-12 Safety Belts ...1-14 Child Restraints ...1-35 Airbag System ...1-69 Restraint System Check... ...2-22 Mirrors ...2-56 Object Detection Systems ...2-64 OnStar® System ...2-67 Universal Home Remote System ...2-71 Storage Areas ...2-78 Sunroof ...2-82 Instrument Panel ...3-1 Instrument Panel Overview ...3-4 Climate Controls ...3-25 Warning Lights, Gages, and Indicators ...3-36 Driver Information Center (DIC) ...3-56 Audio System(s) ...3-84 M Driving Your Vehicle ...4-1 Your Driving, ...
2008 Chevrolet Silverado Owner Manual Seats and Restraint Systems ...1-1 Front Seats ...1-2 Rear Seats ...1-12 Safety Belts ...1-14 Child Restraints ...1-35 Airbag System ...1-69 Restraint System Check... ...2-22 Mirrors ...2-56 Object Detection Systems ...2-64 OnStar® System ...2-67 Universal Home Remote System ...2-71 Storage Areas ...2-78 Sunroof ...2-82 Instrument Panel ...3-1 Instrument Panel Overview ...3-4 Climate Controls ...3-25 Warning Lights, Gages, and Indicators ...3-36 Driver Information Center (DIC) ...3-56 Audio System(s) ...3-84 M Driving Your Vehicle ...4-1 Your Driving, ...

Owner's Manual
Page 179
... Charging System Light ...3-45 Voltmeter Gage ...3-45 Brake System Warning Light ...3-46 Anti-lock Brake System (ABS) Warning Light ...3-47 3-1 Instrument Panel Overview ...3-4 Instrument Panel Overview (Base/Uplevel version) ...3-4 Instrument Panel Overview (Premium version) ...3-6 Hazard Warning Flashers ...3-8 Other Warning Devices ...3-8 Horn ...3-8 Tilt Wheel ...3-8 Turn Signal/Multifunction Lever ...3-9 Turn and Lane-Change Signals ...3-10...
... Charging System Light ...3-45 Voltmeter Gage ...3-45 Brake System Warning Light ...3-46 Anti-lock Brake System (ABS) Warning Light ...3-47 3-1 Instrument Panel Overview ...3-4 Instrument Panel Overview (Base/Uplevel version) ...3-4 Instrument Panel Overview (Premium version) ...3-6 Hazard Warning Flashers ...3-8 Other Warning Devices ...3-8 Horn ...3-8 Tilt Wheel ...3-8 Turn Signal/Multifunction Lever ...3-9 Turn and Lane-Change Signals ...3-10...

Owner's Manual
Page 182
Air Outlets. See Turn Signal/Multifunction Lever on page 3-35. 3-4 B. Instrument Panel Overview Instrument Panel Overview (Base/Uplevel version) The main components of the instrument panel are the following: A. See Outlet Adjustment on page 3-9. Turn Signal/Multifunction Lever.
Air Outlets. See Turn Signal/Multifunction Lever on page 3-35. 3-4 B. Instrument Panel Overview Instrument Panel Overview (Base/Uplevel version) The main components of the instrument panel are the following: A. See Outlet Adjustment on page 3-9. Turn Signal/Multifunction Lever.

Owner's Manual
Page 184
See Turn Signal/Multifunction Lever on page 3-37. Instrument Panel Overview (Premium version) A. B. Turn Signal/Multifunction Lever. See Instrument Panel Cluster on page 3-9. Air Outlets. C. See Outlet Adjustment on page 3-8. 3-6 Hazard Warning Flasher Button. See Hazard Warning Flashers on page 3-35. Instrument Panel Cluster. D.
See Turn Signal/Multifunction Lever on page 3-37. Instrument Panel Overview (Premium version) A. B. Turn Signal/Multifunction Lever. See Instrument Panel Cluster on page 3-9. Air Outlets. C. See Outlet Adjustment on page 3-8. 3-6 Hazard Warning Flasher Button. See Hazard Warning Flashers on page 3-35. Instrument Panel Cluster. D.

Owner's Manual
Page 253
... transmission fluid temperature high can damage the transmission. Move the turn signal is left on page 5-14 for more information. 3-75 See Engine Compartment Overview on for 3/4 of the windshield washer fluid reservoir. TRANSMISSION HOT IDLE ENGINE Notice: If you drive your vehicle while the transmission fluid is...
... transmission fluid temperature high can damage the transmission. Move the turn signal is left on page 5-14 for more information. 3-75 See Engine Compartment Overview on for 3/4 of the windshield washer fluid reservoir. TRANSMISSION HOT IDLE ENGINE Notice: If you drive your vehicle while the transmission fluid is...
Owner's Manual
Page 392
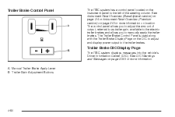
... more information. Manual Trailer Brake Apply Lever B. The control panel allows you to manually apply the trailer brakes. A. See Instrument Panel Overview (Base/Uplevel version) on page 3-4 or Instrument Panel Overview (Premium version) on page 3-6 for more information on location. Trailer Brake DIC Display Page The ITBC system displays messages into the...
... more information. Manual Trailer Brake Apply Lever B. The control panel allows you to manually apply the trailer brakes. A. See Instrument Panel Overview (Base/Uplevel version) on page 3-4 or Instrument Panel Overview (Premium version) on page 3-6 for more information on location. Trailer Brake DIC Display Page The ITBC system displays messages into the...
Owner's Manual
Page 407
...% Ethanol) ...5-8 Fuels in Foreign Countries ...5-9 Filling the Tank ...5-10 Filling a Portable Fuel Container ...5-12 Checking Things Under the Hood ...5-12 Hood Release ...5-13 Engine Compartment Overview ...5-14 Engine Oil (Gasoline Engine) ...5-15 Engine Oil Life System ...5-18 Engine Air Cleaner/Filter (Gasoline Engines) ...5-20 Automatic Transmission Fluid (6-Speed Transmission) ...5-22 5-1
...% Ethanol) ...5-8 Fuels in Foreign Countries ...5-9 Filling the Tank ...5-10 Filling a Portable Fuel Container ...5-12 Checking Things Under the Hood ...5-12 Hood Release ...5-13 Engine Compartment Overview ...5-14 Engine Oil (Gasoline Engine) ...5-15 Engine Oil Life System ...5-18 Engine Air Cleaner/Filter (Gasoline Engines) ...5-20 Automatic Transmission Fluid (6-Speed Transmission) ...5-22 5-1

Owner's Manual
Page 420
Engine Compartment Overview If your vehicle has the DURAMAX® Diesel engine, see : 5-14 When you open the hood on the 5.3L engine (4.3L, 4.8L and 6.0L similar), this is what you will see the DURAMAX® Diesel manual for more information.
Engine Compartment Overview If your vehicle has the DURAMAX® Diesel engine, see : 5-14 When you open the hood on the 5.3L engine (4.3L, 4.8L and 6.0L similar), this is what you will see the DURAMAX® Diesel manual for more information.

Owner's Manual
Page 421
...) on page 5-14 for the location of the engine oil dipstick. 1. D. Battery. Remote Negative (−) Terminal (Out of View). Engine Cooling Fan. See Engine Compartment Overview on page 5-20. Positive (+) Terminal. See "Checking the Fluid Level" under Windshield Washer Fluid on page 5-46. Power Steering Fluid Reservoir. L. B. F. See "Checking Engine Oil...
...) on page 5-14 for the location of the engine oil dipstick. 1. D. Battery. Remote Negative (−) Terminal (Out of View). Engine Cooling Fan. See Engine Compartment Overview on page 5-20. Positive (+) Terminal. See "Checking the Fluid Level" under Windshield Washer Fluid on page 5-46. Power Steering Fluid Reservoir. L. B. F. See "Checking Engine Oil...

Owner's Manual
Page 422
... capacity, see Capacities and Specifications on page 5-14 for the location of the recommended oil. When to Add Engine Oil See Engine Compartment Overview on page 5-133. If the engine has so much oil. If the oil is below the cross-hatched area at the tip of the dipstick...
... capacity, see Capacities and Specifications on page 5-14 for the location of the recommended oil. When to Add Engine Oil See Engine Compartment Overview on page 5-133. If the engine has so much oil. If the oil is below the cross-hatched area at the tip of the dipstick...

Owner's Manual
Page 426
See Engine Compartment Overview on page 6-4 for more information. When to Inspect the Engine Air Cleaner/Filter If your vehicle has a diesel engine, see "Pickup Models" under "Engine Air Cleaner/Filter" in dusty/dirty conditions, inspect the filter at the first oil change after each engine oil change ...
See Engine Compartment Overview on page 6-4 for more information. When to Inspect the Engine Air Cleaner/Filter If your vehicle has a diesel engine, see "Pickup Models" under "Engine Air Cleaner/Filter" in dusty/dirty conditions, inspect the filter at the first oil change after each engine oil change ...

Owner's Manual
Page 427
Loosen the four screws on page 5-14. See Steps 1 through 7. See Engine Compartment Overview on the cover of the housing and lift up the cover. 5-21 Locate the air cleaner/filter assembly. If the engine air cleaner/fi...
Loosen the four screws on page 5-14. See Steps 1 through 7. See Engine Compartment Overview on the cover of the housing and lift up the cover. 5-21 Locate the air cleaner/filter assembly. If the engine air cleaner/fi...

Owner's Manual
Page 430
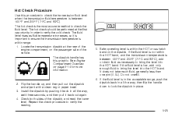
... much fluid, generally less than one pint (0.5L). Check both sides of the vehicle. Repeat the check procedure to 93°C). 7. See Engine Compartment Overview on the passenger side of the dipstick, and read the lower level. Perform a hot check at the first opportunity after the transmission reaches a normal...
... much fluid, generally less than one pint (0.5L). Check both sides of the vehicle. Repeat the check procedure to 93°C). 7. See Engine Compartment Overview on the passenger side of the dipstick, and read the lower level. Perform a hot check at the first opportunity after the transmission reaches a normal...
Owner's Manual
Page 431
... should be performed at the rear of the engine compartment, on the passenger side of the dipstick, and read the lower level. See Engine Compartment Overview on the dipstick. If the fluid level is not within the HOT band, and the transmission temperature is between 160°F and 200°...
... should be performed at the rear of the engine compartment, on the passenger side of the dipstick, and read the lower level. See Engine Compartment Overview on the dipstick. If the fluid level is not within the HOT band, and the transmission temperature is between 160°F and 200°...

Owner's Manual
Page 433
... temperature gage moves and then remains steady for about 15 miles (24 km) when outside temperatures are above 50°F (10°C). See Engine Compartment Overview on a level place.
... temperature gage moves and then remains steady for about 15 miles (24 km) when outside temperatures are above 50°F (10°C). See Engine Compartment Overview on a level place.

Owner's Manual
Page 437
... on page 5-35 for more coolant, add the proper DEX-COOL® coolant mixture at the FULL COLD mark on engine coolant. See Engine Compartment Overview on page 5-14 for more information. {CAUTION: Turning the surge tank pressure cap when the engine and radiator are low on the coolant surge tank...
... on page 5-35 for more coolant, add the proper DEX-COOL® coolant mixture at the FULL COLD mark on engine coolant. See Engine Compartment Overview on page 5-14 for more information. {CAUTION: Turning the surge tank pressure cap when the engine and radiator are low on the coolant surge tank...

Owner's Manual
Page 438
... vehicle until there is cool. See Engine Coolant Temperature Gage on page 3-66. 5-32 See DIC Warnings and Messages on page 3-48. See Engine Compartment Overview on page 5-14 for information on the coolant surge tank. If Steam Is Coming From Your Engine {CAUTION: Steam from the engine if you just...
... vehicle until there is cool. See Engine Coolant Temperature Gage on page 3-66. 5-32 See DIC Warnings and Messages on page 3-48. See Engine Compartment Overview on page 5-14 for information on the coolant surge tank. If Steam Is Coming From Your Engine {CAUTION: Steam from the engine if you just...

Owner's Manual
Page 447
... fluid. Unscrew the cap and wipe the dipstick with a clean rag. 4. Replace the cap and completely tighten it. 5. Power Steering Fluid See Engine Compartment Overview on page 6-14. Turn the key off and let the engine compartment cool down. 2. A fluid loss in this system could indicate a problem. How to...
... fluid. Unscrew the cap and wipe the dipstick with a clean rag. 4. Replace the cap and completely tighten it. 5. Power Steering Fluid See Engine Compartment Overview on page 6-14. Turn the key off and let the engine compartment cool down. 2. A fluid loss in this system could indicate a problem. How to...

Owner's Manual
Page 448
... washer fluid. Open the cap with ready-to-use . It can cause the solution to the windshield washer fluid reservoir. See Engine Compartment Overview on it is full. Water can damage the vehicle's windshield washer system and paint. 5-42 This allows for 15 seconds at the start of the...
... washer fluid. Open the cap with ready-to-use . It can cause the solution to the windshield washer fluid reservoir. See Engine Compartment Overview on it is full. Water can damage the vehicle's windshield washer system and paint. 5-42 This allows for 15 seconds at the start of the...

Owner's Manual
Page 449
.... The other reason is that sooner or later the brakes will burn if the engine is done on the brake hydraulic system. See Engine Compartment Overview on page 6-4. Add or remove brake fluid, as necessary, only when work is done on the engine. See "Checking Brake Fluid" in , the fl...
.... The other reason is that sooner or later the brakes will burn if the engine is done on the brake hydraulic system. See Engine Compartment Overview on page 6-4. Add or remove brake fluid, as necessary, only when work is done on the engine. See "Checking Brake Fluid" in , the fl...