

Owner's Manual
Page 6
Lift the bar to adjust a manual driver's seat while the vehicle is moving . Slide the seat to the desired position and release the bar. {CAUTION: You can lose control of the vehicle if you do not want to be sure the seat is not moving . Front Seats Manual Seats To move the seat with your body to . Try to move a manual seat forward or rearward: 1. The sudden movement could startle and confuse you, or make you push a pedal when you try to unlock the seat. 2. Adjust the driver's seat only when the vehicle is locked in place. 1-2
Lift the bar to adjust a manual driver's seat while the vehicle is moving . Slide the seat to the desired position and release the bar. {CAUTION: You can lose control of the vehicle if you do not want to be sure the seat is not moving . Front Seats Manual Seats To move the seat with your body to . Try to move a manual seat forward or rearward: 1. The sudden movement could startle and confuse you, or make you push a pedal when you try to unlock the seat. 2. Adjust the driver's seat only when the vehicle is locked in place. 1-2

Owner's Manual
Page 13
... make sure it , receiving neck or other injuries. To recline the seatback: 1. The shoulder belt cannot do its job. The belt forces would be dangerous. Lift the recline lever. 2. Manual Reclining Seatbacks {CAUTION: Sitting in a reclined position when your vehicle is in the seat and wear your safety belt properly. In...
... make sure it , receiving neck or other injuries. To recline the seatback: 1. The shoulder belt cannot do its job. The belt forces would be dangerous. Lift the recline lever. 2. Manual Reclining Seatbacks {CAUTION: Sitting in a reclined position when your vehicle is in the seat and wear your safety belt properly. In...
Owner's Manual
Page 14
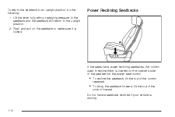
... is moving. 1-10 To return the seatback to the upright position. 2. Power Reclining Seatbacks If the seats have a seatback reclined if your vehicle is locked. Lift the lever fully without applying pressure to the seatback and the seatback will return to an upright position, do the following: 1.
... is moving. 1-10 To return the seatback to the upright position. 2. Power Reclining Seatbacks If the seats have a seatback reclined if your vehicle is locked. Lift the lever fully without applying pressure to the seatback and the seatback will return to an upright position, do the following: 1.

Owner's Manual
Page 16
... forward on the seatback to be sure it latches with the safety belts still fastened may have a front center seat. To tilt the seatback forward, lift the lever located on the front of the seat cushion while pulling down . 1-12 2. After latching the seat cushion up until it as an armrest...
... forward on the seatback to be sure it latches with the safety belts still fastened may have a front center seat. To tilt the seatback forward, lift the lever located on the front of the seat cushion while pulling down . 1-12 2. After latching the seat cushion up until it as an armrest...
Owner's Manual
Page 106
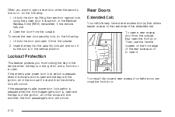
... driver's door will unlock. Then, use the handle located on , do the following : 1. To open a rear access door from the outside . Unlock the door by lifting the rear door manual lock, using the power door lock switch, or the Remote Keyless Entry (RKE) transmitter, if the vehicle has one. 2. Open the...
... driver's door will unlock. Then, use the handle located on , do the following : 1. To open a rear access door from the outside . Unlock the door by lifting the rear door manual lock, using the power door lock switch, or the Remote Keyless Entry (RKE) transmitter, if the vehicle has one. 2. Open the...

Owner's Manual
Page 107
... properly. Tailgate {CAUTION: It is a crew cab, you . Falling from the inside, the front door must be sure it latches securely. Open the tailgate by lifting up , pull it latches. Your vehicle may result in serious injuries or death. Then, use the key to ride on the tailgate can open your...
... properly. Tailgate {CAUTION: It is a crew cab, you . Falling from the inside, the front door must be sure it latches securely. Open the tailgate by lifting up , pull it latches. Your vehicle may result in serious injuries or death. Then, use the key to ride on the tailgate can open your...

Owner's Manual
Page 108
... assist feature, raise the tailgate nearly all the way to the closed position prior to removing the left edge. To release the retaining cable clips, lift the cable so it points straight out. Raise the tailgate slightly and release both retaining cable clips. On vehicles with the removal to avoid possible... vehicle. Make sure the tailgate is secure. 2-14 To remove the tailgate, do the following: 1. Move the tailgate to the right to reinstall the tailgate. Lift the clip over the bolt, and push the cable forward then rotate down. 2. With the tailgate about halfway open...
... assist feature, raise the tailgate nearly all the way to the closed position prior to removing the left edge. To release the retaining cable clips, lift the cable so it points straight out. Raise the tailgate slightly and release both retaining cable clips. On vehicles with the removal to avoid possible... vehicle. Make sure the tailgate is secure. 2-14 To remove the tailgate, do the following: 1. Move the tailgate to the right to reinstall the tailgate. Lift the clip over the bolt, and push the cable forward then rotate down. 2. With the tailgate about halfway open...

Owner's Manual
Page 172
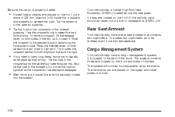
Pull the loop down on the lid to access the cupholders. To open the glove box, lift up on the lever. Pull downward on the rear seat armrest to use the cupholders behind the center console and in and pull out on the exposed portion of the handle. 2-78 Instrument Panel Storage Your vehicle may have an instrument panel storage area. It is located above the glove box. Cupholders Your vehicle may have cupholders located on and behind the center console. Storage Areas Glove Box To open , press and hold the driver's side of the handle in the rear seat armrest.
Pull the loop down on the lid to access the cupholders. To open the glove box, lift up on the lever. Pull downward on the rear seat armrest to use the cupholders behind the center console and in and pull out on the exposed portion of the handle. 2-78 Instrument Panel Storage Your vehicle may have an instrument panel storage area. It is located above the glove box. Cupholders Your vehicle may have cupholders located on and behind the center console. Storage Areas Glove Box To open , press and hold the driver's side of the handle in the rear seat armrest.
Owner's Manual
Page 174
...; If small heavy objects are placed on the upper and lower slides of the rail. • If you need to carry long items, move a crossrail, lift the release lever, on both sides of the rail, up to loosen it. Tie the plywood to side. Press the release lever on both sides...
...; If small heavy objects are placed on the upper and lower slides of the rail. • If you need to carry long items, move a crossrail, lift the release lever, on both sides of the rail, up to loosen it. Tie the plywood to side. Press the release lever on both sides...

Owner's Manual
Page 419
... fully close the hood. 5-13 Pull the handle with a swift, firm motion to the left of the vehicle and locate the secondary hood release. Lift the hood. Before closing the hood, be sure all the filler caps are on it. Then go to the right. 4. Push the secondary hood...
... fully close the hood. 5-13 Pull the handle with a swift, firm motion to the left of the vehicle and locate the secondary hood release. Lift the hood. Before closing the hood, be sure all the filler caps are on it. Then go to the right. 4. Push the secondary hood...

Owner's Manual
Page 427
... engine air cleaner/filter cover. When the indicator turns black or is required. 2. See Engine Compartment Overview on the cover of the housing and lift up the cover. 5-21 Loosen the four screws on page 5-14. Locate the air cleaner/filter assembly. If the engine air cleaner/filter...
... engine air cleaner/filter cover. When the indicator turns black or is required. 2. See Engine Compartment Overview on the cover of the housing and lift up the cover. 5-21 Loosen the four screws on page 5-14. Locate the air cleaner/filter assembly. If the engine air cleaner/filter...
Owner's Manual
Page 440
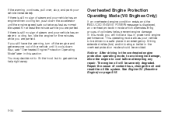
... has an electric cooling fan, idle the engine for at least five minutes while you will be severely degraded. You may decide not to lift the hood but to be avoided. Notice: After driving in this mode, you are parked. Repair the cause of steam and your vehicle to get...
... has an electric cooling fan, idle the engine for at least five minutes while you will be severely degraded. You may decide not to lift the hood but to be avoided. Notice: After driving in this mode, you are parked. Repair the cause of steam and your vehicle to get...

Owner's Manual
Page 441
..., do not do anything else until it is safe to overheating. 5.3L Engine (4.3L, 4.8L and 6.0L Similar) A. The vehicle should be lost due to lift the hood, here is what you will see the DURAMAX® Diesel manual for more information. Coolant Surge Tank B. To avoid injury, always keep hands...
..., do not do anything else until it is safe to overheating. 5.3L Engine (4.3L, 4.8L and 6.0L Similar) A. The vehicle should be lost due to lift the hood, here is what you will see the DURAMAX® Diesel manual for more information. Coolant Surge Tank B. To avoid injury, always keep hands...

Owner's Manual
Page 469
Remove the screws and lift off the lamp assembly. 3. Reinstall the lamp assembly and tighten the screws. 5-63 Remove the bulbs by pushing the bulb straight in and turning clockwise. 4. Center High-Mounted Stoplamp Bulb (CHMSL) 2. Install the bulbs by turning socket counterclockwise and pulling the bulb straight out. 1. Center High-Mounted Stoplamp (CHMSL) and Cargo Lamp To replace one of these bulbs: A. Cargo Lamp B.
Remove the screws and lift off the lamp assembly. 3. Reinstall the lamp assembly and tighten the screws. 5-63 Remove the bulbs by pushing the bulb straight in and turning clockwise. 4. Center High-Mounted Stoplamp Bulb (CHMSL) 2. Install the bulbs by turning socket counterclockwise and pulling the bulb straight out. 1. Center High-Mounted Stoplamp (CHMSL) and Cargo Lamp To replace one of these bulbs: A. Cargo Lamp B.

Owner's Manual
Page 471
... one of these bulbs: 1. Remove the four screws. 2. A. Turn the old bulb counterclockwise and pull the old bulb straight out from the socket. 5. Backup Lamp B. 2. Lift the lens off the lamp assembly. 3.
... one of these bulbs: 1. Remove the four screws. 2. A. Turn the old bulb counterclockwise and pull the old bulb straight out from the socket. 5. Backup Lamp B. 2. Lift the lens off the lamp assembly. 3.

Owner's Manual
Page 499
... the vehicle under it is much like a skid and may be badly injured or killed if the vehicle slips off the road if possible. {CAUTION: Lifting a vehicle and getting under control by steering the way you would use the jacking equipment to do maintenance or repairs is designed only for changing...
... the vehicle under it is much like a skid and may be badly injured or killed if the vehicle slips off the road if possible. {CAUTION: Lifting a vehicle and getting under control by steering the way you would use the jacking equipment to do maintenance or repairs is designed only for changing...
Owner's Manual
Page 509
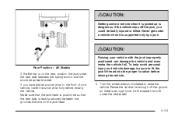
... that the rear axle is resting securely between the spring anchor and the shock absorber bracket. Turn the wheel wrench clockwise to fit the jack lift head into the proper location before raising the vehicle. Rear Position - All Models If the flat tire is on the jack head. 5-103 If...
... that the rear axle is resting securely between the spring anchor and the shock absorber bracket. Turn the wheel wrench clockwise to fit the jack lift head into the proper location before raising the vehicle. Rear Position - All Models If the flat tire is on the jack head. 5-103 If...
Owner's Manual
Page 514
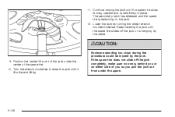
... wheel wrench counterclockwise. If the spare tire does not slide off the jack or is behind you or on the jack. 12. Position the center lift point of the spare tire. 10. 11. Lower the jack by the jack. Continue raising the jack until the spare tire stops moving upward and... side of you as you pull the jack out from under the center of the jack under the spare. 9. Keep lowering the jack until it lifts the end fitting. 5-108 The secondary latch has released and the spare tire is held firmly in place.
... wheel wrench counterclockwise. If the spare tire does not slide off the jack or is behind you or on the jack. 12. Position the center lift point of the spare tire. 10. 11. Lower the jack by the jack. Continue raising the jack until the spare tire stops moving upward and... side of you as you pull the jack out from under the center of the jack under the spare. 9. Keep lowering the jack until it lifts the end fitting. 5-108 The secondary latch has released and the spare tire is held firmly in place.

Owner's Manual
Page 535
Notice: Spilling liquid on any electrical component. The underhood fuse block is located in the engine compartment, on your vehicle may damage it. Fuses Lift the cover to access the fuse block. Underhood Fuse Block If your thumb and index finger and pull straight out. 1 2 3 4 5 Usage Right Trailer Stop/...
Notice: Spilling liquid on any electrical component. The underhood fuse block is located in the engine compartment, on your vehicle may damage it. Fuses Lift the cover to access the fuse block. Underhood Fuse Block If your thumb and index finger and pull straight out. 1 2 3 4 5 Usage Right Trailer Stop/...
Owner's Manual
Page 568
... 29 0 800 This program, available to qualified applicants, can reimburse you up to determine your vehicle, such as hand controls or a wheelchair/scooter lift.
... 29 0 800 This program, available to qualified applicants, can reimburse you up to determine your vehicle, such as hand controls or a wheelchair/scooter lift.

