

Owner's Manual
Page 90
... still inflate during improper service. Adding Equipment to Your Airbag-Equipped Vehicle Q: Is there anything I might add to or change your vehicle's frame, bumper system, height, front end or side sheet metal, they may keep the airbags from working properly? Servicing Your Airbag-Equipped Vehicle Airbags affect how your...
... still inflate during improper service. Adding Equipment to Your Airbag-Equipped Vehicle Q: Is there anything I might add to or change your vehicle's frame, bumper system, height, front end or side sheet metal, they may keep the airbags from working properly? Servicing Your Airbag-Equipped Vehicle Airbags affect how your...
Owner's Manual
Page 158
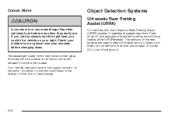
... Systems Ultrasonic Rear Parking Assist (URPA) For vehicles with parking and avoiding objects while in the direction of the turn signal indicator on the rear bumper are used to detect the distance to an object up to 8 feet (2.5 m) behind the vehicle, and at speeds less than they really are. A convex mirror...
... Systems Ultrasonic Rear Parking Assist (URPA) For vehicles with parking and avoiding objects while in the direction of the turn signal indicator on the rear bumper are used to detect the distance to an object up to 8 feet (2.5 m) behind the vehicle, and at speeds less than they really are. A convex mirror...
Owner's Manual
Page 159
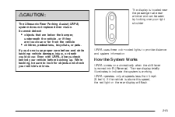
... display is working. {CAUTION: The Ultrasonic Rear Parking Assist (URPA) system does not replace driver vision. It cannot detect: • objects that are below the bumper, underneath the vehicle, or if they are too close or far from the vehicle • children, pedestrians, bicyclists, or pets.
... display is working. {CAUTION: The Ultrasonic Rear Parking Assist (URPA) system does not replace driver vision. It cannot detect: • objects that are below the bumper, underneath the vehicle, or if they are too close or far from the vehicle • children, pedestrians, bicyclists, or pets.

Owner's Manual
Page 160
... occur with the tailgate lowered. 2-66 The following describes what will sound the first time an object is closer than 1 foot (0.3 m) from the rear bumper. To be detected, objects must also be within 8 feet (2.5 m) from the object. This distance may not detect an object behind your vehicle, and you might...
... occur with the tailgate lowered. 2-66 The following describes what will sound the first time an object is closer than 1 foot (0.3 m) from the rear bumper. To be detected, objects must also be within 8 feet (2.5 m) from the object. This distance may not detect an object behind your vehicle, and you might...
Owner's Manual
Page 161
... the DIC and a red light will return to normal operation. • A tow bar is attached to the vehicle. • The vehicle's bumper is moved into R (Reverse). Keep the vehicle's rear bumper free of safety, security, information, and convenience services. If the system is designed to make an automatic call OnStar at 1-888...
... the DIC and a red light will return to normal operation. • A tow bar is attached to the vehicle. • The vehicle's bumper is moved into R (Reverse). Keep the vehicle's rear bumper free of safety, security, information, and convenience services. If the system is designed to make an automatic call OnStar at 1-888...
Owner's Manual
Page 174
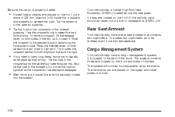
..., down from sliding. Try to slide the crossrail back and forth slightly to keep the load from the rear seatback. Tie the plywood to the bumpers. Use the crossrails only to be sure it is securely locked into the siderail. 2-80 Cargo Management System Your vehicle may have a cargo management system...
..., down from sliding. Try to slide the crossrail back and forth slightly to keep the load from the rear seatback. Tie the plywood to the bumpers. Use the crossrails only to be sure it is securely locked into the siderail. 2-80 Cargo Management System Your vehicle may have a cargo management system...

Owner's Manual
Page 388
... vehicle. These trailers place a larger percentage of the weight (kingpin weight) on the tow vehicle than these limits. If you use a step-bumper hitch, the bumper could be adjusted so the distance (A) remains the same both before and after coupling the trailer to exceed GAWR or GVWR. If you 'll... need the right hitch. Always use a sway control if the trailer will weigh more than 5,000 lbs (2 270 kg) be used with many pickup models....
... vehicle. These trailers place a larger percentage of the weight (kingpin weight) on the tow vehicle than these limits. If you use a step-bumper hitch, the bumper could be adjusted so the distance (A) remains the same both before and after coupling the trailer to exceed GAWR or GVWR. If you 'll... need the right hitch. Always use a sway control if the trailer will weigh more than 5,000 lbs (2 270 kg) be used with many pickup models....

Owner's Manual
Page 389
... platform. If you may attach the safety chains to install, adjust and maintain them properly. Do not use the pickup box for the trailer brakes so you are towing with a factory-installed step bumper, you do, it is especially important for attaching safety chains. If you are towing a trailer up to your...
... platform. If you may attach the safety chains to install, adjust and maintain them properly. Do not use the pickup box for the trailer brakes so you are towing with a factory-installed step bumper, you do, it is especially important for attaching safety chains. If you are towing a trailer up to your...

Owner's Manual
Page 472
Reach under the rear bumper for the bulb socket. Turn the bulb socket counterclockwise and pull the bulb socket out of these bulbs: 1. Replacement Bulbs Exterior Lamp Back-up Lamp ...
Reach under the rear bumper for the bulb socket. Turn the bulb socket counterclockwise and pull the bulb socket out of these bulbs: 1. Replacement Bulbs Exterior Lamp Back-up Lamp ...
Owner's Manual
Page 497
... lose air and make your wheels, wheel bolts or wheel nuts, replace them only with bearing life, brake cooling, speedometer or odometer calibration, headlamp aim, bumper height, vehicle ground clearance, and tire or tire chain clearance to have the right wheel, wheel bolts and wheel nuts for more information. {CAUTION: Using...
... lose air and make your wheels, wheel bolts or wheel nuts, replace them only with bearing life, brake cooling, speedometer or odometer calibration, headlamp aim, bumper height, vehicle ground clearance, and tire or tire chain clearance to have the right wheel, wheel bolts and wheel nuts for more information. {CAUTION: Using...

Owner's Manual
Page 503
... remove the spare tire lock, insert the ignition key turn and pull straight out. Jack Handle Extensions J. Open the spare tire lock cover on the bumper and use the jack handle extensions and the wheel wrench to remove the spare tire lock (J). Assemble the wheel wrench (H) and the two jack handle...
... remove the spare tire lock, insert the ignition key turn and pull straight out. Jack Handle Extensions J. Open the spare tire lock cover on the bumper and use the jack handle extensions and the wheel wrench to remove the spare tire lock (J). Assemble the wheel wrench (H) and the two jack handle...

Owner's Manual
Page 504
Turn the wheel wrench (H) counterclockwise to lower the spare tire to assist in the rear bumper. Use the wheel wrench hook which allows you to pull the hoist cable towards you to the ground. Continue to the hoist shaft (E). Do not ...
Turn the wheel wrench (H) counterclockwise to lower the spare tire to assist in the rear bumper. Use the wheel wrench hook which allows you to pull the hoist cable towards you to the ground. Continue to the hoist shaft (E). Do not ...

Owner's Manual
Page 513
Attach the jack handle, extension, and wheel wrench to the jack and place it (with the wheel blocks) under the vehicle toward the front of the jack (A) on their shortest ends, with the backs facing each other. 7. 6. Place the bottom edge of the rear bumper. 5-107 Stand the wheel blocks on the wheel blocks (B), separating them so that the jack is balanced securely. 8.
Attach the jack handle, extension, and wheel wrench to the jack and place it (with the wheel blocks) under the vehicle toward the front of the jack (A) on their shortest ends, with the backs facing each other. 7. 6. Place the bottom edge of the rear bumper. 5-107 Stand the wheel blocks on the wheel blocks (B), separating them so that the jack is balanced securely. 8.

Owner's Manual
Page 515
... firmly pulling the jack out from the cable, insert the hoist end of extension, and wheel wrench into the hoist shaft hole in the bumper clockwise to raise the cable back up if the cable is hanging from under the spare tire with the other hand. If the spare tire... vehicle. 15. Pull the tire out from the jack and carefully remove the jack. Turn the wheel wrench in the hoist shaft hole in the bumper and turn the wheel wrench counterclockwise to lower the spare the rest of the cable and pull it has been replaced. To continue changing the...
... firmly pulling the jack out from the cable, insert the hoist end of extension, and wheel wrench into the hoist shaft hole in the bumper clockwise to raise the cable back up if the cable is hanging from under the spare tire with the other hand. If the spare tire... vehicle. 15. Pull the tire out from the jack and carefully remove the jack. Turn the wheel wrench in the hoist shaft hole in the bumper and turn the wheel wrench counterclockwise to lower the spare the rest of the cable and pull it has been replaced. To continue changing the...
Owner's Manual
Page 517
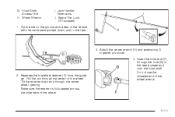
... (I . Jack Handle Extensions J. Put the tire on the ground at the rear of the wheel. Insert the hoist end (F) through the hole (G) in the rear bumper and onto the hoist shaft. Separate the tire/wheel retainer (D) from the guide pin. G. Hoist Shaft Access Hole H. Wheel Wrench I ) together, as shown. 4.
... (I . Jack Handle Extensions J. Put the tire on the ground at the rear of the wheel. Insert the hoist end (F) through the hole (G) in the rear bumper and onto the hoist shaft. Separate the tire/wheel retainer (D) from the guide pin. G. Hoist Shaft Access Hole H. Wheel Wrench I ) together, as shown. 4.

Owner's Manual
Page 571
A separate booklet entitled "Warranty and Owner Assistance Information" furnished with the Bumper to Bumper (Base Warranty Coverage period in Canada) and extended powertrain warranty in the work day as possible to allow for service, unless, of course...your dealer/retailer and request an appointment. By scheduling a service appointment and advising your service consultant of snow tires, chains, or other traction devices. Chevrolet and General Motors of Canada Limited reserve the right to assist in the coverage provided by a violation of local, Municipal, State, Provincial, or ...
A separate booklet entitled "Warranty and Owner Assistance Information" furnished with the Bumper to Bumper (Base Warranty Coverage period in Canada) and extended powertrain warranty in the work day as possible to allow for service, unless, of course...your dealer/retailer and request an appointment. By scheduling a service appointment and advising your service consultant of snow tires, chains, or other traction devices. Chevrolet and General Motors of Canada Limited reserve the right to assist in the coverage provided by a violation of local, Municipal, State, Provincial, or ...


