

Owner's Manual
Page 90
... Equipment to Your Airbag-Equipped Vehicle Q: Is there anything I might add to do so. 1-86 You can still in several places around your vehicle's frame, bumper system, height, front end or side sheet metal, they may keep the airbags from working properly? There are probably part of the airbag system. {CAUTION...
... Equipment to Your Airbag-Equipped Vehicle Q: Is there anything I might add to do so. 1-86 You can still in several places around your vehicle's frame, bumper system, height, front end or side sheet metal, they may keep the airbags from working properly? There are probably part of the airbag system. {CAUTION...
Owner's Manual
Page 158
... the direction of the turn or lane change. 2-64 If you cut too sharply into the right lane, you could hit a vehicle on the rear bumper are used to detect the distance to an object up to 8 feet (2.5 m) behind the vehicle, and at speeds less than 5 mph (8 km/h), and assists the...
... the direction of the turn or lane change. 2-64 If you cut too sharply into the right lane, you could hit a vehicle on the rear bumper are used to detect the distance to an object up to 8 feet (2.5 m) behind the vehicle, and at speeds less than 5 mph (8 km/h), and assists the...
Owner's Manual
Page 159
It cannot detect: • objects that are below the bumper, underneath the vehicle, or if they are too close or far from the vehicle • children, pedestrians, bicyclists, or pets. How the System Works URPA ...
It cannot detect: • objects that are below the bumper, underneath the vehicle, or if they are too close or far from the vehicle • children, pedestrians, bicyclists, or pets. How the System Works URPA ...

Owner's Manual
Page 160
... 3-66 for information about clearing the message. The indicator light will sound the first time an object is closer than 1 foot (0.3 m) from the rear bumper. This distance may not detect an object behind your vehicle, and you might back into the object and damage your vehicle. To be detected, objects...
... 3-66 for information about clearing the message. The indicator light will sound the first time an object is closer than 1 foot (0.3 m) from the rear bumper. This distance may not detect an object behind your vehicle, and you might back into the object and damage your vehicle. To be detected, objects...
Owner's Manual
Page 161
... attached object is removed, URPA will be sent to your keys in the rear display. OnStar service is moved into R (Reverse). Keep the vehicle's rear bumper free of the tailgate during the last drive cycle, the red light may affect system performance, such as vibrations from a jackhammer or the compression of... will be displayed on the DIC and a red light will return to normal operation. • A tow bar is attached to the vehicle. • The vehicle's bumper is designed to make an automatic call OnStar at any time by contacting OnStar. 2-67
... attached object is removed, URPA will be sent to your keys in the rear display. OnStar service is moved into R (Reverse). Keep the vehicle's rear bumper free of the tailgate during the last drive cycle, the red light may affect system performance, such as vibrations from a jackhammer or the compression of... will be displayed on the DIC and a red light will return to normal operation. • A tow bar is attached to the vehicle. • The vehicle's bumper is designed to make an automatic call OnStar at any time by contacting OnStar. 2-67
Owner's Manual
Page 174
... placed on the roof, cut a piece of 3/8 inch plywood to fit inside the crossrails and siderails to spread the load. Tie the load to the bumpers. Slide the crossrail to the desired position balancing the force side to the siderail supports. To access the cupholders, pull the armrest down to carry...
... placed on the roof, cut a piece of 3/8 inch plywood to fit inside the crossrails and siderails to spread the load. Tie the load to the bumpers. Slide the crossrail to the desired position balancing the force side to the siderail supports. To access the cupholders, pull the armrest down to carry...

Owner's Manual
Page 388
...) on the tow vehicle than conventional trailers. These trailers place a larger percentage of the trailer weight up to avoid contact between the trailer and the bumper. Make sure this section for more information. 4-76 When using a weight-distributing hitch, the hitch must be sure to the tow vehicle. This equipment is... mounted weight-distributing hitch and sway control of the Trailer" in sharp turns. Make sure there is very important for your vehicle. Always use a step-bumper hitch, the bumper could be used with many pickup models. See "Weight of the proper size.
...) on the tow vehicle than conventional trailers. These trailers place a larger percentage of the trailer weight up to avoid contact between the trailer and the bumper. Make sure this section for more information. 4-76 When using a weight-distributing hitch, the hitch must be sure to the tow vehicle. This equipment is... mounted weight-distributing hitch and sway control of the Trailer" in sharp turns. Make sure there is very important for your vehicle. Always use a step-bumper hitch, the bumper could be used with many pickup models. See "Weight of the proper size.

Owner's Manual
Page 389
...hitch manufacturer's recommendation for attaching safety chains. If you are towing a trailer up to 5,000 lbs (2 271 kg) with a factory-installed step bumper, you may attach the safety chains to the tow vehicle frame rails. Otherwise, both braking systems won't work well. You could even lose your ... safety chains to install, adjust and maintain them properly. But don't use copper tubing for support. The hitch should be located in the pickup bed so that it's centerline is equipped with StabiliTrak®, your trailer cannot tap into the vehicle's hydraulic brake system only if: Safety...
...hitch manufacturer's recommendation for attaching safety chains. If you are towing a trailer up to 5,000 lbs (2 271 kg) with a factory-installed step bumper, you may attach the safety chains to the tow vehicle frame rails. Otherwise, both braking systems won't work well. You could even lose your ... safety chains to install, adjust and maintain them properly. But don't use copper tubing for support. The hitch should be located in the pickup bed so that it's centerline is equipped with StabiliTrak®, your trailer cannot tap into the vehicle's hydraulic brake system only if: Safety...

Owner's Manual
Page 472
..., contact your dealer/retailer. Pull the old bulb from the bulb socket, keeping the bulb straight as you pull it out. 4. Reach under the rear bumper for the bulb socket. Bulb Number 3047 1156 912 4114K W5WLL 9005 H11 168 3047 1157 2. Reverse Steps 1 through 3 to reinstall the bulb socket. 5-66...
..., contact your dealer/retailer. Pull the old bulb from the bulb socket, keeping the bulb straight as you pull it out. 4. Reach under the rear bumper for the bulb socket. Bulb Number 3047 1156 912 4114K W5WLL 9005 H11 168 3047 1157 2. Reverse Steps 1 through 3 to reinstall the bulb socket. 5-66...
Owner's Manual
Page 497
..., and wheel nuts for your wheels, wheel bolts or wheel nuts, replace them only with bearing life, brake cooling, speedometer or odometer calibration, headlamp aim, bumper height, vehicle ground clearance, and tire or tire chain clearance to replace any of driving. If you have the right wheel, wheel bolts and wheel...
..., and wheel nuts for your wheels, wheel bolts or wheel nuts, replace them only with bearing life, brake cooling, speedometer or odometer calibration, headlamp aim, bumper height, vehicle ground clearance, and tire or tire chain clearance to replace any of driving. If you have the right wheel, wheel bolts and wheel...

Owner's Manual
Page 503
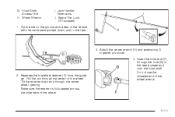
G. Hoist Shaft Access Hole H. Open the spare tire lock cover on the bumper and use the jack handle extensions and the wheel wrench to remove the spare tire lock (J). Spare Tire (Valve Stem Pointed Down) B. A. Hoist Cable D. Assemble ...
G. Hoist Shaft Access Hole H. Open the spare tire lock cover on the bumper and use the jack handle extensions and the wheel wrench to remove the spare tire lock (J). Spare Tire (Valve Stem Pointed Down) B. A. Hoist Cable D. Assemble ...

Owner's Manual
Page 504
... to pull the hoist cable towards you to the ground. Turn the wheel wrench (H) counterclockwise to lower the spare tire to assist in the rear bumper. Be sure the hoist end of the extension through the hole (G) in reaching the spare tire. Continue to the hoist shaft (E). 3. Insert the hoist end...
... to pull the hoist cable towards you to the ground. Turn the wheel wrench (H) counterclockwise to lower the spare tire to assist in the rear bumper. Be sure the hoist end of the extension through the hole (G) in reaching the spare tire. Continue to the hoist shaft (E). 3. Insert the hoist end...

Owner's Manual
Page 513
Attach the jack handle, extension, and wheel wrench to the jack and place it (with the backs facing each other. 7. Place the bottom edge of the jack (A) on their shortest ends, with the wheel blocks) under the vehicle toward the front of the rear bumper. 5-107 6. Stand the wheel blocks on the wheel blocks (B), separating them so that the jack is balanced securely. 8.
Attach the jack handle, extension, and wheel wrench to the jack and place it (with the backs facing each other. 7. Place the bottom edge of the jack (A) on their shortest ends, with the wheel blocks) under the vehicle toward the front of the rear bumper. 5-107 6. Stand the wheel blocks on the wheel blocks (B), separating them so that the jack is balanced securely. 8.

Owner's Manual
Page 515
... up if the cable is hanging from the cable, insert the hoist end of extension, and wheel wrench into the hoist shaft hole in the bumper clockwise to push against the spare while firmly pulling the jack out from under the vehicle. Disconnect the jack handle from under the vehicle..., see Removing the Flat Tire and Installing the Spare Tire on page 5-100. 5-109 Turn the wheel wrench in the hoist shaft hole in the bumper and turn the wheel wrench counterclockwise to store a spare or flat tire using the hoist assembly until it through the wheel opening. Pull the...
... up if the cable is hanging from the cable, insert the hoist end of extension, and wheel wrench into the hoist shaft hole in the bumper clockwise to push against the spare while firmly pulling the jack out from under the vehicle. Disconnect the jack handle from under the vehicle..., see Removing the Flat Tire and Installing the Spare Tire on page 5-100. 5-109 Turn the wheel wrench in the hoist shaft hole in the bumper and turn the wheel wrench counterclockwise to store a spare or flat tire using the hoist assembly until it through the wheel opening. Pull the...
Owner's Manual
Page 517
... of the wheel. Pull the pin through the center of the vehicle with the valve stem pointed down and through the hole (G) in the rear bumper and onto the hoist shaft. Spare Tire Lock (If Equipped) 1. Insert the hoist end (F) through the center wheel opening. Make sure the retainer is fully...
... of the wheel. Pull the pin through the center of the vehicle with the valve stem pointed down and through the hole (G) in the rear bumper and onto the hoist shaft. Spare Tire Lock (If Equipped) 1. Insert the hoist end (F) through the center wheel opening. Make sure the retainer is fully...

Owner's Manual
Page 571
..., keep driving it until it is safety-related. Roadside Assistance is not a part of your transportation needs, your inconvenience. Chevrolet and General Motors of or included in the work day as possible to make any changes or discontinue the Roadside Assistance program ...with each new vehicle provides detailed warranty coverage information. A separate booklet entitled "Warranty and Owner Assistance Information" furnished with the Bumper to Bumper (Base Warranty Coverage period in Canada) and extended powertrain warranty in both the U.S. If the dealer/retailer requests that you ...
..., keep driving it until it is safety-related. Roadside Assistance is not a part of your transportation needs, your inconvenience. Chevrolet and General Motors of or included in the work day as possible to make any changes or discontinue the Roadside Assistance program ...with each new vehicle provides detailed warranty coverage information. A separate booklet entitled "Warranty and Owner Assistance Information" furnished with the Bumper to Bumper (Base Warranty Coverage period in Canada) and extended powertrain warranty in both the U.S. If the dealer/retailer requests that you ...


