
Owner's Manual
Page 49
... the anchors. Be sure to Put the Restraint on page 1-40 for each rear seating position are restrained in the rear cargo area to adjust the rear compartment storage panel/cover in the rear rather than the front seat. The top tether anchors for additional information. Do not secure a child restraint in...
... the anchors. Be sure to Put the Restraint on page 1-40 for each rear seating position are restrained in the rear cargo area to adjust the rear compartment storage panel/cover in the rear rather than the front seat. The top tether anchors for additional information. Do not secure a child restraint in...
Owner's Manual
Page 52
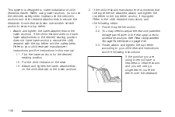
... the following instructions: If the position you are using lower anchors, do not use the vehicle's safety belts. See Rear Compartment Storage Panel/Cover on the seat. 1.3. This system is designed to the lower anchors. 2. If the child restraint does not have lower attachments or the ... this manual. 1.1. Route, attach and tighten the top tether according to your child restraint manufacturer instructions and the instructions in the rear cargo area to your child restraint instructions and the following steps: 2.1. When using a single tether, route the tether over the seatback. 1-48...
... the following instructions: If the position you are using lower anchors, do not use the vehicle's safety belts. See Rear Compartment Storage Panel/Cover on the seat. 1.3. This system is designed to the lower anchors. 2. If the child restraint does not have lower attachments or the ... this manual. 1.1. Route, attach and tighten the top tether according to your child restraint manufacturer instructions and the instructions in the rear cargo area to your child restraint instructions and the following steps: 2.1. When using a single tether, route the tether over the seatback. 1-48...

Owner's Manual
Page 80
Section 2 Features and Controls Rear Compartment Storage Panel/Cover ...2-45 Rear Seat Armrest ...2-47 Table ...2-48 Convenience Net ...2-49 Cargo Tie Downs ...2-49 Sunroof ...2-49 OnStar® System ...2-39 Storage Areas ...2-42 Glove Box ...2-42 Cupholder(s) ...2-42 Center Console Storage ...2-42 Luggage Carrier ...2-43 2-2
Section 2 Features and Controls Rear Compartment Storage Panel/Cover ...2-45 Rear Seat Armrest ...2-47 Table ...2-48 Convenience Net ...2-49 Cargo Tie Downs ...2-49 Sunroof ...2-49 OnStar® System ...2-39 Storage Areas ...2-42 Glove Box ...2-42 Cupholder(s) ...2-42 Center Console Storage ...2-42 Luggage Carrier ...2-43 2-2
Owner's Manual
Page 123
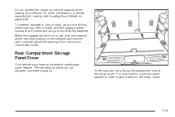
...lock one crossrail at the rear most position on page 4-22. To prevent damage or loss of the cargo cover. When the luggage carrier is not in order to gain access to the cargo cover. 2-45 Do not exceed the maximum vehicle capacity when loading your vehicle. For more information on vehicle ...above the opening of the rear door to make sure the luggage carrier crossrails are locked and cargo is still securely fastened. The panel/cargo cover can be a flip panel towards the front of cargo as you are driving, check now and then to reduce wind noise. Rear Compartment Storage Panel...
...lock one crossrail at the rear most position on page 4-22. To prevent damage or loss of the cargo cover. When the luggage carrier is not in order to gain access to the cargo cover. 2-45 Do not exceed the maximum vehicle capacity when loading your vehicle. For more information on vehicle ...above the opening of the rear door to make sure the luggage carrier crossrails are locked and cargo is still securely fastened. The panel/cargo cover can be a flip panel towards the front of cargo as you are driving, check now and then to reduce wind noise. Rear Compartment Storage Panel...

Owner's Manual
Page 124
Place the cargo on top of the panel in this position if you were to lock it in place. 2-46...used in the vehicle. Insert the front corners of the panel to carry things on the adjustable panel when it is in the upper (cargo cover) or center positions, during a sudden vehicle movement or a crash, those things could be injured. When it is in the lower ...position, do the following: 1. To use the panel in the upper or center position, always secure any cargo on the back of the panel into the lower guides. 2. Slide the panel forward. 3. Press down on the floor beneath...
Place the cargo on top of the panel in this position if you were to lock it in place. 2-46...used in the vehicle. Insert the front corners of the panel to carry things on the adjustable panel when it is in the upper (cargo cover) or center positions, during a sudden vehicle movement or a crash, those things could be injured. When it is in the lower ...position, do the following: 1. To use the panel in the upper or center position, always secure any cargo on the back of the panel into the lower guides. 2. Slide the panel forward. 3. Press down on the floor beneath...

Owner's Manual
Page 125
Press down from the rear seatback. 2-47 The panel may be used as a cargo cover for more information. The panel may have to place a flat or spare tire in the rear cargo area. To access the cupholders, pull the armrest down and pull rearward on the back of the panel into the middle...
Press down from the rear seatback. 2-47 The panel may be used as a cargo cover for more information. The panel may have to place a flat or spare tire in the rear cargo area. To access the cupholders, pull the armrest down and pull rearward on the back of the panel into the middle...

Owner's Manual
Page 126
... sure to position it . Always be sure that the items that are of the table and turn the leg outward. 3. Always have an adjustable panel/cargo cover that can be up the table, do the following: 1. Turn the knob to release the leg from the plastic side of moderate temperature. Table To...
... sure to position it . Always be sure that the items that are of the table and turn the leg outward. 3. Always have an adjustable panel/cargo cover that can be up the table, do the following: 1. Turn the knob to release the leg from the plastic side of moderate temperature. Table To...

Owner's Manual
Page 163
... - An emission control system malfunction has been detected on . Diagnosis and service might be required. 3-35 This could lead to costly repairs not covered by your vehicle. Avoid hard accelerations. If the light does not come on your vehicle. Modifications to these systems could also result in... one of two ways: If the Light is Flashing The following . If you are towing a trailer, reduce the amount of cargo being hauled as soon as it is still flashing, follow the previous steps and see your dealer/retailer for service as soon as a ...
... - An emission control system malfunction has been detected on . Diagnosis and service might be required. 3-35 This could lead to costly repairs not covered by your vehicle. Avoid hard accelerations. If the light does not come on your vehicle. Modifications to these systems could also result in... one of two ways: If the Light is Flashing The following . If you are towing a trailer, reduce the amount of cargo being hauled as soon as it is still flashing, follow the previous steps and see your dealer/retailer for service as soon as a ...
Owner's Manual
Page 265
..., secure it can shorten the life of your vehicle handles. These could cause you need to lose control and crash. Repairs would not be covered by your vehicle may cause damage. Do not overload your vehicle any heavier than the Gross Vehicle Weight Rating (GVWR), or either the maximum ...front or rear Gross Axle Weight Rating (GAWR). If you can strike and injure people in the cargo area of the seats. • Do not leave an unsecured child restraint in your vehicle. • When you carry something inside your vehicle. Try...
..., secure it can shorten the life of your vehicle handles. These could cause you need to lose control and crash. Repairs would not be covered by your vehicle may cause damage. Do not overload your vehicle any heavier than the Gross Vehicle Weight Rating (GVWR), or either the maximum ...front or rear Gross Axle Weight Rating (GAWR). If you can strike and injure people in the cargo area of the seats. • Do not leave an unsecured child restraint in your vehicle. • When you carry something inside your vehicle. Try...

Owner's Manual
Page 357
... sure that the jack lift head is in the cargo area until you may damage your warranty. 3. Loosen all the wheel nuts. That will raise the lift head a little. 6. Pull the cover or center cap away from the cover or center cap. 5. Store the wheel cover in the correct position or you have the... wrench to the jack bolt head and turn the wheel wrench clockwise. Removing the Flat Tire and Installing the Spare Tire Take off the wheel cover or center cap, if the vehicle has one, to remove plastic caps from the wheel. See Changing a Flat Tire on page 5-76 for more information...
... sure that the jack lift head is in the cargo area until you may damage your warranty. 3. Loosen all the wheel nuts. That will raise the lift head a little. 6. Pull the cover or center cap away from the cover or center cap. 5. Store the wheel cover in the correct position or you have the... wrench to the jack bolt head and turn the wheel wrench clockwise. Removing the Flat Tire and Installing the Spare Tire Take off the wheel cover or center cap, if the vehicle has one, to remove plastic caps from the wheel. See Changing a Flat Tire on page 5-76 for more information...


