Owner's Manual
Page 86
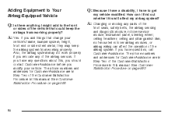
... the Customer Satisfaction Procedure in this manual. If you have any parts of the vehicle that change your vehicle. If you modify your vehicle's frame, bumper system, height, front end or side sheet metal, they may not work properly if you add things that could keep the airbag system from working...
... the Customer Satisfaction Procedure in this manual. If you have any parts of the vehicle that change your vehicle. If you modify your vehicle's frame, bumper system, height, front end or side sheet metal, they may not work properly if you add things that could keep the airbag system from working...
Owner's Manual
Page 171
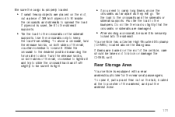
... it and try to slide the crossrail back and forth slightly to be sure it to the siderail supports. • Tie the load to the bumpers. If plywood is used, tie it is equipped with a rear armrest/cupholder for the rear seat passengers. Also tie the load to the crossrails or...
... it and try to slide the crossrail back and forth slightly to be sure it to the siderail supports. • Tie the load to the bumpers. If plywood is used, tie it is equipped with a rear armrest/cupholder for the rear seat passengers. Also tie the load to the crossrails or...
Owner's Manual
Page 220
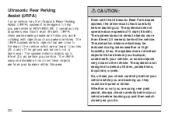
... easier and helps you avoid colliding with the Ultrasonic Rear Park Assist system, the driver must check carefully before backing up to 8 feet (2.5 m) behind your bumper within this area. {CAUTION: Even with objects such as you are below hood or trunk level. The system does not detect objects more than 5 mph... the vehicle. Ultrasonic Rear Parking Assist (URPA) If your vehicle. It operates only at least 10 inches (25.4 cm) off the ground and below your bumper, underneath your vehicle, or some objects very close these objects are backing up .
... easier and helps you avoid colliding with the Ultrasonic Rear Park Assist system, the driver must check carefully before backing up to 8 feet (2.5 m) behind your bumper within this area. {CAUTION: Even with objects such as you are below hood or trunk level. The system does not detect objects more than 5 mph... the vehicle. Ultrasonic Rear Parking Assist (URPA) If your vehicle. It operates only at least 10 inches (25.4 cm) off the ground and below your bumper, underneath your vehicle, or some objects very close these objects are backing up .

Owner's Manual
Page 222
... amber lights will be on. • At distances between 12 inches (0.3 m) and 23 inches (0.6 m), all three lights (amber/amber/red) will return to the rear bumper. If this occurs, URPA assumes the object is still attached, so you turned off the vehicle. The first time an object is detected a single...
... amber lights will be on. • At distances between 12 inches (0.3 m) and 23 inches (0.6 m), all three lights (amber/amber/red) will return to the rear bumper. If this occurs, URPA assumes the object is still attached, so you turned off the vehicle. The first time an object is detected a single...
Owner's Manual
Page 223
...550. Take the vehicle to repair the system. 223 For cleaning instructions, see DIC Warnings and Messages on page 269. If the vehicle bumper is damaged, the URPA system may affect system performance include vibrations from a jackhammer or the compression of air brakes on a very large ...the indicator light will flash for other vehicles, obstructions and blind spots. For Driver Information Center messages related to keep your vehicle's rear bumper free of at least 15 mph (25 km/h), see your dealer to your dealer. • Other conditions that interfere with URPA performance. &#...
...550. Take the vehicle to repair the system. 223 For cleaning instructions, see DIC Warnings and Messages on page 269. If the vehicle bumper is damaged, the URPA system may affect system performance include vibrations from a jackhammer or the compression of air brakes on a very large ...the indicator light will flash for other vehicles, obstructions and blind spots. For Driver Information Center messages related to keep your vehicle's rear bumper free of at least 15 mph (25 km/h), see your dealer to your dealer. • Other conditions that interfere with URPA performance. &#...

Owner's Manual
Page 435
...: Back-up Lamps • Red: Battery Feed **# • Dark Blue: Trailer Brake # **If you can turn on the headlamps as a second way to the rear bumper beam. This will boost the vehicle system voltage and properly charge the battery.
...: Back-up Lamps • Red: Battery Feed **# • Dark Blue: Trailer Brake # **If you can turn on the headlamps as a second way to the rear bumper beam. This will boost the vehicle system voltage and properly charge the battery.

Owner's Manual
Page 498
... the following: 1. Pull the old bulb straight out from the taillamp assembly. 5. Turn the bulb socket clockwise into the taillamp assembly. Reach under the rear bumper for the bulb socket. 2. License Plate Lamp To replace one , and turn the bulb socket counterclockwise to line up the pins with the vehicle. Reinstall...
... the following: 1. Pull the old bulb straight out from the taillamp assembly. 5. Turn the bulb socket clockwise into the taillamp assembly. Reach under the rear bumper for the bulb socket. 2. License Plate Lamp To replace one , and turn the bulb socket counterclockwise to line up the pins with the vehicle. Reinstall...
Owner's Manual
Page 523
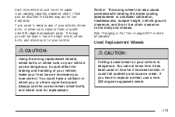
... Changing a Flat Tire on your wheels, wheel bolts, or wheel nuts, replace them only with bearing life, brake cooling, speedometer or odometer calibration, headlamp aim, bumper height, vehicle ground clearance, and tire or tire chain clearance to have a collision in which you lose control. If you have to replace any of...
... Changing a Flat Tire on your wheels, wheel bolts, or wheel nuts, replace them only with bearing life, brake cooling, speedometer or odometer calibration, headlamp aim, bumper height, vehicle ground clearance, and tire or tire chain clearance to have a collision in which you lose control. If you have to replace any of...
Owner's Manual
Page 530
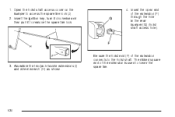
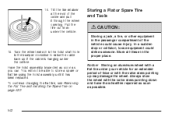
1. Insert the open end of the extension is used to remove the spare tire lock. 4. Assemble the two jack handle extensions (I) and wheel wrench (H) as shown. The ribbed square end of the extension (F) through the hole in the rear bumper (G) (hoist shaft access hole). 3. Open the hoist shaft access cover on the bumper to the hoist shaft. Be sure the hoist end (F) of the extension connects to access the spare tire lock (J). 2. Insert the ignition key, turn it clockwise and then pull it to lower the spare tire. 530
1. Insert the open end of the extension is used to remove the spare tire lock. 4. Assemble the two jack handle extensions (I) and wheel wrench (H) as shown. The ribbed square end of the extension (F) through the hole in the rear bumper (G) (hoist shaft access hole). 3. Open the hoist shaft access cover on the bumper to the hoist shaft. Be sure the hoist end (F) of the extension connects to access the spare tire lock (J). 2. Insert the ignition key, turn it clockwise and then pull it to lower the spare tire. 530
Owner's Manual
Page 540
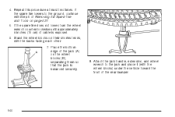
... the jack (A) on page 527. 5. If the spare tire does not lower, turn the wheel wrench counterclockwise until approximately 6 inches (15 cm) of the rear bumper. 540 Stand the wheel blocks on their shortest ends, with the wheel blocks) under the vehicle toward the front of cable is balanced securely. 8. If...
... the jack (A) on page 527. 5. If the spare tire does not lower, turn the wheel wrench counterclockwise until approximately 6 inches (15 cm) of the rear bumper. 540 Stand the wheel blocks on their shortest ends, with the wheel blocks) under the vehicle toward the front of cable is balanced securely. 8. If...

Owner's Manual
Page 541
... wrench into the hoist shaft hole in place so that the secondary latch has released and the spare tire is held firmly in the bumper and turn the wheel wrench counterclockwise to push against the spare while firmly pulling the jack out from the jack and carefully remove the...
... wrench into the hoist shaft hole in place so that the secondary latch has released and the spare tire is held firmly in the bumper and turn the wheel wrench counterclockwise to push against the spare while firmly pulling the jack out from the jack and carefully remove the...
Owner's Manual
Page 542
Pull the tire out from under the vehicle. Turn the wheel wrench in the hoist shaft hole in the bumper clockwise to store a spare or flat the end of the vehicle could strike someone. Always stow the wheel with the valve stem pointing down ...
Pull the tire out from under the vehicle. Turn the wheel wrench in the hoist shaft hole in the bumper clockwise to store a spare or flat the end of the vehicle could strike someone. Always stow the wheel with the valve stem pointing down ...

Owner's Manual
Page 544
... the tire fully against the underside of the extension (F) through the hole in the wheel opening. 6. Make sure the tire is seated in the rear bumper (G) (hoist shaft access hole). 5. If the tire moves, use the wheel wrench to turn (B) the tire. Insert the open end of the vehicle by turning...
... the tire fully against the underside of the extension (F) through the hole in the wheel opening. 6. Make sure the tire is seated in the rear bumper (G) (hoist shaft access hole). 5. If the tire moves, use the wheel wrench to turn (B) the tire. Insert the open end of the vehicle by turning...
Owner's Manual
Page 599
... good condition will be covered at no charge if you are provided in the U.S. Winch-out assistance when the vehicle is for coverage. during the Bumper-to-Bumper warranty period and, in Canada, during the Base Warranty coverage period of the New Vehicle Limited Warranty, up to a maximum coverage of $100. •...
... good condition will be covered at no charge if you are provided in the U.S. Winch-out assistance when the vehicle is for coverage. during the Bumper-to-Bumper warranty period and, in Canada, during the Base Warranty coverage period of the New Vehicle Limited Warranty, up to a maximum coverage of $100. •...

Owner's Manual
Page 600
... is to assist you with any cost for parts and labor for non-warranty repairs are the responsibility of the repair order are covered under Chevrolet's Bumper-to-Bumper warranty, and the duration of the Base Warranty Coverage for Canadian customers of $40/day). This benefit is best to allow three weeks...
... is to assist you with any cost for parts and labor for non-warranty repairs are the responsibility of the repair order are covered under Chevrolet's Bumper-to-Bumper warranty, and the duration of the Base Warranty Coverage for Canadian customers of $40/day). This benefit is best to allow three weeks...
Owner's Manual
Page 602
... dealers are proud to offer Courtesy Transportation, a customer support program for service, unless, of course, the problem is safety-related. For warranty repairs during the Bumper-to-Bumper (U.S.) or Base Warranty Coverage period (Canada), provided by the New Vehicle Limited Warranty, interim transportation may be scheduled for new vehicles. A separate booklet entitled...
... dealers are proud to offer Courtesy Transportation, a customer support program for service, unless, of course, the problem is safety-related. For warranty repairs during the Bumper-to-Bumper (U.S.) or Base Warranty Coverage period (Canada), provided by the New Vehicle Limited Warranty, interim transportation may be scheduled for new vehicles. A separate booklet entitled...

