

Owner's Manual
Page 2
... end when they first receive their new vehicle. Pictures and words work together in the back of the manual. It is an alphabetical list of what is the Index in the owner manual to explain things. For vehicles first sold , leave this manual in this manual. ... No. 06SSR A First Printing ii © 2005 General Motors Corporation. Box 07130 Detroit, MI 48207 GENERAL MOTORS, GM, the GM Emblem, CHEVROLET, the CHEVROLET Emblem and the name SSR are on the road. This manual includes the latest information at the time it was printed. We reserve the right to make changes...
... end when they first receive their new vehicle. Pictures and words work together in the back of the manual. It is an alphabetical list of what is the Index in the owner manual to explain things. For vehicles first sold , leave this manual in this manual. ... No. 06SSR A First Printing ii © 2005 General Motors Corporation. Box 07130 Detroit, MI 48207 GENERAL MOTORS, GM, the GM Emblem, CHEVROLET, the CHEVROLET Emblem and the name SSR are on the road. This manual includes the latest information at the time it was printed. We reserve the right to make changes...

Owner's Manual
Page 84
And, if you leave the vehicle with the engine running . You or others could overheat and even catch fire. Then, see "Shifting Into PARK (P)" listed previously in the transmission. Shifting Out of PARK (P). You may put too much force on the console shift lever. If you can, it . If you ...
And, if you leave the vehicle with the engine running . You or others could overheat and even catch fire. Then, see "Shifting Into PARK (P)" listed previously in the transmission. Shifting Out of PARK (P). You may put too much force on the console shift lever. If you can, it . If you ...
Owner's Manual
Page 106
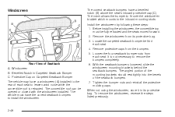
.... Protective Cap on Carpeted Seatback Bumper The vehicle may have a bevelled notch (B) above the seat's inboard protective cap (C). To remove the windscreen, reverse the steps listed previously. 2-46 The notch allows the bumper to fit over the windscreen bracket which mounts to the inboard mounting studs. Rear View of each seat...
.... Protective Cap on Carpeted Seatback Bumper The vehicle may have a bevelled notch (B) above the seat's inboard protective cap (C). To remove the windscreen, reverse the steps listed previously. 2-46 The notch allows the bumper to fit over the windscreen bracket which mounts to the inboard mounting studs. Rear View of each seat...

Owner's Manual
Page 127
Turning the exterior lamps control to this position turns on the headlamps, together with the previously listed lamps and lights. 2(Headlamps): 3-13 See Automatic Headlamp System on page 3-16 for more information. ;(Parking Lamps): The interior lamp control (A) is used to adjust ...
Turning the exterior lamps control to this position turns on the headlamps, together with the previously listed lamps and lights. 2(Headlamps): 3-13 See Automatic Headlamp System on page 3-16 for more information. ;(Parking Lamps): The interior lamp control (A) is used to adjust ...

Owner's Manual
Page 156
... and Displays The DIC has different modes which can be accessed by pressing the four buttons located on the steering wheel. The DIC buttons are listed in the following pages. 3-42 A. 3 (Trip Information): Press this button to display the odometer, trip odometer, timer, and outside air temperature. D. Be sure to display...
... and Displays The DIC has different modes which can be accessed by pressing the four buttons located on the steering wheel. The DIC buttons are listed in the following pages. 3-42 A. 3 (Trip Information): Press this button to display the odometer, trip odometer, timer, and outside air temperature. D. Be sure to display...

Owner's Manual
Page 166
DIC Vehicle Personalization Your vehicle has a personalization feature that allows you purchased. Move the turn signal is a list of the driver's seat. Press the select button to acknowledge this message and clear it from the display. See your vehicle. See Memory Seat on ...
DIC Vehicle Personalization Your vehicle has a personalization feature that allows you purchased. Move the turn signal is a list of the driver's seat. Press the select button to acknowledge this message and clear it from the display. See your vehicle. See Memory Seat on ...

Owner's Manual
Page 167
... seconds. When the mode you want is taken out of the ignition. Automatic Locking (Automatic Transmission only) This feature allows you to scroll through the list of modes. Press the personalization button until AUTOMATIC LOCKING appears in the display. To access the modes for AUTOMATIC UNLOCKING, press the select button. If...
... seconds. When the mode you want is taken out of the ignition. Automatic Locking (Automatic Transmission only) This feature allows you to scroll through the list of modes. Press the personalization button until AUTOMATIC LOCKING appears in the display. To access the modes for AUTOMATIC UNLOCKING, press the select button. If...

Owner's Manual
Page 168
...the lock button. For more information on automatic door locks, see Programmable Automatic Door Locks on the remote keyless entry transmitter. Scroll through the list of modes. To access the modes for REMOTE LOCK FEEDBACK, press the select button. Once REMOTE LOCK FEEDBACK is displayed on the remote ...and advance to the next programmable feature. If you choose Mode 3, the horn will be no feedback when locking the vehicle. Scroll through the list of modes. If you choose Mode 1, the parking lamps will flash each time you choose Mode 2, there will chirp the second time ...
...the lock button. For more information on automatic door locks, see Programmable Automatic Door Locks on the remote keyless entry transmitter. Scroll through the list of modes. To access the modes for REMOTE LOCK FEEDBACK, press the select button. Once REMOTE LOCK FEEDBACK is displayed on the remote ...and advance to the next programmable feature. If you choose Mode 3, the horn will be no feedback when locking the vehicle. Scroll through the list of modes. If you choose Mode 1, the parking lamps will flash each time you choose Mode 2, there will chirp the second time ...

Owner's Manual
Page 169
... with the unlock symbol on the remote keyless entry transmitter. Once HEADLAMPS ON AT EXIT is selected, press the select button to scroll through the list of time you want the headlamps to the next programmable feature. Scroll through the following modes: Mode 1: UNLOCK FEEDBACK: BOTH Mode 2: UNLOCK FEEDBACK: OFF Mode...
... with the unlock symbol on the remote keyless entry transmitter. Once HEADLAMPS ON AT EXIT is selected, press the select button to scroll through the list of time you want the headlamps to the next programmable feature. Scroll through the following modes: Mode 1: UNLOCK FEEDBACK: BOTH Mode 2: UNLOCK FEEDBACK: OFF Mode...

Owner's Manual
Page 170
...vehicle. If you choose Mode 3, the memory seat position you unlock the vehicle with the remote keyless entry transmitter. Scroll through the list of modes. Once PERIMETER LIGHTING is dark enough outside, when you saved will come on the DIC, press the personalization button to ...the modes for PERIMETER LIGHTING, press the select button. Press the personalization button until SEAT POSITION RECALL appears in the display. Scroll through the list of modes. Once SEAT POSITION RECALL is selected, press the select button to scroll through the following modes: Mode 1: SEAT RECALL: OFF...
...vehicle. If you choose Mode 3, the memory seat position you unlock the vehicle with the remote keyless entry transmitter. Scroll through the list of modes. Once PERIMETER LIGHTING is dark enough outside, when you saved will come on the DIC, press the personalization button to ...the modes for PERIMETER LIGHTING, press the select button. Press the personalization button until SEAT POSITION RECALL appears in the display. Scroll through the list of modes. Once SEAT POSITION RECALL is selected, press the select button to scroll through the following modes: Mode 1: SEAT RECALL: OFF...

Owner's Manual
Page 171
... the personalization button and the trip information button at the same time. Once DISPLAY LANGUAGE is selected, press the select button to scroll through the list of alarm warning feedback that will flash when the alarm is active. If you accidentally choose a language that you chose. 3-57 When you see...
... the personalization button and the trip information button at the same time. Once DISPLAY LANGUAGE is selected, press the select button to scroll through the list of alarm warning feedback that will flash when the alarm is active. If you accidentally choose a language that you chose. 3-57 When you see...

Owner's Manual
Page 172
... with your favorite radio stations, setting the tone and adjusting the speakers. While your vehicle is selected, press the select button to scroll through the list of its features. Scroll through the following to set up your audio system by presetting your vehicle's audio system, you want is a necessity for DISPLAY...
... with your favorite radio stations, setting the tone and adjusting the speakers. While your vehicle is selected, press the select button to scroll through the list of its features. Scroll through the following to set up your audio system by presetting your vehicle's audio system, you want is a necessity for DISPLAY...

Owner's Manual
Page 173
... system by checking with all of your vehicle operate through the GM radio/entertainment system. Notice: The chime signals related to audio stations and song listings. Then, when driving conditions permit, you or others can be added, it is very important to do it . Added sound equipment may interfere with the...
... system by checking with all of your vehicle operate through the GM radio/entertainment system. Notice: The chime signals related to audio stations and song listings. Then, when driving conditions permit, you or others can be added, it is very important to do it . Added sound equipment may interfere with the...

Owner's Manual
Page 182
... CD does not contain any playlists, then play enters a new folder, the display will search playlists (Px) first and then go to their numerical listing.
... CD does not contain any playlists, then play enters a new folder, the display will search playlists (Px) first and then go to their numerical listing.

Owner's Manual
Page 195
... RDM again to turn off random play. 3-81 Press RPT again to turn off repeat play for more information on AUTO EQ, see "AUTO EQ" listed previously in random, rather than four seconds until SCAN appears on the CD you hear a beep. To scan one CD, press and hold RDM for...
... RDM again to turn off random play. 3-81 Press RPT again to turn off repeat play for more information on AUTO EQ, see "AUTO EQ" listed previously in random, rather than four seconds until SCAN appears on the CD you hear a beep. To scan one CD, press and hold RDM for...

Owner's Manual
Page 196
... listening. 3. Turn the CD player on and load it off. 3-82 Check to see that the CD changer is present, press the SONG LIST button to play. 4. S-LIST should not appear on the display. The selected display will begin to save tracks into memory. Press and hold the knob until the display... pressing the numbered pushbutton and then use the SEEK or TYPE right arrow to locate the track to be heard and S-LIST will sound to save the track into the song list feature, perform the following steps: 1. This feature is playing. Select the desired CD by using the SEEK or TYPE arrows...
... listening. 3. Turn the CD player on and load it off. 3-82 Check to see that the CD changer is present, press the SONG LIST button to play. 4. S-LIST should not appear on the display. The selected display will begin to save tracks into memory. Press and hold the knob until the display... pressing the numbered pushbutton and then use the SEEK or TYPE right arrow to locate the track to be heard and S-LIST will sound to save the track into the song list feature, perform the following steps: 1. This feature is playing. Select the desired CD by using the SEEK or TYPE arrows...

Owner's Manual
Page 197
...heard immediately. After a track has been deleted, the remaining tracks are automatically deleted from the song list. To delete the entire song list, perform the following steps: 1. Press and hold the SONG LIST button for more than four seconds. One beep will be heard, followed by two beeps after four... seconds. To end song list mode, press the SONG LIST button. When another track is added to the end of the list. S-LIST will appear on the display indicating the song list has been deleted. If a CD is pressed, one beep will be...
...heard immediately. After a track has been deleted, the remaining tracks are automatically deleted from the song list. To delete the entire song list, perform the following steps: 1. Press and hold the SONG LIST button for more than four seconds. One beep will be heard, followed by two beeps after four... seconds. To end song list mode, press the SONG LIST button. When another track is added to the end of the list. S-LIST will appear on the display indicating the song list has been deleted. If a CD is pressed, one beep will be...

Owner's Manual
Page 237
... (GCWR) is the total allowable weight of the completely loaded vehicle and trailer including any special equipment that you can write us at the address listed in the tow vehicle and it has all important. The GCWR for your vehicle, and the amount of tongue weight the vehicle can carry. In...
... (GCWR) is the total allowable weight of the completely loaded vehicle and trailer including any special equipment that you can write us at the address listed in the tow vehicle and it has all important. The GCWR for your vehicle, and the amount of tongue weight the vehicle can carry. In...

Owner's Manual
Page 252
... 1-51. To order the proper service manual, see Servicing Your Airbag-Equipped Vehicle on page 6-15. 5-4 You should keep a record with all parts receipts and list the mileage and the date of any vehicle maintenance task. • Be sure to use the proper nuts, bolts, and other fasteners. It tells you...
... 1-51. To order the proper service manual, see Servicing Your Airbag-Equipped Vehicle on page 6-15. 5-4 You should keep a record with all parts receipts and list the mileage and the date of any vehicle maintenance task. • Be sure to use the proper nuts, bolts, and other fasteners. It tells you...

Owner's Manual
Page 268
Change the fluid and filter at the intervals listed in Additional Required Services on page 6-12. Wait at the dealership service department. If it is colder than 50°F (10°C), drive the vehicle ...;ve minutes if outside temperatures are 50°F (10°C) or more. Should the fluid level be sure to use the transmission fluid listed in hot weather. How to Check Automatic Transmission Fluid Because this is colder than 50°F (10°C), you have been driving: When outside temperatures...
Change the fluid and filter at the intervals listed in Additional Required Services on page 6-12. Wait at the dealership service department. If it is colder than 50°F (10°C), drive the vehicle ...;ve minutes if outside temperatures are 50°F (10°C) or more. Should the fluid level be sure to use the transmission fluid listed in hot weather. How to Check Automatic Transmission Fluid Because this is colder than 50°F (10°C), you have been driving: When outside temperatures...