Owner's Manual
Page 50
... tether anchors for additional information. 1-44 There is no place to access the anchors. You may need to adjust the rear compartment storage panel/cover in the rear cargo area to attach the top tether in the right front passenger's position if a national or local law requires that the top tether be...
... tether anchors for additional information. 1-44 There is no place to access the anchors. You may need to adjust the rear compartment storage panel/cover in the rear cargo area to attach the top tether in the right front passenger's position if a national or local law requires that the top tether be...
Owner's Manual
Page 52
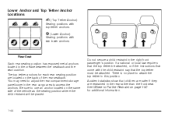
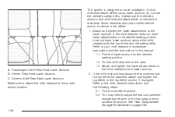
... tether anchor. 2.2. Passenger's Side Rear Seat Lower Anchors B. Refer to your child restraint manufacturer instructions and the instructions in the rear cargo area to the lower anchors. 2. Attach and tighten the lower attachments on page 2-38. Refer to make installation of child restraints easier...the anchors. When using lower anchors, do not use the vehicle's anchors and child restraint attachments to adjust the rear compartment storage panel/cover in this manual. 1.1. Find the lower anchors for the desired seating position. 1.2. This system is designed to the child ...
... tether anchor. 2.2. Passenger's Side Rear Seat Lower Anchors B. Refer to your child restraint manufacturer instructions and the instructions in the rear cargo area to the lower anchors. 2. Attach and tighten the lower attachments on page 2-38. Refer to make installation of child restraints easier...the anchors. When using lower anchors, do not use the vehicle's anchors and child restraint attachments to adjust the rear compartment storage panel/cover in this manual. 1.1. Find the lower anchors for the desired seating position. 1.2. This system is designed to the child ...
Owner's Manual
Page 59
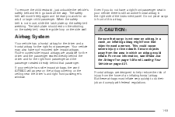
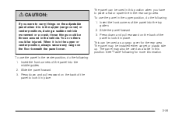
Do not place cargo in front of an in your vehicle has side impact airbags, the word AIRBAG will move ... on the stitching on the side wall. Secure objects away from the force of this airbag. {CAUTION: Be sure that cargo is not near the guide loop on the safety belt, near an airbag. Frontal airbags are available for the driver and the...-mounted side impact airbags. In a crash, an in flate very quickly to help reduce the risk of the instrument panel. This could cause severe injury or even death. If your vehicle there is not in flate. When the safety belt...
Do not place cargo in front of an in your vehicle has side impact airbags, the word AIRBAG will move ... on the stitching on the side wall. Secure objects away from the force of this airbag. {CAUTION: Be sure that cargo is not near the guide loop on the safety belt, near an airbag. Frontal airbags are available for the driver and the...-mounted side impact airbags. In a crash, an in flate very quickly to help reduce the risk of the instrument panel. This could cause severe injury or even death. If your vehicle there is not in flate. When the safety belt...
Owner's Manual
Page 107
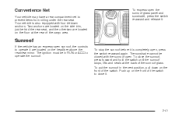
... capacity when loading your vehicle. This will be able to move the crossrail into a new position. 2-37 Do not stand on plastic lower body panel when loading cargo on the slats as far forward as you are driving, check now and then to make sure the luggage carrier crossrails are locked and... cargo is not in the siderail. When the luggage carrier is still securely fastened. To reposition the crossrail, pull up on the end levers of the ...
... capacity when loading your vehicle. This will be able to move the crossrail into a new position. 2-37 Do not stand on plastic lower body panel when loading cargo on the slats as far forward as you are driving, check now and then to make sure the luggage carrier crossrails are locked and... cargo is not in the siderail. When the luggage carrier is still securely fastened. To reposition the crossrail, pull up on the end levers of the ...
Owner's Manual
Page 108
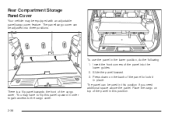
... you need additional space above the panel. The panel can be adjusted into the lower guides. 2. Rear Compartment Storage Panel/Cover Your vehicle may have to the cargo cover. 2-38 Insert the front corners of the panel in this panel upward in place. The panel/cargo cover can be equipped with an adjustable panel/cargo cover feature. There is a fl...
... you need additional space above the panel. The panel can be adjusted into the lower guides. 2. Rear Compartment Storage Panel/Cover Your vehicle may have to the cargo cover. 2-38 Insert the front corners of the panel in this panel upward in place. The panel/cargo cover can be equipped with an adjustable panel/cargo cover feature. There is a fl...
Owner's Manual
Page 109
...you were to carry things on the floor beneath the panel/cover. This can be installed either carpet or plastic side up. The panel can be injured. Slide the panel forward. 3. The panel may be used as a cargo cover for more information. 2-39 See "Table" following for ...the rear area. Insert the front corners of the panel into the middle guides. 2. To use the panel in the center position...
...you were to carry things on the floor beneath the panel/cover. This can be installed either carpet or plastic side up. The panel can be injured. Slide the panel forward. 3. The panel may be used as a cargo cover for more information. 2-39 See "Table" following for ...the rear area. Insert the front corners of the panel into the middle guides. 2. To use the panel in the center position...
Owner's Manual
Page 111
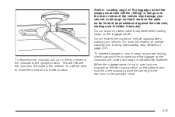
... floor at the back of the sunroof glass. To stop the sunroof before it is also equipped with the sunroof open the sunroof glass panel and sunshade, press the switch rearward and release it. To put the sunroof in RUN or ACC to operate it . 2-41 To express-open . The... four tie-down on the front of the switch to prevent items from rolling under the rear seat. Push up on the front of the cargo area.
... floor at the back of the sunroof glass. To stop the sunroof before it is also equipped with the sunroof open the sunroof glass panel and sunshade, press the switch rearward and release it. To put the sunroof in RUN or ACC to operate it . 2-41 To express-open . The... four tie-down on the front of the switch to prevent items from rolling under the rear seat. Push up on the front of the cargo area.
Owner's Manual
Page 113
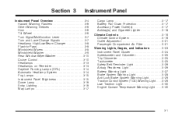
...Panel Cargo Lamp ...3-17 Battery Run-Down Protection ...3-17 Accessory Power Outlet(s) ...3-17 Ashtray(s) and Cigarette Lighter ...3-18 Climate Controls ...3-19 Climate Control System ...3-19 Outlet Adjustment ...3-21 Passenger Compartment Air Filter ...3-21 Warning Lights, Gages, and Indicators ...3-23 Instrument Panel... Control System (TCS) Warning Light ...3-29 Low Traction Light ...3-30 Engine Coolant Temperature Warning Light ...3-30 Instrument Panel Overview ...3-4 Hazard Warning Flashers ...3-6 Other Warning Devices ...3-6 Horn ...3-6 Tilt Wheel ...3-6 Turn Signal/Multifunction Lever ...
...Panel Cargo Lamp ...3-17 Battery Run-Down Protection ...3-17 Accessory Power Outlet(s) ...3-17 Ashtray(s) and Cigarette Lighter ...3-18 Climate Controls ...3-19 Climate Control System ...3-19 Outlet Adjustment ...3-21 Passenger Compartment Air Filter ...3-21 Warning Lights, Gages, and Indicators ...3-23 Instrument Panel... Control System (TCS) Warning Light ...3-29 Low Traction Light ...3-30 Engine Coolant Temperature Warning Light ...3-30 Instrument Panel Overview ...3-4 Hazard Warning Flashers ...3-6 Other Warning Devices ...3-6 Horn ...3-6 Tilt Wheel ...3-6 Turn Signal/Multifunction Lever ...
Owner's Manual
Page 306
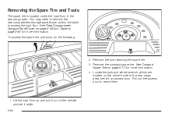
Removing the Spare Tire and Tools The spare tire is located under the load floor in the rear cargo area. See Rear Compartment Storage Panel/Cover on page 2-38 and Table on page 5-73 for more information. 4. Remove the bolt retaining the spare tire. 3. See Compact Spare Tire on page... 2-40 for more information. You may need to remove the rear compartment storage panel/cover and/or the table to reach them. 1. Remove the compact spare tire. Pull out the access door to access the load floor....
Removing the Spare Tire and Tools The spare tire is located under the load floor in the rear cargo area. See Rear Compartment Storage Panel/Cover on page 2-38 and Table on page 5-73 for more information. 4. Remove the bolt retaining the spare tire. 3. See Compact Spare Tire on page... 2-40 for more information. You may need to remove the rear compartment storage panel/cover and/or the table to reach them. 1. Remove the compact spare tire. Pull out the access door to access the load floor....
Owner's Manual
Page 314
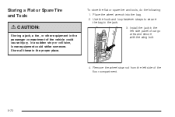
... equipment could cause injury. Install the jack in the left side of the floor compartment. 5-72 Store all these in the passenger compartment of cargo area and secure with the wing bolt. 4. Place the wheel wrench into the bag. 2. Use the hook and loop fastener straps to secure the bag... to the jack. {CAUTION: Storing a jack, a tire, or other equipment in the proper place. 3. Remove the wheel stow rod from the left side panel of the vehicle could strike someone. Storing a Flat or Spare Tire and Tools To store the flat or spare tire and tools, do the...
... equipment could cause injury. Install the jack in the left side of the floor compartment. 5-72 Store all these in the passenger compartment of cargo area and secure with the wing bolt. 4. Place the wheel wrench into the bag. 2. Use the hook and loop fastener straps to secure the bag... to the jack. {CAUTION: Storing a jack, a tire, or other equipment in the proper place. 3. Remove the wheel stow rod from the left side panel of the vehicle could strike someone. Storing a Flat or Spare Tire and Tools To store the flat or spare tire and tools, do the...

Owner's Manual
Page 367
Care of Safety Belts ...Your CD Player ...Your CDs ...Cargo Lamp ...Center Console Storage Area ...Chains, Tire ...Check Engine Light ...Checking Things Under the Hood ...Chemical Paint Spotting ...Child Restraints Child Restraint ...1-50 1-40 3-84 3-18 Cleaning Aluminum Wheels ...5-80 Exterior Lamps/Lenses ...5-78 Fabric/Carpet ...5-75 Finish Care ...5-79 Inside of Your Vehicle ...5-74 Instrument Panel, Vinyl, and Other Plastic Surfaces ...5-77 Leather ...5-77 Tires ...5-80 Underbody Maintenance ...5-81 Washing Your Vehicle ...5-78 Weatherstrips ...5-78 Windshield and Wiper Blades ...5-79...
Care of Safety Belts ...Your CD Player ...Your CDs ...Cargo Lamp ...Center Console Storage Area ...Chains, Tire ...Check Engine Light ...Checking Things Under the Hood ...Chemical Paint Spotting ...Child Restraints Child Restraint ...1-50 1-40 3-84 3-18 Cleaning Aluminum Wheels ...5-80 Exterior Lamps/Lenses ...5-78 Fabric/Carpet ...5-75 Finish Care ...5-79 Inside of Your Vehicle ...5-74 Instrument Panel, Vinyl, and Other Plastic Surfaces ...5-77 Leather ...5-77 Tires ...5-80 Underbody Maintenance ...5-81 Washing Your Vehicle ...5-78 Weatherstrips ...5-78 Windshield and Wiper Blades ...5-79...
Owner's Manual
Page 371
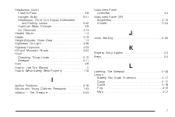
... Horn ...3-6 How to Use This Manual ...ii How to Wear Safety Belts Properly ...1-18 Instrument Panel Overview ...3-4 Instrument Panel (I/P) Brightness ...3-15 Cluster ...3-24 J Jump Starting ...5-35 K Keyless Entry System ...2-3 Keys ...2-2 L Labeling, Tire Sidewall ...Lamps Battery Run-Down Protection ...Cargo ...Dome ...Fog ...Map ...5-48 3-17 3-17 3-16 3-15 3-17 I Ignition Positions ...2-16 Infants and...
... Horn ...3-6 How to Use This Manual ...ii How to Wear Safety Belts Properly ...1-18 Instrument Panel Overview ...3-4 Instrument Panel (I/P) Brightness ...3-15 Cluster ...3-24 J Jump Starting ...5-35 K Keyless Entry System ...2-3 Keys ...2-2 L Labeling, Tire Sidewall ...Lamps Battery Run-Down Protection ...Cargo ...Dome ...Fog ...Map ...5-48 3-17 3-17 3-16 3-15 3-17 I Ignition Positions ...2-16 Infants and...


