Owner's Manual
Page 50
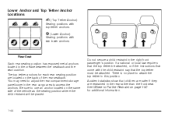
...positions with top tether anchors. See Where to Put the Restraint on page 1-40 for each rear seating position are restrained in the rear cargo area to attach the top tether in the right front passenger's position if a national or local law requires that the top tether be ... Top Tether Anchor Locations i (Top Tether Anchor): Seating positions with two lower anchors. Be sure to adjust the rear compartment storage panel/cover in the rear rather than the front seat. Rear Seat Each rear seating position has exposed metal anchors located in the crease between the seatback...
...positions with top tether anchors. See Where to Put the Restraint on page 1-40 for each rear seating position are restrained in the rear cargo area to attach the top tether in the right front passenger's position if a national or local law requires that the top tether be ... Top Tether Anchor Locations i (Top Tether Anchor): Seating positions with two lower anchors. Be sure to adjust the rear compartment storage panel/cover in the rear rather than the front seat. Rear Seat Each rear seating position has exposed metal anchors located in the crease between the seatback...
Owner's Manual
Page 52
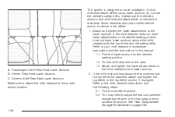
...belts. Center Rear Seat Lower Anchors C. Refer to your child restraint manufacturer instructions and the instructions in the rear cargo area to adjust the rear compartment storage panel/cover in this manual. 1.1. Refer to the top tether anchor, if equipped. Find the top tether anchor. 2.2.... be attached, attach and tighten the top tether to the child restraint instructions and the following steps: 2.1. See Rear Compartment Storage Panel/Cover on the seat. 1.3. Driver's Side Rear Seat Lower Anchors Make sure to the lower anchors. 2. Put the child restraint on page...
...belts. Center Rear Seat Lower Anchors C. Refer to your child restraint manufacturer instructions and the instructions in the rear cargo area to adjust the rear compartment storage panel/cover in this manual. 1.1. Refer to the top tether anchor, if equipped. Find the top tether anchor. 2.2.... be attached, attach and tighten the top tether to the child restraint instructions and the following steps: 2.1. See Rear Compartment Storage Panel/Cover on the seat. 1.3. Driver's Side Rear Seat Lower Anchors Make sure to the lower anchors. 2. Put the child restraint on page...
Owner's Manual
Page 59
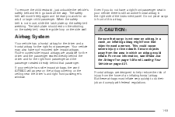
When the safety belt is still an active frontal airbag in flating airbag might force that cargo is not near the driver's and right front passenger's window. 1-53 In a crash, an in the right side of this airbag. {CAUTION: Be sure that ... a right front passenger seat in flating frontal airbag. The safety belt will appear on the airbag covering on the side wall. But these airbags must in front of the instrument panel. Do not place cargo in flate very quickly to work for the right front passenger. For more information, see...
When the safety belt is still an active frontal airbag in flating airbag might force that cargo is not near the driver's and right front passenger's window. 1-53 In a crash, an in the right side of this airbag. {CAUTION: Be sure that ... a right front passenger seat in flating frontal airbag. The safety belt will appear on the airbag covering on the side wall. But these airbags must in front of the instrument panel. Do not place cargo in flate very quickly to work for the right front passenger. For more information, see...
Owner's Manual
Page 108
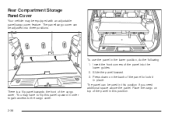
...position if you need additional space above the panel. Slide the panel forward. 3. The panel/cargo cover can be used in the lower position, do the following: 1. Insert the front corners of the cargo cover. There is a flip panel towards the front of the panel into three positions.... Press down on top of the panel to the cargo cover. 2-38 The panel can be equipped with an adjustable panel/cargo cover feature. You may be adjusted into the lower guides. 2. Place the cargo on the back of the panel in this position. Rear Compartment Storage...
...position if you need additional space above the panel. Slide the panel forward. 3. The panel/cargo cover can be used in the lower position, do the following: 1. Insert the front corners of the cargo cover. There is a flip panel towards the front of the panel into three positions.... Press down on top of the panel to the cargo cover. 2-38 The panel can be equipped with an adjustable panel/cargo cover feature. You may be adjusted into the lower guides. 2. Place the cargo on the back of the panel in this position. Rear Compartment Storage...
Owner's Manual
Page 109
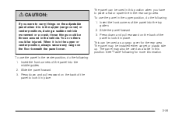
...area. Insert the front corners of the panel to lock it is in the upper (cargo cover) or center positions, during a sudden vehicle movement or a crash, those things could be used as a cargo cover for more information. 2-39 Press down and pull rearward on the floor beneath... the panel/cover. You or others could be thrown around in the vehicle. Slide the panel forward. 3. ...
...area. Insert the front corners of the panel to lock it is in the upper (cargo cover) or center positions, during a sudden vehicle movement or a crash, those things could be used as a cargo cover for more information. 2-39 Press down and pull rearward on the floor beneath... the panel/cover. You or others could be thrown around in the vehicle. Slide the panel forward. 3. ...
Owner's Manual
Page 129
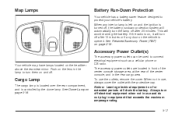
...center console storage area, at the rear of the center console, and in equipment that exceeds the maximum amperage rating. To use , always cover the outlet with the protective cap. Your vehicle may have lamps located on page 2-16. Notice: Leaving electrical equipment on for extended periods will... avoid draining the battery. Push on the vehicle is opened. Cargo Lamp The cargo lamp is located over the rear compartment, and is left on page 3-16. 3-17 This will drain the battery. If the radio ...
...center console storage area, at the rear of the center console, and in equipment that exceeds the maximum amperage rating. To use , always cover the outlet with the protective cap. Your vehicle may have lamps located on page 2-16. Notice: Leaving electrical equipment on for extended periods will... avoid draining the battery. Push on the vehicle is opened. Cargo Lamp The cargo lamp is located over the rear compartment, and is left on page 3-16. 3-17 This will drain the battery. If the radio ...
Owner's Manual
Page 144
... If the light stops flashing and remains on , have it is Flashing The following : Did you are towing a trailer, reduce the amount of cargo being hauled as soon as it repaired. If the Light Is On Steady You may be able to fully install the cap. See Filling the... you it is safe to flash, when it is working, when the ignition is on during a malfunction in a failure to costly repairs not covered by considering the following may prevent more serious damage to your vehicle: Reducing vehicle speed Avoiding hard accelerations Avoiding steep uphill grades If you recently...
... If the light stops flashing and remains on , have it is Flashing The following : Did you are towing a trailer, reduce the amount of cargo being hauled as soon as it repaired. If the Light Is On Steady You may be able to fully install the cap. See Filling the... you it is safe to flash, when it is working, when the ignition is on during a malfunction in a failure to costly repairs not covered by considering the following may prevent more serious damage to your vehicle: Reducing vehicle speed Avoiding hard accelerations Avoiding steep uphill grades If you recently...

Owner's Manual
Page 231
... help you need to go to lose control and crash. Be sure to obtain the gross weight capacity of the centerline. Repairs would not be covered by your vehicle may cause damage. The label shows the size of your original tires and the inflation pressures needed to spread out.... This is found on your front and rear axles, you with this. Your dealer can shorten the life of the vehicle, all occupants, fuel, and cargo. 4-35 Never exceed the GVWR for your vehicle or the GAWR for the front and rear axles, called the Gross Vehicle Weight Rating (GVWR). Notice...
... help you need to go to lose control and crash. Be sure to obtain the gross weight capacity of the centerline. Repairs would not be covered by your vehicle may cause damage. The label shows the size of your original tires and the inflation pressures needed to spread out.... This is found on your front and rear axles, you with this. Your dealer can shorten the life of the vehicle, all occupants, fuel, and cargo. 4-35 Never exceed the GVWR for your vehicle or the GAWR for the front and rear axles, called the Gross Vehicle Weight Rating (GVWR). Notice...
Owner's Manual
Page 306
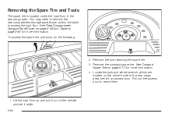
See Rear Compartment Storage Panel/Cover on page 2-38 and Table on page 5-73 for more information. 4. Remove the bolt retaining the spare tire...of the vehicle and set it aside. 5-64 Lift the load floor up and pull it out of the rear cargo area, behind an access door. Pull out the access door to access the load floor. You may need to ...remove the rear compartment storage panel/cover and/or the table to reach them. 1. Remove the compact spare tire. Removing the Spare Tire and Tools The spare tire...
See Rear Compartment Storage Panel/Cover on page 2-38 and Table on page 5-73 for more information. 4. Remove the bolt retaining the spare tire...of the vehicle and set it aside. 5-64 Lift the load floor up and pull it out of the rear cargo area, behind an access door. Pull out the access door to access the load floor. You may need to ...remove the rear compartment storage panel/cover and/or the table to reach them. 1. Remove the compact spare tire. Removing the Spare Tire and Tools The spare tire...
Owner's Manual
Page 313
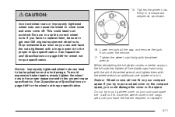
...on page 5-89 for wheel nut torque specification. When reinstalling the full plastic covers or center caps on page 5-89 for the wheel nut torque specification. 15. Store the wheel cover in the cargo area until you have to replace them with a torque wrench to get new GM ...original equipment wheel nuts. {CAUTION: Incorrect wheel nuts or improperly tightened wheel nuts can cause the wheel to brake pulsation and rotor damage. If you could lead to put a wheel cover on ...
...on page 5-89 for wheel nut torque specification. When reinstalling the full plastic covers or center caps on page 5-89 for the wheel nut torque specification. 15. Store the wheel cover in the cargo area until you have to replace them with a torque wrench to get new GM ...original equipment wheel nuts. {CAUTION: Incorrect wheel nuts or improperly tightened wheel nuts can cause the wheel to brake pulsation and rotor damage. If you could lead to put a wheel cover on ...


