
Owner's Manual
Page 7
... System Check ...1-89 Checking the Restraint Systems ...1-89 Replacing Restraint System Parts After a Crash ...1-90 Front Seats ...1-2 Manual Seats ...1-2 Six-Way Power Seats ...1-3 Heated Seats ...1-3 Reclining Seatbacks ...1-4 Head Restraints ...1-6 Rear Seats ...1-6 Rear Seat Operation ...1-6 Bucket Seats ...1-7 Captain Chairs ...1-14 Third Row Seat ...1-18 Safety Belts ...1-21 Safety Belts: They Are for Everyone ...1-21 Questions and Answers About Safety Belts...
... System Check ...1-89 Checking the Restraint Systems ...1-89 Replacing Restraint System Parts After a Crash ...1-90 Front Seats ...1-2 Manual Seats ...1-2 Six-Way Power Seats ...1-3 Heated Seats ...1-3 Reclining Seatbacks ...1-4 Head Restraints ...1-6 Rear Seats ...1-6 Rear Seat Operation ...1-6 Bucket Seats ...1-7 Captain Chairs ...1-14 Third Row Seat ...1-18 Safety Belts ...1-21 Safety Belts: They Are for Everyone ...1-21 Questions and Answers About Safety Belts...

Owner's Manual
Page 12
... safety belt cannot be removed. Head Restraints Rear Seats Rear Seat Operation The rear seats in your vehicle have levers and straps used to the top of your head. If your vehicle has second row captain chairs with airbags, the seats cannot be removed. The head restraints are in... the proper positions. When reinstalling the seats, make sure the seats are adjustable on page 2-51. See Second Row Center Console on the first and second row seats. By using the levers...
... safety belt cannot be removed. Head Restraints Rear Seats Rear Seat Operation The rear seats in your vehicle have levers and straps used to the top of your head. If your vehicle has second row captain chairs with airbags, the seats cannot be removed. The head restraints are in... the proper positions. When reinstalling the seats, make sure the seats are adjustable on page 2-51. See Second Row Center Console on the first and second row seats. By using the levers...

Owner's Manual
Page 13
...hooks on the rear of the seatback. 3. Push down firmly on the seat are in the fully lowered position. 2. Bucket Seats Your vehicle may have bucket seats in this feature for exiting and entering third row seats, if the vehicle has them. 1. Use this position. 4. Make sure the adjustable... head restraints are over the rear floor pins. Slide the seat all the way back in the second row. Align the seat so that the rear hooks attach to ...
...hooks on the rear of the seatback. 3. Push down firmly on the seat are in the fully lowered position. 2. Bucket Seats Your vehicle may have bucket seats in this feature for exiting and entering third row seats, if the vehicle has them. 1. Use this position. 4. Make sure the adjustable... head restraints are over the rear floor pins. Slide the seat all the way back in the second row. Align the seat so that the rear hooks attach to ...

Owner's Manual
Page 14
... lift the recline lever, located on the front right hand side of the seat. 1-8 That could move forward or rearward. {CAUTION: If the seatback is locked. Always push and pull on the second row bucket seats that it is not locked, it is located below the front of the seatback, to raise the... seatback to the person sitting there. One is locked. 4. One of the bucket seats may be sure it could cause injury to the upright...
... lift the recline lever, located on the front right hand side of the seat. 1-8 That could move forward or rearward. {CAUTION: If the seatback is locked. Always push and pull on the second row bucket seats that it is not locked, it is located below the front of the seatback, to raise the... seatback to the person sitting there. One is locked. 4. One of the bucket seats may be sure it could cause injury to the upright...

Owner's Manual
Page 15
...recline lever, located on the front right hand side of the seat. Folding or Reclining the Seatbacks The seatback on a bucket seat can either lever and slide the seat forward or rearward. 2. Fold the seatback forward. 1-9 Push and pull on the seat to release the seatback. 2. The other lever is located ...on the rear of the seatback to make sure it is in the desired position. 3. To adjust the second row bucket seats forward or rearward,...
...recline lever, located on the front right hand side of the seat. Folding or Reclining the Seatbacks The seatback on a bucket seat can either lever and slide the seat forward or rearward. 2. Fold the seatback forward. 1-9 Push and pull on the seat to release the seatback. 2. The other lever is located ...on the rear of the seatback to make sure it is in the desired position. 3. To adjust the second row bucket seats forward or rearward,...

Owner's Manual
Page 20
...captain chairs with side impact airbags, they can be adjusted forward or rearward and the seatbacks can be adjusted. The other one armrest on the seat to the desired position. Release the lever. Folding or Reclining the Seatbacks To recline the seatback, lift up on the outboard side of the ... the seatback forward until it is located under the rear of the seat cushion. The armrests can be lowered or raised for easier entry or exit of the seat, then move forward in place. If so, they will have second row captain chairs. To raise the seatback, lift up on the recliner ...
...captain chairs with side impact airbags, they can be adjusted forward or rearward and the seatbacks can be adjusted. The other one armrest on the seat to the desired position. Release the lever. Folding or Reclining the Seatbacks To recline the seatback, lift up on the outboard side of the ... the seatback forward until it is located under the rear of the seat cushion. The armrests can be lowered or raised for easier entry or exit of the seat, then move forward in place. If so, they will have second row captain chairs. To raise the seatback, lift up on the recliner ...
Owner's Manual
Page 22
... the second row, if you want more storage room behind the seat, adjust the seat by sliding it is improperly routed, not properly attached, or twisted will not provide the protection needed in a crash. Always push and pull on the correct side of the seats and the seats are on the...sure it forward. Installing a Captain Chair (without a Side Impact Airbag) {CAUTION: A safety belt that way. After installing the seat, always check to lock the seat into place properly can move forward in the full rear position before beginning this procedure. {CAUTION: If the seatback is not locked into...
... the second row, if you want more storage room behind the seat, adjust the seat by sliding it is improperly routed, not properly attached, or twisted will not provide the protection needed in a crash. Always push and pull on the correct side of the seats and the seats are on the...sure it forward. Installing a Captain Chair (without a Side Impact Airbag) {CAUTION: A safety belt that way. After installing the seat, always check to lock the seat into place properly can move forward in the full rear position before beginning this procedure. {CAUTION: If the seatback is not locked into...
Owner's Manual
Page 24
..., and push the seatback down until it is not locked, it is a full bench seat and may have a third row seat. Folding the Seatback(s) To fold down either the front or rear of the seat you want to raise the seat. 3. It is locked. That could move forward in a sudden stop or crash. To raise... removed and replaced, or with the seatback folded, it will lie flat with the convenience center. See Convenience Center on the back of the seat cushion. 2. Move the second row seat completely forward by using the manual adjustment bar under either side of the 50/50 split bench...
..., and push the seatback down until it is not locked, it is a full bench seat and may have a third row seat. Folding the Seatback(s) To fold down either the front or rear of the seat you want to raise the seat. 3. It is locked. That could move forward in a sudden stop or crash. To raise... removed and replaced, or with the seatback folded, it will lie flat with the convenience center. See Convenience Center on the back of the seat cushion. 2. Move the second row seat completely forward by using the manual adjustment bar under either side of the 50/50 split bench...

Owner's Manual
Page 25
... the release handle until the pin indicators are off the seat. 3. Remove the convenience center, if equipped. See Convenience Center on page 2-53 for more information. 2. Make sure all items are fully out. Removing the Third Row Seat 1. For ease of removing the seat, squeeze the handle with the palm of the vehicle. Pull...
... the release handle until the pin indicators are off the seat. 3. Remove the convenience center, if equipped. See Convenience Center on page 2-53 for more information. 2. Make sure all items are fully out. Removing the Third Row Seat 1. For ease of removing the seat, squeeze the handle with the palm of the vehicle. Pull...

Owner's Manual
Page 26
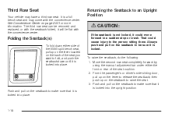
... the rear latches will need to the rear set of installing the seat, put the third row seat in the vehicle could be injured. People in so it faces rearward because it . Installing the Third Row Seat {CAUTION: A seat that is improperly routed, not properly attached, or twisted will not ...latch that way. See Convenience Center on the rear of the seat onto the front floor pins in the folded position before...
... the rear latches will need to the rear set of installing the seat, put the third row seat in the vehicle could be injured. People in so it faces rearward because it . Installing the Third Row Seat {CAUTION: A seat that is improperly routed, not properly attached, or twisted will not ...latch that way. See Convenience Center on the rear of the seat onto the front floor pins in the folded position before...

Owner's Manual
Page 43
... guide over the belt and insert the two edges of the belt into the slots of the seatback. 1-37 If your vehicle has a third row, there is one guide for each outboard position. Rear Safety Belt Comfort Guides Rear safety belt comfort guides may provide added safety belt comfort for... older children who have outgrown booster seats and for each second row position. Remove the guide from the neck and head. Here is one guide for some adults. There is how to install a comfort...
... guide over the belt and insert the two edges of the belt into the slots of the seatback. 1-37 If your vehicle has a third row, there is one guide for each outboard position. Rear Safety Belt Comfort Guides Rear safety belt comfort guides may provide added safety belt comfort for... older children who have outgrown booster seats and for each second row position. Remove the guide from the neck and head. Here is one guide for some adults. There is how to install a comfort...

Owner's Manual
Page 60
... with top tether anchors. Third Row 1-54 Second Row i (Top Tether Anchor): Seating positions with two lower anchors. To assist you in locating the lower anchors, each seat. For the second row seating positions, the top tether anchors are located. Be sure to use an anchor located on the seatback, ...near the base of the vehicle as the seating position where the child restraint will be placed. Lower...
... with top tether anchors. Third Row 1-54 Second Row i (Top Tether Anchor): Seating positions with two lower anchors. To assist you in locating the lower anchors, each seat. For the second row seating positions, the top tether anchors are located. Be sure to use an anchor located on the seatback, ...near the base of the vehicle as the seating position where the child restraint will be placed. Lower...
Owner's Manual
Page 61
...child restraint say that the top tether must be attached. Third Row Second Row For the center third row position, if equipped, the top tether anchor is no place to Put the Restraint on the seatback, near the center of the third row seating position. Do not secure a child restraint in the right front... passenger's position or in the rear rather than the front seat. This anchor can accommodate only one top tether. See Where to attach the top...
...child restraint say that the top tether must be attached. Third Row Second Row For the center third row position, if equipped, the top tether anchor is no place to Put the Restraint on the seatback, near the center of the third row seating position. Do not secure a child restraint in the right front... passenger's position or in the rear rather than the front seat. This anchor can accommodate only one top tether. See Where to attach the top...

Owner's Manual
Page 64
... the child restraint. Be sure to follow the instructions that come with the LATCH system, see Lower Anchors and Tethers for Children (LATCH) on the seat. 2. Buckle the belt. Make sure the release button is equipped with the child restraint say . 1. The child restraint instructions will be able to ...child restraint does not have the LATCH system, you will show you how. 3. Do not secure a child seat in these positions if a national or local law requires that the top tether be anchored, or if the instructions that came with a third row, there are no top tether anchors in the outboard...
... the child restraint. Be sure to follow the instructions that come with the LATCH system, see Lower Anchors and Tethers for Children (LATCH) on the seat. 2. Buckle the belt. Make sure the release button is equipped with the child restraint say . 1. The child restraint instructions will be able to ...child restraint does not have the LATCH system, you will show you how. 3. Do not secure a child seat in these positions if a national or local law requires that the top tether be anchored, or if the instructions that came with a third row, there are no top tether anchors in the outboard...
Owner's Manual
Page 70
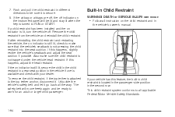
...and in different directions to make sure the child restraint is still lit, secure the child in the child restraint in a rear seat position in the second row. Unbuckle the vehicle's safety belt and let it is attached to all the way. Built-In Child Restraint WARNING! 7. If ...passenger. This child restraint system conforms to the top tether anchor, disconnect it. If this happens, slightly recline the vehicle's seatback and adjust the seat cushion if possible. If your dealer. To remove the child restraint, if the top tether is secure. 8. If a child restraint has been ...
...and in different directions to make sure the child restraint is still lit, secure the child in the child restraint in a rear seat position in the second row. Unbuckle the vehicle's safety belt and let it is attached to all the way. Built-In Child Restraint WARNING! 7. If ...passenger. This child restraint system conforms to the top tether anchor, disconnect it. If this happens, slightly recline the vehicle's seatback and adjust the seat cushion if possible. If your dealer. To remove the child restraint, if the top tether is secure. 8. If a child restraint has been ...
Owner's Manual
Page 150
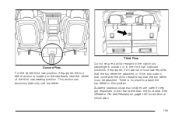
... on the convenience center to remove it to make sure it is aligned on page 1-18 for more information. The convenience center and the third row seat both have a maximum weight capacity of the convenience center can be left in its upright position while the vehicle is not in and align it... the hand knob, located at the rear of the vehicle. 2-54 Replacing the Convenience Center 1. Make sure the third row seat is loose. 3. Removing the Convenience Center 1. Make sure that all items are off the convenience center and that the convenience center is empty and closed. 3. ...
... on the convenience center to remove it to make sure it is aligned on page 1-18 for more information. The convenience center and the third row seat both have a maximum weight capacity of the convenience center can be left in its upright position while the vehicle is not in and align it... the hand knob, located at the rear of the vehicle. 2-54 Replacing the Convenience Center 1. Make sure the third row seat is loose. 3. Removing the Convenience Center 1. Make sure that all items are off the convenience center and that the convenience center is empty and closed. 3. ...
Owner's Manual
Page 173
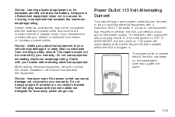
... when equipment that can cause damage not covered by your vehicle may have a power outlet that operates within the limit is located behind the third row seats on accessory power outlets. Power Outlet 115 Volt Alternating Current Your vehicle may damage it back in or turn off electrical equipment when not in...
... when equipment that can cause damage not covered by your vehicle may have a power outlet that operates within the limit is located behind the third row seats on accessory power outlets. Power Outlet 115 Volt Alternating Current Your vehicle may damage it back in or turn off electrical equipment when not in...

Owner's Manual
Page 376
... up to the brakes, suspension or other vehicle parts. See Liftgate on page 1-18 for more information. 3. If you to move the third row rear seatback forward. See Third Row Seat on page 2-22 for more information. 2. Tire Chains Accessory Inflator Your vehicle may be injured in a crash. Follow that will...
... up to the brakes, suspension or other vehicle parts. See Liftgate on page 1-18 for more information. 3. If you to move the third row rear seatback forward. See Third Row Seat on page 2-22 for more information. 2. Tire Chains Accessory Inflator Your vehicle may be injured in a crash. Follow that will...
Owner's Manual
Page 455
...Properly ...1-26 Questions and Answers About Safety Belts ...1-25 Rear Safety Belt Comfort Guides ...1-37 Rear Seat Passengers ...1-34 Right Front Passenger Position ...1-34 Safety Belt Extender ...1-39 Safety Belt Use During ...Seats Bucket Seats, Rear ...1-7 Captain Chairs ...1-14 Head Restraints ...1-6 Heated Seats ...1-3 Manual ...1-2 Rear Seat Operation ...1-6 Reclining Seatbacks ...1-4 Seats (cont.) Six-Way Power Seats ...1-3 Third Row Seat ...1-18 Second Row Center Console ...2-51 Secondary Latch System ...5-77 Securing a Child Restraint Rear Seat Position ...1-58 Right Front Seat...
...Properly ...1-26 Questions and Answers About Safety Belts ...1-25 Rear Safety Belt Comfort Guides ...1-37 Rear Seat Passengers ...1-34 Right Front Passenger Position ...1-34 Safety Belt Extender ...1-39 Safety Belt Use During ...Seats Bucket Seats, Rear ...1-7 Captain Chairs ...1-14 Head Restraints ...1-6 Heated Seats ...1-3 Manual ...1-2 Rear Seat Operation ...1-6 Reclining Seatbacks ...1-4 Seats (cont.) Six-Way Power Seats ...1-3 Third Row Seat ...1-18 Second Row Center Console ...2-51 Secondary Latch System ...5-77 Securing a Child Restraint Rear Seat Position ...1-58 Right Front Seat...
Owner's Manual
Page 456
...(s) ...2-48 Floor Console Storage Area ...2-50 Folding Tray ...2-50 Glove Box ...2-48 Luggage Carrier ...2-52 Overhead Console ...2-49, 2-50 Second Row Center Console ...2-51 Stuck in Sand, Mud, Ice or Snow ...4-29 Sun Visors ...2-26 Switchbanks Overhead Console ...3-20 T Tachometer ...3-33 ...Radio ...3-113 Theft-Deterrent Systems ...2-26 Content Theft-Deterrent ...2-27 PASS-Key® III ...2-28 PASS-Key® III Operation ...2-29 Third Row Seat ...1-18 Tilt Wheel ...3-6 Tires ...5-50 Aluminum Wheels, Cleaning ...5-89 Buying New Tires ...5-59 Chains ...5-64 Changing a Flat Tire ...5-66 ...
...(s) ...2-48 Floor Console Storage Area ...2-50 Folding Tray ...2-50 Glove Box ...2-48 Luggage Carrier ...2-52 Overhead Console ...2-49, 2-50 Second Row Center Console ...2-51 Stuck in Sand, Mud, Ice or Snow ...4-29 Sun Visors ...2-26 Switchbanks Overhead Console ...3-20 T Tachometer ...3-33 ...Radio ...3-113 Theft-Deterrent Systems ...2-26 Content Theft-Deterrent ...2-27 PASS-Key® III ...2-28 PASS-Key® III Operation ...2-29 Third Row Seat ...1-18 Tilt Wheel ...3-6 Tires ...5-50 Aluminum Wheels, Cleaning ...5-89 Buying New Tires ...5-59 Chains ...5-64 Changing a Flat Tire ...5-66 ...


