
Owner's Manual
Page 98
Section 2 Features and Controls Luggage Carrier ...2-52 Convenience Net (With Rear Convenience Center) ...2-52 Convenience Net (Without Rear Convenience Center) ...2-53 Convenience Center ...2-53 Storage Areas ...2-48 Glove Box ...2-48 Cupholder(s) ...2-48 Overhead Console (With Rail) ...2-49 Overhead Console (Without Rail) ...2-50 Floor Console Storage Area ...2-50 Folding Tray ...2-50 Second Row Center Console ...2-51 2-2
Section 2 Features and Controls Luggage Carrier ...2-52 Convenience Net (With Rear Convenience Center) ...2-52 Convenience Net (Without Rear Convenience Center) ...2-53 Convenience Center ...2-53 Storage Areas ...2-48 Glove Box ...2-48 Cupholder(s) ...2-48 Overhead Console (With Rail) ...2-49 Overhead Console (Without Rail) ...2-50 Floor Console Storage Area ...2-50 Folding Tray ...2-50 Second Row Center Console ...2-51 2-2
Owner's Manual
Page 138
... provide you lock your shoulder before changing lanes. Outside Heated Mirrors If the vehicle has outside heated rearview mirrors, they are included in the vehicle's glove box literature. A complete OnStar® User's Guide and the Terms and Conditions of safety, security, information, and convenience services.
... provide you lock your shoulder before changing lanes. Outside Heated Mirrors If the vehicle has outside heated rearview mirrors, they are included in the vehicle's glove box literature. A complete OnStar® User's Guide and the Terms and Conditions of safety, security, information, and convenience services.

Owner's Manual
Page 139
...®, the Safe and Sound Plan is included for more about OnStar® Personal Calling, refer to the OnStar® User's Guide in the vehicle's glove box, visit www.onstar.com or www.onstar.ca, or speak to an advisor. Calls can extend this plan beyond the first year, or upgrade...
...®, the Safe and Sound Plan is included for more about OnStar® Personal Calling, refer to the OnStar® User's Guide in the vehicle's glove box, visit www.onstar.com or www.onstar.ca, or speak to an advisor. Calls can extend this plan beyond the first year, or upgrade...
Owner's Manual
Page 144
...to prevent the door from lowering too far. For additional information on Universal Home Remote, see Customer Assistance Offices on page 7-4. Open the glove box until the door is partway open, then pull the door down if you to Universal Home Remote using a Universal Home Remote button previously...not in this section. Press and hold the desired Universal Home Remote button. There may be pushed up past the detent. To lock the glove box, put your key into the lock and turn the key counterclockwise. Reprogramming a Single Universal Home Remote Button To program a device to open ...
...to prevent the door from lowering too far. For additional information on Universal Home Remote, see Customer Assistance Offices on page 7-4. Open the glove box until the door is partway open, then pull the door down if you to Universal Home Remote using a Universal Home Remote button previously...not in this section. Press and hold the desired Universal Home Remote button. There may be pushed up past the detent. To lock the glove box, put your key into the lock and turn the key counterclockwise. Reprogramming a Single Universal Home Remote Button To program a device to open ...
Owner's Manual
Page 155
... 3-16. Q. See Turn Signal/Multifunction Lever on page 3-32. See Instrument Panel Cluster on page 3-7. F. Interior Lamps Control. M. See Glove Box on page 3-17. Air Outlets. Audio System. Hood Release. R. Passenger Airbag Status And Passenger Seatbelt Reminder Indicator. See Interior Lamps Control on... See Hazard Warning Flashers on page 3-34. G. The main components of the instrument panel are the following: A. Glove Box. P. B. See Passenger Airbag Status Indicator on page 3-35 and Passenger Safety Belt Reminder Light on page 3-6. See Parking Brake on ...
... 3-16. Q. See Turn Signal/Multifunction Lever on page 3-32. See Instrument Panel Cluster on page 3-7. F. Interior Lamps Control. M. See Glove Box on page 3-17. Air Outlets. Audio System. Hood Release. R. Passenger Airbag Status And Passenger Seatbelt Reminder Indicator. See Interior Lamps Control on... See Hazard Warning Flashers on page 3-34. G. The main components of the instrument panel are the following: A. Glove Box. P. B. See Passenger Airbag Status Indicator on page 3-35 and Passenger Safety Belt Reminder Light on page 3-6. See Parking Brake on ...
Owner's Manual
Page 179
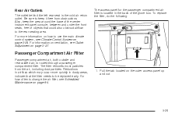
... page 6-4. 1. Be sure to keep the area around the base of the center instrument panel console, between and under the front seats, free of the glove box. Reductions in airflow, which may occur more information on how to be replaced early. For more quickly in the back of objects that...
... page 6-4. 1. Be sure to keep the area around the base of the center instrument panel console, between and under the front seats, free of the glove box. Reductions in airflow, which may occur more information on how to be replaced early. For more quickly in the back of objects that...
Owner's Manual
Page 180
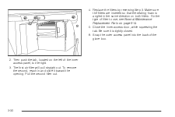
... to the right. 3. Pull the second filter out. 3-30 The first air filter will pull straight out. For the type of the glove box. 2. Then push the tab, located on both filters. Close the inner access door, while squeezing the tab. Be sure it toward the opening. Make...
... to the right. 3. Pull the second filter out. 3-30 The first air filter will pull straight out. For the type of the glove box. 2. Then push the tab, located on both filters. Close the inner access door, while squeezing the tab. Be sure it toward the opening. Make...
Owner's Manual
Page 312
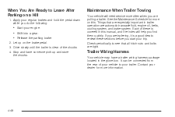
... You Are Ready to your trailer. Stop and have a trailer wiring harness package located in this . Drive slowly until the trailer is covered in the glove box. It can be connected from the rear of the chocks. 4.
... You Are Ready to your trailer. Stop and have a trailer wiring harness package located in this . Drive slowly until the trailer is covered in the glove box. It can be connected from the rear of the chocks. 4.
Owner's Manual
Page 404
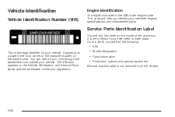
... in the front corner of the instrument panel, on the Vehicle Certification and Service Parts labels and the certificates of the glove box. The VIN also appears on the driver's side.
... in the front corner of the instrument panel, on the Vehicle Certification and Service Parts labels and the certificates of the glove box. The VIN also appears on the driver's side.

Owner's Manual
Page 450
G Gage Engine Coolant Temperature ...3-40 Fuel ...3-45 Speedometer ...3-33 Tachometer ...3-33 Garage Door Opener ...2-44 Gasoline Octane ...5-5 Specifications ...5-5 Glove Box ...2-48 GM Mobility Reimbursement Program ...7-6 H Hazard Warning Flashers ...3-6 Head Restraints ...1-6 Headlamp Wiring ...5-93 Headlamps Bulb Replacement ...5-45 Daytime Running Lamps/Automatic Headlamp System ...3-15 Headlamps (...
G Gage Engine Coolant Temperature ...3-40 Fuel ...3-45 Speedometer ...3-33 Tachometer ...3-33 Garage Door Opener ...2-44 Gasoline Octane ...5-5 Specifications ...5-5 Glove Box ...2-48 GM Mobility Reimbursement Program ...7-6 H Hazard Warning Flashers ...3-6 Head Restraints ...1-6 Headlamp Wiring ...5-93 Headlamps Bulb Replacement ...5-45 Daytime Running Lamps/Automatic Headlamp System ...3-15 Headlamps (...
Owner's Manual
Page 456
... ...3-114 Steering Wheel, Tilt Wheel ...3-6 Storage Areas ...2-48 Convenience Center ...2-53 Convenience Net ...2-52, 2-53 Cupholder(s) ...2-48 Floor Console Storage Area ...2-50 Folding Tray ...2-50 Glove Box ...2-48 Luggage Carrier ...2-52 Overhead Console ...2-49, 2-50 Second Row Center Console ...2-51 Stuck in Sand, Mud, Ice or Snow ...4-29 Sun Visors ...2-26 Switchbanks...
... ...3-114 Steering Wheel, Tilt Wheel ...3-6 Storage Areas ...2-48 Convenience Center ...2-53 Convenience Net ...2-52, 2-53 Cupholder(s) ...2-48 Floor Console Storage Area ...2-50 Folding Tray ...2-50 Glove Box ...2-48 Luggage Carrier ...2-52 Overhead Console ...2-49, 2-50 Second Row Center Console ...2-51 Stuck in Sand, Mud, Ice or Snow ...4-29 Sun Visors ...2-26 Switchbanks...


