Owner's Manual
Page 1
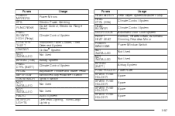
2005 Chevrolet Malibu Owner Manual Seats and Restraint Systems ...1-1 Front Seats ...1-2 Rear Seats ...1-8 Safety Belts ...1-10 Child Restraints ...1-32 Airbag System ...1-51 Restraint System Check ...1-62 Features and Controls ...2-1 Keys ...2-3 Doors and Locks ...2-10 Windows ...2-15 Theft-Deterrent Systems ...2-16 Starting and Operating Your Vehicle ...2-21 Mirrors ...2-32 OnStar® System ...2-34 HomeLink® Transmitter ...2-36...
2005 Chevrolet Malibu Owner Manual Seats and Restraint Systems ...1-1 Front Seats ...1-2 Rear Seats ...1-8 Safety Belts ...1-10 Child Restraints ...1-32 Airbag System ...1-51 Restraint System Check ...1-62 Features and Controls ...2-1 Keys ...2-3 Doors and Locks ...2-10 Windows ...2-15 Theft-Deterrent Systems ...2-16 Starting and Operating Your Vehicle ...2-21 Mirrors ...2-32 OnStar® System ...2-34 HomeLink® Transmitter ...2-36...
Owner's Manual
Page 22
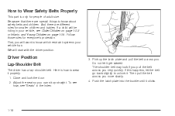
... latch plate into the buckle until it . Adjust the seat so you will want to know about safety belts and children. The shoulder belt may lock if you pull the belt across you very quickly. How to Wear Safety Belts Properly This part is how to wear it get twisted. Be... to unlock it clicks. 1-16 We will be riding in the Index. 3. Pick up straight. If a child will start with the driver position. Close and lock the door. 2. If this happens, let the belt go back slightly to know which restraint systems your vehicle, see "Seats" in your vehicle has.
... latch plate into the buckle until it . Adjust the seat so you will want to know about safety belts and children. The shoulder belt may lock if you pull the belt across you very quickly. How to Wear Safety Belts Properly This part is how to wear it get twisted. Be... to unlock it clicks. 1-16 We will be riding in the Index. 3. Pick up straight. If a child will start with the driver position. Close and lock the door. 2. If this happens, let the belt go back slightly to know which restraint systems your vehicle, see "Seats" in your vehicle has.
Owner's Manual
Page 29
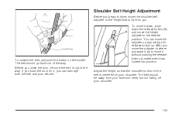
... back out of the way. After you move it without pushing the release button to make sure it has locked into position. To unlatch the belt, just push the button on your shoulder. If you slam the door on it down, push down the release button (A) and move it , you close the... door, be away from your face and neck, but not falling off your shoulder. To move the height adjuster to where...
... back out of the way. After you move it without pushing the release button to make sure it has locked into position. To unlatch the belt, just push the button on your shoulder. If you slam the door on it down, push down the release button (A) and move it , you close the... door, be away from your face and neck, but not falling off your shoulder. To move the height adjuster to where...
Owner's Manual
Page 71
... Outside Power Heated Mirrors ...2-34 Outside Convex Mirror ...2-34 Keys ...2-3 Remote Keyless Entry System ...2-4 Remote Keyless Entry System Operation ...2-5 Doors and Locks ...2-10 Door Locks ...2-10 Power Door Locks ...2-10 Door Ajar Reminder ...2-11 Delayed Locking ...2-11 Programmable Automatic Door Locks ...2-12 Lockout Protection ...2-12 Trunk (Sedan) ...2-13 Liftgate (MAXX) ...2-14 Windows ...2-15 Power Windows ...2-16 Sun Visors ...2-16 Theft...
... Outside Power Heated Mirrors ...2-34 Outside Convex Mirror ...2-34 Keys ...2-3 Remote Keyless Entry System ...2-4 Remote Keyless Entry System Operation ...2-5 Doors and Locks ...2-10 Door Locks ...2-10 Power Door Locks ...2-10 Door Ajar Reminder ...2-11 Delayed Locking ...2-11 Programmable Automatic Door Locks ...2-12 Lockout Protection ...2-12 Trunk (Sedan) ...2-13 Liftgate (MAXX) ...2-14 Windows ...2-15 Power Windows ...2-16 Sun Visors ...2-16 Theft...
Owner's Manual
Page 76
... will come on and stay on for more information. The interior lamps will turn off after all of four transmitters matched to lock or unlock the doors. Remember to bring any remaining transmitters must also be purchased through the Driver Information Center (DIC), the parking lamps will unlatch...Each remote keyless entry transmitter is pressed and held for 30 seconds. See DIC Operation and Displays on the transmitter is coded to lock all remaining doors, and liftgate will flash three times. You can be matched. The horn will sound three times and the headlamps and parking...
... will come on and stay on for more information. The interior lamps will turn off after all of four transmitters matched to lock or unlock the doors. Remember to bring any remaining transmitters must also be purchased through the Driver Information Center (DIC), the parking lamps will unlatch...Each remote keyless entry transmitter is pressed and held for 30 seconds. See DIC Operation and Displays on the transmitter is coded to lock all remaining doors, and liftgate will flash three times. You can be matched. The horn will sound three times and the headlamps and parking...
Owner's Manual
Page 79
The vehicle's doors will turn on and remain on while the vehicle is running time has expired, 10 minutes is added and you now have been provided, the vehicle must be started will lock. When the vehicle starts, the parking lamps will automatically shut off after 10 minutes unless a...2-9 The remote start button until the vehicle's turn signal lights flash or for a 10 minute time extension. Press and release the transmitter's lock button, then immediately press and hold this button to use the remote start , do the following : • Aim the remote keyless entry transmitter at...
The vehicle's doors will turn on and remain on while the vehicle is running time has expired, 10 minutes is added and you now have been provided, the vehicle must be started will lock. When the vehicle starts, the parking lamps will automatically shut off after 10 minutes unless a...2-9 The remote start button until the vehicle's turn signal lights flash or for a 10 minute time extension. Press and release the transmitter's lock button, then immediately press and hold this button to use the remote start , do the following : • Aim the remote keyless entry transmitter at...
Owner's Manual
Page 80
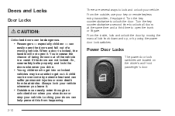
... by using the power door lock switches. {CAUTION: Unlocked doors can easily enter through an unlocked door when you drive. • Young children who get into unlocked vehicles may be unable to lock and unlock your vehicle. When a door is locked, the handle will not open the trunk or liftgate. Power Door Locks The power door lock switches are located on...
... by using the power door lock switches. {CAUTION: Unlocked doors can easily enter through an unlocked door when you drive. • Young children who get into unlocked vehicles may be unable to lock and unlock your vehicle. When a door is locked, the handle will not open the trunk or liftgate. Power Door Locks The power door lock switches are located on...
Owner's Manual
Page 81
...while the ignition is on and the shift lever is not fully closed . The rear doors do not have power door lock switches. See DIC Operation and Displays on their doors. Rear seat passengers must use the manual lock knob on page 3-46. See DIC Warnings and Messages on page 2-12. 2-11 ... liftgate, if equipped. Press the bottom of the vehicle. Press the driver's power door lock switch or the remote keyless entry transmitter lock button once. With the key removed from the ignition and the driver's door open, the following will occur: • three chimes will chirp if the horn chirp ...
...while the ignition is on and the shift lever is not fully closed . The rear doors do not have power door lock switches. See DIC Operation and Displays on their doors. Rear seat passengers must use the manual lock knob on page 3-46. See DIC Warnings and Messages on page 2-12. 2-11 ... liftgate, if equipped. Press the bottom of the vehicle. Press the driver's power door lock switch or the remote keyless entry transmitter lock button once. With the key removed from the ignition and the driver's door open, the following will occur: • three chimes will chirp if the horn chirp ...
Owner's Manual
Page 82
... prompts allow you use the manual lock knob or power door unlock switch. Pressing and holding the power door lock switch for more than three seconds will lock all the doors and then unlock the driver's door. If you remove the key from being locked using the power door locks, if the key is left in... the ignition and a door is moved back to PARK (P), all doors will unlock. If ...
... prompts allow you use the manual lock knob or power door unlock switch. Pressing and holding the power door lock switch for more than three seconds will lock all the doors and then unlock the driver's door. If you remove the key from being locked using the power door locks, if the key is left in... the ignition and a door is moved back to PARK (P), all doors will unlock. If ...
Owner's Manual
Page 84
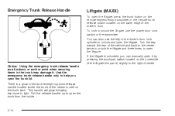
...and three times to help you can also use the power door lock switch or the transmitter. Use the emergency trunk release handle only to open the liftgate. To lock or unlock the liftgate, use the key in the driver's door lock cylinder to the right of center. This handle will glow ...following exposure to open the liftgate, press the trunk button on the remote keyless entry transmitter or the remote trunk release button located on the lower edge of the driver's door. If the liftgate is...
...and three times to help you can also use the power door lock switch or the transmitter. Use the emergency trunk release handle only to open the liftgate. To lock or unlock the liftgate, use the key in the driver's door lock cylinder to the right of center. This handle will glow ...following exposure to open the liftgate, press the trunk button on the remote keyless entry transmitter or the remote trunk release button located on the lower edge of the driver's door. If the liftgate is...
Owner's Manual
Page 86
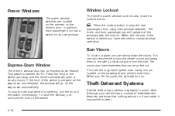
...the front of the switch momentarily. Although your vehicle has a number of the switch part way, and the driver's window will turn on the driver's door. This switch is big business, especially in some cities. o: Press the lockout button to steal. 2-16 Press the front of theft-deterrent features, ...pull and hold the front of the switch is pressed all the way down and released, the window will go all the windows with the lock on the passenger and driver's side visor. The visors also have returned to block out glare from using their window switches. Theft-Deterrent Systems ...
...the front of the switch momentarily. Although your vehicle has a number of the switch part way, and the driver's window will turn on the driver's door. This switch is big business, especially in some cities. o: Press the lockout button to steal. 2-16 Press the front of theft-deterrent features, ...pull and hold the front of the switch is pressed all the way down and released, the window will go all the windows with the lock on the passenger and driver's side visor. The visors also have returned to block out glare from using their window switches. Theft-Deterrent Systems ...
Owner's Manual
Page 87
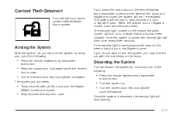
... three seconds. Once the system is closed, it will turn on to arm the system, you press the lock button on the remote keyless entry transmitter a second time while all the doors and the liftgate (MAXX model) are closed , • Turn the ignition on the instrument panel cluster,...can arm the system by doing any one of the following : • Press the power door lock switch while the driver's door is open. The security light, located on . • Turn the driver's door key lock cylinder counterclockwise. Arming the System With the ignition off, you can disarm the system by doing...
... three seconds. Once the system is closed, it will turn on to arm the system, you press the lock button on the remote keyless entry transmitter a second time while all the doors and the liftgate (MAXX model) are closed , • Turn the ignition on the instrument panel cluster,...can arm the system by doing any one of the following : • Press the power door lock switch while the driver's door is open. The security light, located on . • Turn the driver's door key lock cylinder counterclockwise. Arming the System With the ignition off, you can disarm the system by doing...
Owner's Manual
Page 88
... will flash the security light once every three seconds after cycling the ignition off the system alarm, do one minute delay with all doors. • Press the lock button on the remote keyless entry transmitter, it can not be activated by a thirty second full alarm of the following: Passive Arming If... immediately cause a full alarm of horn and lights for thirty seconds. The system will also disarm the system. • Insert the key in the driver's door key lock cylinder and turn it counterclockwise. This flashing serves as a visual deterrent;
... will flash the security light once every three seconds after cycling the ignition off the system alarm, do one minute delay with all doors. • Press the lock button on the remote keyless entry transmitter, it can not be activated by a thirty second full alarm of the following: Passive Arming If... immediately cause a full alarm of horn and lights for thirty seconds. The system will also disarm the system. • Insert the key in the driver's door key lock cylinder and turn it counterclockwise. This flashing serves as a visual deterrent;
Owner's Manual
Page 106
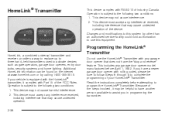
... a way to replace up to three hand−held transmitters used to program the HomeLink® Transmitter. This includes any garage door opener that does not have another person available to the following two conditions: 1. Read the instructions completely before April 1, 1982. ... transmitter. This device may not cause harmful interference. 2. HomeLink® Transmitter This device complies with any garage door opener model manufactured before attempting to activate devices such as gate operators, garage door openers, entry door locks, security systems and home lighting.
... a way to replace up to three hand−held transmitters used to program the HomeLink® Transmitter. This includes any garage door opener that does not have another person available to the following two conditions: 1. Read the instructions completely before April 1, 1982. ... transmitter. This device may not cause harmful interference. 2. HomeLink® Transmitter This device complies with any garage door opener model manufactured before attempting to activate devices such as gate operators, garage door openers, entry door locks, security systems and home lighting.
Owner's Manual
Page 133
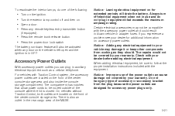
..., the accessory power outlets are designed for accessory power plugs only. • Press the remote trunk release button. • Press the power door lock switch. There is also an outlet in the rear cargo area of the center console storage area. Notice: Leaving electrical equipment on for additional ...accessories may damage it or keep other components from the plug because the power outlets are located on the ignition. Do not hang any door on accessory power outlets. Always turn off and then on the front of the MAXX. 3-21 Accessory Power Outlets With accessory power outlets...
..., the accessory power outlets are designed for accessory power plugs only. • Press the remote trunk release button. • Press the power door lock switch. There is also an outlet in the rear cargo area of the center console storage area. Notice: Leaving electrical equipment on for additional ...accessories may damage it or keep other components from the plug because the power outlets are located on the ignition. Do not hang any door on accessory power outlets. Always turn off and then on the front of the MAXX. 3-21 Accessory Power Outlets With accessory power outlets...

Owner's Manual
Page 260
... rear axle; Label Example A vehicle specific Tire and Loading Information label is also important loading information on page 5-52. With the driver's door open, you the Gross Vehicle Weight Rating (GVWR) and the Gross Axle Weight Rating (GAWR) for Determining Correct Load Limit 1. The tire and ... and Inflation - For example, if the "XXX" amount equals 1400 lbs and there will find the label attached below the door lock post (striker). It tells you will be riding in your vehicle. 3. Tire and Loading Information Label The Tire and Loading Information label also shows...
... rear axle; Label Example A vehicle specific Tire and Loading Information label is also important loading information on page 5-52. With the driver's door open, you the Gross Vehicle Weight Rating (GVWR) and the Gross Axle Weight Rating (GAWR) for Determining Correct Load Limit 1. The tire and ... and Inflation - For example, if the "XXX" amount equals 1400 lbs and there will find the label attached below the door lock post (striker). It tells you will be riding in your vehicle. 3. Tire and Loading Information Label The Tire and Loading Information label also shows...
Owner's Manual
Page 361
... Ignition Switch Not Used Not Used Audio System Overhead Lighting, Trunk/Cargo Lighting ® Fuses REAR WIPER HVAC CTRL (IGN) HVAC BLOWER DOOR LOCK ROOF/ HEAT SEAT POWER WINDOWS NOT INSTALLED NOT INSTALLED AIRBAG (BATT) FUSE PULLER SPARE FUSE HOLDER SPARE FUSE HOLDER SPARE FUSE HOLDER SPARE ...FUSE HOLDER Usage Rear Wiper System/Washer Pump Climate Control System Climate Control System Automatic Door Lock System Sunroof, Heated Seats, Automatic Dimming Rearview Mirror Power Window Switch Not Used Not Used Airbag System Fuse Puller Spare Spare Spare ...
... Ignition Switch Not Used Not Used Audio System Overhead Lighting, Trunk/Cargo Lighting ® Fuses REAR WIPER HVAC CTRL (IGN) HVAC BLOWER DOOR LOCK ROOF/ HEAT SEAT POWER WINDOWS NOT INSTALLED NOT INSTALLED AIRBAG (BATT) FUSE PULLER SPARE FUSE HOLDER SPARE FUSE HOLDER SPARE FUSE HOLDER SPARE ...FUSE HOLDER Usage Rear Wiper System/Washer Pump Climate Control System Climate Control System Automatic Door Lock System Sunroof, Heated Seats, Automatic Dimming Rearview Mirror Power Window Switch Not Used Not Used Airbag System Fuse Puller Spare Spare Spare ...
Owner's Manual
Page 400
... ...7-6 Service Publications Ordering Information ...7-11 D Daytime Running Lamps ...3-17 Defensive Driving ...4-2 Delayed Headlamps ...3-17 Delayed Locking ...2-11 Doing Your Own Service Work ...5-4 Dome Lamp ...3-19 Door Delayed Locking ...2-11 Door Ajar Reminder ...2-11 Locks ...2-10 Power Door Locks ...2-10 Programmable Automatic Door Locks ...2-12 Driver Position, Safety Belt ...1-16 Six-Way Power Seat ...1-3 Driver Information Center (DIC) ...3-45 DIC...
... ...7-6 Service Publications Ordering Information ...7-11 D Daytime Running Lamps ...3-17 Defensive Driving ...4-2 Delayed Headlamps ...3-17 Delayed Locking ...2-11 Doing Your Own Service Work ...5-4 Dome Lamp ...3-19 Door Delayed Locking ...2-11 Door Ajar Reminder ...2-11 Locks ...2-10 Power Door Locks ...2-10 Programmable Automatic Door Locks ...2-12 Driver Position, Safety Belt ...1-16 Six-Way Power Seat ...1-3 Driver Information Center (DIC) ...3-45 DIC...
Owner's Manual
Page 404
Locks Delayed Locking ...2-11 Door ...2-10 Lockout Protection ...2-12 Power Door ...2-10 Programmable Automatic Door Locks ...2-12 Loss of Control ...4-14 Lumbar Manual Controls ...1-3 M Maintenance Schedule Additional Required Services ...6-6 At Each Fuel Fill ...6-8 At Least Once a Month ...6-9 At Least Once a Year ...6-9 ...
Locks Delayed Locking ...2-11 Door ...2-10 Lockout Protection ...2-12 Power Door ...2-10 Programmable Automatic Door Locks ...2-12 Loss of Control ...4-14 Lumbar Manual Controls ...1-3 M Maintenance Schedule Additional Required Services ...6-6 At Each Fuel Fill ...6-8 At Least Once a Month ...6-9 At Least Once a Year ...6-9 ...
Owner's Manual
Page 405
... Parking Brake ...2-27 Over Things That Burn ...2-30 Passing ...4-12 PASS-Key® III+ ...2-19 PASS-Key® III+ Operation ...2-19 Power ...1-3 Accessory Outlets ...3-21 Door Locks ...2-10 Electrical System ...5-85 Retained Accessory (RAP) ...2-22 Windows ...2-16 Pretensioners, Safety Belt ...1-31 Programmable Automatic...
... Parking Brake ...2-27 Over Things That Burn ...2-30 Passing ...4-12 PASS-Key® III+ ...2-19 PASS-Key® III+ Operation ...2-19 Power ...1-3 Accessory Outlets ...3-21 Door Locks ...2-10 Electrical System ...5-85 Retained Accessory (RAP) ...2-22 Windows ...2-16 Pretensioners, Safety Belt ...1-31 Programmable Automatic...


