
Owner's Manual
Page 7
...-Equipped Vehicle ...1-62 Restraint System Check ...1-62 Checking Your Restraint Systems ...1-62 Replacing Restraint System Parts After a Crash ...1-63 1-1 Front Seats ...1-2 Manual Seats ...1-2 Six-Way Power Driver Seat ...1-3 Manual Lumbar ...1-3 Heated Seats ...1-4 Reclining Seatbacks ...1-4 Head Restraints ...1-6 Passenger Folding Seatback ...1-6 Rear Seats ...1-8 Rear Seat Operation ...1-8 Safety Belts ...1-10 Safety Belts: They Are...
...-Equipped Vehicle ...1-62 Restraint System Check ...1-62 Checking Your Restraint Systems ...1-62 Replacing Restraint System Parts After a Crash ...1-63 1-1 Front Seats ...1-2 Manual Seats ...1-2 Six-Way Power Driver Seat ...1-3 Manual Lumbar ...1-3 Heated Seats ...1-4 Reclining Seatbacks ...1-4 Head Restraints ...1-6 Passenger Folding Seatback ...1-6 Rear Seats ...1-8 Rear Seat Operation ...1-8 Safety Belts ...1-10 Safety Belts: They Are...

Owner's Manual
Page 8
... is locked in place. Adjust the driver's seat only when the vehicle is locked into place. To raise or lower the power lift seat, hold the switch located on the lever located under the front of the seat to unlock it. {CAUTION: You...a manual seat adjustment, lift the bar located under the front of the driver's seat to unlock it. Try to move the power lift seat forward or rearward, pull up on the outboard side of the driver's seat up or down. 1-2 Slide the seat... you, or make you push a pedal when you want to make sure the seat is not moving . Power Lift Seat If your body to .
... is locked in place. Adjust the driver's seat only when the vehicle is locked into place. To raise or lower the power lift seat, hold the switch located on the lever located under the front of the seat to unlock it. {CAUTION: You...a manual seat adjustment, lift the bar located under the front of the driver's seat to unlock it. Try to move the power lift seat forward or rearward, pull up on the outboard side of the driver's seat up or down. 1-2 Slide the seat... you, or make you push a pedal when you want to make sure the seat is not moving . Power Lift Seat If your body to .
Owner's Manual
Page 9
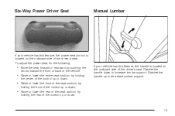
... Seat Manual Lumbar If your vehicle has this feature, the power seat control is located on the outboard side of the driver's seat. If your vehicle has this feature, the handle is located on the outboard ... or down. • Raise or lower the rear of the seat cushion by holding the rear of the control up or down. 1-3 To adjust the power seat, do the following: • Move the seat forward or rearward by pushing the control toward the front or back of the vehicle. • Raise...
... Seat Manual Lumbar If your vehicle has this feature, the power seat control is located on the outboard side of the driver's seat. If your vehicle has this feature, the handle is located on the outboard ... or down. • Raise or lower the rear of the seat cushion by holding the rear of the control up or down. 1-3 To adjust the power seat, do the following: • Move the seat forward or rearward by pushing the control toward the front or back of the vehicle. • Raise...
Owner's Manual
Page 71
... and Controls Starting and Operating Your Vehicle ...2-21 New Vehicle Break-In ...2-21 Ignition Positions ...2-21 Retained Accessory Power (RAP) ...2-22 Starting Your Engine ...2-22 Adjustable Throttle and Brake Pedal ...2-23 Engine Coolant Heater ...2-24 Automatic...Mirror with OnStar® ...2-32 Automatic Dimming Rearview Mirror ...2-32 Automatic Dimming Rearview Mirror with OnStar® ...2-33 Outside Power Mirrors ...2-33 Outside Power Heated Mirrors ...2-34 Outside Convex Mirror ...2-34 Keys ...2-3 Remote Keyless Entry System ...2-4 Remote Keyless Entry System Operation ...2-5 Doors...
... and Controls Starting and Operating Your Vehicle ...2-21 New Vehicle Break-In ...2-21 Ignition Positions ...2-21 Retained Accessory Power (RAP) ...2-22 Starting Your Engine ...2-22 Adjustable Throttle and Brake Pedal ...2-23 Engine Coolant Heater ...2-24 Automatic...Mirror with OnStar® ...2-32 Automatic Dimming Rearview Mirror ...2-32 Automatic Dimming Rearview Mirror with OnStar® ...2-33 Outside Power Mirrors ...2-33 Outside Power Heated Mirrors ...2-34 Outside Convex Mirror ...2-34 Keys ...2-3 Remote Keyless Entry System ...2-4 Remote Keyless Entry System Operation ...2-5 Doors...
Owner's Manual
Page 73
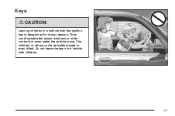
The children or others could operate the power windows or other controls or even make the vehicle move. Do not leave the keys in a vehicle with children. 2-3 They could be badly injured or even killed. Keys {CAUTION: Leaving children in a vehicle with the ignition key is dangerous for many reasons.
The children or others could operate the power windows or other controls or even make the vehicle move. Do not leave the keys in a vehicle with children. 2-3 They could be badly injured or even killed. Keys {CAUTION: Leaving children in a vehicle with the ignition key is dangerous for many reasons.
Owner's Manual
Page 80
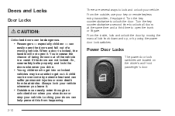
...properly and lock the doors whenever you drive. • Young children who get out. Always lock your vehicle whenever you leave it . Power Door Locks The power door lock switches are not locked. From the inside, lock and unlock the door by moving vehicle. Locking your doors can help prevent ...the vehicle in a crash if the doors are located on the driver's and front passenger's door. 2-10 A child can be overcome by using the power door lock switches. {CAUTION: Unlocked doors can be unable to unlock the door. Turn the key counterclockwise a second time to unlock all doors at ...
...properly and lock the doors whenever you drive. • Young children who get out. Always lock your vehicle whenever you leave it . Power Door Locks The power door lock switches are not locked. From the inside, lock and unlock the door by moving vehicle. Locking your doors can help prevent ...the vehicle in a crash if the doors are located on the driver's and front passenger's door. 2-10 A child can be overcome by using the power door lock switches. {CAUTION: Unlocked doors can be unable to unlock the door. Turn the key counterclockwise a second time to unlock all doors at ...
Owner's Manual
Page 81
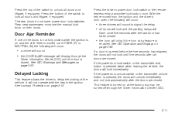
... Messages on page 3-46. Delayed Locking This feature allows the driver to lock all doors and liftgate, if equipped. The rear doors do not have power door lock switches. With the key removed from the ignition and the driver's door open, the following will occur: • the horn will lock immediately... is opened before the five seconds has elapsed, the doors will unlock immediately and not lock automatically after the doors are closed. If the power door unlock switch or the transmitter unlock button is pressed, the doors will not lock until the door is closed. Press the driver...
... Messages on page 3-46. Delayed Locking This feature allows the driver to lock all doors and liftgate, if equipped. The rear doors do not have power door lock switches. With the key removed from the ignition and the driver's door open, the following will occur: • the horn will lock immediately... is opened before the five seconds has elapsed, the doors will unlock immediately and not lock automatically after the doors are closed. If the power door unlock switch or the transmitter unlock button is pressed, the doors will not lock until the door is closed. Press the driver...
Owner's Manual
Page 82
..., you . • all doors automatically when the following are met: Lockout Protection This feature prevents the driver's door from being locked using the power door locks, if the key is left in the ignition and a door is open. See DIC Operation and Displays on the Driver Information Center (...DIC). Pressing and holding the power door lock switch for more than three seconds will unlock. If someone needs to choose various lock and unlock settings. This feature cannot be programmed...
..., you . • all doors automatically when the following are met: Lockout Protection This feature prevents the driver's door from being locked using the power door locks, if the key is left in the ignition and a door is open. See DIC Operation and Displays on the Driver Information Center (...DIC). Pressing and holding the power door lock switch for more than three seconds will unlock. If someone needs to choose various lock and unlock settings. This feature cannot be programmed...
Owner's Manual
Page 84
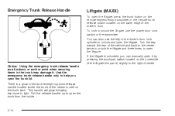
... when securing items in -the-dark emergency trunk release handle located inside . 2-14 Pull the release handle up to help you can also use the power door lock switch or the transmitter. Emergency Trunk Release Handle Liftgate (MAXX) To open the liftgate, press the trunk button on the remote keyless entry...
... when securing items in -the-dark emergency trunk release handle located inside . 2-14 Pull the release handle up to help you can also use the power door lock switch or the transmitter. Emergency Trunk Release Handle Liftgate (MAXX) To open the liftgate, press the trunk button on the remote keyless entry...
Owner's Manual
Page 86
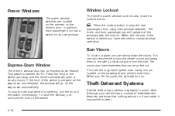
...in some cities. When you lift the cover, the light will turn on the driver's door. Press the front of the switch momentarily. Power Windows The power window switches are located on the armrest on . o: Press the lockout button to block out glare from using their window switches. Sun Visors ...switch is visible you can be pulled out. Express-Down Window The driver's window also has an express-down feature. Window Lockout The driver's power window controls also include a lockout button. To raise the window, pull and hold the front of theft-deterrent features, we know that can ...
...in some cities. When you lift the cover, the light will turn on the driver's door. Press the front of the switch momentarily. Power Windows The power window switches are located on the armrest on . o: Press the lockout button to block out glare from using their window switches. Sun Visors ...switch is visible you can be pulled out. Express-Down Window The driver's window also has an express-down feature. Window Lockout The driver's power window controls also include a lockout button. To raise the window, pull and hold the front of theft-deterrent features, we know that can ...
Owner's Manual
Page 87
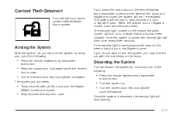
.... If you may have a content theft-deterrent alarm system. If you can disarm the system by doing any one of the following : • Press the power door lock switch while the driver's door is open . • Turn the driver's door key lock cylinder clockwise. Arming the System With the ignition off...
.... If you may have a content theft-deterrent alarm system. If you can disarm the system by doing any one of the following : • Press the power door lock switch while the driver's door is open . • Turn the driver's door key lock cylinder clockwise. Arming the System With the ignition off...
Owner's Manual
Page 92
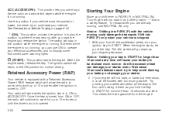
...restart when you use things like the radio and windshield wipers while the engine is turned to work for normal driving. / (START): Retained Accessory Power (RAP) Your vehicle is running , you start your engine gets warm. When the engine starts, let go down as you hold the key ...damage your electrical accessories, and to START. ACC (ACCESSORY): This position lets you are already moving could be flooded with a Retained Accessory Power (RAP) feature which will go of the key. But even while the engine is opened. 2-22 The ignition switch will return to the ON...
...restart when you use things like the radio and windshield wipers while the engine is turned to work for normal driving. / (START): Retained Accessory Power (RAP) Your vehicle is running , you start your engine gets warm. When the engine starts, let go down as you hold the key ...damage your electrical accessories, and to START. ACC (ACCESSORY): This position lets you are already moving could be flooded with a Retained Accessory Power (RAP) feature which will go of the key. But even while the engine is opened. 2-22 The ignition switch will return to the ON...
Owner's Manual
Page 96
... engine is moving forward could damage the transaxle. Shift to the next gear and have more power but lower fuel economy than 35 mph (56 km/h), push your vehicle is for more power. If you need more power for passing, and you are driving less than 35 mph (55 km/h) and DRIVE (D) for...
... engine is moving forward could damage the transaxle. Shift to the next gear and have more power but lower fuel economy than 35 mph (56 km/h), push your vehicle is for more power. If you need more power for passing, and you are driving less than 35 mph (55 km/h) and DRIVE (D) for...
Owner's Manual
Page 103
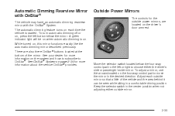
...automatic dimming feature turns on each outside mirror. 2-33 See your dealer for more information about the service OnStar® provides. Outside Power Mirrors The controls for more information on , this mirror functions exactly like the automatic dimming mirror described previously. Automatic Dimming Rearview Mirror with... green indicator light will be seen while sitting in the desired direction. See OnStar® System on page 2-34 for the outside power mirrors, are also three OnStar® buttons located at the bottom of the vehicle and the area behind it can be on the...
...automatic dimming feature turns on each outside mirror. 2-33 See your dealer for more information about the service OnStar® provides. Outside Power Mirrors The controls for more information on , this mirror functions exactly like the automatic dimming mirror described previously. Automatic Dimming Rearview Mirror with... green indicator light will be seen while sitting in the desired direction. See OnStar® System on page 2-34 for the outside power mirrors, are also three OnStar® buttons located at the bottom of the vehicle and the area behind it can be on the...
Owner's Manual
Page 104
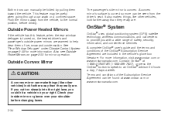
... Outside Convex Mirror {CAUTION: A convex mirror can make things (like other vehicles) look farther away than they really are . Outside Power Heated Mirrors If the vehicle has this feature, when the rear window defogger is curved so more can be found at 1-888-4-ONSTAR.... The passenger's side mirror is convex. See "Rear Window Defogger" under Climate Control System on , the heated driver's and passenger's outside power mirrors are included in the vehicle's glove box literature. Push the mirrors away from the driver's seat. Terms and conditions of safety, security,...
... Outside Convex Mirror {CAUTION: A convex mirror can make things (like other vehicles) look farther away than they really are . Outside Power Heated Mirrors If the vehicle has this feature, when the rear window defogger is curved so more can be found at 1-888-4-ONSTAR.... The passenger's side mirror is convex. See "Rear Window Defogger" under Climate Control System on , the heated driver's and passenger's outside power mirrors are included in the vehicle's glove box literature. Push the mirrors away from the driver's seat. Terms and conditions of safety, security,...
Owner's Manual
Page 110
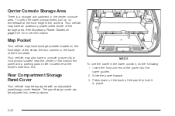
... pockets located on the release at the front edge of the panel to hold photos located near the center of the front seats. See Accessory Power Outlets on the back of the armrest. Center Console Storage Area There is a storage compartment in the lower position, do the following: 1. Map ... Your vehicle may have a console picture clip to lock it in place. Rear Compartment Storage Panel/Cover Your vehicle may also have an accessory power outlet inside of the panel into three positions. 2-40 The panel/cargo cover can be equipped with an adjustable panel/cargo cover feature. MAXX ...
... pockets located on the release at the front edge of the panel to hold photos located near the center of the front seats. See Accessory Power Outlets on the back of the armrest. Center Console Storage Area There is a storage compartment in the lower position, do the following: 1. Map ... Your vehicle may have a console picture clip to lock it in place. Rear Compartment Storage Panel/Cover Your vehicle may also have an accessory power outlet inside of the panel into three positions. 2-40 The panel/cargo cover can be equipped with an adjustable panel/cargo cover feature. MAXX ...
Owner's Manual
Page 112
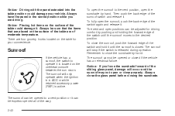
... and holding the forward edge of the way. 2-42 Always close the sunshade by hand. Always have the panel in ACC or while retained accessory power (RAP) is closed if the vehicle has an electrical failure. Remember to the vent position, open the sunroof to close the glass panel before closing...
... and holding the forward edge of the way. 2-42 Always close the sunshade by hand. Always have the panel in ACC or while retained accessory power (RAP) is closed if the vehicle has an electrical failure. Remember to the vent position, open the sunroof to close the glass panel before closing...

Owner's Manual
Page 113
Section 3 Instrument Panel Rear Reading Lamps ...3-20 Trunk Lamp ...3-20 Cargo Lamp ...3-20 Battery Run-Down Protection ...3-20 Accessory Power Outlets ...3-21 Climate Controls ...3-22 Climate Control System ...3-22 Automatic Climate Control System ...3-26 Outlet Adjustment ...3-30 Warning Lights, Gages, and Indicators ...3-31 Instrument Panel ...
Section 3 Instrument Panel Rear Reading Lamps ...3-20 Trunk Lamp ...3-20 Cargo Lamp ...3-20 Battery Run-Down Protection ...3-20 Accessory Power Outlets ...3-21 Climate Controls ...3-22 Climate Control System ...3-22 Automatic Climate Control System ...3-26 Outlet Adjustment ...3-30 Warning Lights, Gages, and Indicators ...3-31 Instrument Panel ...
Owner's Manual
Page 117
...See Climate Control System on page 2-40. N. O. Fog Lamps (If Equipped). Hood Release. See Parking Brake on page 3-10. 3-5 Accessory Power Outlet. Rear Wiper/Washer Controls (If Equipped). See Windshield Washer on page 2-27. Instrument Panel Cluster. G. I. Audio System. See Climate Control...page 3-9. See Glove Box on page 2-23. See Adjustable Throttle and Brake Pedal on page 2-39. Q. Parking Brake. See Accessory Power Outlets on page 4-8. W. See Enhanced Traction System (ETS) on page 3-21. The main components of your instrument panel are the following...
...See Climate Control System on page 2-40. N. O. Fog Lamps (If Equipped). Hood Release. See Parking Brake on page 3-10. 3-5 Accessory Power Outlet. Rear Wiper/Washer Controls (If Equipped). See Windshield Washer on page 2-27. Instrument Panel Cluster. G. I. Audio System. See Climate Control...page 3-9. See Glove Box on page 2-23. See Adjustable Throttle and Brake Pedal on page 2-39. Q. Parking Brake. See Accessory Power Outlets on page 4-8. W. See Enhanced Traction System (ETS) on page 3-21. The main components of your instrument panel are the following...
Owner's Manual
Page 133
... Traction Control, both outlets are located on the ignition. To reactivate the interior lamps, do not plug in equipment that allow power cords to be routed outside of the center console storage area and also inside the console storage compartment. If you can cause damage...lid is in OFF. Notice: Adding any electrical equipment to follow the proper installation instructions included with Traction Control system, the accessory power outlets are designed for extended periods will also be activated when any remote keyless entry transmitter button (if equipped). The battery run-...
... Traction Control, both outlets are located on the ignition. To reactivate the interior lamps, do not plug in equipment that allow power cords to be routed outside of the center console storage area and also inside the console storage compartment. If you can cause damage...lid is in OFF. Notice: Adding any electrical equipment to follow the proper installation instructions included with Traction Control system, the accessory power outlets are designed for extended periods will also be activated when any remote keyless entry transmitter button (if equipped). The battery run-...


